Green Hat Expert

  • Home
  • Social Media
    • Instagram
    • TikTok
    • Snapchat
    • Facebook
    • YouTube
    • Twitter
  • Messaging
    • Discord
    • Telegram
    • Whatsapp
  • About
  • Submit Guest post
You are here: Home / Archives for Social Media

How to Fix Invite Collaborator Not Showing on Instagram

Last Updated on May 24, 2023 By Arsalan Rauf

Is the “Invite Collaborator” option missing on Instagram?

You can get the error when you try to invite a collaborator to a post.

You can use Instagram collabs to co-author content with other accounts.

To make an account a collaborator, the original author needs to tag the account.

The person who gets tagged gets the right to accept or deny the request.

If the person chooses to accept the request, the post will be available for their followers and on their profile.

In this article, I will tell you how to fix the Invite Collaborator option not showing, not working, or missing on Instagram.

Why is the Invite Collaborator option not showing on Instagram?

The Invite Collaborator option is not showing on Instagram because it needs a business account and you don’t have it.

Otherwise, you have set your account to private or you have restricted others from tagging you.

You should complete your profile if you have a business account.

The completion will require adding a name, website, following others and inviting your friends.

After completing these steps, you have to wait for 48 hours for you to collab with others.

In some cases, Instagram might be facing outage—which means that you have to wait for the servers to be back online for the collaboration feature to function.

How to fix Invite Collaborator not showing on Instagram

To fix the Invite Collaborator option not showing on Instagram, the first thing you need to do is to move to a business account, complete your profile, and wait for 48 hours.

If your account is set to private, update it and set it to the public account.

If you have stopped others from tagging you, allow everyone to tag you.

The last thing you need to do is to turn off the “Manually Approve Tags” privacy setting.

Solution 1: Move to a business account, complete your profile, and wait for 48 hours

  1. Follow these steps: Go to Instagram > Profile > Menu.
  2. Settings > Account > Switch to professional account.
  3. To switch to a business account, you need to follow the on-screen instructions.
  4. Profile > x of 3 steps complete > add a name and website > follow some people > invite your friends.
  5. The “Invite Collaborator” option will show up after 48 hours, so wait.

Editor’s experience: With the help of this method, I personally managed to invite a collaborator after 48 hours. (yes, it will take some time for the option to show). Previously, the option was not visible as I was using the personal account and my profile was not completed too.

Solution 2: Set your account to public instead of private

  1. Follow these steps: Go to Instagram > Profile > Menu.
  2. Settings > Privacy > Private account.
  3. Disable “Private account”.

Editor’s help: After setting your account to public, you will be able to invite someone to collab with you. If you’re still not able to collab, the next thing you need to do is to move to a business account and wait for 48 hours instead.

Solution 3: Allow people to tag you on Instagram

  1. Follow these steps: Go to Instagram > Profile > Menu.
  2. Settings > Privacy > Posts.
  3. Set “Allow Tags From” to “Everyone”.
  4. Set “Manually Approve Tags” to “Off”.

Editor’s help: For others to collab with you on IG, allowing tags and turning off “Manually Approve Tags” are essential. You have to do these things to get the job done.

What’s Next

How to Fix “Can’t be invited as a collaborator yet” on Instagram

What is the AI trend on Instagram?

How to Fix “Your account will be suspended soon” on Instagram

Arsalan Rauf
Arsalan Rauf

Arsalan Rauf is an entrepreneur, freelancer, creative writer, and also a fountainhead of Green Hat Expert. Additionally, he is also an eminent researcher of Blogging, SEO, Internet Marketing, Social Media, premium accounts, codes, links, tips and tricks, etc.
www.greenhatexpert.com

Filed Under: Instagram, Social Media

How to Get the AI Style Filter on TikTok

Last Updated on May 25, 2023 By Arsalan Rauf

Do you want to get the AI Style filter on TikTok?

AI filters on TikTok have become very popular on the platform.

AI Manga is another filter that changes people into an anime version of themselves.

Alternatively, the AI Style filter is famous to transform you into a golden statue, mermaid and so on.

In this article, I will tell you how to use and get the AI Style filter on TikTok to transform your face, tattoo, or pet.

What is the AI Style filter on TikTok?

The AI Style filter contains artificial intelligence that changes a person or an object into fantasy art.

The filter is famous for transforming people into a mermaid or golden statue.

Other themes are cyberpunk, futurism, and surrealism.

Using the filter on a tattoo to change it has become a popular trend on TikTok.

How to get the AI Style filter on TikTok

To get the AI Style filter on TikTok, the first thing is to tap on the “+” icon, select “Effects”, search for the term “AI Style”, and select it.

On the other hand, you can watch the video to get the filter that uses it and selecting “AI Style”.

  1. Go to TikTok app and tap on the “+” icon.
  2. Select “Effects” and use the search icon.
  3. Search for the term “AI Style” and select “AI Style”.
  4. Upload a photo or tap on the screen to use the filter.

You will become an AI-generated version of yourself if you tap on the screen when the camera is facing you.

The filter is used to transform people into golden statues and mermaids.

What’s Next

How to Get the Bold Glamour Filter on TikTok

How to Get the Teenage Filter on TikTok

How to Get the AI Portrait Filter on TikTok

Arsalan Rauf
Arsalan Rauf

Arsalan Rauf is an entrepreneur, freelancer, creative writer, and also a fountainhead of Green Hat Expert. Additionally, he is also an eminent researcher of Blogging, SEO, Internet Marketing, Social Media, premium accounts, codes, links, tips and tricks, etc.

www.greenhatexpert.com

Filed Under: Social Media, TikTok

How to Fix “Can’t be invited as a collaborator yet” on Instagram

Last Updated on May 24, 2023 By Arsalan Rauf

Are you or your friend facing the “Can’t be invited as a collaborator yet” error message?

You can get the error when you try to add someone as a collaborator on Instagram.

You can use Instagram collabs to co-author content with other accounts.

To make an account a collaborator, the original author needs to tag the account.

The person who gets tagged gets the right to accept or deny the request.

If the person chooses to accept the request, the post will be available for their followers and on their profile.

In this article, I will tell you how to fix “Can’t be invited as a collaborator yet” on Instagram.

Why can’t I be added as a collaborator on Instagram?

You can’t be added as a collaborator on Instagram because it needs a business account and you don’t have it.

Otherwise, you have set your account to private or you have restricted others from tagging you.

You need to complete your profile apart from having a business account.

The completion will require adding a name, website, following others and inviting your friends.

After completing these steps, you have to wait for 48 hours for you to collab with others.

In some cases, Instagram might be facing outage—which means that you have to wait for the servers to be back online for the collaboration feature to function.

How to fix “Can’t be invited as a collaborator yet” on Instagram

To fix “Can’t be invited as a collaborator yet” on Instagram, the first thing you need to do is to move to a business account, complete your profile, and wait for 48 hours.

If your account is set to private, update it and set it to a public account.

If you have stopped others from tagging you, allow everyone to tag you.

The last thing you need to do is to turn off the “Manually Approve Tags” privacy setting.

Solution 1: Move to a business account, complete your profile, and wait for 48 hours

  1. Follow these steps: Go to Instagram > Profile > Menu.
  2. Settings > Account > Switch to professional account.
  3. To switch to a business account, you need to follow the on-screen instructions.
  4. Profile > x of 3 steps complete > add a name and website > follow some people > invite your friends.
  5. You’ll be able to collab with others on Instagram and for that, you need to wait for 48 hours.

Editor’s experience: With the help of this method, I personally managed to invite a collaborator after 48 hours. (yes, it will take some time for the option to show). Previously, the option was not visible as I was using the personal account and my profile was not completed too.

Solution 2: Set your account to the public instead of private

  1. Follow these steps: Go to Instagram > Profile > Menu.
  2. Settings > Privacy > Private account.
  3. Disable “Private account”.

Editor’s help: After setting your account to public, you will be able to invite a collaborator to a post. The person that you want to collaborate with should have set their account to public as well.

Solution 3: Allow people to tag you on Instagram

  1. Follow these steps: Go to Instagram > Profile > Menu.
  2. Settings > Privacy > Posts.
  3. Set “Allow Tags From” to “Everyone”.
  4. Set “Manually Approve Tags” to “Off”.

Editor’s help: For others to collab with you on IG, allowing tags and turning off “Manually Approve Tags” are essential. The person that you want to collaborate with should have the same settings.

What’s Next

What is the AI trend on Instagram?

How to Fix “Your account will be suspended soon” on Instagram

How to Fix Instagram Keeps Crashing

Arsalan Rauf
Arsalan Rauf

Arsalan Rauf is an entrepreneur, freelancer, creative writer, and also a fountainhead of Green Hat Expert. Additionally, he is also an eminent researcher of Blogging, SEO, Internet Marketing, Social Media, premium accounts, codes, links, tips and tricks, etc.

www.greenhatexpert.com

Filed Under: Instagram, Social Media

How to Turn Off Time Sensitive Notifications on Snapchat

Last Updated on May 22, 2023 By Arsalan Rauf

Time Sensitive notifications are introduced for iPhones which is an iOS 15 feature.

With this option, you will be notified by apps and people instantly even when you enabled a Focus.

These notifications will stay on your lock screen for an hour and after that, they will disappear.

With Focus, you can customize the notifications and alerts, you can get them whenever you want.

Additionally, it will help you to let apps and people know when you’re busy.

TikTok, Twitch, and Snapchat are those apps that have time-sensitive notifications.

However, it is your choice whether you want to enable or disable the feature.

In this post, I will guide you on how to turn off time-sensitive notifications on Snapchat on iOS/iPhone devices.

How to Turn Off Time Sensitive Notifications on Snapchat

To turn off time-sensitive notifications on Snapchat, you have to access the Settings app and select “Snapchat”.

After selecting “Snapchat”, choose “Notifications” and turn off “Time Sensitive Notifications” from there.

Here’s a step-by-step guide on how to turn it off:

  1. Go to the Settings app on your iPhone.
  2. Scroll down to reach Snapchat and tap on “Snapchat”.
  3. Under “Allow Snapchat to access”, select “Notifications”.
  4. Now, turn off “Time-Sensitive Notifications”.

After turning off “Time-Sensitive Notifications”, you’ll not receive them.

However, you’ll still get the rest of the alerts you have enabled.

If you don’t want to get any notifications, you must turn off “Allow Notifications” for that.

What’s Next

How to Remove My AI on Snapchat

How to Get My AI on Snapchat

How to Fix My AI Not Showing on Snapchat

Arsalan Rauf
Arsalan Rauf

Arsalan Rauf is an entrepreneur, freelancer, creative writer, and also a fountainhead of Green Hat Expert. Additionally, he is also an eminent researcher of Blogging, SEO, Internet Marketing, Social Media, premium accounts, codes, links, tips and tricks, etc.

www.greenhatexpert.com

Filed Under: Snapchat, Social Media

How to Fix Facebook Watch Video Icon Not Showing

Last Updated on May 13, 2023 By Arsalan Rauf

Facebook Watch is a place that allows you to see videos on FB related to shows, sports, live events and so on.

The stats show that 1.25 billion people use the watch feature every month to discover and share videos on the platform.

The purpose of the feature is to entertain users and make it easier for people to find videos related to their interests.

The users can also stay connected with their favorite artists, creators, sports and celebrities etc.

To access the Facebook Watch, you need to tap on the TV icon/tab/option on the navigation bar available on the Facebook app.

However, some users reported that the option is not showing up on the app.

In this article, I will tell you how to fix the Facebook Watch video icon, tab, or option not showing or missing from your feed.

Why is the Facebook Watch tab missing?

The Facebook Watch tab is missing because you have not pinned the option to your navigation bar.

Your navigation bar will be updated as per your activity.

You can customize your navigation bar on Facebook app.

You can select from the three options including Auto, Pin, and Hide.

All the options will be set to “Auto” by default.

It means that FB will personalize your navigation bar automatically for you.

In some cases, you might not see the Facebook Watch tab because Facebook thinks that you don’t prefer the option or do not use it much.

How to fix Facebook Messenger story not showing

To fix Facebook Messenger story not showing, the only thing you need to do is to pin Facebook Watch to your navigation bar.

By doing this, you will view the feature in your navigation bar at all times.

Solution for Android phones

  1. Go to the Facebook app and tap on your profile picture.
  2. Scroll down to expand “Settings & Privacy”.
  3. Tap on “Settings” next to “Navigation bar”.
  4. After that, tap on “Customize the bar”.
  5. To pin FB watch, set “Watch” to “Pin” to pin it.

Solution for iPhones

  1. Go to the FB app and tap on your profile picture.
  2. Scroll down to expand “Settings & Privacy”.
  3. Tap on “Settings” next to “Profile settings”.
  4. Under “Navigation bar”, tap on “Customize”.
  5. To pin Facebook Watch, set “Watch” to “Pin”.

What’s Next

How to Fix Facebook Messenger Story Not Showing

How to Make a Website Like Facebook

How to Fix Facebook Two-Factor Authentication Code Not Received

Arsalan Rauf
Arsalan Rauf

Arsalan Rauf is an entrepreneur, freelancer, creative writer, and also a fountainhead of Green Hat Expert. Additionally, he is also an eminent researcher of Blogging, SEO, Internet Marketing, Social Media, premium accounts, codes, links, tips and tricks, etc.

www.greenhatexpert.com

Filed Under: Facebook, Social Media

How to Fix “Switch to Instagram Lite”

Last Updated on June 2, 2023 By Arsalan Rauf

Are you facing a “Switch to Instagram Lite” error on Instagram on Android?

The error message you can get is “This version of Instagram is no longer supported”.

“You can switch to Instagram Lite, which gives you newer features without downloading a larger app”.

“Google Play is the easiest way to get Instagram Lite”.

“You can also get it by downloading an APK directly to your device”.

“You can also access your account at instagram.com”.

In this article, I will tell you how to fix the “Switch to Instagram Lite” error on Instagram on Android.

Why did Instagram ask me to switch to Instagram Lite?

Instagram asked you to switch to Instagram Lite because the version installed on your android phone is an outdated one.

For instance, you have installed version 240.0 of Instagram but the newest version is 260.0, the version you are using will not be supported now.

Otherwise, you are using an outdated device and the Instagram app does not support it.

Instagram Lite does not consume much storage and it’s faster than the Instagram app.

If you have slow internet connection, it can still work well on it and for older devices.

How to fix “Switch to Instagram Lite”

To fix “Switch to Instagram Lite”, you can download and use Instagram Lite or an get an APK of older version of Instagram.

Other ways to get rid of it are updating Instagram, updating your device, or clearing the app’s cache.

Solution 1: Download Instagram Lite

  1. Go to the Google Play Store.
  2. Find “Instagram Lite” by searching for it.
  3. Download Instagram Lite.
  4. Go to Instagram Lite.
  5. Use your Instagram account credentials to sign in.

Solution 2: Download an older version of Instagram

  1. Remove Instagram app from your device to download the older version.
  2. Copy and paste this link into your browser: https://instagram.en.uptodown.com/android/versions.
  3. To install an older version, select “Older versions”.
  4. To download APK, you need to choose “Download”.
  5. After installation, open Instagram and log in to your account.

Solution 3: Other troubleshooting methods

  • Update IG app: Go to App Store or Google Play Store, search for “Instagram”, and tap on “Update” if there is any.
  • Remove and reinstall: Delete the Instagram app and go to the Google Play Store and reinstall it.
  • Clear Instagram’s cache: Follow these steps to remove cache: Force exit Instagram > open the Settings app > Apps > Manage apps > Instagram > Clear Cache > Clear Data > re-open Instagram.
  • Update your android version: Follow these steps: go to the Settings app > System > System update > follow the instructions on the screen.

What’s Next

How to Fix Meta Verified Option Not Showing on Instagram

How to Fix “Instagram closed because this app has a bug”

How to Fix Instagram Failed to Start Several Times

Arsalan Rauf
Arsalan Rauf

Arsalan Rauf is an entrepreneur, freelancer, creative writer, and also a fountainhead of Green Hat Expert. Additionally, he is also an eminent researcher of Blogging, SEO, Internet Marketing, Social Media, premium accounts, codes, links, tips and tricks, etc.

www.greenhatexpert.com

Filed Under: Instagram, Social Media

How to Fix Meta Verified Option Not Showing on Instagram

Last Updated on May 3, 2023 By Arsalan Rauf

Meta is releasing a new subscription bundle known as “Meta Verified” on Instagram.

This subscription will help users to get a blue checkmark along with new features.

It is same as the Twitter Blue subscription in which the users pay a monthly subscription to add blue checkmark on their Twitter account.

Meta is still testing the verified subscription and it is currently available in certain countries.

In this article, I will tell you why is the Meta Verified option not showing on Instagram and how to fix it.

Why is the Meta Verified option not showing on Instagram?

The Meta Verified option is not showing on Instagram because the option is not available in your country/region yet.

It is currently supported in the United States, Australia, and New Zealand for people 18 years old or above.

You will not be able to use the bundle, if you are not living in any of these countries.

Additionally, Meta has allowed personal accounts only to get Meta verified and they are eligible for it.

Business accounts are not eligible which is why they cannot get the bundle subscription.

How to fix Meta Verified option not showing on Instagram

To fix Meta Verified option not showing on Instagram, the first thing you need to do is to join the waitlist.

While joining the waitlist and you choose marketing-related electronic communications, you will receive a notification when Meta Verified is available to you.

Here’s a step by step guide on how to join the waitlist for Meta Verified:

  1. Visit an Instagram profile that is currently Meta Verified.
  2. Tap on the username of the person.
  3. Select “Join the waitlist for Meta Verified”.

If you’re getting issues with joining the waitlist, you can join it using this link.

Meta Verified is currently only available in certain countries including the USA, Australia, and New Zealand.

If you are a resident of any of these countries and the options is not visible to you, try updating Instagram.

The eligibility criteria for Meta Verified include the age, it must be at least 18 years old and you should have a personal account.

If you try to violate Instagram’s Terms of Use or Community Guidelines, the feature can be disabled or canceled at any time for you.

What’s Next

How to Get Meta Verified on Instagram

How to Fix “Something went wrong with Instagram”

How to Fix Instagram Notes Not Showing

Arsalan Rauf
Arsalan Rauf

Arsalan Rauf is an entrepreneur, freelancer, creative writer, and also a fountainhead of Green Hat Expert. Additionally, he is also an eminent researcher of Blogging, SEO, Internet Marketing, Social Media, premium accounts, codes, links, tips and tricks, etc.

www.greenhatexpert.com

Filed Under: Instagram, Social Media

How to Get Meta Verified on Instagram

Last Updated on May 3, 2023 By Arsalan Rauf

Meta is coming up with a new subscription bundle on Instagram.

The bundle is known as “Meta Verified” which allows users to get a blue checkmark along with additional features.

Elon Musk acquired Twitter and he launched the Twitter Blue subscription to allow the users to get a blue checkmark.

Meta is doing the same and trying to copy the business model of Twitter by launching Meta Verified.

Currently, the subscription is launched in some countries which are United States, Australia, and New Zealand.

In this article, I will tell you how to get Meta Verified on Instagram in any country.

What does Meta Verified mean on Instagram?

Meta Verified on Instagram is a new subscription bundle that will help you to get additional features.

The features will be impersonation protections, increased visibility/support, and a blue checkmark.

The price of the subscription is $11.99 USD per month on the web and for android and iOS users, it is $14.99 USD per month.

According to Meta, the purpose of launching the bundle is to make it easier for users to build their presence on IG.

You have to meet minimum activity requirements to become eligible and you should be at least 18 years old.

To prove your identity, a government ID and a selfie video is also required.

How to get Meta Verified on Instagram

To get Meta Verified on Instagram, first visit the Accounts Center, select “Meta Verified”, and follow the instructions on the screen in order to get verified.

The verification process will require you to set up a payment method, provide an ID, and take a selfie video and it will prove your identity.

Here’s a step-by-step guide on how to get Meta Verified:

  1. Go to the Instagram app and visit your profile and follow these steps: Menu > Settings > Accounts Center > Meta Verified.
  2. After that, choose an account that you want to get Meta Verified.
  3. After that > Add a payment method > Pay now.
  4. Upload your ID > Take a selfie video > finish to complete the process.

Note: There are certain countries where Meta Verified is currently rolled out including the United States, Australia, and New Zealand—if you’re not from any of those countries, you have to join the wait list.

After uploading your ID and took a selfie video, you have to wait for 48 hours (2 days) for the verification to complete.

In some cases, the process can take more than 48 hours due to the load of submissions.

If your first attempt to verify your profile is not fulfilled and you are not trying it again, you’ll get a refund.

If you are refunded, you can apply again if you’re using Apple Pay, the process can take up to 60 days.

What’s Next

How to Fix “Something went wrong with Instagram”

How to Fix Instagram Notes Not Showing

How to Make a Website Like Instagram

Arsalan Rauf
Arsalan Rauf

Arsalan Rauf is an entrepreneur, freelancer, creative writer, and also a fountainhead of Green Hat Expert. Additionally, he is also an eminent researcher of Blogging, SEO, Internet Marketing, Social Media, premium accounts, codes, links, tips and tricks, etc.

www.greenhatexpert.com

Filed Under: Instagram, Social Media

How to Remove My AI on Snapchat

Last Updated on April 25, 2023 By Arsalan Rauf

My AI is a new Snapchat feature that helps you to use AI chatbot in your chat or conversations.

OpenAI is the tech that is behind this chatbot and they named it ChatGPT.

To access the option, you need to swipe right on the Camera screen and select “My AI” in your Chat feed.

Every user on Snapchat can access it whether it is a free user or Snapchat Plus user.

However, some users are reporting that My AI is compromising their privacy and steals their data.

If you want privacy, my recommendation is to get rid of the chatbot from the chat feed.

In this article, I will tell you how to delete or remove My AI on Snapchat from your Chat feed and clear your data.

Can I remove My AI on Snapchat?

Yes, you can remove My AI on Snapchat only if have a Snapchat Plus subscription.

If you’re not a Snapchat Plus subscriber, you cannot remove the chatbot from your chat feed.

According to Team Snapchat, Snapchat Plus subscribers will also get new My AI features early.

The features will be the ability to unpin, remove, or delete My AI from their Chat feed.

The cost of Snapchat Plus is $3.99 USD per month and it’s a good investment if you want to try new Snapchat features early as compared to the free users.

How to Remove My AI on Snapchat

To remove My AI on Snapchat, the first thing you need to do is to subscribe to Snapchat Plus, follow these steps: visit your Chat geed> tap and hold “My AI”> tap on “Chat Settings”> tap on “Clear from Chat Feed”.

After removing the chatbot from your Chat feed, it is my suggestion to remove the data that you have sent to the bot too.

To delete it, follow these steps: go to your settings> tap on “Clear Data”> tap on “Clear My AI Data”> and confirm.

This step will remove all the content that you have sent to My AI.

Remove My AI from your Chat feed

#1 Method:

  1. Get a Snapchat Plus subscription.
  2. To visit the chat feed, swipe right from the Camera screen.
  3. Tap and hold “My AI”.
  4. Choose “Chat Settings”.
  5. After that, tap on “Clear from Chat Feed”.

#2 Method:

  1. Get a Snapchat Plus subscription.
  2. After that, tap on your Profile icon and tap on the Settings icon.
  3. Now, scroll down and tap on “Clear Data” under “Privacy Controls”.
  4. After that, tap on “Clear Conversations”.
  5. Tap on the “+” icon beside “My AI” to delete the conversation from your Chat feed.

Delete the data sent to My AI

#1 Method:

  1. Firstly, tap your Profile icon and tap on the Settings icon.
  2. Now, scroll down and tap on “Clear Data” under “Privacy Controls”.
  3. Lastly, tap on “Clear My AI Data” to delete the data.

#2 Method:

  1. Firstly, tap your Snapchat Profile icon and tap on the Settings icon.
  2. After that, scroll down to reach “Account Actions”.
  3. Lastly, tap on “Clear My AI Data” to clear it.

What’s Next

How to Fix My AI Not Showing on Snapchat

How to Get My AI on Snapchat

How to Get Snapchat Plus

Arsalan Rauf
Arsalan Rauf

Arsalan Rauf is an entrepreneur, freelancer, creative writer, and also a fountainhead of Green Hat Expert. Additionally, he is also an eminent researcher of Blogging, SEO, Internet Marketing, Social Media, premium accounts, codes, links, tips and tricks, etc.

www.greenhatexpert.com

Filed Under: Snapchat, Social Media

How to Fix My AI Not Showing on Snapchat

Last Updated on April 25, 2023 By Arsalan Rauf

My AI is a new feature introduced on Snapchat which is same as ChatGPT.

It is a chatbot that has the ability to answer questions, give you new ideas and suggestions and so on.

In the beginning, the option was available for Snapchat + subscribers, but recently it was launched for every user.

You will get the Chatbot in your chats, to view it, you need to swipe right from the camera screen.

However, everyone cannot see My AI in their chats which is a purple-skinned and blue-haired Bitmoji.

In this article, I will tell you how to fix My AI not showing, missing, or not working on Snapchat.

Why is My AI not showing on Snapchat

My AI is not showing on Snapchat because the feature is not made available to you yet.

According to Team Snapchat, My AI and the new My AI features will be rolled out gradually.

Therefore, you may not have a chatbot even if you are a Snapchat Plus subscriber.

Having said that, the feature does not require the subscription to Snapchat + as it is accessible for all users.

After the launch of My AI on the app, the platform has done it.

You can customize the bot by changing its look with a custom Bimoji avatar and updating its name.

If the feature of My AI is not available for you, you have to wait until it is available for you, it can take a few weeks or months to fully roll out.

How to fix My AI not showing on Snapchat

To fix My AI not showing on Snapchat, the first thing you need to do is to update the app on the App Store or Google Play Store.

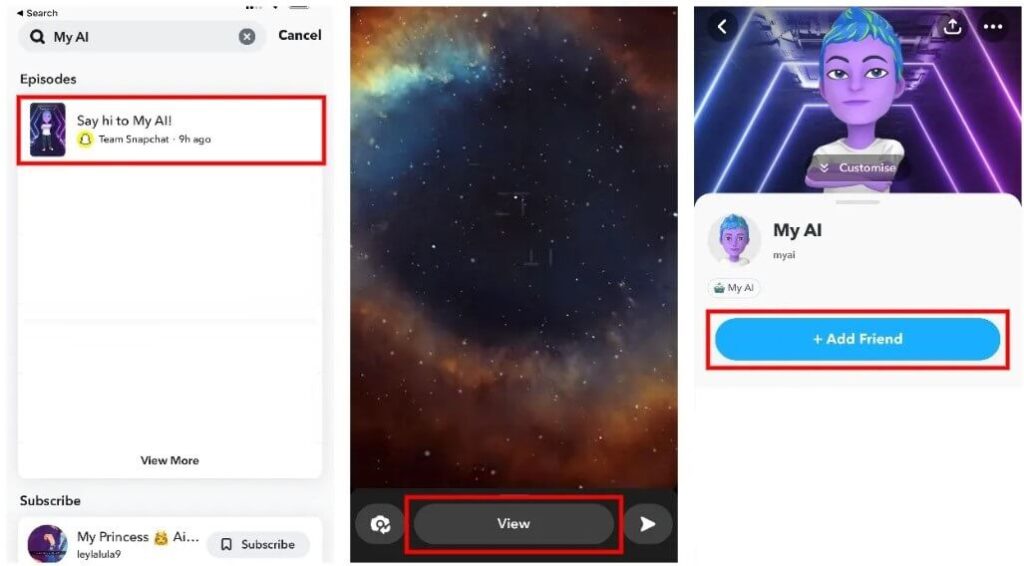
To use the tool, you can also add it as a friend, use these steps: go to the “Say hi to My AI!” Snapchat episode> tap on “View”> tap on “Add Friend”.

If My AI is still not showing, it indicates that the option is not rolled out to you yet.

According to Team Snapchat, the feature will be made available slowly and it can take around a few weeks to months to fully roll out.

#1 Method: Update Snapchat

  1. Go to the App Store or Google Play Store.
  2. Search for “Snapchat” to find the app.
  3. To update the app, you need to tap on the “Update” button.
  4. Go to Snapchat, swipe right from the Camera screen, and tap on “My AI” to begin the chat.

#2 Method: Add My AI as a friend

Get My AI on Snapchat 1
  1. Go to the Google play store or app store to update Snapchat app.
  2. Go to Snapchat and swipe right from the Camera screen.
  3. Use the search icon to search for “My AI”.
  4. Now, you need to tap on the “Say hi to My AI!” episode and tap on “View”.
  5. To add My AI as a friend, you need to tap on the “Add Friend” button.
  6. Visit your chats again and chat with My AI.

#3 Method: Wait for My AI to roll out to you

  • According to Snapchat, the feature, My AI is slowly rolling out to every user.
  • If the feature is not available to you, it means that it has not been rolled out to you yet.
  • To get access to My AI, you have to wait for a few weeks or months.

What’s Next

How to Get My AI on Snapchat

How to Get Snapchat Plus

Why is Snapchat Plus Not Showing?

Arsalan Rauf
Arsalan Rauf

Arsalan Rauf is an entrepreneur, freelancer, creative writer, and also a fountainhead of Green Hat Expert. Additionally, he is also an eminent researcher of Blogging, SEO, Internet Marketing, Social Media, premium accounts, codes, links, tips and tricks, etc.

www.greenhatexpert.com

Filed Under: Snapchat, Social Media

  • « Previous Page
  • 1
  • …
  • 5
  • 6
  • 7
  • 8
  • 9
  • …
  • 37
  • Next Page »


Recent Posts

  • Free DeepSeek Accounts 2025
  • Free Zoho Mail Accounts 2025
  • Acudepot Discount Codes 2025
  • Free Blackshot Accounts 2025
  • Free GMX Email Accounts 2025
  • Songtrust Discount Codes 2025
  • Uzicases Discount Codes 2025
  • Cardillo Promo Codes 2025
  • Free DriverFix License Keys 2025
  • Avast Secureline VPN Activation Codes 2025

Recommended Posts

Create a Gmail Account Without Phone Number

Free Course Hero Account

Crunchyroll Accounts

Cracked Apps

Free Pokemon Go Accounts
Onlyfans Free Accounts
Free Chegg Accounts
Free Paypal Accounts
Free Gmail Accounts
Funny Steam Names

Categories

  • Apps
  • Apps for PC
  • Blogging
  • Discord
  • Facebook
  • Gaming
  • Grammar
  • Guide
  • How to
  • Instagram
  • Messaging
  • OnlyFans
  • Pinterest
  • Reddit
  • SEO
  • Snapchat
  • Social Media
  • Spotify
  • Steam
  • Telegram
  • TikTok
  • Twitch
  • Twitter
  • Whatsapp
  • WordPress
  • YouTube
  • Home
  • Social Media
  • Messaging
  • About
  • Submit Guest post