Green Hat Expert

  • Home
  • Social Media
    • Instagram
    • TikTok
    • Snapchat
    • Facebook
    • YouTube
    • Twitter
  • Messaging
    • Discord
    • Telegram
    • Whatsapp
  • About
  • Submit Guest post
You are here: Home / Archives for WordPress

Mobile SEO guide in 2024 – How to Optimize Your Website for Mobile SEO

Last Updated on January 9, 2024 By Arsalan Rauf

In this post, I shall share with you everything you need to know about mobile SEO in 2024.

I shall also tell you why mobile optimization is necessary now?

In addition, I will also help you to ready your website for Google’s mobile first algorithm.

Mobile SEO guide in 2024 – The Definitive Guide

CHAPTER 1: Mobile Optimization 101

In this chapter I’ll help you to learn the basics.

So if your site is not mobile optimized or you are not sure, this chapter will move you to the right track.

In upcoming chapters, you will learn advanced strategies and techniques.

What Is Mobile SEO?

Mobile SEO stands for the practice of optimizing your website for users on tablets and smartphones or android. It also refers to make your site resources accessible to search engine spiders.

Why Is Mobile SEO Important?

In short: the number of mobile searches is increasing day by day.

In fact, 58% of all searches in Google are now done from a mobile device.

1_2_mobile-vs-desktop

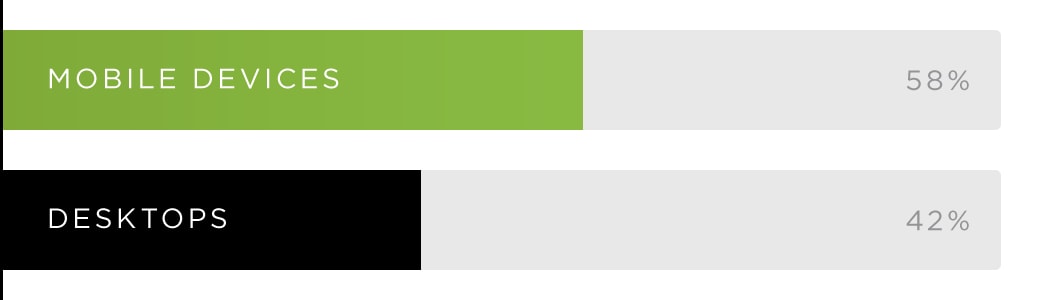
This trend is growing rapidly. According to statistics of Google, mobile has 27.8 billion more queries than desktop.

1_3_mobile-queries

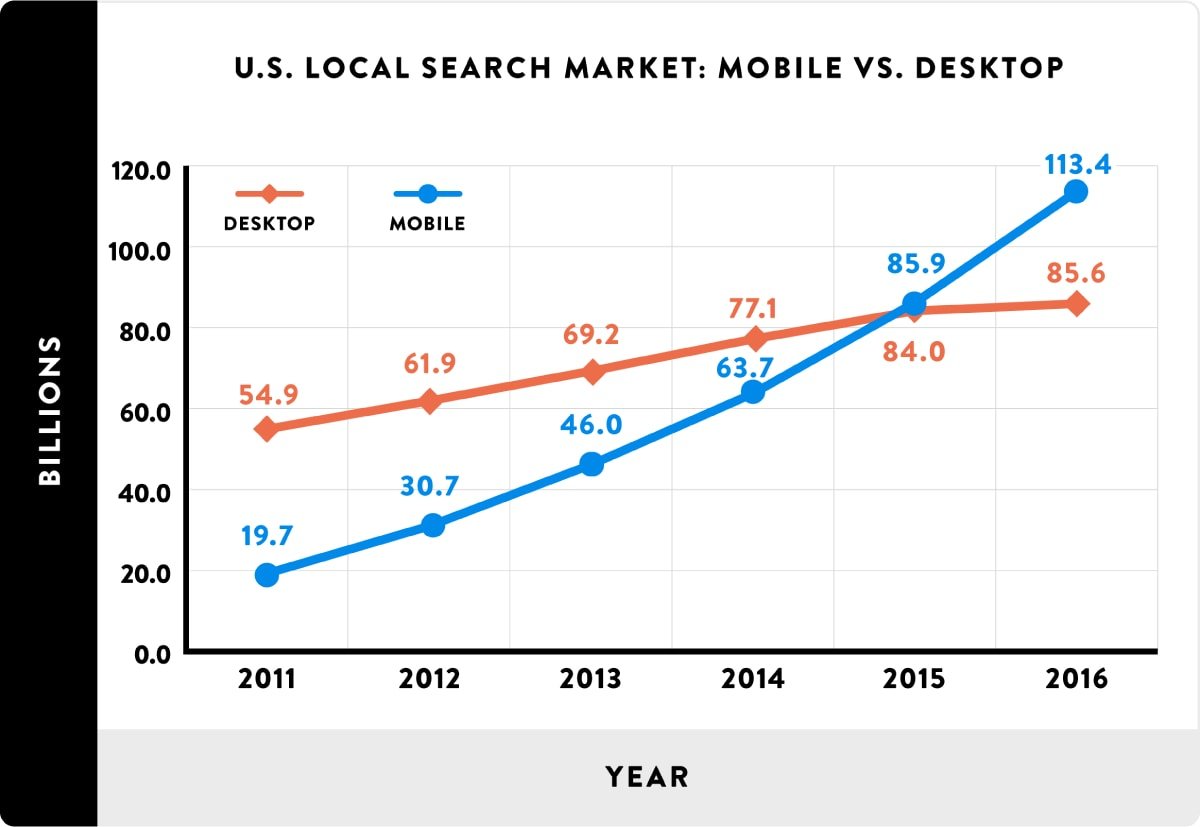
So the mobile is the future of SEO. This is the reason why Google and its algorithm are focussing on mobile search.

SEO in 2019: The Definitive Guide

Is “SEO” Now About Optimizing for “Mobile SEO”?

Yes, if you want to optimize your site for Google.

Today, 95% of searches are from the search engine of Google.

1_4_mobile-searches-on-google

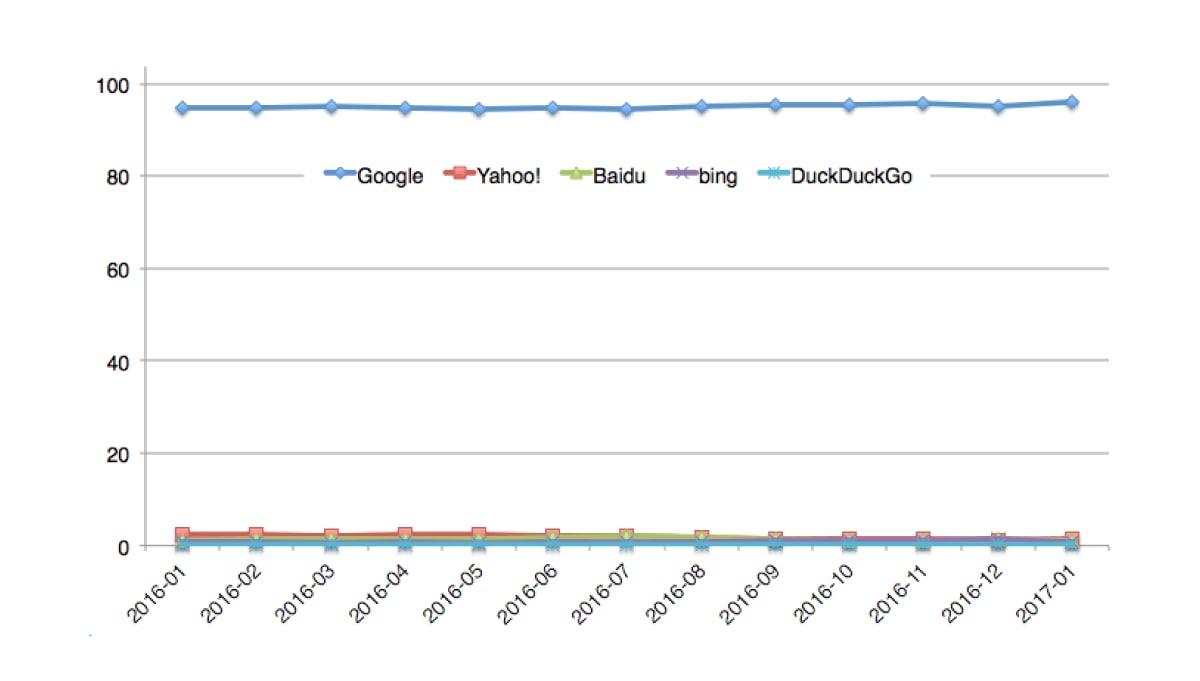
Google will retain this level of dominance by twisting their algorithm.

So you need to optimize your site for mobile users first.

Firstly, Google launched its Mobile-Friendly Update (which many people called “Mobilegeddon”).

1_5_mobile-friendly-update

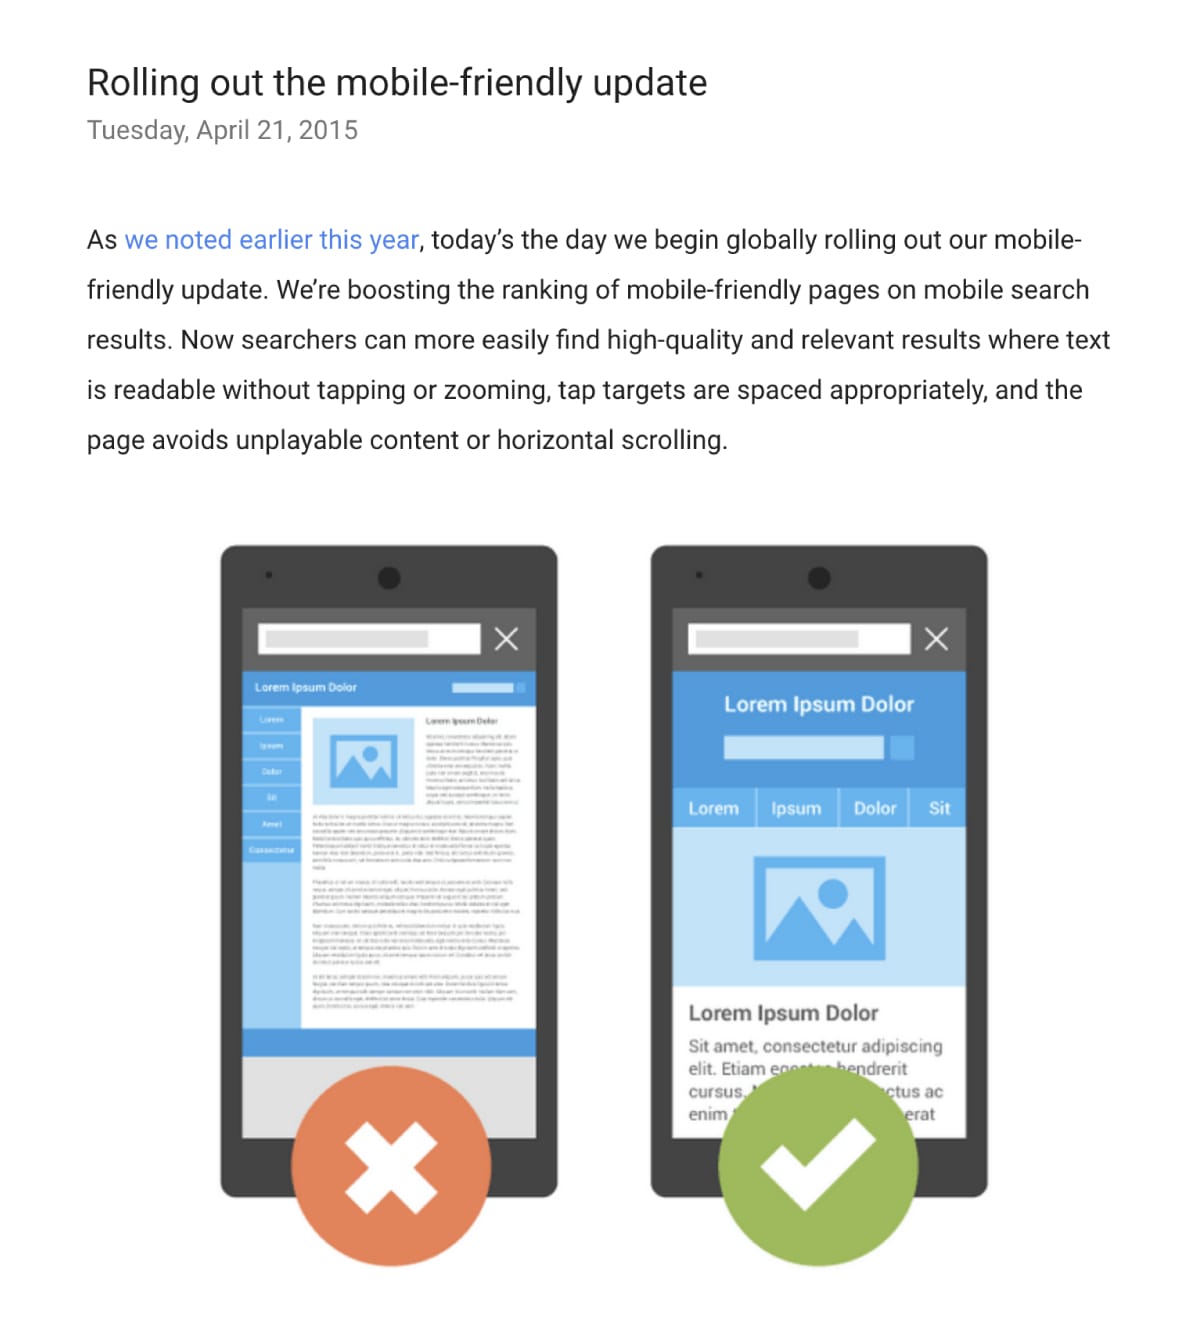
This update affected those sites which were not mobile friendly for android or smartphones.

If your target audience does not search using their smartphones, this update was not a big deal for you.

Unless Google made every search a mobile search by implementing its Mobile First algorithm.

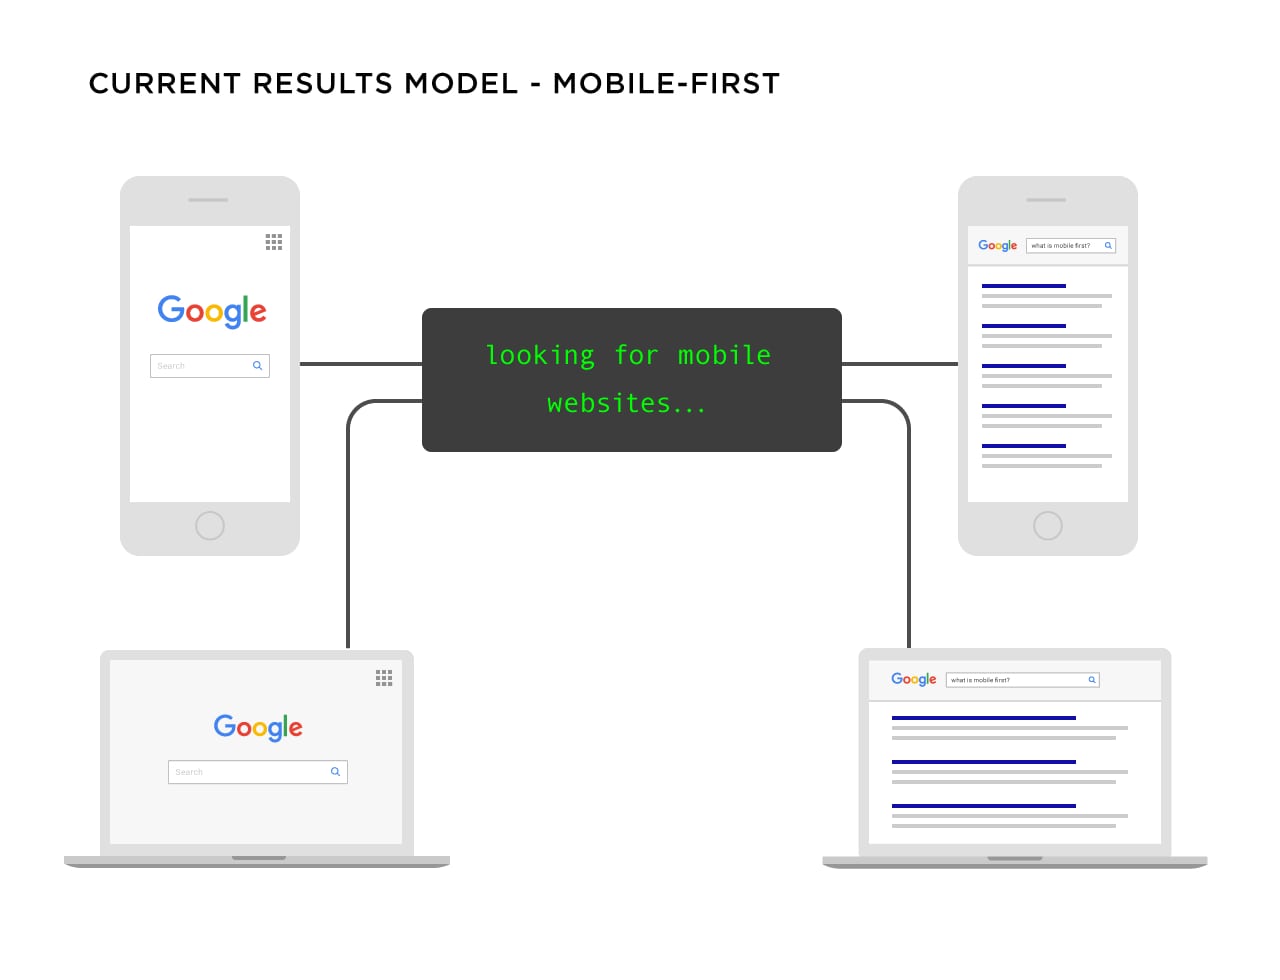
What Is Google’s Mobile-First Index?

Google Mobile first index will rank the search results according to the mobile version of the page. It occurs even if you are searching from a desktop as well.

Before this update, Google ran two indexes side-by-side: desktop version and mobile version.

If someone is searching from an iPhone or android, Google will show them results from mobile index. If someone searches on a desktop, he will get desktop results.

1_6_google-search-model

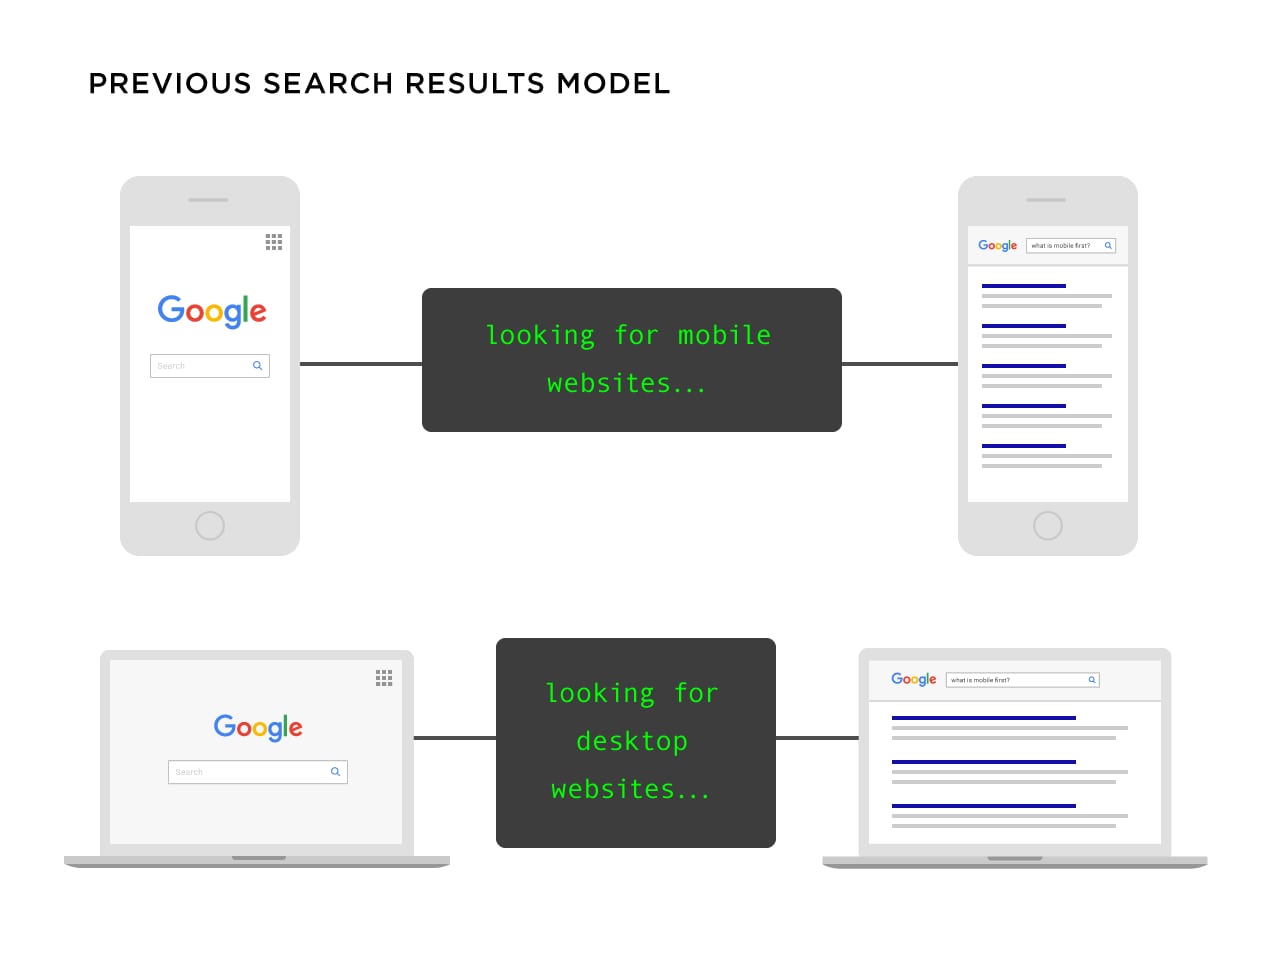
Today, it does not matter what device you use, Google will show you the results from mobile index.

1_7_google-mobile-first-search-model

I shall discuss more about optimization for mobile SEO in chapter 3, 4 and 5.

Is Google’s Mobile-First Index a Big Deal?

It depends.

If your site is optimized for mobile, you are good to go.

If your site….

  • Loads resources across all devices
  • Does not hide content on mobile versions of your site
  • Loads quickly like mobile users expect
  • Has working internal links and redirects
  • Boasts a UX which is optimized no matter what device your visitors use

If all is done, you are good.

If not, Google may drop your rankings.

Therefore, I am making this whole guide for you to optimize your site for mobile.

Firstly….

What Does Google Consider “Mobile”?

1_8_what-does-google-consider-mobile

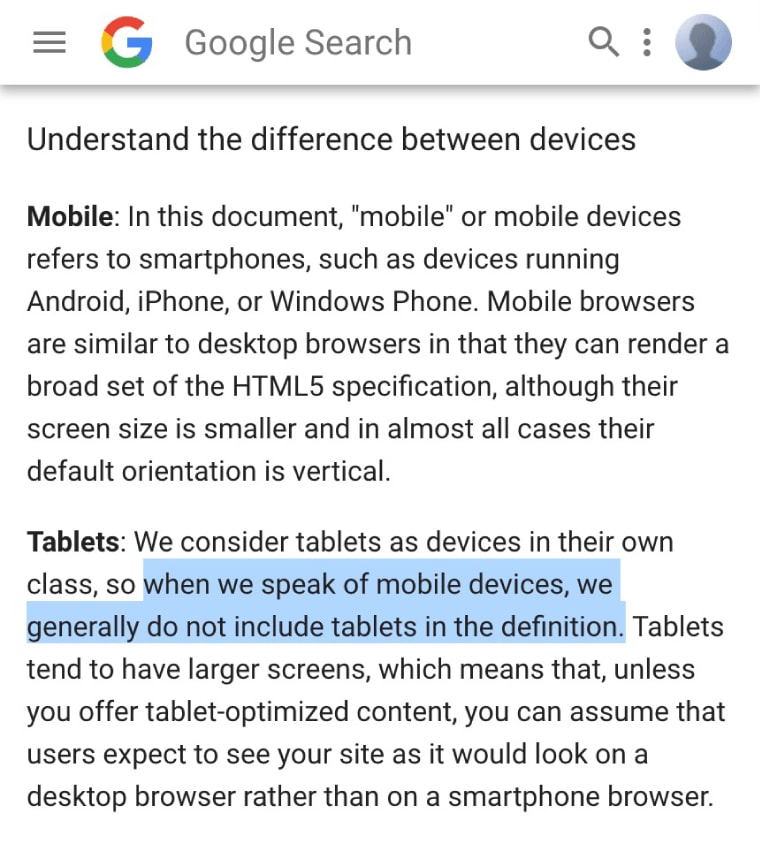
Most of the people consider “mobile device” a table or smartphone.

Google puts tablets in their own class and states that they do not include tablets in the definition.

In short, according to Google: mobile=smartphones.

The main purpose is to optimize your site and content for every device. It includes tablets, phones and other mobile devices.

Image on right side

CHAPTER 2: How to Implement a Mobile Website That Ranks in Google

To get over mobile SEO, your site has to work on mobile devices at least.

If a visitor goes to a mini version of your desktop site, you will be in trouble.

Luckily, to implement a mobile website is not a hard nut to crack.

So in this chapter, I shall teach you different ways to implement a mobile version of your website by focussing on mobile SEO.

When It Comes to Mobile, You’ve Got 3 Options

There are 3 different ways to configure your site for mobile.

1

First of all, you have got separate URLs which is also known as“m” configuration.

With this setup, you have a mobile version which is “M” version of your site and you also have the “main” means desktop version of your site.

2_2_seperate-urls

In short, your site figures out what type of device your visitor is using and redirects them to optimized URL for that device.

Separate URLs were common in the past but now, not anymore.

Why? It is because they are hard to manage.

“M” version creates SEO problems and you require multiple URLs for every piece of content on your website. It also needs complicated “rel=canonical” and “rel=alternative” tags.

That is why I do not suggest M/separate URLs configuration. It is the worst way to configure your website for mobile SEO.

2

Next, we have Dynamic Serving.

When you serve content dynamically, all of your content is on the same URL. But you show every user different CSS/HTML that depends on the device that they use.

2_3_dynamic-serving

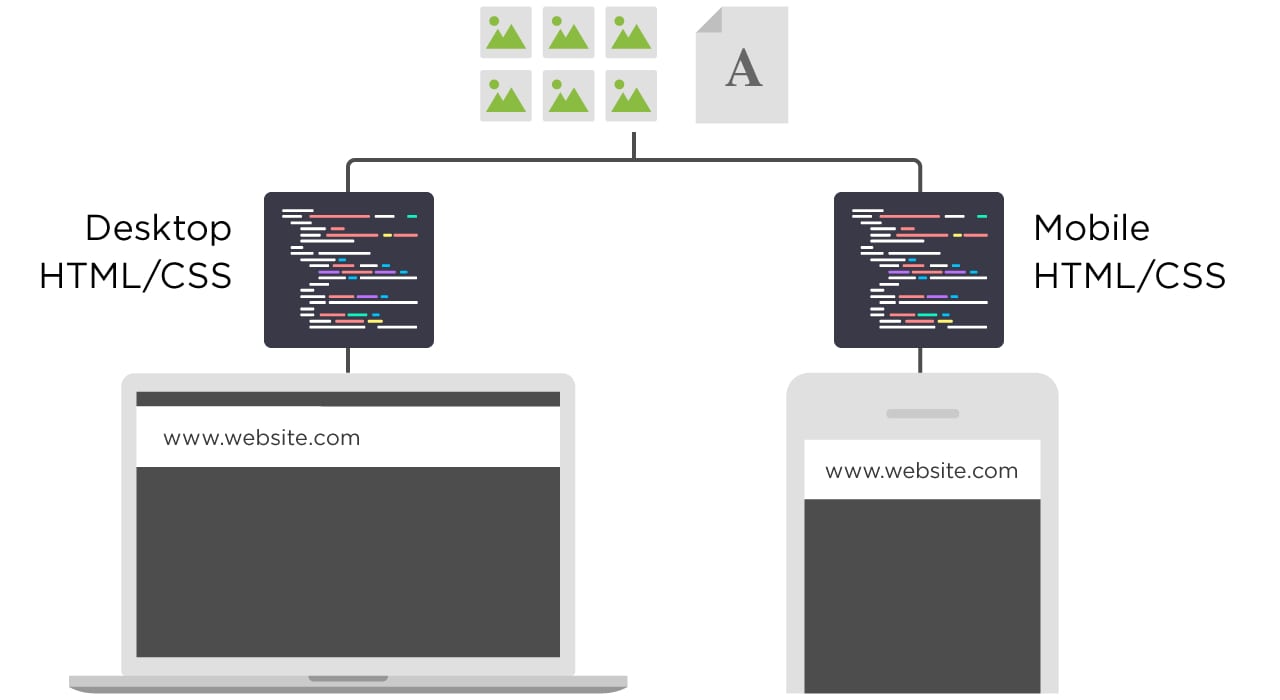
For example, if you visit https://www.greenhatexpert.com/seo-this-year on a desktop, you will see a pre-made desktop version of the site.

desktop version

But if you will visit the page from your iPhone 8, you will still be on https://www.greenhatexpert.com/seo-this-year but you will see the iPhone 8 version of the page.

mobile version

Dynamic serving is a better choice for SEO as compared to “M” version of the site. It has some downsides.

For example, it is notorious for showing desktop version to mobile users.

You need to create different versions of your content for upcoming devices. If you do not do this, your site will not be able to recognize a new device. And will show them the terrible version of your site.

3

Finally, we have Responsive Design.

I saved the best for last.

With the help of responsive design, the content and page’s layout responds to every user.

2_6_responsive-design

Responsive design gets rid of separate URLs and different HTML for every device.

In case of being SEO friendly, responsive design is the best and perfect option.

Why?

  • All of your content is on a single URL (good for sharing and getting links)
  • Minimal SEO headaches (no “rel=canonical tags”, duplicate content issues etc.)
  • Insanely user friendly (UX is a big part of SEO thanks to RankBrain)
  • No redirects (which cause technical SEO issues and can slow down your site)

Still not convinced? Google recommends responsive layouts.

CHAPTER 3: How to Mobile Optimize Your Site

After going through 2 chapters, your site is configured for mobile users. Now it’s time to do mobile SEO.

In this chapter, I shall show you how to tell Google and other search engines that your site is optimized for mobile.

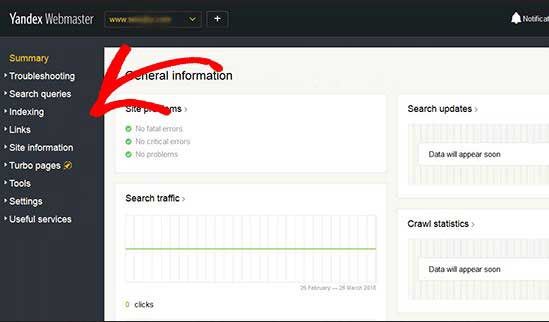
Use Google’s Mobile Usability Test

This tool is available in Google Search Console and it will let you know the issues of your site regarding mobile usability.

To use it, go to your Google search console account. Click “search traffic”>Mobile usability.

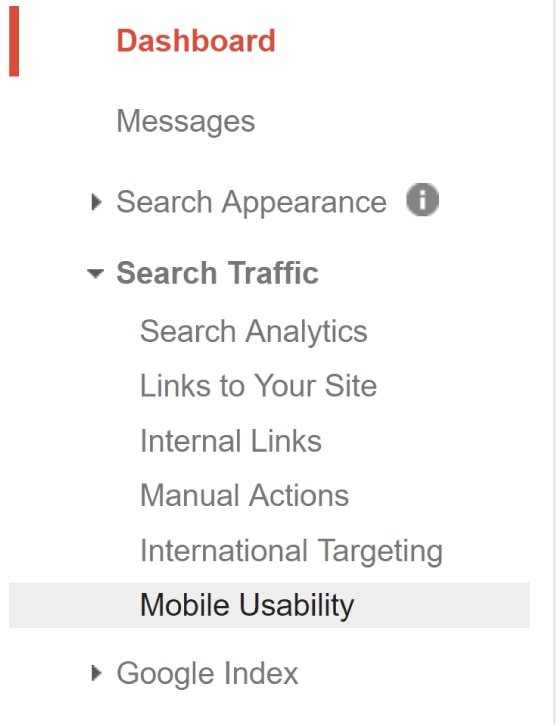
There Google will let you know if your mobile users are facing any problem.

3_3_mobile-usability

(For example, the tool may let you know that you use Flash or that your font is too small for mobile users to read).

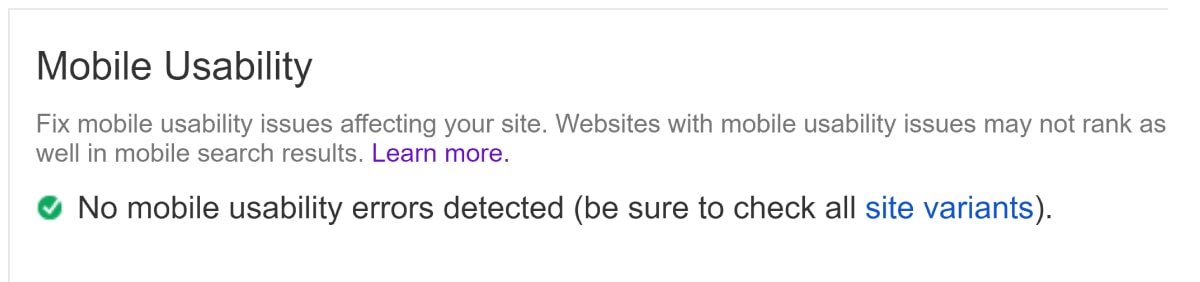
You can also use Google’s Mobile-Friendly test.

Just enter your URL into the tool.

3_4_google-mobile-friendly-test

And get a full report.

3_5_mobile-friendly-report

As you can observe, I passed. But it is telling me that mobile Googlebot is having trouble to load all of my resources on my page.

3_6_mobile-googlebot

Desktop Googlebot is having no problems to crawl the resources. But the mobile version is unable to do it.

With Google’s Mobile first index live, it is a serious issue. And this is something which remains unknown without this tool.

Super duper helpful.

Let Google Crawl Everything

Do you block Googlebot from accessing Javascript, CSS or other important parts of your site’s code?

It used to be no big deal. But today, it is a very bad idea.

Until Google cannot fully crawl your page, it cannot tell whether it is mobile friendly or not.

How do you know if this is an issue?

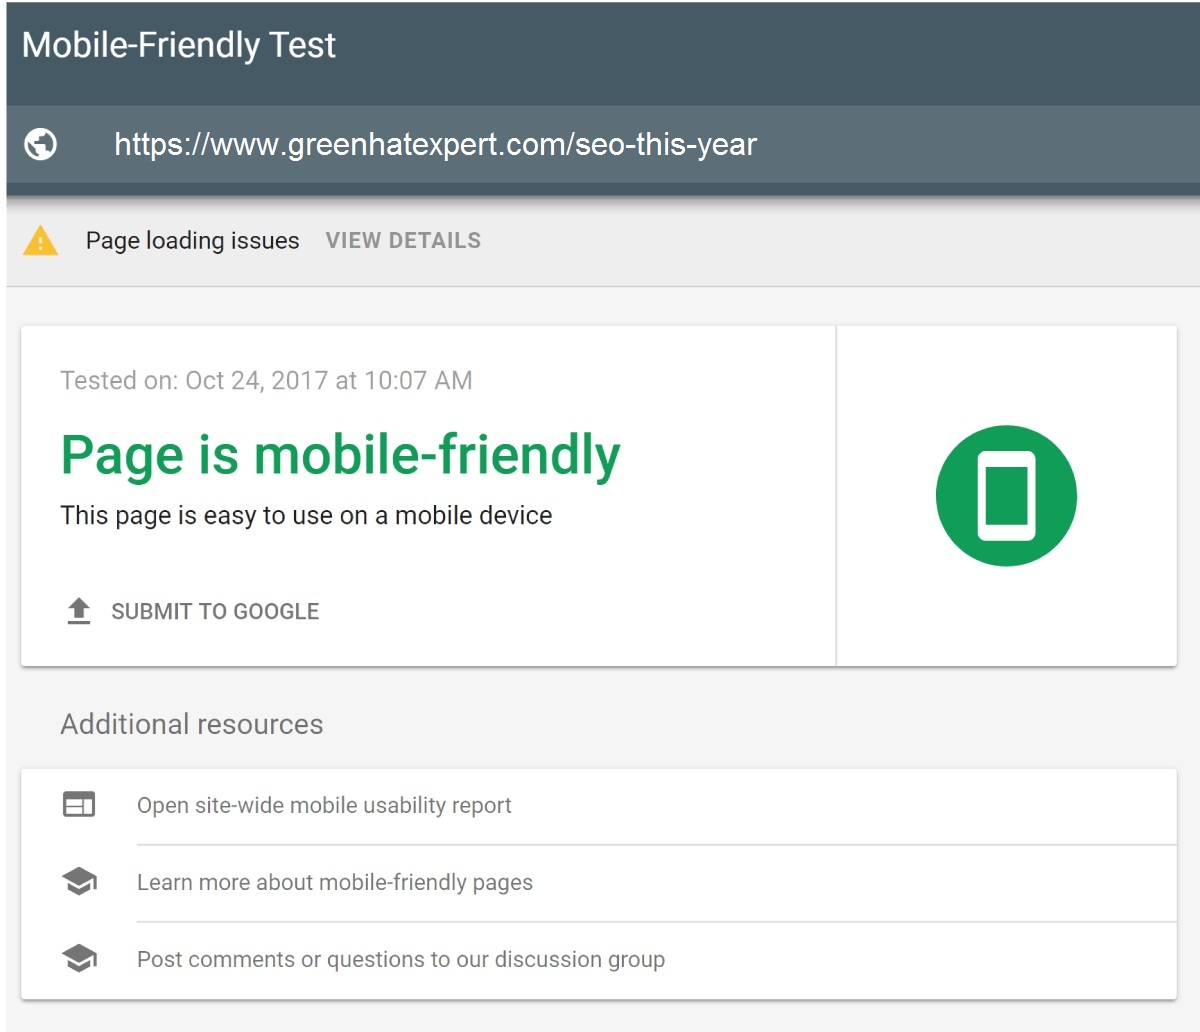
First of all, check your robots.txt file.

This file tells Googlebot to not index or crawl certain parts of your site. This file is usually available at site.com/robots.txt. You can also find it inside of Google search console.

3_7_google-crawl

While you’re there, click on “Google Index” —> “Blocked Resources”. This will let you know if you’re blocking Googlebot from crawling certain parts of your site.

3_8_blocking-googlebot

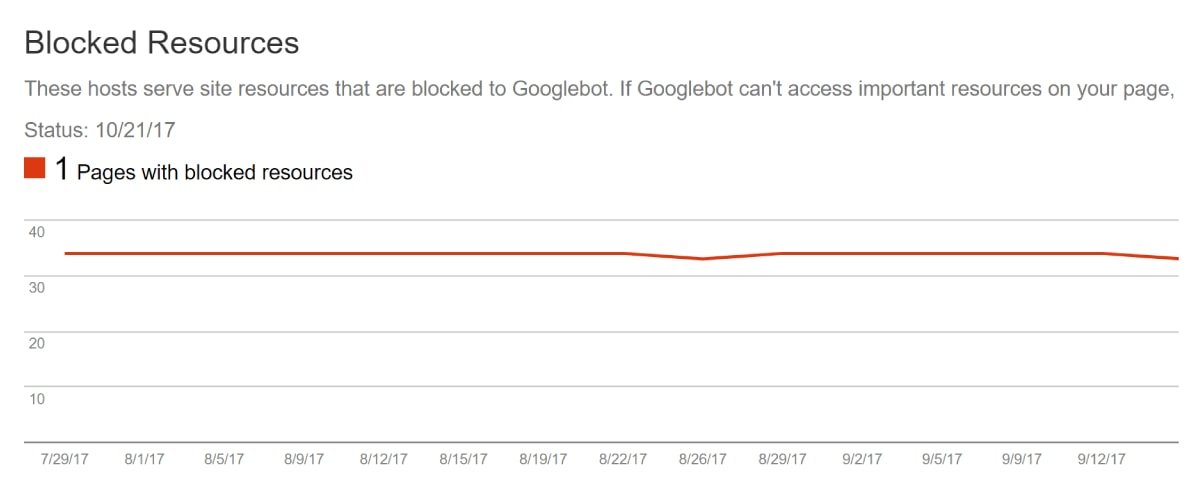
If you are not blocking anything important, you are good to go.

Put the Kibosh on Interstitial Popups

I know: everyone HATES popups.

Google also hates popups….. especially for mobile users.

Remember: Google #1 priority is to show their users amazing and engaging content. If the content is hidden behind a popup and it is not a good thing.

In fact, Google rolled out an update that specifically targets “Intrusive” popups.

3_9_intrusive-popups

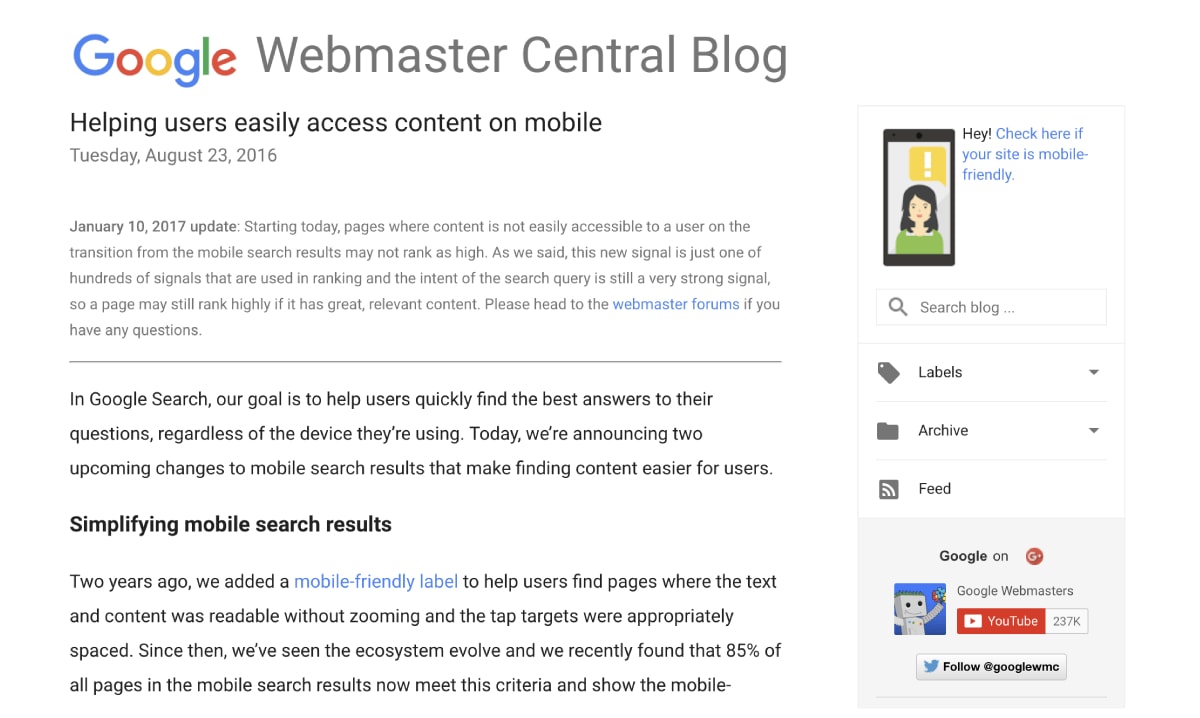
So if you are using popups on your site, it can affect your rankings.

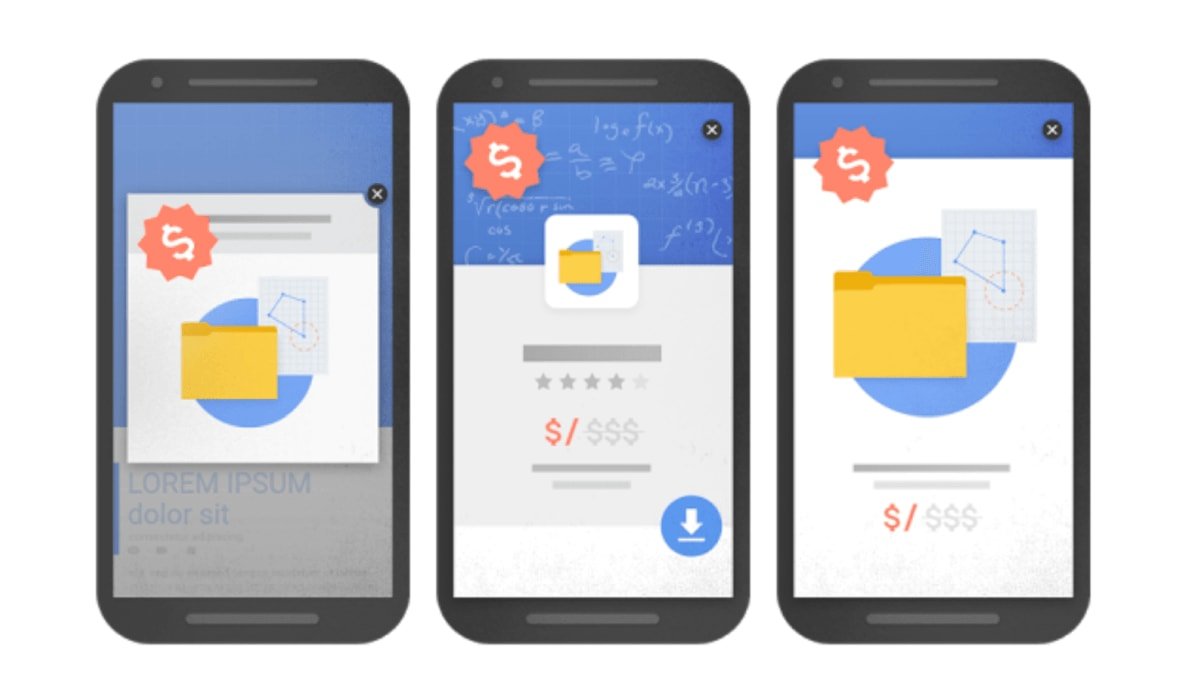
How do you know which popups are OK?

Google gives a few examples of acceptable popups…

3_10_acceptable-popups

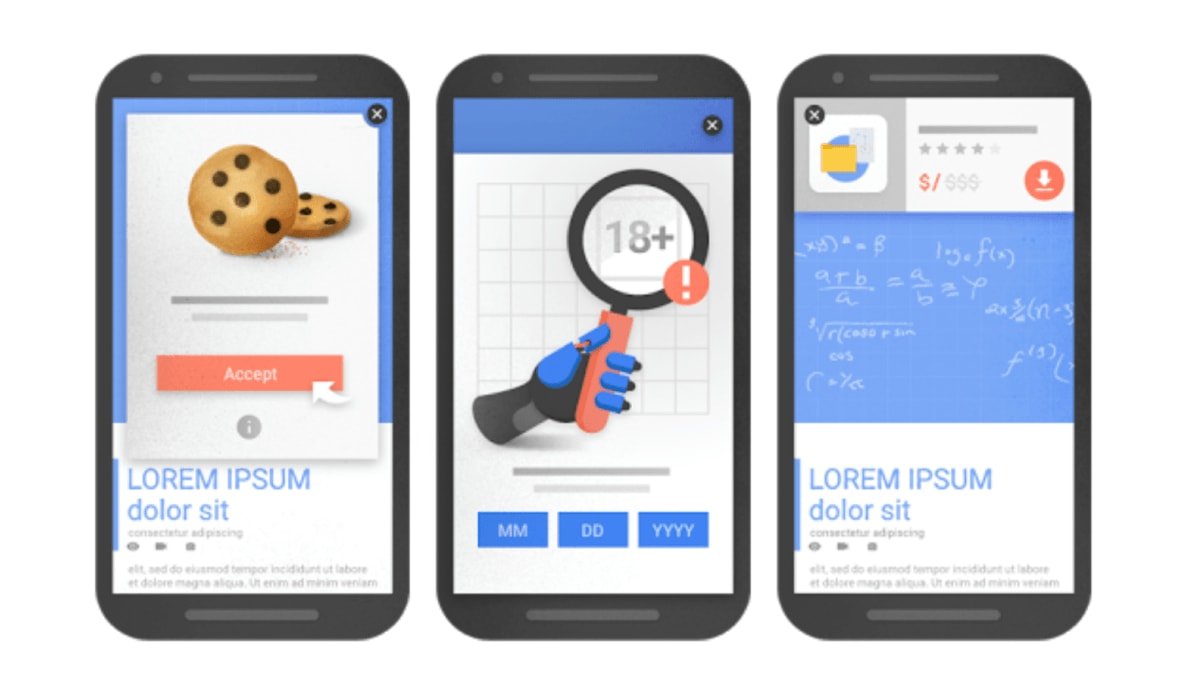
…and popups that can get your site penalized.

3_11_bad-popups

How Does Your Responsive Site Actually Look? Check Out This Cool Tool

It is to see how Google views your mobile site.

But nothing can beat seeing your site on different devices.

If your site is responsive, I recommend checking this free tool.

It’ll show you how your site looks on iPhones, tablets and more:

Image

I love this tool.

Use The Mobile Version of “Fetch as Google”

Like most people, I’m a visual learner.

It is a nice thing to see a list of mobile SEO issues.

Personally, it is more helpful to know how Google sees my page.

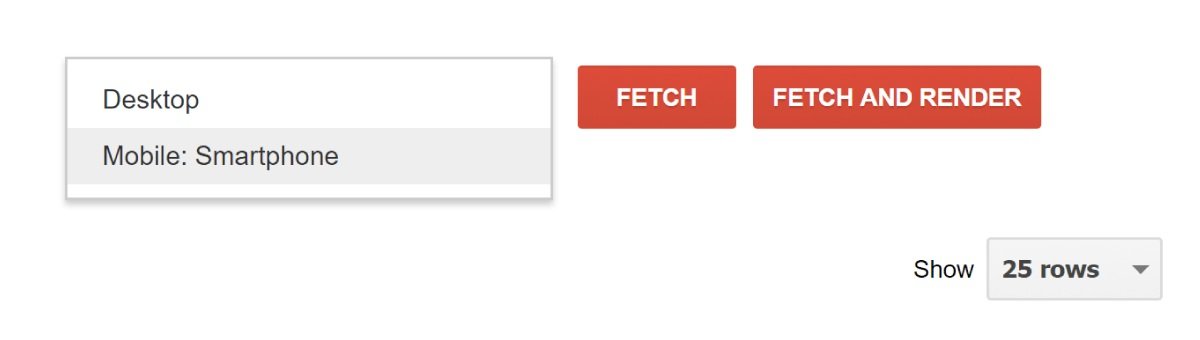
Therefore, I suggest spot testing a few pages on your website using Google search console’s Fetch as Google feature.

Just enter a URL of a prominent page of your site into it:

3_13_fetch-as-google

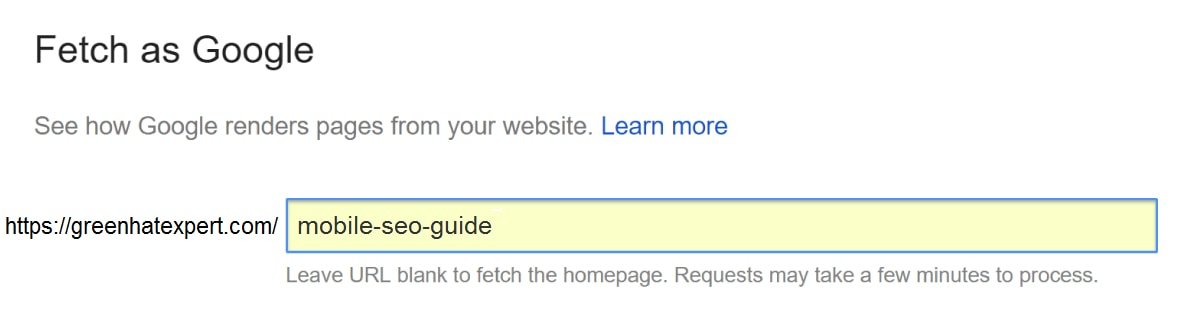
(Make sure to select “Mobile” from the dropdown box)

3_14_fetch-as-google-mobile

And it will show you exactly that same result what Google Bot saw. You can also scroll down to see if Google missed anything like videos, menus and images etc.

Image

Very helpful.

Let Mobile Users See It All

In past, people would block certain resources from mobile users.

(For example, they might block javascript from loading or hide some content)

They were not doing anything suspicious. To block these resources allow them to load their page faster on mobile devices. It also improves the user experience.

Here is an example of what I mean:

3_16_dont-hide-content-on-mobile

See you need to click “read more” to watch the rest of the content. It may be a problem with Google’s first mobile index.

Why?

With Mobile-first, Google will consider the mobile version of your page as the main version.

If the content is hidden from the mobile visitors, it may not crawl or index or affect the weight of this content.

Back in the day, when it came to hiding content for desktop users, Google has said that:

“If something is relevant to the page, then it’s probably relevant to the user too, so I’d recommend showing it to the user.”

But then Google’s John Mueller recently said that, for the Mobile-first index:

“On the mobile version of the page it can be that you have these kind of tabs and folders and things like that, which we will still treat as normal content on the page. Even if it is hidden on the initial view.”

He also said that, when it comes to Mobile First Index:

“If it’s critical content, it should be visible.”

I shall wait for the official announcement on Google blog before saying anything on this.

In the meantime, here’s my take:

If you will hide or block the content for mobile users, Google will put less weight on it or simply ignore it.

So observe your website on different mobile phones. If desktop users can see something and mobile users are missing it. I suggest that fix it asap.

CHAPTER 4: How to Optimize Your Mobile Sitefor UX Signals

As you know, SEO today is less about focussing on meta tags and more about building an awesome website.

In fact, Google’s RankBrain algorithm is paying attention to Google searchers and how they interact with your site.

If RankBrain observes that your is frustrating for mobile users, it will drop your rankings like a stone.

In this chapter, I shall show you some tips that make sure that mobile users love your website.

Master Mobile Sitespeed

Does Google care how fast your mobile site loads?

Yes.

In fact, they recommend that your site should load under a second for mobile users.

That is a hard nut to crack. Luckily, there are some free tools on the market to help you to reach Google’s guideline.

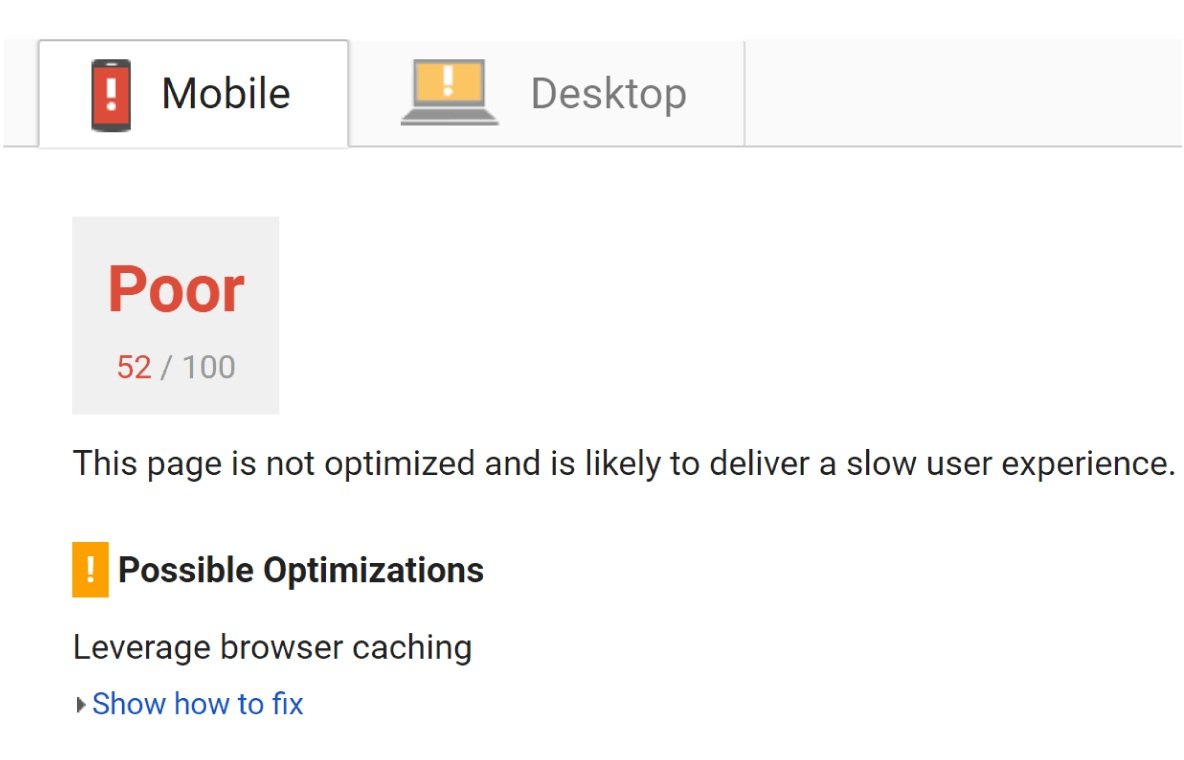
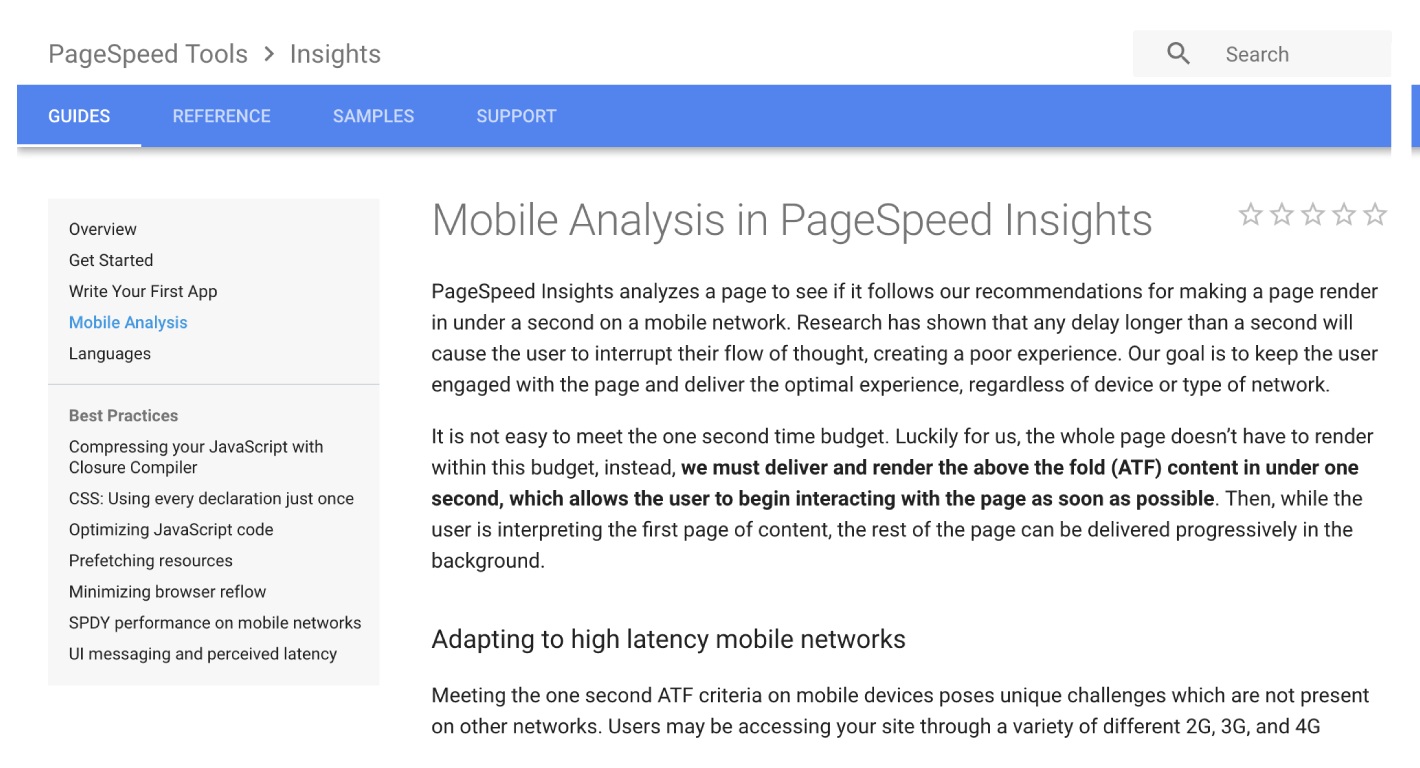
First of all, we have Google’s PageSpeed Insights tool.

This tool allows you to know the time of site load on mobile.

In addition, it also gives you suggestions that you can use to speed up.

4_2_google-pagespeed-insights

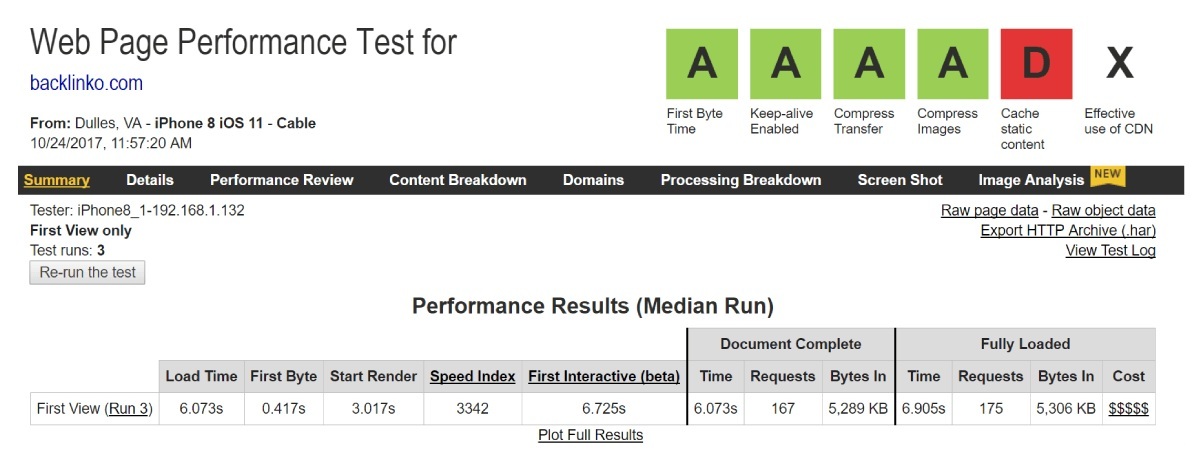
You can also check out WebPageTest.org. By default, it will load your site on a desktop browser. You can select a mobile browser from the menu:

4_3_webpagetest-org

And it will give you a list of suggestion which are for mobile browsers:

4_4_adapted-for-mobile-browsers

If you are really interested in pagespeed, check out this excellent resource.

4_5_speed-test-big-g

This guide will help you to load your site like lightening.

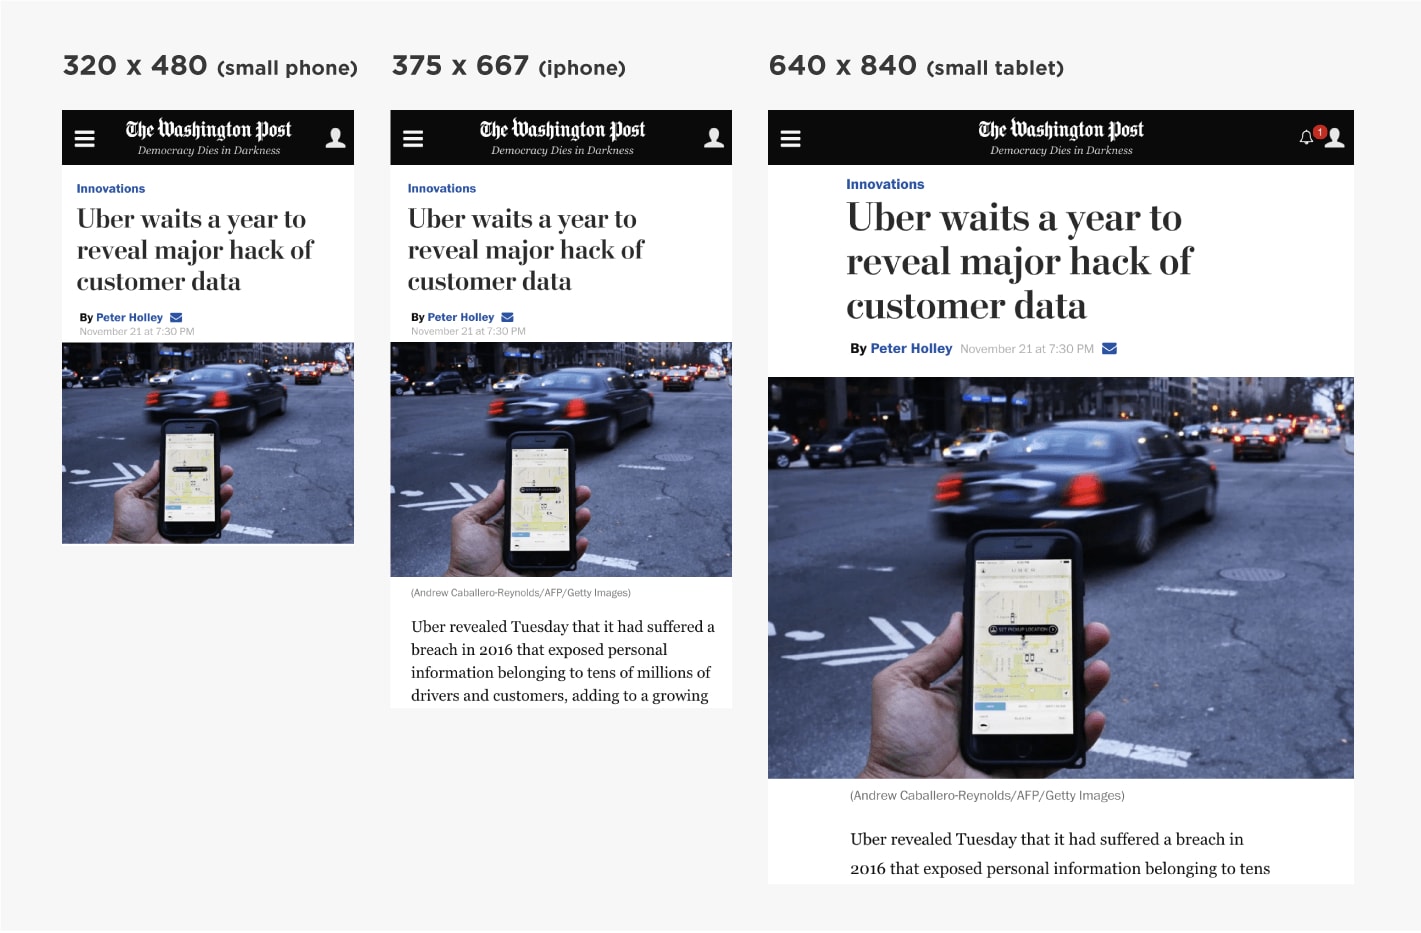
Make Your Content Insanely Easy to Read on Phones

Do users have to pinch, scroll or squint to read your mobile content?

So they will press the ‘back’ button.

For example, you don’t want your content to look like this:

4_6_legibility-on-mobile-devices

Yes, this page is optimized for mobile. But it is hard to read.

You need your font to be big, bold and legible:

So:

How can you make your mobile content more readable?

  • Use at least 14px font (I prefer 15 or 16)
  • Use short paragraphs (1-2 lines per paragraph)
  • Go with a line length between 50-60 characters
  • Make sure there’s tons of contrast between text and background (people use phones outside, which can make low-contrast text harder to read)

It is also helpful if your content is good and interesting but that is another thing.

Use HTML5 For Video and Animated Content

Do you embed videos in your content?

Does your page perform all sorts of fancy animations when people visit?

If the content is coded in flash, it will not work on mobile devices.

Instead, you need to code that up in HTML5.

Don’t Forget the “Viewport Content” Tag

Do you use responsive design?

If yes, do not forget the viewport meta tag.

This tag changes the size of your page based on the device of user.

Google also suggests that you setup your viewport meta tag like this:

4_8_viewport-tag

If you will forget this tag or you will not configure it correctly. Your site will look funky to mobile users.

4_9_no-viewport-tag

You have double check it to know that you have set this up.

Implement These 3 Quick Mobile UX Hacks

These are 3 quick tips designed to boost the usability of your site for mobile Google searchers.

1

Make Header Images Really Small

Mobile Google users want to get answer now.

It means you do not have to use giant header images like this:

4_10_mobile-ux-hacks

So delete them or make them smaller for mobile users or visitors:

Use Lots of “Negative” Space

Negative space is the space between buttons, text and design elements. It is really important for mobile websites.

On a desktop, you can use a covered page.

But on a phone, you cannot get away with a covered page.

4_12_negative-space-on-mobile

It is very important for content which you want to rank in Google. If a Google visitor is having trouble to read your content or finding what he needs. He will bounce your site and will return to search results.

And using a lot of negative space, like this, is another way to reduce the bounce rate and improve the dwell time:

4_13_negative-space-improves-dwell-time

Put Social Share Buttons as a Tab Bar

The fact is: social sharing buttons can increase the amount of shares of your content.

Social share buttons work well when they are in a sidebar:

They do not distract but if someone wants to share, the buttons are right here.

The problem is: the setup is not possible on mobile.

Therefore, I suggest using a tool like Sumo that shows the social icons as a tab bar at the bottom of the page.

Image

Simple.

CHAPTER 5:Advanced Mobile SEO Tips and Best Practices

Now your site is mobile optimized, it’s time to take things to the next level.

In this last chapter of my guide, I shall give you an advanced mobile SEO tips, strategies and best practices.

Fix Your Mobile CTR, Get More Traffic

I do not need to tell you that your organic click through rate is a Huge Google ranking factor.

If Google will observe that the mobile users do not click on your result, it will downrank you.

But how do you know that your CTR is up to the mark? Here is the process:

First, go to the Google Search Console’s Search Analytics section.

Image

Next, click “Compare Devices”.

Image

And choose “Desktop” vs. “Mobile” and hit “Compare”:

Image

Now, take a look at how your desktop and mobile CTR size up.

Image

It is a normal thing for your desktop and mobile CTRs to be different here.

If you notice that your desktop CTR presses your mobile CTR for a certain keyword, search for that keyword in Google using your phone.

It can be that the mobile SERPs have more ads which are crowding organic results.

Or it can be your title tag is cutting off.

Either way, you will come with an insight which you can use to increase your mobile CTR.

Turn Mobile Donkeys Into Unicorns

Google’s Mobile first index means that Google will put more weight on mobile UX signals.

In simple words, if mobile users bounce from your site like crazy, it will put a negative effect on your rankings.

Therefore, I suggest compare your desktop vs mobile bounce rate and dwell time using Google analytics.

It is very easy and well worth.

To do it, login to your Google analytics account. Click Site Content>Landing Pages.

Image

It will show you the most popular pages on your website. Click on a page which you want to get more traffic to.

Image

Then click “Secondary Dimension”> “Device Category”.

Image

It will show you how your UX signals compare on desktop vs mobile.

For example, for this page, my bounce rate and dwell time are almost similar. So this page is probably optimized well for mobile users.

Image

But if Google analytics shows you the big difference between mobile and desktop users, then visit the page on your own phone.

You may find something bad that is causing mobile users to bounce your page.

When you are done, move to the next tip.

Boost Your Mobile Page Speed With These 3 Tips

After Google’s mobile-first update, Google will look into the mobile page speed. Will my desktop speed will still matter? Maybe.

But it will not get that importance as how your website loads on mobile.

Here is how you can skyrocket the mobile loading speed of your site.

First of all, do a mobile speed test at ThinkWithGoogle.com:

Image

This tool is similar to any other speed testing tool. It even loads your site on 3G to create the mobile environment.

It will give you a helpful report that will tell you how long your site takes to load on a mobile device.

Image

And also how to remove the speed breakers.

Image

Here are some other quick tips to try out:

  • Smash your images: If you use WordPress, I suggest installing an image optimizer, like Smush Image Compression. These SIGNIFICANTLY reduce the file size of your images, which can speed up load times dramatically.
  • Implement Browser Cache: Google themselves suggested caching your site to make your site load faster.
  • Get a CDN: CDNs can make page elements (especially images) load 2-3x faster.

Optimize Title and Description Tags for Mobile SERPs

Do you get the majority of the organic traffic from mobile?

Then you need to optimize your title and descriptions tags according to the mobile search results.

Here’s how:

Google provides more title tag characters to work on mobile. But your meta description is short.

(Go figure)

Here’s the exact breakdown:

Desktop
Title: Approximately 70 Characters
Description: Approximately 300 Characters

Mobile
Title: Approximately 78 Characters
Description: Approximately 300 Characters

In short words, if your title tag is 69 or fewer characters, it will not get cut off on mobile or on desktop.

But let’s suppose you get more traffic from mobile. You may want to expand the title tag and take advantage of the extra space. Even if you exceed the desktop characters limit.

For example, your title tag looks like this:

Image

That’s 66 characters. So this title will show in-full on desktop and mobile.

Now suppose you wanted to use a word or phrase that can increase your CTR. Your title tag will be look like this:

Image

That’s 78 characters.

Yes, 78 characters mean that Google will cut your title tag on desktop searches. But it will show up just fine on mobile.

If you have small traffic of desktop users. It may be worth making your title tag longer to increase the CTR.

Should You Implement AMP?

Accelerated Mobile Pages are designed to load quickly on mobile devices. In fact, AMP pages load 4 times faster than non-AMP pages.

As you may know, Google has led the charge on AMP.

Image

As AMP is a Google project, that is why a lot of SEO experts are implementing AMP on their client’s sites.

(It is due to the fact that Google will reward AMP-friendly sites with higher rankings)

Apart from higher rankings, Google also shows a little icon in the search results that may boost your CTR.

Image

The question is:

Does it make sense to use AMP?

The choice is yours, I do not recommend it.

Here’s why:

First, AMP puts SERIOUS limits on your page’s functionality.

Want full control of your ads? Not happening.

How about a lightbox or popup? No.

AMP also puts serious restrictions on CSS. This makes your site load faster but makes your content look like generic.

Secondly, AMP can hurt your link building efforts.

When someone links to your content, those links point directly to your site.

But here’s the deal:

When someone links to your AMP pages, this link will give a link to Google.com domain

Image

In other words, AMP can cost you in the link department as well.

So links to your AMP pages will boost Google domain authority, not yours.

Finally, AMP may not last.

LTE is already SUPER fast. And 5G is just around the corner.

So the idea of jumping through a thousand methods to increase in mobile loading speed can make sense. But moving forward makes more sense.

Bottom line? Unless you have a compelling reason to do so, I do not suggest AMP for most publishers.

Use Schema Structured Data To Stand Out in Mobile SERPs

As you may know, mobile SERPs show the search results like cards:

Image

And these cards make Schema.org structured data super effective.

Why?

Well structured data can hook you up with recipe images, review stars and event dates in SERPs. It can increase your organic CTR.

For example, look at the downshiftology mobile results from ToddyCafe.com. this contrast is not powerful on desktop:

Image

In a nutshell, if you want more clicks from mobile Google searchers, implement well structured data.

Now It’s Your Turn

So that’s it for my guide to mobile optimization.

I hope you enjoyed it.

What are you doing to get your site ready for mobile SEO?

Or maybe you have a question about something from today’s guide.

Either way, let me know by leaving a quick comment below.

Do not forget to share this post.

Related Posts:

  • SEO this Year: The Definitive Guide
  • How to Score 100/100 in Google Pagespeed Insights
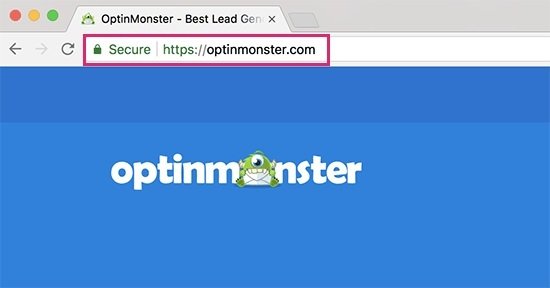
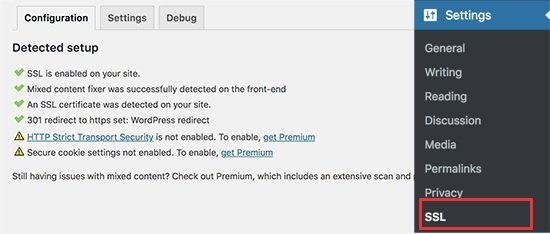
  • How to Add SSL and HTTPS in WordPress Website
  • How to Fix Eliminate render-blocking JavaScript and CSS in WordPress
Arsalan Rauf
Arsalan Rauf

Arsalan Rauf is an entrepreneur, freelancer, creative writer, and also a fountainhead of Green Hat Expert. Additionally, he is also an eminent researcher of Blogging, SEO, Internet Marketing, Social Media, premium accounts, codes, links, tips and tricks, etc.

www.greenhatexpert.com

Filed Under: Blogging, Guide, SEO, WordPress Tagged With: mobile seo checklist, mobile seo definition, mobile seo google, mobile seo guide, mobile seo meaning, mobile seo techniques, optimize website for mobile free, what is mobile optimization

Best Online Grammar Checker Tools for WordPress in 2024

Last Updated on December 30, 2023 By Arsalan Rauf

In this post of Green Hat Expert, we shall discuss the best online Grammar Checker tools for WordPress in 2024.

Best Online Grammar Checker Tools for WordPress

Are you searching for the best online grammar checker tools for WordPress this year? There are several browsers that support built-in spell checking but they do not check grammar and readability. In this post, we are sharing the best grammar checker tools which you can use with WordPress.

Why Add a Grammar Checker Tool for WordPress?

It is due to the fact that most experienced writers also make mistakes while writing.

If you will do proofreading of your articles before publishing them, it will lead to small careless errors.

There is another way to get over this problem if you read your articles loud.

If you listen to your own voice, it will help you to find mistakes and you can also improve the readability score of your articles.

You need a grammar checker tool if you want to get help with spelling and grammar.

These tools can detect your grammar and spelling mistakes instantly.

So it will also save your time from proofreading and it will also improve your content.

Let’s take a look at the best grammar checker tools for WordPress which you can use.

  1. Grammarly

grammarly for wordpress

Grammarly is a professional grammar checker tool that you can use as an addon. The addon is available for Google Chrome and Firefox.

Grammarly checks your spelling and grammar errors when you compose your post.

You will find an indicator at the bottom right corner of the writing area. When you click the indicator it will show you the number of errors you make while writing.

It will highlight grammar, spelling and contextual errors with an underline when you write.

I am also using Grammarly for grammar checking.

There is a downside of Grammarly, you have to go to the text editor in order to proofread it. If you do not like it, you can always go for the best Grammarly alternatives.

  1. Ginger

ginger grammar checker tool

Ginger is another best online grammar checker tools for WordPress which improves your writing skills and also boost your productivity.

It is also available as a browser addon that gives good user experience.

It shows a tiny icon at the bottom right corner of writing areas including Gmail, Facebook and WordPress post editor etc.

Ginger starts checking your mistakes when you write content and highlights errors with context.

Additionally, it also has some few drawbacks, you have to go to the text editor in WordPress.

For better experience, you need to click on the icon (edit in ginger).

  1. After the Deadline

After the Deadline WordPress Plugins

After the deadline is a Google chrome extension which is another grammar checker tool.

It has built-in spelling checker along with readability and optional grammar check.

After the installation of the addon in your browser, you need to go to the options.

It will take you to the addon settings page where you can check the options of your choice.

The spellcheck icon of this tool is available at the bottom right corner of the editor and you can run it while writing your content.

  1. Hemingway Proofreading Tool for Writers

Hemingway Editor Proofreading Tool for Writers

Hemingway is another web based grammar checker tool or text editor. So it will not work in your WordPress post editor.

It is free web based editor which enables you to check grammar, spelling and readability of your articles.

Additionally, do not consider it only a grammar checker but also a style checker.

It shows you your readability score so that you improve the readability score of your content.

Hemingway app also suggests improvements in your content and it is the best grammar checker app.

It has distraction-free and clean layout that helps you to assess your content quickly before publishing your content on WordPress.

Hemingway app is also available in paid version for both Windows and Mac.

These versions allow you to post content directly to WordPress.

  1. Language Tool

LanguageTool Style and Grammar Check

Language tool is also available as a free addon for Google Chrome, Firefox, Libre office and Google Docs etc.

It is also a web based editor and we can also call it a complete desktop app.

Language tool has more than 20 languages including English, German, Polish and Russian etc.

So you can use this tool for various languages and correct your spelling and grammar errors.

In addition, this feature makes it beneficial for multilingual websites and multilingual writers or authors.

Note: The free version of this tool is limited to 20,000 characters per check. If you want to get more features, you need to switch or upgrade to paid plans.

  1. Jetpack

jetpack for wordpress

Jetpack is a WordPress plugin that has a number of modules.

You can add proofreading feature to your WordPress post editor using this plugin.

Go to Jetpack > Settings page for extended grammar check. You will find spelling, grammar and style section under the writing tab. You can enable different options for proofreading such as style rules.

The user needs a WordPress.com account if he wants to use Jetpack which is a downside of this plugin.

Additionally, you also get a number of features that you may not require.

I hope that after reading this post, you will get the best grammar checker tool for WordPress.

You may like our post on Best Managed WordPress Hosting.

Do not forget to share this post.

Arsalan Rauf
Arsalan Rauf

Arsalan Rauf is an entrepreneur, freelancer, creative writer, and also a fountainhead of Green Hat Expert. Additionally, he is also an eminent researcher of Blogging, SEO, Internet Marketing, Social Media, premium accounts, codes, links, tips and tricks, etc.

www.greenhatexpert.com

Filed Under: Blogging, SEO, WordPress Tagged With: best grammar checker app, best grammar checker app for android, best grammar checker for mac, best grammar checker software free, best grammar checker software free download, professional grammar check, whitesmoke grammar checker, whitesmoke writer grammar

Best Managed WordPress Hosting in 2023

Last Updated on December 7, 2023 By Arsalan Rauf

Best Managed WordPress Hosting in 2023

To manage a WordPress blog is a hard nut to crack. You need to focus on different things including marketing, content, social media and so on. Before you pay attention to these things, you need to focus on the speed of your WordPress website. Whether it is running smoothly or not and your hosting is good enough for you and not creating issues for you.

Nowadays, there are several companies that are giving affordable solutions to their customers. The cost of the hosting is less than 5$ and you will get a shared hosting. It will be a great solution for you to take a start. If you are running a business site, you need a high-quality WordPress hosting to manage your website.

By using the word high-quality hosting, it means best managed WordPress hosting. It will be online for specific WordPress users. So it has become an eminent option among the users of WordPress and developers of websites. You can take a start by using WordPress.com VIP, but there are a number of options available in the market too.

If you want to solve your problem as early as possible so select out of these top 3 hosting providers we recommend and why:

1. WPEngine:

WPEngine is the best managed WordPress hosting for users and it is perfect for everyone. You will get everything you need and you will also get developer friendly tools. Additionally, you can also use WPEngine coupon to get 50% off or discount “wpkube50”.

2. SiteGround:

SiteGround is another best managed WordPress hosting for beginner as well as for advanced users. It is easy to setup and gives you outstanding support. You get support within 10 to 15 minutes and the rates are unshakable. These qualities enable it to become the best host for WordPress bloggers. You do not need a Siteground Coupon to get 60% off because you will get it without using a coupon.

3. FlyWheel:

FlyWheel is another best managed WordPress hosting which you will not change. It is due to the fact that they are perfect for small business, bloggers and agencies. It also gives a number of qualities and unique features including demo site, billing transfer, and blueprint.

Here is a quick comparison of the 3 Best managed WordPress hosting providers listed above (last updated on January 19):

  Name Loads Under: Suitable for (visits / month)Cost per month
 WPEngine WPEngine 0.26s 25,000 $29
 SiteGround SiteGround 0.4s 10,000 $9.95
 Flywheel Flywheel 1s 5,000 $15

Best managed WordPress hosting gives faster loading times along with better security and professional WordPress support. But quality comes with cost so it is a bit costly than other shared hosting companies. Managed WordPress host’s servers aim to give better and faster performance of WordPress with easy configuration.

In this post, we are going to give you basic information about 8 trusted and best WordPress managed hosting services. So it will be an easy task for you to select the hosting of your own choice for your own business.

What is Managed WordPress Hosting?

Managed WordPress hosting is only designed and optimized for the sake of WordPress websites. In other words, this hosting will take care of all the technical aspects of WordPress for your convenience. It will also enable you to create as well as share the great content with your users. You will get rid of the worries of site updates, up-time, site speed and other problems.

There are several hosting companies which are using their own CDNs and server caching. It will save you from the burden of cache plugins including WP Super Cache and W3 Total Cache plugins. It is also suitable for those users who do not possess technical skills and do not have time to manage the server.

The Pros of Managed Hosting for WordPress

Security:

Premium managed hosting will give you bulletproof security. It will give you a tight layer of security which will save you from hacking, DoS, malware and other security attacks.

Expert Support

It will not be a fair statement that shared hosting providers consist of poor support. There are many companies which have staff that is well-trained and have knowledge of WordPress. Still, they cannot give you support of different things including site functionality, performance and WordPress errors etc. But opposite is the case with managed hosting support, they will give you expert WordPress assistance.

Speed:

Speed is a part and parcel of site ranking and there are many things you can do to improve it. It includes the usage of cache plugin and content delivery network including MaxCDN and reduces the size of images.

Most of the best managed WordPress hosting providers enable content caching at server level which gives you relief from external cache plugins. If you will use a normal plan, there is a chance that you may need CDN to improve the speed of website.

Daily Backups:

They take a backup of your website on daily basis. It includes data, content, themes and plugins which you can access from your dashboard. It will save you some bucks if you are paying for backup or maintenance including BlogVault and Vaultpress.

Additionally, they also create a restore point and if you face any problem. You can restore your site to the previous version when your site was fully functional with one click.

Automatic Updates

You do not need to update your WordPress files to the latest version because they will do it for you. Whenever the update is released and you do not have to pay for this update. Your managed WordPress hosting will do it for you.

No Downtime

It will never go down whatever the amount of traffic is, on your website.

The Cons of Managed Hosting for WordPress

Expensive

First of all, it is expensive from shared hosting and there is a marked difference between shared and managed hosting. An average shared hosting plan costs 3.95$ only and managed hosting can be of 30$.

Limitations:

They do not allow you to use any plugin that uses resources. It includes cache plugins including WP super cache and W3 Total cache. We are going to give you a list of disallowed plugins ­shared by managed hosts.

cPanel:

If you were using shared hosting and now moving to managed hosting, you will feel irritation to use the portal of managed hosting. It is because it is a bit different.

Top Managed WordPress Hosting Providers:

1: Hostinger

In 2024, Hostinger is the most affordable hosting option that you can use for your blog or e-commerce website.

2: WP Engine

(Loads under 0.26s, starts at $29, and comes with fantastic support)

Managed WordPress Hosting, Perfected WP Engine

WPEngine is one of the best managed WordPress hosting providers in the market. The price is expensive if we compare it to other hosting providers. It is because this company gives you fast loading, secure servers and great support. They have a team which can keep your website secure as well as fast. Therefore, it is the best and popular hosting company.  HTC and Foursquare and SoundCloud are using it and they are brands.

It can make backup with one-click and restore process is also available in one-click. This feature is available in all hosting plans. Additionally, it will scan and monitor your website to save it from hacking attempts and in case of hacking, it will fix it free of cost. Additional features

  • Staging area

It creates a copy of your live website so you can test new plugins and themes before making changes to your live site.

One Click Restore Point

One click restore point is helpful when something goes wrong with your website, theme or plugins. So you can use one click restore point to get the previous version of your website.

No Need for Cache Plugins

WP Engine has custom built ever cache technology which helps WordPress site to make fast enough for Google and other search engines.

Hacking Scans

If your site gets any attack, the company will fix it for you.

Pros:

You can add CDN easily to your site with one click and will get support for WordPress site. They have extremely fast and secure servers. Evercache is integrated and no cache plugins are required. In addition, they do regular attempts to scan hacking attempts in order to make your website secure and safe.

Cons:

WPEngine is costly than other managed WordPress hosting providers. It does not give flexibility in the plugin department.

WPEngine Coupons

Use this WPEngine coupon to get 50% off (wpkube50)

  1. SiteGround

(Loads under .4s, starts at $7.95, and usually responds to support questions in 15 minutes)

SiteGround WordPress Hosting Top Security and Speed Managed

Note: the support of SiteGround is super fast and priority support is not available in startup plan. Premium caching solution and one click staging is also not available in startup plan. So if you want to use these features you need to select GoGeek plan.

SiteGround is another best managed WordPress hosting provider and it is for those who cannot afford expensive hosting providers. SiteGround provides speed solutions and unique WP security at a reasonable price. In addition, it also gives all the shared hosting features including free domain name, WordPress installation, free WordPress migration, support and email accounts for 3.95$ only for one month.

Other features include:

  • Unique WordPress Autoinstaller— Easy to setup.
  • Autoupdater — It will update WordPress Core files and all of your plugins
  • WordPress SuperCacher — To improve the site performance.
  • WordPress staging — to test the new features before making it live.
  • HHVM— to improve site speed and it will load faster in 200ms only than PHP. This feature is available only for cloud hosting.

WP-CLI comes pre-installed — to do multisite management if you want to.

Pros:

Gives autoupdate, autoinstall, staging features and caching for a low price. It also has WP-CLI pre-installed, Git and WordPress migration without additional cost.  The security team is active and they regularly run security checks.

Cons:

It comes with Cloudflare and if you want to use MaxCDN, you will have to use plugins like WP total cache or W3 Total cache.

  1. Flywheel

(Loads under 1s, costs $15, amazing dashboard, a lot of useful features, and a ton of happy customers)

Flywheel Managed WordPress Hosting for Designers and Agencies

Flywheel is another best managed WordPress hosting which is designed by creative minds to fulfill your needs. It focuses on your workflow and makes the working of web designers smooth. There are features like billing transfers to your clients, easy collaboration and staging sites etc. In addition, you can manage all your websites with one dashboard and it is an easy task.

It’s Like a Design Party on The Internet

Flywheel has staff of WordPress experts and most of them are designers so do not worry about your problems. The prices are reasonable and suit your needs. It includes pay per site plan which costs you 15$ per month. Additionally, there are bulk plans are also available for you if you are a serious developer. It will cost you 100$ per month. Custom plans are also available.

Key Features:

  • Lightning speed– Designed specifically for WordPress sites and has unique features that affect your website with CDN.
  • Nightly backups –It will automatically make backup of your website on daily or nightly basis.
  • Around the clock security – it will monitor your websites constantly to avoid hacking attempts and malware and will fix the problems free of cost.
  • More intuitive SFTP – they are working and collaborating with other designers to make the task easier.

Pros:

it loads your page quickly and you can use plugins of your own choice. Flywheel has a highly qualified staff which is expert in WordPress which can take care of your problems and needs.

Cons:

It is also more expensive than shared hosting and it will be a bit difficult to learn a new dashboard. According to our point of view, it’s dashboard is super easy to use.

Flywheel coupon:

Use flywheel coupon to get 20% off “flykube”

  1. Bluehost WP Hosting

(Loads under 2s, starts at $12.49, and comes with bad customer support)

Optimized Hosting for WordPress - Fast, Secure, Simple - Bluehost

Bluehost is another best managed WordPress hosting provider which is available at reasonable price. The basic plan of Bluehost gives 100 million visitors per month with 2GB RAM, 30GB storage and 30GB backup storage. It has enhanced cPanel, 24/7 support from WordPress experts and you can add 5 WP sites. It also offers sitelock CDN with SiteLock pro. The minimum price is 2.95$ for the first month and will cost 24.99$/month after the first month.

Features of Bluehost:

  • VPS-based — Built on a VPS platform, gives enhanced performance and site speed.
  • Includes ManageWP — Can Manage and migrate multiple WordPress sites all from within one hosting plan.
  • Robust security— Gives SiteLock, an advanced CDN, and SiteLock WAF.
  • Expert support — All hosting plans include 24/7 access to WordPress experts.
  • Enhanced cPanel— Makes the transition from shared to managed hosting more seamless when working within a familiar interface.

Pros:

Affordable, VPS, SiteLock security, and Manage WP for added convenience. Gives 24/7 support with enhanced cPanel.

Cons:

It is more expensive than some other managed WordPress hosting providers. It may not give as many features as compared to other plans and may not suitable for largest developers.

  1. Kinsta

Kinsta Managed WordPress Hosting - Powered By Google Cloud

Kinsta is another fast and best managed WordPress hosting for WordPress users powered by Google cloud platform. The best feature of this hosting provider is unlimited visitors and unlimited page views on all plans. If you are a beginner in online business so you will not have to move to another hosting plan if your website starts receiving more traffic.

Kinsta has a premium quality customer service which is working behind the scenes to give the best results. Their team consists of professional developers who work with WordPress on daily basis.

Some other features on offer with Kinsta hosting include:

  • Free Migrations– it gives uninterrupted service with free site migration for multiple websites. You need to send the request and Kinsta will take care of the rest. The dashboard of Kinsta will enable you to monitor the migrations and you can also manage them on your phone.
  • Next-Gen Infrastructure– The company is powered by the Google Cloud Platform that offers automatic scaling, LXD containers, SSH access, PHP 7, WP-CLI automation, and Git. It also has a server level caching solution which can speed up your website and you do not have to use any caching plugin.
  • Top Notch Security– Kinsta is based on multi-layer protocols on the back-end and this quality makes the site more secure 24/7. It also monitors your website every minute 1440 times in a day in order to run it smoothly for you.

Pros:

Powered by Google cloud platform with server level caching service for your WP site that gives an outstanding performance. The support team is dedicated and works around the clock and also monitor your website on daily basis. Additionally, they do not charge extra for extra page view or visitor.

Cons:

Kinsta has service charges that starts from 100$ per month on their business plan 1.

  1. Pagely Hosting

(Loads under 0.09s, starts at $499, and overall perfect hosting for big businesses)

Managed WordPress Hosting by Pagely

Pagely is a famous and best managed WordPress hosting that pay attention to security. It focuses on high class security and they also pay attention to the site speed so that they can load faster. It is replete with features including automatic plugin and WordPress updates, daily backups, press Armor custom WP security configuration that will keep the harm at arm’s length.

In addition, you can use any app or plugin of your choice. The price starts at 499$/month for 30 websites and 200GB bandwidth with all features. It includes:

  • Convenient updates: Automatic WordPress Core and plugin upgrades with minimal interaction needed.
  • Varnish caching: Advanced varnish caching layer that loads the site in millisecond.
  • Free reign on plugins: Use almost any plugin or theme you want to use.
  • Complete site scans: Gives real-time malware scanning and removal plus redundant firewalls and DDoS protection.
  • PRESSCDN: This service starts at $9/month.

Pros:

Security focused, rich in features, best managed wordpress hosting with open attitude towards themes and plugins. It offers varnish caching and PRESSCDN to load site quickly.

Cons:

It is more costly than some other managed hosting providers.

  1. Pressable

(Loads under 2s and starts at $25)

Managed WordPress Hosting from Pressable

It is also known as Zippykid, it is a unique managed hosting service for WordPress and it gives 100% customer satisfaction. Therefore, it is rated no 1 in customer satisfaction. It has an appealing list of clients and testimonials, and the services are available on custom Reckspace hardware. The price plan begins with 25$ per month and it can handle 15k shared pageviews per month.

All plans include the following features:

  • Rackspace Hybrid cloud— The best servers to store your sites.
  • Daily backups— Your content will always be backed up automatically and in time.
  • SFTP access— Secure file transfer protocol so your data will remain safe.
  • SSL support— So you can set up shop and keep your customers secure, too.
  • Malware scanning and removal— Never feel the effects of malicious hackers again.

Pros:

It is high quality and reliable hosting for businesses and developers. It includes SSL, CDN, malware scanning and removal for convenience.

Cons:

When we consider it’s price, it may not offer the best managed WordPress hosting plans and not suitable for those who want extraordinary features.

  1. WebSynthesis

Synthesis Managed WordPress Hosting by StudioPress

Websynthesis is another best managed WordPress hosting and it was started by CopyBlogger Media. They have produced the most popular products on the internet. It includes Genesis Theme Framework and ScribeSEO. Synthesis is using NGINX architecture to maintain the traffic and it consumes 1/8 of the resources. It has MediaTemple dedicated servers and the plan begins at 47$ per month.

Some of its features include:

  • High quality servers— Get superior uptime and page load speed.
  • SEO— Keyword and social media research included.
  • Robust security — Enhanced security defenses.
  • Content marketing — Content and website optimization included.
  • Site Sensor uptime monitoring — Keep tabs on site uptime at all times.

Pros:

It uses NGINX architecture in order to load the site faster and gives SEO and content marketing tools. Uses site sensor uptime monitoring and enhanced security features for ultimate protection of your site and content.

Cons:

The price tag of the product is higher than other managed WordPress hosting and can go out of reach of newer developers.

  1. WordPress.com VIP

Services – WordPress.com VIP Enterprise content management

WordPress.com VIP is not normal managed WordPress hosting provider. It can cost 5000$ per month and it is a wonderful choice for high traffic websites including MSNBC, TechCrunch, GigaOM and Time. It is also ideal for those people who are looking for enterprise level solution.

Some features include:

  • SaaS— Turnkey infrastructure lets you build your site with confidence.
  • CDN— Security is a top priority.
  • Hourly backups— You will never lose a bit of data.
  • Flat pricing— Pay monthly rate to get unlimited traffic, bandwidth, and storage without paying a penny more.
  • 24/7 support— will answer your most pressing middle-of-the-night WordPress questions.

Pros:

It has SaaS, CDN, backups, 24/7 support all for a flat price.

Cons:

It is suitable for enterprise customers because the price tag is too much. Additionally, it is not appropriate for new developers and smaller website developers.

Do You Really Need Managed WordPress Hosting?

Best managed WordPress hosting is a perfect for both small and enterprise/high traffic website owners. If you are a blogger and developer, SiteGround is the best solution for you. The cost is less than other managed hosting companies and gives high quality support.

First of all, you need to know your achievement and priorities. If you are thinking to create a website that will drive a lot of traffic to your site, you need to get a managed host for it. It is because it will allow you enough traffic volume with stability for sites especially WordPress websites. If you are building a site for the first time and you purchase a managed host it may not be helpful.

You need to consider the customization and level of support you want. Shared hosting gives one click installations for your convenience, these can preload your website with settings that you may not like. Especially if you are a developer. If you will use a managed host, it will give you an opportunity to make smart decision while installation including security. It depends on your approach and achievement, what you want to do?

My Top Picks

After reviewing all the managed hosting providers, we consider every hosting provider as the best managed WordPress hosting. Let’s have a bird’s eye view of it.

SiteGroudn is for developers and bloggers who need features including SSL support, staging area, git integration at low price. They offer free migration, pretty inexpensive, and support team is quick. Most of the questions are answered within one or two hour. Live chat guys are not knowledgeable. So you have to go through ticket support system for technical questions instead of live chat group.

FlyWheel is for people who are not developers. Flywheel came into existence pretty late but they established themselves quickly. They offer managed hosting solution for WordPress, designers, small business owners and bloggers etc and easy to use. If you do not want to stuck with technical issues choose Flywheel. The dashboard of this company is very easy to use as compare to other companies. In short, Flywheel is not for developers but for those who can configure and setup WordPress sites.

Are you a developer? Use Pagely but they are expensive, it costs $499 / month).

Last year, Pagely had moved their servers to Amazon and since then they are providing world-class services for small blogs, membership sites, WooCommerce stores, SaaS solutions and global corporate sites. Their infrastructure technology has automatically daily backups, HHVM, built-in redundancy, real time malware monitoring, SSL acceleration, Press CDN, Press Armour and developer friendly tools including SSH, WP-CLI, GIT, Staging, REST API etc.

If you want everything, use WPEngine or Kinsta. These options are for you if you do not want to compromise the quality of support and developer friendly tools. We have been using WPEngine for a long time and did not face any trouble.

You can share your hosting providers and ideas in the comments section.

Do not forget to share this post.

**Data for speed tests data was taken from designbombs.com

Arsalan Rauf
Arsalan Rauf

Arsalan Rauf is an entrepreneur, freelancer, creative writer, and also a fountainhead of Green Hat Expert. Additionally, he is also an eminent researcher of Blogging, SEO, Internet Marketing, Social Media, premium accounts, codes, links, tips and tricks, etc.

www.greenhatexpert.com

Filed Under: Blogging, SEO, WordPress Tagged With: best cloud hosting for wordpress, Best Managed WordPress Hosting, best wordpress hosting, fastest managed wordpress hosting, fully managed wordpress hosting, Managed WordPress Hosting, managed wordpress hosting godaddy, siteground managed wordpress

How Google AdSense Pays in India

Last Updated on August 20, 2022 By Arsalan Rauf

Google Adsense is one of the famous monetization techniques used by website owners as well as bloggers. At times, it may be confusing for new users. Despite it has an easy to use dashboard and its help pages. There are always some problems regarding sign up, account approval, account ban and optimization etc.

There is no doubt in saying that Adsense is a plug and play advertising network. It does not mean that you do not need to learn anything about it. Learn about it and take the full advantage of the opportunity. It allows you to make a lot of money instead of pennies.

People often ask:

How does Google Adsense pays in India?

Does it pay by cheque or through local bank transfer or EFT?

AdSense Payment in India:

Adsense supports different payment options for different countries around the globe. It supports Western Union Quick cash, EFT transfer and cheque facility. It is not an easy task to get an Adsense account in countries like India and Pakistan as compared to USA, UK and Australia. It is because of spamming and fake Adsense account in Pakistan and India.

In India, Adsense was offering Cheque and EFT in the previous years. They converted your earning into INR and then make your payment. Usually, the Adsense conversion rate of USD to INR is high so you may not find it a problem for you. Adsense cheques need time to reach India from 10-15 days. It takes a couple of days for its clearance.

Now Adsense has increased its payment options in different countries and they have also introduced EFT payment for Indian users or publishers.

If you are a beginner at Adsense, you need to keep some pin points in your mind:

  • While signing up, make sure all details are accurate (name, address, etc.)
  • Your name should be the same as that you used on your bank account. The name on your AdSense cheque will be similar to your account name.
  • AdSense will send a PIN number to you at the address you used when signing up. It will be functional for an address verification too, before generating a payment.
  • With Adsense EFT payment, you can get payment to another payee name as well by changing it.
  • Adsense will soon add telephone support for all AdSense publishers. This system is already in beta testing since June, 2014.
  • You can also refer to the official guideto read more about AdSense payment policies.
  • You can update your payment preference before the 15th of a given month.
  • The user can also put a minimum payment threshold for your payment, and it should be greater than $100.

You can read a piece of writing from the official AdSense India payment page below:

AdSense users in India will get standard delivery checks mailed via the local courier service Blue Dart for no additional charge. Cheques mailed by Blue Dart should reach within 10-30 days of the cheque date. Blue Dart is not able to service all areas throughout India. If you live in a location, they do not service, your cheque will be sent by Registered Post and should arrive at you within 2-3 weeks of the mailing date.

If the cheque is already issued, you can use Bluedart tracking to keep yourself update for your cheque status. If you have not got your AdSense cheque within 60 days of the issue, you can use this form to request a re-issue of the cheque.

I hope that you liked this post about how Google Adsense pays in India. You have got the answers. Still have questions? Do not hesitate to ask in the comment section.

Do not forget to share this post.

Arsalan Rauf
Arsalan Rauf

Arsalan Rauf is an entrepreneur, freelancer, creative writer, and also a fountainhead of Green Hat Expert. Additionally, he is also an eminent researcher of Blogging, SEO, Internet Marketing, Social Media, premium accounts, codes, links, tips and tricks, etc.

www.greenhatexpert.com

Filed Under: Blogging, WordPress Tagged With: adsense wire transfer sbi, google adsense india, google adsense minimum payout, google adsense payment date in india, google adsense payment not received, google adsense payment settings, how to receive payment from google adsense, payment threshold adsense india

How To Enable Direct Bank Transfer for AdSense Payment in India

Last Updated on August 20, 2022 By Arsalan Rauf

Earlier I shared the post about how Google Adsense pays in India. I told about Adsense that they are planning to enable EFT payment for Indian Adsense users. EFT is aka Electronic fund transfer. It will make sure that your Adsense earnings will be deposited into your account directly. It will save you the time for receiving the cheque and cheque clearance time. Being an Adsense publisher, will be helpful for you and will make your work paperless. In this post, I shall explain everything you need to get EFT payment for your Adsense account.

Also read:

  • Best WordPress plugins to Protect Adsense Account

How to Configure Wire transfer for Indian AdSense publishers

The whole setup process will take more or less 15 minutes. I highly suggest it do that to save time for your future payment. Follow the instructions step by step, and keep your mobile phone near you. As you may need to call your bank customer representative to get the Swift and IFSC code. By using direct bank deposit method, you can change the payment threshold according to your own choice. And can hold the payment for up to 1 year. So let’s go through this quick tutorial to enable EFT payment for your Adsense account.

  • Log in to your AdSense account and Click on the gear box and select payments.
  • Click on Payment settings under payment page.
  • Click on add a new form of payment.

You need to enter your bank account details on the next screen. Two important details you need to get from your bank. It includes Swift BIC and IFSC code. In order to get Swift and IFSC code for your account, simply call your bank representative and ask for it. Most of the people use ICICI bank saving account, they use following swift code to get payment: ICICINBBNRI. If your bank is ICICI bank, then they will give you two swift code ICICINBBNRI for INR and CHASUS33XXX for USD. You will enter the swift code for INR and the bank will take care of the conversion. If your bank account is different from ICICI then I recommend you re-confirm it from your bank customer care. Current account for ICICI bank, you need to use ICICINBBCTS.

Click on save payment and that is all.

Now you will get money directly from your bank account. There are some more detail that you need to know due to the updated payment policy of Adsense.

  • You can update your payment method before 15th of any month.
  • You can now use any AdSense payment threshold greater than minimum ($100) payment 100$ is the minimum threshold to set.
  • You can hold your payment until any specific date; maximum up to 1 year. (Though I do not recommend using this feature, as you may face issue if AdSense decides to ban your account).

Direct bank deposit feature is used by most of the Indian Adsense publishers and it makes it easy. If you want to update your Adsense payment settings, log in to your Adsense account and update the payment settings.

FAQ about AdSense EFT Payment:

  • What is the minimum payment threshold for EFT payment?
  • Minimum payment threshold is $100
  • Is Pin verification necessary after AdSense introduced EFT payment?
  • Pin verification is essential process from AdSense to verify your address, so yes; it is!

In case if you are using another bank account such as HDFC, SBI and Axis so share the swift code in the comment section. So it will be beneficial for our other users. Do not forget to share this post with other Adsense publishers in India.

Arsalan Rauf
Arsalan Rauf

Arsalan Rauf is an entrepreneur, freelancer, creative writer, and also a fountainhead of Green Hat Expert. Additionally, he is also an eminent researcher of Blogging, SEO, Internet Marketing, Social Media, premium accounts, codes, links, tips and tricks, etc.

www.greenhatexpert.com

Filed Under: Blogging, WordPress Tagged With: adsense bank account verification, adsense payment paypal, adsense payment youtube, eft payment in india, google adsense payment date, google adsense payment not received, google adsense payment settings, how to receive payment from google adsense

How to Get a Free SSL Certificate for Your WordPress Website

Last Updated on August 21, 2022 By Arsalan Rauf

How to Get a Free SSL Certificate for Your WordPress Website

Do you want a free SSL certificate (HTTPS) for your WordPress site?

Everyone needs an SSL certificate to accept online payments and secure their site during this task. Starting today, July 1st, 2018, Google Chrome will show all sites which are not using HTTPS as insecure. In this post, I shall show you how to get a free SSL certificate for your WordPress site with ease.

What is SSL?

SSL refers to Secure Sockets Layer. It is an internet protocol for securing data transfer between the browser of the user and the website they are visiting.

Every web user transfers info when they visit sites. This information can often be sensitive such as credit card information, payment details, or login details.

Using the normal HTTP protocol means this information can be taken over by rogue people. This is where SSL or HTTPS is useful.

Websites using HTTPS require an SSL certificate issued by one of the recognized certificate issuing authority. This certificate is verified and highlighted in the browser of the user’s address bar with HTTPS and green secure sign instead of using HTTP.

ssl secure website

Do I need an SSL Certificate for my WordPress website?

SSL / HTTPS is suggested for all websites on the web. However it is absolutely needed for all websites that collect user information such as credit card information, login information, payment details and so on.

If you are running a membership site, an online store, or ask users to log in, then you need to get an SSL certificate straight away.

Most online payment services also ask your website to use SSL/HTTPs before you start receiving payments.

Apart from security, SSL certificate also gives a positive impression of your brand on your visitors. Google also suggests using SSL and provides a tiny bump to SSL enabled sites in the search engine or search results.

Last but not least, if your website is not using a SSL certificate, then Google Chrome will show your visitors that this website is not secure. It creates a negative impression.

not secure ssl

How Does SSL Certificate Work?

SSL protects information by encrypting the data transfer between the website and the browser of the user. When a user visits an SSL/HTTPs website, their browser first verifies if the SSL of the website is valid or not.

ssl security

If everything is working fine, then the browser uses special keys to encrypt the data transfer. This data is then sent back to the intended server (website) where it is decrypted with the help of unique SSL key.

How Much Do SSL Certificates Cost?

The price of SSL Certificates is different from one certificate authority to another. Their cost could be anywhere between $50-200 per year. Some providers provide add-on services with their certificates which may also affect the pricing of your SSL certificate.

If you are going to purchase an SSL certificate, then I suggest GoDaddy. They are the largest domain name registration service in the whole world, managing more than 76 million URLs.

They have simple SSL certificate plans starting from $69.9 per year. After you have bought an SSL certificate, you can ask your hosting provider to install it for you.

How Can I Get a SSL Certificate for Free?

A number of website owners are hesitate to use SSL because of the additional cost. This left many of these sites vulnerable to data and information robbery.

A non-profit project known as Let’s Encrypt decided to fix this by establishing a free certificate authority. Due to the importance of the project, it quickly got the support of major companies including Facebook, Google Chrome, WordPress.com, Shopify and so on.

If you want to install Let’s Encrypt by yourself, then you should have the know how of coding, server knowledge, and Shell / SSH access to use command line tools. Therefore, it is quite difficult for beginners to properly setup Let’s Encrypt SSL on their website.

Thanks to the best WordPress hosting companies are now also offering free SSL certificate or HTTPS along with their hosting plans. Selecting one of them saves you from the irritation of installing a SSL certificate on your own.

Here are the best WordPress hosting companies that provide free SSL certificate with their hosting plans.

  • Bluehost
  • WPEngine
  • GreenGeeks
  • Liquid Web
  • Dreamhost
  • SiteGround
  • InMotion Hosting

If you are already using hosting of one of these companies, then you can turn on your free SSL certificate from your hosting dashboard with ease. You can also ask your hosting provider’s support to set it for you.

If your web hosting company does not offer free HTTPS, then you have to switch your hosting provider and move your site to the hosting listed above.

Setting up WordPress After Enabling Free SSL Certificate

Once you have enabled your free SSL Certificate, you have to set up WordPress to begin using HTTPS instead of HTTP in all your URLs.

The easiest way to do this is by finding and installing the Really Simple SSLplugin on your WordPress. For more details, see our step by step guide on how to install a WordPress plugin.

After activation, the plugin will check to see if your SSL certificate is working. After that, it will turn on http to https redirect the URLs and change your site settings to start using SSL/HTTPs.

ssl enabled wp

While this plugin tries to fix all mix content problems, there may still be some files loading from HTTP instead of HTTPS. To solve that, you will need to find those files with the help of Inspect tool and fix them.

Most commonly, these files are loaded by poorly coded WordPress plugins. If you are unable to get rid of them, then feel free to uninstall those plugins and find a suitable replacement for it.

I hope that you liked the post on how to get a free SSL certificate for your WordPress site.

You may also want to see my guide on How to Add SSL and HTTPS in WordPress.

Do not forget to share this post.

Arsalan Rauf
Arsalan Rauf

Arsalan Rauf is an entrepreneur, freelancer, creative writer, and also a fountainhead of Green Hat Expert. Additionally, he is also an eminent researcher of Blogging, SEO, Internet Marketing, Social Media, premium accounts, codes, links, tips and tricks, etc.

www.greenhatexpert.com

Filed Under: Guide, How to, WordPress Tagged With: best free ssl certificate, cloudflare free ssl wordpress, how to get ssl certificate, let's encrypt wordpress godaddy, letsencrypt wordpress, sslforfree wordpress, wordpress free ssl bluehost, wordpress ssl

How to Add Your Etsy Store in WordPress

Last Updated on August 21, 2022 By Arsalan Rauf

How to Add Your Etsy Store in WordPress

Recently one of my readers asked:

Is it possible to connect an Etsy store to WordPress website?

If you have integrated your WordPress site with your Etsy shop then it will help you to sell more products online. In this post, I shall show you how to add your Etsy store in WordPress.

Why Add Your Etsy Store in WordPress?

Etsy shops consist of limited features if we compare them with other popular eCommerce platforms such as Shopify or WooCommerce. It is because Etsy is an online marketplace for creative goods whereas WooCommerce and Shopify are complete eCommerce platforms.

Etsy shops have harsh product guidelines with limited payment choices, which may not be available in several countries. You also don’t have the ability to add advanced features to your Etsy Shop which you can use in a WooCommerce online store.

However, Etsy gives you more exposure to a niche customers looking for handcrafted, artistic, and different products. It is very easy to use, and you don’t have to spend enough time on finding consumers because they are already there.

If you want to increase your business, then you may want to use WordPress to make a website to better showcase your Etsy shop items.

After this discussion, let’s have a look at how to add your Etsy store in WordPress easily.

Adding Your Etsy Store in WordPress

First of all, you need to install and activate the Etsy Shop plugin. For more details, see my post on how to install a WordPress plugin.

After activation, you need to visit the Settings > Etsy Shop page and enter your Etsy API key to connect your store with the plugin.

Note: If you currently do not have an Etsy API key, then simply click the link to get one from your Etsy store.

add etsy api key

When you will click on the link, it will ask you to create a new app. You need to put the name for your app, describe your app, and add the URL of your WordPress website. After that, you need to choose the best choices for your app and click on the Create App button below.

create new etsy app

You will now get a success message of registering your app with your Etsy API key. Go ahead and copy the key from here.

copy etsy api key

Now, you need to return to your WordPress admin area and paste the Etsy API key which you copied. After doing so, click on the Save Changes button, and the plugin will validate your API key and connect to your Etsy store.

add valid etsy api key

After attaching your Etsy store successfully, you can show and sell products from your Etsy shop right on your WordPress site.

To add the Etsy shop products in WordPress, you need to make a new page in WordPress or edit an existing page. On this page, you have to add the following shortcode to the edit area of your page.

[etsy-shop shop_name="MyShopUSDesign"

section_id="55895579"]

Do not forget to change the shop name and section ID in this shortcode with your Etsy store name and ID.

To get these two details, you need to visit your Etsy store and click on the Shop Manager tab from top right corner of the screen.

Note: You need to ensure that you are already logged in to your Etsy account.

open shop manager

On this page, you have to click the link in the left menu to get access to your shop.

go to shop name etsy

First of all, you have to copy the name of your store and then click on the Edit Shop button to locate the section ID.

edit shop for section id etsy

From here, you will have to click on Listings tab available in the left menu.

edit listings for section id

On this page, you will be asked to choose the section in which you have added your items or products. You can select the Sections from the dropdown menu as shown in the screenshot below.

select section

The section ID of your store will be shown in the page URL when your selected section is loaded. Now copy this section ID to replace in the shortcode.

section id etsy

After adding the shortcode with your store name and section ID, you can go to the post/page to see your Etsy store in your WordPress website.

my etsy store

You can add the same shortcode to multiple posts or pages in WordPress to show your Etsy store. To display different listings, you need to change the section ID available in the shortcode. However, the shop name can remain same.

I hope that you liked the post on how to add your Etsy store in WordPress. You may want to see my post on:

  • How to add a Paypal Donate Button in WordPress

Do not forget to share this post.

Arsalan Rauf
Arsalan Rauf

Arsalan Rauf is an entrepreneur, freelancer, creative writer, and also a fountainhead of Green Hat Expert. Additionally, he is also an eminent researcher of Blogging, SEO, Internet Marketing, Social Media, premium accounts, codes, links, tips and tricks, etc.

www.greenhatexpert.com

Filed Under: Guide, How to, WordPress Tagged With: etsy 360, etsy api key wordpress, etsy mini wordpress, etsy shop plugin, export woocommerce to etsy, import etsy to wordpress, woocommerce etsy, wordpress etsy reviews

How to Add a Search Bar to WordPress Menu (Step by Step)

Last Updated on August 21, 2022 By Arsalan Rauf

How to Add a Search Bar to WordPress Menu (Step by Step)

Do you want to add a search bar to your navigation menu in WordPress?

If yes, then you are in the right place.

Search form can be really beneficial for your users to find what they are looking for on your website. In this post, I shall show you how to add a search bar to your WordPress menu.

Why You Should Add a Search Bar in Menu?

A search bar allows your users to find what they’re looking for with ease. They do not have to scroll to all the pages.

If you add a search bar to your top navigation menu, then it will be visible on all pages that show the menu, and your users can search and find all the content on your site with ease.

There are a number of search plugins that you can use to add a search bar to your website. Let’s have a look at how to add a search bar to your WordPress menu.

Adding a Search Bar to WordPress Menu

First of all, you need to install and activate the Add Search to Menuplugin. For more details, read our step by step guide on how to install a WordPress plugin.

After activation, you need to visit the Settings > Add Search To Menu page in your WordPress admin area to add search bar to your menu.

add search to menu plugin

In this area, you need to choose the menu where you want to add the search bar. This list of menus (Primary Menu and Social Links Menu) is a property of your WordPress template. If you change the template of your website, then the list will be automatically upgraded with the available menus within your template.

After selecting, the search bar will be added to your navigation menu. You can define the search post types, search menu title, search form style, manage mobile display for search, and so on. These settings will also help you to control the search results for your users.

After doing so, you can go to your site to see the search bar in the WordPress navigation menu.

add search to menu

You can also add the search bar to all other available menus of your website. Simply choose the menu from plugin settings where you want to show your search form.

I hope that you liked the post on how to add a search bar to WordPress menu.

You may also want to see our guides on

  • How to add a favicon to your WordPress blog
  • How to change the font size in WordPress
  • Tips to fix add media button not working in WordPress
  • How to Change your WordPress username
  • How to Add a PayPal donate button in WordPress

Do not forget to share this post.

Arsalan Rauf
Arsalan Rauf

Arsalan Rauf is an entrepreneur, freelancer, creative writer, and also a fountainhead of Green Hat Expert. Additionally, he is also an eminent researcher of Blogging, SEO, Internet Marketing, Social Media, premium accounts, codes, links, tips and tricks, etc.

www.greenhatexpert.com

Filed Under: How to, WordPress Tagged With: add search to menu plugin, add search to menu wordpress plugin, how to add search box in wordpress header, how to add search box in wordpress page, search bar wordpress plugin, search icon in menu wordpress plugin, toggle search box wordpress plugin, wordpress add search icon to menu

How to Add Your WordPress Site in Yandex Webmaster Tools

Last Updated on July 27, 2022 By Arsalan Rauf

How to Add Your WordPress Site in Yandex Webmaster Tools

Do you want to add your website to Yandex webmaster tools?

Do you want to connect your site to Yandex webmaster tools?

If yes, this post is for you.

Webmaster tools including Google search console and Bing webmaster help you to optimize your website, manage robots.txt, check site errors, monitor the traffic and so on. In this post, I shall show you how to add your WordPress site in Yandex webmaster tools to monitor your search engine traffic.

What is Yandex?

Yandex is another popular search engine like Google and Bing. It is based in Russia.

You can optimize your website for SEO in Yandex to get more visitors from Russia.

what is yandex

Yandex has a variety of tools like image search, generalized search engine, email, maps, videos and so on. It also has webmaster tools that help you to monitor traffic stats, rank your website, search queries, keywords etc.

You can connect your WordPress website with Yandex by using Yoast SEO plugin. It is similar to Bing webmaster tools and Google search console.

Adding WordPress Site in Yandex Webmaster Tools

Before I start, you will need a Yandex webmaster tools account to get started or connect your website. After creating your account, login to your WordPress site to configure Yandex webmaster tools using Yoast SEO plugin.

Now let’s have a look at how can you add your website in Yandex webmaster tools and start optimizing it.

Step 1: Create an Account at Yandex

First of all, you need to login to your Yandex webmaster tools account. If you do not have an existing Yandex account, then you can create one using this link.

Create an Account at Yandex

After creating the account, you will see the Yandex webmaster page.

On this page, you will have to click on the (+) button in the top bar to add your site in Yandex.

add your site in Yandex

In the address field of website, you will add the full domain name of your website and click on the Add button.


add your domain name

Note: If you have ‘www’ in your domain URL, then you have to add it before the domain name like (www.greenhatexpert.com)

On the next page, you will be asked to verify website ownership by adding meta content in your WordPress website. Now copy the content code from this page because you will need it in the second step.

copy the content code

Step 2: Login to WordPress Admin Area and Add the Code

Now login to your WordPress admin area and put the verification code in the Yoast SEO webmaster settings.

Simply go to SEO>General area and click on the Webmaster tools tab.

general seo webmaster

Now paste the code in the Yandex verification code field and click on the save changes button to save changes.

paste code save

After adding the code in your website, you need to revisit the Yandex webmaster tools page where you copied the code and now click the Check button to verify the ownership.

check button rights

After successful verification, it will display your username which you can use to manage your website in Yandex webmaster tools. In addition, you can also delegate the rights to other users by adding their username and clicking on the Delegate rights button.

username rights

now you have verified and added your website in Yandex webmaster tools. You can see search errors, traffic stats, search queries, internal and external links, robots.txt analysis, site information, audit pages for mobile on the Yandex dashboard. Use the menu on the left side of the screen to get any information that you need.

yandex dashboard

Yandex webmaster tools also offer options for website optimization which are filtered from troubleshooting to important settings like .htaccess and robots.txt.

I hope that this post helped you to learn how to add your WordPress site in Yandex webmaster tools.

You may also want to read our post on Mobile SEO.

Do not forget to share this post.

Arsalan Rauf
Arsalan Rauf

Arsalan Rauf is an entrepreneur, freelancer, creative writer, and also a fountainhead of Green Hat Expert. Additionally, he is also an eminent researcher of Blogging, SEO, Internet Marketing, Social Media, premium accounts, codes, links, tips and tricks, etc.

www.greenhatexpert.com

Filed Under: Blogging, SEO, WordPress Tagged With: add site to yandex, baidu webmaster tools, google webmaster tools, yandex cy, yandex meta tag, yandex site check, yandex verification meta tag, yandex webmaster blog

How to Increase Pageviews and Reduce Bounce Rate in WordPress

Last Updated on July 27, 2022 By Arsalan Rauf

Do you want to increase pageviews and reduce bounce rate?

If yes, this post is for you.

How to Increase Pageviews and Reduce Bounce Rate in WordPress

Most bloggers think that it is a hard task to get people to their website or blog. Most expert bloggers or SEO experts believe that getting people to their blog is an easy task. To let the user stay on your site is a hard task. Most users visit your site and leave it without going through the second page. When the user does not visit the second page, it increases the bounce rate. In addition, it also decreases the pageviews per visit.

In general, it affects your ad revenue and decreases it. In this post, I shall tell you some tips and tricks to increase pageviews and reduce bounce rate in WordPress.

Before we start

Let’s start with basics to consider technology and terminology. Bounce rate stands for the percentage of visitors who enter your website and bounce (leave the site) rather than visiting other pages of the site. Page view represents the load of a single page on an internet site. I use Google Analytics to track my data. You can use other analytics services or you can also install Google Analytics on your WordPress website.

Now I have discussed the basic terminology and you are thinking that why do these numbers matter?

If you have a website which is primarily monetized by banner ads, then the number of pageviews do matter.

If you want to get a loyal users or audience, then the number of bounce rate also matter.  In addition, the lower your bounce rate, the better ads CPC(cost per click) or eCPM(cost per thousand) you will get. When the same user visits the next page, your ad provider will show a better ad to serve him and it will give you a higher CPC or eCPM. I have done a lot of experiments on my own websites so the methods I shall share with you are the ones that I used in the past and know that they will work.

P.S. These techniques will ONLY work if you have Good Content.

Interlink Your Posts

When you will interlink your other posts within the new post content, it will increase in pageviews. In WordPress 3.1 version, it has become an easy task to interlink. Simple you need to search for the post which you want to link while adding links. Interlinking techniques work great when your website is full of great articles. If you are a beginner, you will be a bit limited in this regard.

So how do you go back and interlink older posts when you will have something new?

You need to do it manually but it is time taking task.

There are plugins that let you automatically link keywords in WordPress.

Additionally, interlinking not only helps to increase pageviews but also reduces bounce rates. It is also helpful in SEO as well.

Show Related Posts After the Post

Why does user leave your blog?

The user leaves your blog after reading the post because you are not showing them what to do next. You should show the user a list of ‘related posts’ or ‘other popular posts’. It may lead them to see another post in your website. There are a number of ways to add or show related posts in your website. If you want to use a plugin to show related post. You may like our post on best related posts plugin for WordPress.

Show Excerpts on Front / Archive Pages

If you show excerpts on front/archive pages, it has two advantages. First of all, it will decrease the page load time. Secondly, it will increase the pageviews. You should not show full posts on your front page or archive page. Imagine if you have 25 images in one post, then have 5 of those on one page. It will give a terrible user experience because of super long page and slow load time.

It will make the user to leave your website. Most of good themes including Genesis, Headway and Thesis already have this as built-in option.

Splitting up Long Posts

Are you writing super long posts?

You can split it into multiple pages by using WordPress <nextpage> tag in your post. Just add it wherever you want to add it, then it will split your post into multiple pages. You may see some websites which split their posts into two pages or even into five pages.

But you need to be careful in this method as well. It is because if you do not have a sufficient amount of content on each page, then the user may get pissed of. There are several famous websites which are using this technique including Forbes, Wall Street Journal and NY Times etc.

Interactive Sidebar

Your sidebar plays an important role in reducing bounce rate and increasing pageviews. You can display your popular posts in the sidebar. You can also customize it to show popular posts by week, month and all time. The blogger can also show the most recent posts only on single post pages.

I have seen different websites that create custom images to navigate to their specific posts. You can integrate other sections of your website in your sidebar.

Encourage Random Browsing

You should encourage the user for random browsing. Make him curious to click on the buttons available on your website.

Results

An average user spends only one page per visit on your website and leaves it. When I started to see the basic data, my website bounce rate was in 70% range. After observing that, I have started implementing the above changes on my site.

Bounce rate decreased from the average of 70% to 45%. Pageviews per visit increased to 2.79/pages per visit. An average time spent on the page went to the average of 2 minutes and 40 seconds.

What is your strategy to increase pageviews and reduce bounce rate? Am I missing something?

Share with us in the comment section.

Do not forget to share this post.

Arsalan Rauf
Arsalan Rauf

Arsalan Rauf is an entrepreneur, freelancer, creative writer, and also a fountainhead of Green Hat Expert. Additionally, he is also an eminent researcher of Blogging, SEO, Internet Marketing, Social Media, premium accounts, codes, links, tips and tricks, etc.

www.greenhatexpert.com

Filed Under: Blogging, Guide, SEO, WordPress Tagged With: bounce plugin, how to check bounce rate in wordpress, how to increase page views in wordpress, how to increase page views per visit, increase page views bot, reduce bounce rate plugin, seyiny's bounce plugin, wordpress plugins to decrease bounce rate

  • 1
  • 2
  • 3
  • 4
  • Next Page »


Recent Posts

  • Free DeepSeek Accounts 2025
  • Free Zoho Mail Accounts 2025
  • Acudepot Discount Codes 2025
  • Free Blackshot Accounts 2025
  • Free GMX Email Accounts 2025
  • Songtrust Discount Codes 2025
  • Uzicases Discount Codes 2025
  • Cardillo Promo Codes 2025
  • Free DriverFix License Keys 2025
  • Avast Secureline VPN Activation Codes 2025

Recommended Posts

Create a Gmail Account Without Phone Number

Free Course Hero Account

Crunchyroll Accounts

Cracked Apps

Free Pokemon Go Accounts
Onlyfans Free Accounts
Free Chegg Accounts
Free Paypal Accounts
Free Gmail Accounts
Funny Steam Names

Categories

  • Apps
  • Apps for PC
  • Blogging
  • Discord
  • Facebook
  • Gaming
  • Grammar
  • Guide
  • How to
  • Instagram
  • Messaging
  • OnlyFans
  • Pinterest
  • Reddit
  • SEO
  • Snapchat
  • Social Media
  • Spotify
  • Steam
  • Telegram
  • TikTok
  • Twitch
  • Twitter
  • Whatsapp
  • WordPress
  • YouTube
  • Home
  • Social Media
  • Messaging
  • About
  • Submit Guest post