Green Hat Expert

  • Home
  • Social Media
    • Instagram
    • TikTok
    • Snapchat
    • Facebook
    • YouTube
    • Twitter
  • Messaging
    • Discord
    • Telegram
    • Whatsapp
  • About
  • Submit Guest post
You are here: Home / Archives for Social Media

How to Fix Rate Limit Exceeded on Twitter

Last Updated on July 4, 2023 By Arsalan Rauf

When Elon Musk acquired Twitter, he made different changes to it.

The main change that is made by him is to take the legacy blue checkmarks for public figures away who are not using the Twitter blue subscription.

Recently, Elon implemented temporary rate limits on different types of accounts.

He tweeted about it saying that these limits are implemented to deal with extreme levels of data scraping and system manipulation.

Consequently, many users on Twitter are not able to see tweets because they are exceeding the viewing limit.

In this article, I will tell you how to fix the “Rate Limit Exceeded” error on Twitter for iOS, Android, or PC.

What does “Rate Limit Exceeded” mean on Twitter?

Rate Limit Exceeded on Twitter means that your limit of viewing tweets has been exceeded.

Elon Musk imposed a temporary rate limit to fight data scraping and system manipulation.

The original limit for verified accounts is 6,000 views per day, for unverified accounts, it is 600 views per day and 300 views per day for new unverified accounts.

After 12 hours of Elon’s tweet, he increased the limits to 10,000, 5,000 and 0.5k respectively.

How to fix Rate Limit Exceeded on Twitter

To fix the Rate Limit Exceeded error on Twitter, the first thing you should do is to subscribe to Twitter Blue subscription to increase the limits.

In addition, you can also use the web version Twitter.com or use a VPN, or wait for 2 days for the rate limit to be lifted.

Solution 1: Subscribe to Twitter Blue

  1. Go to the Twitter app and sign in to your account.
  2. Tap on your profile picture to select “Twitter Blue”.
  3. Choose the desired plan from the “Annually” or “Monthly”.
  4. To get Twitter Blue subscription, complete the payment.

Note: After subscribing to Twitter Blue, your limits will be increased on the platform.

Solution 2: Use the web version Twitter.com

  • For iPhone devices: Go to Safari in private mode, visit twitter.com, log in to your account, and start viewing tweets.
  • For Android users: Go to Chrome in incognito mode, visit twitter.com, log in to your account, and start viewing tweets.
  • For PC users: Go to Chrome in incognito mode, visit twitter.com, log in to your account, and start seeing tweets.

Solution 3: Connect to a VPN

  1. Force close the Twitter platform whether you are using website or app.
  2. Download and use a free VPN such as Proton VPN, or VPN – Super Unlimited Proxy.
  3. Connect to that VPN server.
  4. Open the Twitter website or app again and start viewing tweets again.

Solution 4: Wait for 24 to 48 hours

  • Rate limits typically last for a few hours, and it can last for 2 days (48 hours).
  • If you’ve recently been rate limited, the best way to deal with it is to wait.
  • Elon stated that the rate limits implementation is temporary.
  • Rate limits will be increased with the passage of time until it’s not considered as a factor.

What’s Next

Free Twitter Accounts

How to Fix Twitter 2FA Not Working

How to Fix Twitter Verification Code Not Received

Arsalan Rauf
Arsalan Rauf

Arsalan Rauf is an entrepreneur, freelancer, creative writer, and also a fountainhead of Green Hat Expert. Additionally, he is also an eminent researcher of Blogging, SEO, Internet Marketing, Social Media, premium accounts, codes, links, tips and tricks, etc.
www.greenhatexpert.com

Filed Under: Social Media, Twitter

How to Fix Chat Heads Not Showing on Messenger

Last Updated on July 3, 2023 By Arsalan Rauf

The Chat Heads feature on Messenger helps you to read and reply to messages while you are busy on other applications.

When you will receive a new message, a chat head will be displayed (a circle with your friend’s profile picture) and a pop up will appear.

You can easily reply or view the message without leaving the app or screen that you are currently on.

The process can be done by tapping on it.

You can also drag the chat head on your screen and move it as you want it.

However, some users said that the option is not showing up on the app.

In this article, I will tell you how to fix Messenger Chat Heads not showing, not working, or missing on Android (Xiaomi/Samsung).

Why are the Messenger Chat Heads not showing?

The Messenger Chat Heads are not showing because you have not allowed the Messenger to “Appear on top”.

You need to keep in mind that the Messenger Chat Heads feature has changed into Bubbles in the latest version of Messenger.

So, you will have to enable the Chat Heads rather than the Bubbles feature.

Both options are same and you will be able to access your chats from your home screen.

How to fix Chat Heads not showing on Messenger

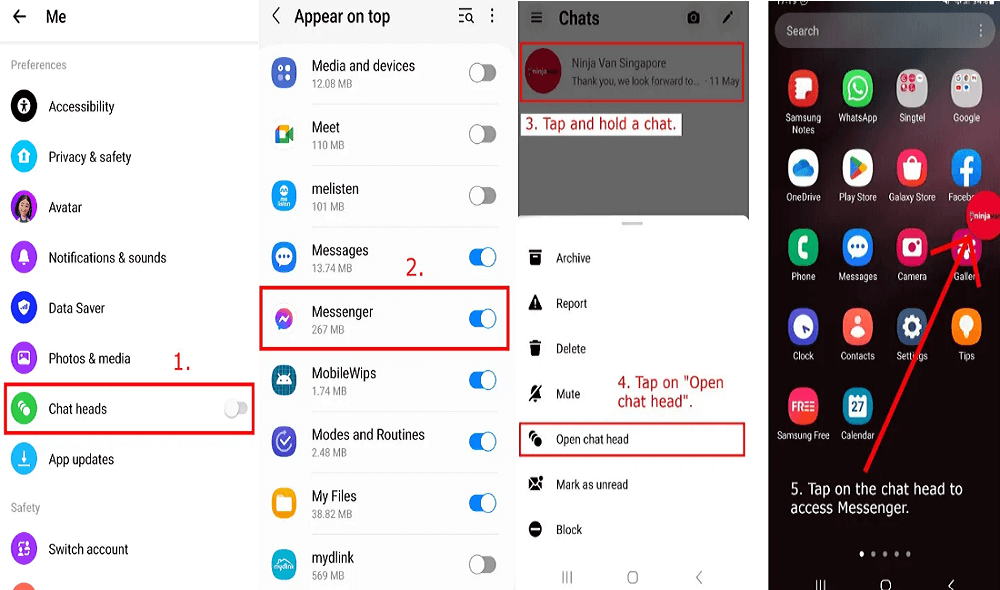
To fix Chat Heads not showing on Messenger, the first step is to turn on the “Chat heads” feature and allow Messenger to “Appear on top”.

After allowing Messenger to “Appear on top”, you have to open a chat head from your chats for it to visible on your home screen.

#1 Step: Turn on “Chat heads”

chat heads not showing messenger 1
  1. Go to the Messenger app and tap on the menu icon.
  2. Tap on the Settings icon beside your profile picture.
  3. Scroll down to “Chat Heads” and turn it on.

Tip: In the newest update of Messenger, the “Bubbles” feature has been changed to “Chat heads”.

#2 Step: Allow Messenger to “Appear on top”

  1. Choose “Go to Settings”.
  2. Now, enable “Messenger” in the “Appear to top” settings.

Tip: These settings can also be accessible from the Settings app > Apps > Three dots > Special access > Appear on top > Messenger > Enable.

#3 Step: Open a chat head

  1. Return to Messenger and go to a chat.
  2. Tap and hold the chat.
  3. Now, tap on “Open chat head”.
  4. Go to the chat head from your home screen whenever you want!

Tip: If you don’t want the chat head to appear on your home screen, you can always disable it by following these steps: Go to the Messenger app > Menu > Settings > Chat heads > Disable.

What’s Next

How to Fix Messenger Bubble Not Showing

How to Fix Facebook Messenger Story Not Showing

How to Fix Messenger Story Not Deleting “This can’t be undone”

Arsalan Rauf
Arsalan Rauf

Arsalan Rauf is an entrepreneur, freelancer, creative writer, and also a fountainhead of Green Hat Expert. Additionally, he is also an eminent researcher of Blogging, SEO, Internet Marketing, Social Media, premium accounts, codes, links, tips and tricks, etc.

www.greenhatexpert.com

Filed Under: Facebook, Social Media

How to Fix Messenger Bubble Not Showing

Last Updated on July 3, 2023 By Arsalan Rauf

The Messenger Bubble feature helps you to read and reply to messages while you’re busy on other apps.

When you will receive a new message, a chat head will be displayed (a circle with your friend’s profile picture) and a pop up will appear.

You can easily reply or view the message without leaving the app or screen that you are currently on.

The process can be done by tapping on it.

You can also drag the chat head on your screen and move it as you want it.

However, some users said that the option is not showing up on the app.

In this article, I will tell you how to fix Messenger Bubble not showing, not working, or missing on Android (Xiaomi/Samsung).

Why is the Messenger Bubble not showing?

The Messenger Bubble is not showing because you have not allowed the Messenger to “Appear on top”.

You need to keep in mind that the Messenger Bubble feature has been renamed into Chat Heads in the latest version of Messenger.

So, if you are not able to see the Bubble feature, you will have to enable the Chat Heads.

Both options are same and you will be able to access your chats from your home screen.

How to fix Messenger Bubble not showing

To fix Messenger Bubble not showing, the first step is to turn on the “Chat heads” feature and allow Messenger to “Appear on top”.

After allowing Messenger to “Appear on top”, you have to open a chat head from your chats.

#1 Step: Turn on “Chat heads”

chat heads not showing messenger 1
  1. Go to the Messenger app and tap on the menu icon.
  2. Tap on the Settings icon beside your profile picture.
  3. Scroll down to “Chat Heads” and turn it on.

Tip: If you are not able to see the “Bubbles” feature in the latest version of Messenger, it indicates that it has been changed with “Chat heads”.

#2 Step: Allow Messenger to “Appear on top”

  1. Choose “Go to Settings”.
  2. Now, enable “Messenger” in the “Appear to top” settings.

Tip: These settings can also be accessible from the Settings app > Apps > Three dots > Special access > Appear on top > Messenger > Enable.

#3 Step: Open a chat head

  1. Return to Messenger and go to a chat.
  2. Tap and hold the chat.
  3. Now, tap on “Open chat head”.
  4. Go to the chat head from your home screen whenever you want!

Tip: If you don’t want the chat head to appear on your home screen, you can always disable it by following these steps: Go to the Messenger app > Menu > Settings > Chat heads > Disable.

What’s Next

How to Fix Facebook Messenger Story Not Showing

How to Fix Messenger Story Not Deleting “This can’t be undone”

How to Fix Messenger Not Opening

Arsalan Rauf
Arsalan Rauf

Arsalan Rauf is an entrepreneur, freelancer, creative writer, and also a fountainhead of Green Hat Expert. Additionally, he is also an eminent researcher of Blogging, SEO, Internet Marketing, Social Media, premium accounts, codes, links, tips and tricks, etc.

www.greenhatexpert.com

Filed Under: Facebook, Social Media

How To Fix YouTube Spacebar Pause Not Working

Last Updated on June 28, 2023 By Arsalan Rauf

Is a YouTube video scrolling down when you try to pause it using the space bar instead of pausing?

If you are watching shorts, you can pause the video by pressing the space bar.

However, some users reported that it moves to the next short.

When it comes to regular videos, the space bar will scroll down the page and will not pause it.

This will be irritating for you because you will have to use your mouse to pause it.

In this article, I will tell you how to fix the YouTube spacebar pause not working (it scrolls down the page instead) issue.

Why is the YouTube spacebar not working?

The YouTube spacebar is not working or pausing is because the video is not in focus.

When it will not be in focus, pressing the space bar will not pause the video rather it will scroll it down.

The reason is that the focus is not on the video but on the page.

You can face this issue if you have clicked outside of the video by mistake.

How to fix YouTube spacebar pause not working

To fix the YouTube spacebar pause not working issue, you have to use the Tamper monkey extension, install it and create a new script, and after that, paste the DisableYoutubeScrolling.user.js code.

Another way to deal with it is press the “K” button instead of using the space bar to pause the video.

Method 1: Use a Tampermonkey script

  1. Go to Chrome web store to install the Tampermonkey extension from it and pin it.
  2. Now, click on the Tampermonkey extension and select “Create a new script”.
  3. After that, highlight and remove/delete the code on the script.
  4. Go to this Github JavaScript file and copy it.
  5. Return to the Tampermonkey script and paste the code.
  6. Click on “File” accompanied by “Save” to ensure that the script is enabled.
  7. Go to a video on YouTube to try pausing it with the help of the space bar!

Method 2: Press the “K” button

  • Press the “K” button instead of pressing the space bar button to pause the video.
  • Google has introduced the “K” button which is an official YouTube keyboard shortcut.

What’s Next

How To Fix YouTube Video Scroll Down When You Press Space Bar

Free YouTube Premium Accounts

How to Download Part of a YouTube Video

Arsalan Rauf
Arsalan Rauf

Arsalan Rauf is an entrepreneur, freelancer, creative writer, and also a fountainhead of Green Hat Expert. Additionally, he is also an eminent researcher of Blogging, SEO, Internet Marketing, Social Media, premium accounts, codes, links, tips and tricks, etc.

www.greenhatexpert.com

Filed Under: Social Media, YouTube

Do You Have to Pay to Subscribe to a YouTube Channel?

Last Updated on June 23, 2023 By Arsalan Rauf

Are you a newbie to YouTube, you might be curious what the subscribe button is for.

Another question that can come to your mind is whether you have to pay money to subscribe to a YouTube channel.

The “subscribe” button can cause confusion to new users as it usually stands for the monthly subscription of any service.

Having said that, some users are reluctant when it comes to subscribing a channel because they do not want to pay anything.

On YouTube, the “subscribe” button has a different meaning.

In short, the “subscribe” button is same as the “follow” button on social media sites such as Facebook.

In this article, I will tell you what the “subscribe” button is and whether you need to pay for it.

Do you have to pay to subscribe to a YouTube channel?

No, you don’t have to pay anything in order to subscribe to a YouTube channel.

It is free to subscribe to a YouTube channel, and it doesn’t cost a penny.

The “subscribe” button on YouTube is the same as the “follow” button on other social media sites including Instagram.

YouTube does not charge for subscribing to a channel.

On social media platforms, you will be able to see the posts when you follow someone.

Whenever they publish new posts whether it is a photo or video will be available at the top of your feed.

Same is the case with subscribing to a YouTube channel, you will receive the videos of the channel on your subscription feed.

Whenever there is a new upload on the channel, the video will be available at the top of your subscription feed.

As you can subscribe to a YouTube channel free, you will be tension free from recurring costs.

The payment will be made if you want to join a channel as a member.

In 2018, YouTube launched channel memberships that allows users to join a channel as a member starting at $4.99 per month.

Channel memberships are same as the Twitch subscriptions.

In short, as long as you do not have to share your credit/debit card details, you don’t have to pay for anything on YouTube.

What does it mean when you subscribe to a YouTube channel?

You can subscribe to a YouTube channel if you like the content on it.

You will see updates from the channel that you have subscribed to on YouTube in your subscription feed.

You will see an update in your subscription feed whether they upload a video or post a community update.

If your YouTube notifications are enabled, it will send you a notification when the channel uploads a new video.

If you want yourself to be familiar with a channel, you can subscribe to a YouTube channel.

To subscribe to a YouTube channel, you need to go to the channel and tap on the “subscribe” button.

After tapping on the “subscribe” button, the button will be updated to “unsubscribe”.

Tap on “Subscriptions” from the bottom bar to see your subscriptions on YouTube mobile app.

After opening the subscriptions page, you’ll be able to see the recently uploaded videos from the channels that you’re subscribed to.

What is the benefit of subscribing to a YouTube channel?

The benefits of subscribing to a YouTube channel are you get updates on their latest videos, community posts, and upload notifications.

You can stay updated on the newest videos if you subscribe to a YouTube channel.

When you are subscribing to a YouTube channel, you will see their uploads in your subscription feed.

Your subscription feed gets quick access so you can easily view the latest videos from a channel.

If you have not subscribed to a channel, you need to find it using their name to view the latest videos.

There is a problem with this as you might forget the name of the channel.

Alternatively, your subscription feed will show the newest videos if you are a subscriber to the channel.

So, you do not have to remember the channel’s name to search for it and view their latest videos.

Is it bad to subscribe to a YouTube channel?

Subscribing to a YouTube channel is a good thing unless the channel uploads videos in bulk on a daily basis.

No, subscribing to a YouTube channel is not bad as it will keep you updated on their latest videos.

However, subscribing to too many YouTube channels can send a lot of things to your subscription feed.

You should check the uploading schedule of a channel before subscribing to it.

If a channel uploads a video on a weekly basis, your feed will not be flooded.

However, if the channel uploads twice or more a day, it will flood your feed with their videos.

Consequently, you might not be able to track the latest videos from your favorite channels.

If you’re subscribed to a lot of channels, you should review them and unsubscribe to the channels that you’re no longer watching or interested in.

As a result, your subscription feed will remain clean and make space for future subscriptions.

Last Words

Typically, “subscribe” is a term used to inform about the monthly payment of a service.

However, to subscribe to a YouTube channel, you do not need payment.

If you view the content of the channel on a regular basis, you can subscribe to it to stay updated on its latest videos.

In addition, you can unsubscribe from the channel at any time if the new videos are against your interest.

What’s Next

How to See Your YouTube Comment History

How to See How Many Videos a YouTube Channel Has

What Does “Join” Mean on YouTube?

Arsalan Rauf
Arsalan Rauf

Arsalan Rauf is an entrepreneur, freelancer, creative writer, and also a fountainhead of Green Hat Expert. Additionally, he is also an eminent researcher of Blogging, SEO, Internet Marketing, Social Media, premium accounts, codes, links, tips and tricks, etc.

www.greenhatexpert.com

Filed Under: Social Media, YouTube

How to Fix “This version of Instagram is no longer supported”

Last Updated on June 21, 2023 By Arsalan Rauf

Are you facing a “Switch to Instagram Lite” error on Instagram on Android?

The error message will be, “This version of Instagram is no longer supported”.

“You can switch to Instagram Lite, which gives you newer features without downloading a larger app”.

“Google Play is the easiest way to get Instagram Lite”.

“You can also get it by downloading an APK directly to your device”.

“You can also access your account at instagram.com”.

In this article, I will tell you how to fix the “This version of Instagram is no longer supported” error on Instagram on Android.

Why is my version of Instagram no longer supported?

Your version of Instagram is no longer supported because you have an outdated version of Instagram.

For instance, if your version is 240.0 of Instagram but the latest version is 260.0, it will not work.

Otherwise, you are using and outdated device and the Instagram app no longer support it.

Instagram Lite consumes less storage and this app is faster than the Instagram app.

It is also designed to use on slower networks, so it’s perfect for older devices.

How to fix “This version of Instagram is no longer supported”

To fix “This version of Instagram is no longer supported”, you can download Instagram Lite and use it or download an older (APK) version of Instagram.

Other ways that can be used are updating Instagram, updating your device, or clearing the app’s cache.

Solution 1: Download Instagram Lite

  1. Go to the Google Play Store.
  2. Find “Instagram Lite” by searching for it.
  3. Download Instagram Lite.
  4. Go to Instagram Lite.
  5. Use your Instagram account credentials to sign in.

Solution 2: Download an older version of Instagram

  1. Remove Instagram app from your device to download the older version.
  2. Copy and paste this link into your browser: https://instagram.en.uptodown.com/android/versions
  3. Choose an older version of Instagram.
  4. To download APK, you need to choose “Download”.
  5. After installation, open Instagram and log in to your account.

Solution 3: Other troubleshooting methods

  • Clear Instagram’s cache and data: Follow these steps to remove cache: open the Settings app > Apps > Manage apps > Instagram > Clear Cache > Clear Data.
  • Update your android device: Follow these steps: go to the Settings app > System > System update > follow the instructions on the screen
  • Update IG app: Go to App Store or Google Play Store, search for “Instagram”, and tap on “Update” if there is any.
  • Remove and reinstall app: Delete the Instagram app and go to the Google Play Store and reinstall it

What’s Next

How to Fix “Switch to Instagram Lite”

How to Fix Meta Verified Option Not Showing on Instagram

How to Fix “Instagram closed because this app has a bug”

Arsalan Rauf
Arsalan Rauf

Arsalan Rauf is an entrepreneur, freelancer, creative writer, and also a fountainhead of Green Hat Expert. Additionally, he is also an eminent researcher of Blogging, SEO, Internet Marketing, Social Media, premium accounts, codes, links, tips and tricks, etc.

www.greenhatexpert.com

Filed Under: Instagram, Social Media

How To Fix YouTube Video Scroll Down When You Press Space Bar

Last Updated on June 21, 2023 By Arsalan Rauf

Is a YouTube video scrolling down when you try to pause it using the space bar instead of pausing?

If you are watching shorts, you can pause the video by pressing the space bar.

However, some users reported that it moves to the next short.

When it comes to regular videos, the space bar will scroll down the page and will not pause it.

This will be irritating for you because you will have to use your mouse to pause it.

In this article, I will tell you how to fix the YouTube video scroll down when you press the space bar (instead of pausing) problem.

Why does the YouTube video scroll down when I press the space bar?

The YouTube video scrolls down when you press the space bar because the video is not in focus which is why it gets paused.

When it will not be in focus, pressing the space bar will not pause the video rather it will scroll it down.

The reason is that the focus is not on the video but on the page.

You can face this issue if you have clicked outside of the video by mistake.

How to fix YouTube video scroll down when you press space bar

To fix the YouTube video scroll down when you press the space bar issue, you have to use the Tamper monkey extension, install it and create a new script, and after that, paste the DisableYoutubeScrolling.user.js code.

Another way to deal with it is by pressing the “K” button instead of using the space bar to pause the video.

Method 1: Use a Tampermonkey script

  1. Go to Chrome web store to install the Tampermonkey extension from it and pin it.
  2. Now, click on the Tampermonkey extension and select “Create a new script”.
  3. After that, highlight and remove/delete the code on the script.
  4. Go to this Github JavaScript file and copy it.
  5. Return to the Tampermonkey script and paste the code.
  6. Click on “File” accompanied by “Save” to ensure that the script is enabled.
  7. Go to a video on YouTube to try pausing it with the help of the space bar!

Method 2: Press the “K” button

  • Press the “K” button instead of pressing the space bar button to pause the video.
  • Google has introduced the “K” button which is an official YouTube keyboard shortcut.

What’s Next

Free YouTube Premium Accounts

How to Download Part of a YouTube Video

How to See Your YouTube Music Recap 2022

Arsalan Rauf
Arsalan Rauf

Arsalan Rauf is an entrepreneur, freelancer, creative writer, and also a fountainhead of Green Hat Expert. Additionally, he is also an eminent researcher of Blogging, SEO, Internet Marketing, Social Media, premium accounts, codes, links, tips and tricks, etc.

www.greenhatexpert.com

Filed Under: Social Media, YouTube

How to Download Part of a YouTube Video

Last Updated on June 21, 2023 By Arsalan Rauf

Some YouTube videos are long and come with a lot of stuff.

On the other hand, some videos are partially interesting, for a specific time such as 3 minutes into the video.

In this case, you might want to download part of a YouTube video instead of downloading it full.

It will save your storage and the video will be concise.

The reason behind it is that a shorter YouTube video will be smaller in size.

In this article, I will tell you how to download part of a YouTube video (or crop/trim it) in 3 easy steps.

How to download part of a YouTube Video

To download part of a YouTube video, the first thing you need to do is to copy the video’s link from YouTube.

After copying the link of the video, you need to paste it on a free online editing tool such as Kapwing.

After that, you need to crop it by clicking and dragging the left and right edges of the video.

In the end, export the video as an MP4 file, download it, and after that, you can also share it.

Step 1. Copy the YouTube video link

  1. Go to the YouTube video from which you want to download a part of it.
  2. After that, click on the “Share” icon.
  3. Copy the video’s link of YouTube.

Step 2. Paste the link on Kapwing

  1. Copy and paste this link to your browser: https://www.kapwing.com/tools/trim.
  2. Sign up or log in to your Kapwing account.
  3. Now, you have to paste the YouTube’s video link into the “Place an image or video URL” field.

Step 3. Export and download the video

  1. To trim it, click and drag the left and right edges of the video.
  2. Now, click on the “Export Project” button to export it.
  3. Select “MP4” file, select a resolution, and select a compression level.
  4. After that, click on the “Export as MP4” button.
  5. To download the video, click on the “Download file” button.

Tip: To download a video without a watermark, you need to have a Kapwing account.

How to share part of a YouTube video

To share part of a YouTube video, the first thing you need to do is to visit the video that you want to share.

After that, click on the “Share” icon beside the like button.

Tick the “Start at” checkbox and tell it where you want to start the video.

In the end, to share it, copy the video link of YouTube.

What’s Next

3 Steps to Uninstall the Riot Client

3 Steps to Update Nvidia Drivers

How to Fix “A supported game is required to use this feature” on Nvidia

Arsalan Rauf
Arsalan Rauf

Arsalan Rauf is an entrepreneur, freelancer, creative writer, and also a fountainhead of Green Hat Expert. Additionally, he is also an eminent researcher of Blogging, SEO, Internet Marketing, Social Media, premium accounts, codes, links, tips and tricks, etc.

www.greenhatexpert.com

Filed Under: Social Media, YouTube

How to Fix “Page isn’t available right now” on Facebook

Last Updated on June 19, 2023 By Arsalan Rauf

Are you facing a “Page isn’t available right now” error when you open Facebook?

The next part of the error, “This may be because of a technical error that we’re working to get fixed”.

Accompanied by, “Try reloading this page” and there will be a refresh button at the bottom of the page.

If you try to refresh it, there is a great chance that you will remain on the same page again.

In this article, I will tell you how to fix “Page isn’t available right now” and “This may be because of a technical error” on Facebook.

Why is the page not available right now on Facebook?

The page is not available right now because Facebook servers are not working properly.

If Facebook is facing an outage, you won’t be able to access it until the team resolves the issue.

There are two methods to check if Facebook is down.

The first method is to visit downdetector.com/status/facebook and see if the reports show an increase.

The second method is to visit Twitter.com and search for the error that you’re getting.

How to fix “Page isn’t available right now” on Facebook

To fix the “Page isn’t available right now” error on Facebook, you can use a VPN.

On the other hand, you can try to download an older version of Facebook using a third-party website (works for Android only).

You need to wait until the servers are back online if you think FB is down.

You can also use different troubleshooting methods such as removing the app’s cache, updating Facebook, and logging out and in of the app.

Solution 1: Connect to a VPN

  1. Swipe up from the bottom of the screen to force exit Facebook, visit the Instagram card, and swipe up.
  2. Download and Install a free VPN app (you can take these as examples: Secure VPN-Safer Internet for Android users – Super Unlimited Proxy for iOS users).
  3. Go to the VPN app and choose a VPN outside of your country (for instance, US, Canada, UK).
  4. Open the Facebook app again to start using it.

Solution 2: Use an older version of Facebook

  1. Firstly, you need to remove the Facebook app from your device.
  2. After that, copy and paste this link into your browser: https://facebook.en.uptodown.com/android.
  3. Now, choose the “Older versions” and install an older version (APK) of FB.
  4. Go to Facebook and the “Page isn’t available right now” error will be fixed.

Solution 3: Other troubleshooting methods

If the “Page isn’t available right now” error still persists, try these troubleshooting tips:

  • Update Facebook app: Go to the App Store/Google Play Store, search for “Facebook” and select “Update” to update it.
  • Remove Facebook’s cache: Follow these steps: Force exit Facebook > go to the Settings app > Apps > Facebook > Storage > Clear Cache > Clear Data > open Facebook again.
  • Force exit and open it again: Swipe up from the bottom of your screen, visit the Facebook card, and swipe up.
  • Sign out and sign in: Go to the Facebook app > Profile > Menu > Settings > Log out > Log in again.
  • Remove and reinstall: Tap and hold the Facebook app, delete it, and install it again from the App Store or Google Play Store.
  • Wait it out: If Facebook server is down, the best bet is to wait for a few hours for the server’s issue to be resolved.

What’s Next

How to Fix Facebook Watch Video Icon Not Showing

How to Fix Facebook Messenger Story Not Showing

How to Make a Website Like Facebook

Arsalan Rauf
Arsalan Rauf

Arsalan Rauf is an entrepreneur, freelancer, creative writer, and also a fountainhead of Green Hat Expert. Additionally, he is also an eminent researcher of Blogging, SEO, Internet Marketing, Social Media, premium accounts, codes, links, tips and tricks, etc.

www.greenhatexpert.com

Filed Under: Facebook, Social Media

How to Fix “Page not available” on TikTok

Last Updated on May 25, 2023 By Arsalan Rauf

Are you facing a “Page not available” error on TikTok?

The next part of the error is, “Sorry about that! Please try again later”.

If yes, when the page is almost loaded, a robot icon will be shown.

You can get the error on the web version of TikTok using the desktop or PC.

The browsers where it can occur are Microsoft Edge, Chrome, Firefox, and other browsers.

In this article, I will tell you how to fix “Page not available” and “Sorry about that! Please try again later” on TikTok.

Why is the page not available on TikTok?

The page is not available on TikTok means that tiktok.com server is down.

If TikTok is facing outage, you will not be able to use the website until the problem is resolved.

You will get the error message when you are using the web version of TikTok.

To find out if TikTok is down, use this link downdetector.com/status/tiktok/.

If it shows a spike in the graph, it is more likely that TikTok is down.

How to fix “Page not available” on TikTok

To fix “Page not available” on TikTok, the first thing you should do is try clearing cookies and other site data.

You can go to MS store to download and use TikTok from the Microsoft Store instead of using tiktok.com.

If TikTok is having outage, you can wait for 2 days for it to be back online.

If everything fails, you can contact TikTok support from its “Share your feedback” form.

Solution 1: Clear cookies and other site data

  • On Google Chrome: Follow these steps: Chrome > Three Dots > More Tools > Clear browsing data > Cookies and other site data / Cached images and files > Clear data.
  • On Mozilla Firefox: Follow these steps: Firebox > Menu > Settings > Privacy & Security > Cookies and Site Data > Clear.
  • On Microsoft Edge: Follow these steps: Edge > Three Dots > Settings > Privacy & services > Choose what to clear > Cached images and files / Cookies and other site data > Clear.

Note: After clearing the cookies, close the website: tiktok.com, reopen it, and try signing in to your account.

Solution 2: Download and use TikTok from the Microsoft Store

  1. Go to the Microsoft Store app (available on the Windows taskbar).
  2. Search for “TikTok”.
  3. To download the app, select “Get”.
  4. To open it, select “Open”.
  5. Log in to your TikTok account and start using it.

Tip: You can also download TikTok directly from MS store (Microsoft Store) from this link: https://apps.microsoft.com/store/detail/tiktok/9NH2GPH4JZS4.

Solution 3: Use a different browser (Links added)

  • For Chrome: https://www.google.com/chrome/.
  • For Firefox: https://www.mozilla.org/en-US/firefox/new/.
  • For Microsoft Edge: https://www.microsoft.com/en-us/edge/download.
  • For Brave: https://brave.com/.

Tip: You can also use incognito mode in each browser.

Solution 4: Wait for 24-48 hours

  • Go to downdetector.com/status/tiktok/ to check if it is down.
  • If TikTok is not up, the only way is to wait for 24 to 48 hours before accessing it.
  • You can use the mobile app of TikTok instead of the web version.

Solution 5: Contact TikTok support

  1. Visit this link: https://www.tiktok.com/legal/report/feedback.
  2. Provide your email address, username, and select a topic.
  3. Tell them that you’re facing the “Page not available” error on TikTok.
  4. Agree to the terms, submit the form, and wait to get a response from TikTok.

Tip: You can also use TikTok app to report a problem by navigating to your Profile > Menu > Settings and privacy > Report a problem.

What’s Next

How to Fix “This content is age restricted” on TikTok

How to Fix “No internet connection” on TikTok

Top 10 Most Viewed TikTok Videos

Arsalan Rauf
Arsalan Rauf

Arsalan Rauf is an entrepreneur, freelancer, creative writer, and also a fountainhead of Green Hat Expert. Additionally, he is also an eminent researcher of Blogging, SEO, Internet Marketing, Social Media, premium accounts, codes, links, tips and tricks, etc.

www.greenhatexpert.com

Filed Under: Social Media, TikTok

  • « Previous Page
  • 1
  • …
  • 4
  • 5
  • 6
  • 7
  • 8
  • …
  • 37
  • Next Page »


Recent Posts

  • Free DeepSeek Accounts 2025
  • Free Zoho Mail Accounts 2025
  • Acudepot Discount Codes 2025
  • Free Blackshot Accounts 2025
  • Free GMX Email Accounts 2025
  • Songtrust Discount Codes 2025
  • Uzicases Discount Codes 2025
  • Cardillo Promo Codes 2025
  • Free DriverFix License Keys 2025
  • Avast Secureline VPN Activation Codes 2025

Recommended Posts

Create a Gmail Account Without Phone Number

Free Course Hero Account

Crunchyroll Accounts

Cracked Apps

Free Pokemon Go Accounts
Onlyfans Free Accounts
Free Chegg Accounts
Free Paypal Accounts
Free Gmail Accounts
Funny Steam Names

Categories

  • Apps
  • Apps for PC
  • Blogging
  • Discord
  • Facebook
  • Gaming
  • Grammar
  • Guide
  • How to
  • Instagram
  • Messaging
  • OnlyFans
  • Pinterest
  • Reddit
  • SEO
  • Snapchat
  • Social Media
  • Spotify
  • Steam
  • Telegram
  • TikTok
  • Twitch
  • Twitter
  • Whatsapp
  • WordPress
  • YouTube
  • Home
  • Social Media
  • Messaging
  • About
  • Submit Guest post