Green Hat Expert

  • Home
  • Social Media
    • Instagram
    • TikTok
    • Snapchat
    • Facebook
    • YouTube
    • Twitter
  • Messaging
    • Discord
    • Telegram
    • Whatsapp
  • About
  • Submit Guest post
You are here: Home / Archives for Social Media

How to Change Your Channel Name on YouTube

Last Updated on September 28, 2021 By Arsalan Rauf

You can change your channel name on YouTube at any time.

Furthermore, in YouTube, the names of the channels are not unique so you can also use the same channel name for your new channel.

If you have a new YouTube channel or small channel, you can change the name of the channel.

However, if you have an old YouTube channel with a lot of subscribers, I highly suggest you should not change it.

It is because your subscribers may not recognize your channel due to the change of name.

As a result, you may lose a lot of subscribers because they will unsubscribe your channel.

If you change your channel name more often, you should make an announcement before you do it.

You should make this action public on your social media or in your upcoming video.

The process will tell your subscribers that you have changed the name of your channel.

In this post, I am going to discuss how to change your YouTube channel name on a desktop and on YouTube mobile (iOS/Android).

How to change your channel name on YouTube

You need to open the app of YouTube to change your channel name on YT, and tap on the channel icon.

After reaching the channel, tap on “Edit channel”, after tapping on it, tap on the edit icon available next to the existing channel name.

Now click on the edit icon, this will allow you to change your YouTube channel name.

Click on tick icon to ensure that you have saved your changes.

Now, go back to your YouTube channel to see that your channel name has been changed.

To change your channel name on YouTube, you can use a PC, Laptop or YouTube mobile application.

In this post, I am going to use YouTube app due to an increase in mobile users as compared with desktop users.

Here is a step by step guide on how to change your Channel name on YouTube:

Step 1: Open YouTube mobile app & tap on your channel’s icon

The first step is to open the mobile app of YouTube using your android or iOS.

Then, sign in to your account using credentials if you are not logged in.

The desktop version of YouTube can also be used for this purpose.

In this post, I am going to use YouTube mobile app to complete the process instead of the desktop version of YouTube.

I am using the mobile app due to a lot of users are using it on mobile rather than desktop.

After opening the app on your mobile, the channel icon can be seen on the top navigation bar.

To open the menu, you need to tap on your channel icon.

In YouTube desktop version, this step includes a click on the channel icon.

Step 2: Go to your YouTube channel

After tapping on the icon available on your channel, it will show a navigation menu.

There are many options on the navigation menu.

The options are “Turn on Incognito”, “Add account”, “Your channel”, and so on.

You need to visit your channel in order to change or edit your YouTube channel name.

Firstly, go to your YouTube channel by Tapping on “Your channel”.

The same is the case with the desktop version of YouTube, you need to click on “Your channel” on desktop too.

Step 3: Tap or Click on “Edit channel”

After tapping on “Your channel” on YouTube, you will go to your YouTube channel.

There are a couple of buttons on YouTube channel.

The buttons are “Edit channel” and “Manage Videos”.

They are available between the name of your channel and your uploads.

Tap on the “Edit Channel” button to edit your YouTube channel name.

The process includes the changing of description and your YouTube channel name.

To edit your YouTube channel, you need to Tap on “Edit channel”.

On YouTube desktop version, you need to click on “Customize channel” option.

Step 4: Tap on the edit icon next to your channel name

After tapping on the “Edit Channel” option, you will reach the settings of your channel.

You can edit your channel on your channel settings.

This editing includes your channel banner, name, icon and description etc.

A small edit icon is available next to your channel name.

Tap on this edit icon to edit your YT channel name.

On the desktop version of YouTube, you will see “Channel customization” page.

After landing on “Channel customization” page, click on “Basic Info” to visit your channel settings.

After that, click on the edit icon available next to your channel’s name.

Step 5: Change your YouTube channel name

When you will tap on the edit icon next to your YouTube channel name, you will be directed to the “Edit name” page.

This page will enable you to change or edit your YouTube channel name.

Your YouTube channel name will be displayed in the “Name” field.

First of all, you need to delete the existing channel name to add a new one.

The next step is to select a new YouTube channel name and enter it in the “Name” field.

There is another thing you need to keep in mind that you can only use up to 50 characters.

The name of your channel will be displayed to all the YouTube users.

Furthermore, the changes you will make to your name will be displayed on YouTube.

After changing the name, you need to save the changes to implement them.

To save the changes, Tap on the tick icon.

Now, go back to your YouTube channel and the name will be the name you have recently changed!

The same steps will be applied if you’re using the desktop version of YouTube.

Final Words

If your YouTube channel has a lot of subscribers or followers, I highly recommend do not change the name.

It is because the changing will confuse your subscribers and they might not recognize the name of the channel.

And you will end up with loss of subscribers and it will also affect your viewership negatively.

If you are a newbie, it is okay to change your YouTube channel name.

In this post, I have discussed how to change your YouTube channel name on the YouTube mobile app.

However, there is a different method to use while changing your YouTube channel name on the desktop version of YouTube.

To change it on desktop, you need to visit the “Channel customization” section on YouTube studio and go to “Basic Info”.

You can change your channel name on the “Basic Info” page, and you can do it by clicking on the edit icon next to it.

You need to save your changes just like YouTube mobile app to implement the settings.

You need to click on the “Publish” button to save the changes on desktop version.

What’s Next

How to download Private Videos from YouTube

What does ft. mean on YouTube

How to Download Private Videos from Vimeo

Arsalan Rauf
Arsalan Rauf

Arsalan Rauf is an entrepreneur, freelancer, creative writer, and also a fountainhead of Green Hat Expert. Additionally, he is also an eminent researcher of Blogging, SEO, Internet Marketing, Social Media, premium accounts, codes, links, tips and tricks, etc.

www.greenhatexpert.com

Filed Under: YouTube

You’re Following Too Fast on TikTok (How to Fix)

Last Updated on September 24, 2021 By Arsalan Rauf

Have you encountered the “You’re following too fast” error on Tiktok when you try to follow new users?

There are many users who see this error and it can be frustrating for them.

You may want to follow the users you like but the TikTok app is preventing you from doing it.

In this post, I am going to guide you on how to fix the TikTok following too fast error and also tell you how to prevent it from happening again.

What is the “You’re following too fast” error on TikTok?

The question is what is this error on tiktok that you are following too fast?

This error “You’re following too fast” indicates that you have exceeded the limit of TikTok.

In short, you are unable to follow new people temporarily.

How do I fix the “You’re following too fast” error on TikTok?

Now we see how to fix this error on TikTok?

To resolve the issue “You’re following too fast” error on TikTok, you need to have patience. The error will be displayed for a few minutes or more depending on the number of times you faced the error.

If you are unable to follow anyone on TikTok, it is because you have exceeded the following limit.

There is nothing you can do about the error except waiting for the error to go away on its own.

How long does the “You’re following too fast” block last?

It depends on the situation.

It depends on the number of times you have exceeded the limit of following, “You’re following too fast” block can last for a few minutes, several minutes or more than that.

For example, if you begin to follow new users soon after the block is lifted, then the system will block you from following once again.

Further, the duration of the block will be longer than the previous span.

When the error message is disappeared, it means that you are not blocked from following but it does not mean that you repeat the mistake again.

It is because it will result in an increase in the duration of the block the next time the message appears.

Is there a follow limit on TikTok?

People frequently ask this question but the answer is no, there is no specific limit on TikTok in terms of limits.

However, it is suggested that you should not follow more than 30 users per hour.

The only method you can use to find the following limit on TikTok for your account is to experiment it on your own.

Here is a step by step guide on how can you experiment it for yourself:

  1. Firstly, start following as many users as possible until you receive the “You’re following too fast” error/message.
  2. After each minute, you can try to follow more users until the block is lifted.
  3. Repeat the process and keep count of the duration of the block every time you get blocked.

If you have leisure time, you can try the previous steps to find out the exact limit of your TikTok account.

Why did I get the error?

The problem occurs when you try to exceed the following limitations on the app.

Every social media platform tries to avoid spamming, bots and automation and the TikTok app is no exception.

So, if you are following users on TikTok too fast, the system will consider you a bot and it will result in a temporary block from following.

The main cause of getting this error is because you are doing the follow and unfollow frequently.

This includes the strategy of getting followers and you use this strategy to build a list of following on the app and also hope they will follow you back.

If you want to do that, you should avoid abusing it and do not exceed the limit of following.

Otherwise, you will be in hot water and it will prevent you from following more users.

How do I prevent the following too fast error on TikTok?

There are a number of steps you can take to avoid the error from ever happening again.

Follow the tricks below and you will never get blocked from following others on the app again.

Trick 1: Follow others in intervals.

When you follow any user, you need to ensure that you do it in gaps.

An example of a gap is following one person every 3 minutes.

This gap between the following will keep you safe from the error and you will not be blocked due to the system abusing.

Trick 2: Do not follow more than 25 users in an hour

This is another way to avoid the restriction from following, you should not follow more than 25 users per hour.

However, the limit of following on TikTok is 30 users per hour.

But I recommend 25 users.

It is the general information for you to follow.

Trick 3: Don’t use automation

It is another way of getting blocked from following that is, using automation.

It is because the algorithm of TikTok can detect that you’re using automation and will block you immediately.

When you go through TikTok’s Community Guidelines, you will come to know that Automation is also against their guidelines and it might result in the suspension of your account.

Why does TikTok say you’re tapping too fast?

There is another error that you might encounter while using TikTok that is, “You’re tapping too fast” error.

If you are getting this error, it means that you are liking various videos rapidly and without even watching them.

This error is also faced by most users and they do it while swiping the videos of their followers.

That is the reason TikTok considers you a bot because you do not act like a normal human being and it results in the error.

You also have to wait for this error to go away on its own.

Final Words

If you get this error “You’re following too fast” on TikTok, the only way to prevent it is to stop following for a long time.

Instead, follow the users in intervals or gaps.

Furthermore, you should not exceed the limit on TikTok which is more or less 30 users per hour.

These tips will help you to avoid being blocked.

Now, you have successfully learned how to get rid of you’re following too fast on TikTok.

What’s Next

Can you see who views your TikTok

How to Find Someone on TikTok by Phone Number

How to Find People on OnlyFans

Arsalan Rauf
Arsalan Rauf

Arsalan Rauf is an entrepreneur, freelancer, creative writer, and also a fountainhead of Green Hat Expert. Additionally, he is also an eminent researcher of Blogging, SEO, Internet Marketing, Social Media, premium accounts, codes, links, tips and tricks, etc.
www.greenhatexpert.com

Filed Under: TikTok

How to Find Someone on TikTok by Phone Number

Last Updated on April 21, 2023 By Arsalan Rauf

Do you want to find someone on Tiktok but you do not know the procedure?

It is a simple task to find someone on Tiktok – all you need to use is the search function of the platform.

However, you need to know the name or username of that person too.

If you do not know the username or name of that person, then you cannot find them on Tik Tok app.

When it comes to finding someone on TikTok by phone number, the search feature will not help you.

To find people on TikTok by phone number, you need to navigate to “Find contacts” page on the application.

In this post, I am going to teach you how to find someone on TikTok on the app, by phone number, and on the computer/PC.

How to find someone on TikTok

Use the search option on the application to find someone on TikTok, or you can also choose “Find Friends” page.

Furthermore, you can also reach them if you are familiar with the username of the person, just visit their profile by typing tiktok.com/@username using a web browser.

Steps include: Open TikTok app> Login> Discover> search for person’s name/username

The page “Find friends” enables you to find your friends on TikTok with the help of your contact list or Facebook.

If you have a large number of contact lists, there is a chance that some of them may have connected the phone number with the app, so you can find the user in “Find contacts” feature.

Unlike other social media platforms, TikTok’s profile link is different.

For example, a social media platform like Instagram, the profile link does not have “@” sign (e.g. Instagram.com/greenhatexpertcom).

However, if you want to visit the profile of someone using their link on TikTok app, you need to include “@” sign before their username, for example, (tiktok.com/@greenhatexpert).

The search feature on TikTok is similar to other social media platforms.

To find someone, you need to enter their username or name there if you know it.

Then, go through the search results to find their profile based on social links or their profile picture (if they posted any).

I am going to share a couple of ways to find people on Tiktok.

How to find someone on TikTok by phone number

The process include: Your Profile> profile icon with “+” sign.

To find someone on TikTok by phone number, you need to go to the “Find friends” page.

This will help you to find your friends on TikTok using contacts or Facebook.

First of all, open TikTok app on your android/mobile.

After doing so, log in to your account, usually it is already logged in.

When you reach the homepage of the app, tap on the “Me” icon available on the bottom navigation bar.

The process will lead you to your profile where you can see all your videos on TikTok app.

The top navigation bar of the profile displays a profile icon with a sign of “+”.

To go to the “Find friends” page, you need to tap on profile icon with a “+” sign.

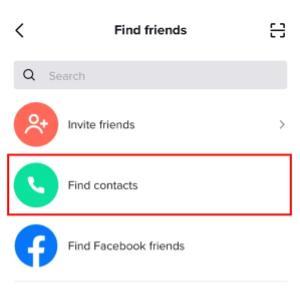
To find your contacts to locate the people with TikTok account who have linked their phone number, tap on “Find contacts” option to find them.

After reaching the “Find friends” page, there are three options you can see there – Find contacts, Invite friends and Find Facebook friends.

The first option is “Invite friends” enables you to invite your friends to TikTok app via social platforms or using your contacts.

The next option is “Find contacts” enables you to locate your friends on TikTok using their phone number.

The last option is “Find Facebook friends” enables you to find someone on Tiktok by Facebook.

You will definitely want to choose the option of “Find contacts”.

So, tap on “Find contacts” option to get started.

It will ask you to add your phone number.

You can skip this option by tapping on “Skip” or add your phone number by tapping on “Add”.

Your friends will be able to find your profile on TikTok using your phone number if you add the number.

If you skip the process by tapping on “Skip”, your friends will not be able to find you on TikTok by your phone number.

After adding your phone number or skipping it, you will see your contacts list.

The contact list displays the list of contacts either with a “Follow” button or an “invite” button.

If your contact shows a “Follow” button, showing that your contact have already connected their phone number with TikTok and they are using the app.

Alternatively, your contact with an “Invite” button shows that they either do not have installed application on the android or didn’t connect the phone number on the app.

Well done! You have successfully learned how to find someone on TikTok by phone number.

How to search for someone on TikTok on computer

log in to existing tiktok account

The steps include visit TikTok.com> Click “Login” button> Login.

You need to visit the TikTok official website and login your account to search for someone on TikTok on computer.

After logging in, the search can be done using their name or username with the help of search function.

This search function cannot be used if you are not logged in.

However, if you are familiar with the username of the person, you can use it to visit the profile using tiktok.com/@username

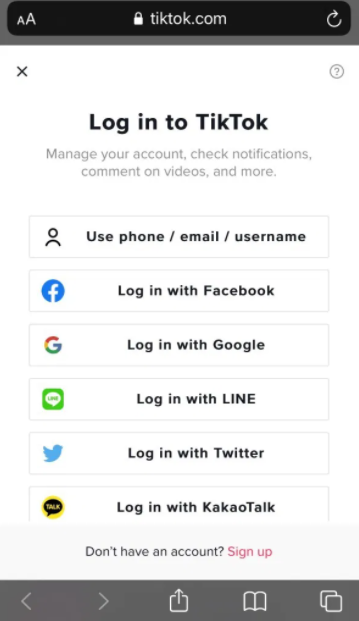
To get started, visit TikTok.com and click the “Login” button on website.

After clicking it, log in using your email/phone number/username or using any social options.

Use the search function available there by using their name or username.

After logging into the TikTok platform, you will see “For You” page.

The TikTok logo can be seen on the top navigation bar.

There is a search bar next to the logo of TikTok that displays “Search accounts”.

Enter the username or name of the person to search for someone using the search bar and press enter.

Now, it will come up with the profiles with the same name or username that you put in the search bar.

If the user is not available in the top results, load more search results by scrolling down and click on “Load more”.

Well done! You have successfully learned how to search someone on TikTok on PC/Computer or Desktop.

Final Words

It can be a hard task to find someone on TikTok because a lot of users do not connect their phone number on TikTok.

The contacts method will not work if they did not connect their phone number with app.

If that is the case, you need to find them by searching for their username or name if you know it.

Otherwise, there is no way to find whether they are using TikTok or not unless you ask them.

What’s Next

How to Find Someone on Instagram without Their Username

How to Find People on Onlyfans

How to see who viewed your TikTok profile

Arsalan Rauf
Arsalan Rauf

Arsalan Rauf is an entrepreneur, freelancer, creative writer, and also a fountainhead of Green Hat Expert. Additionally, he is also an eminent researcher of Blogging, SEO, Internet Marketing, Social Media, premium accounts, codes, links, tips and tricks, etc.

www.greenhatexpert.com

Filed Under: TikTok

How to Recover Your Facebook Account Without Email or Phone Number

Last Updated on September 2, 2021 By Arsalan Rauf

How to Recover Your Facebook Account Without Email And Phone Number

Do you want to recover your Facebook account without email and phone number?

You can reset the password on Facebook by clicking the “Forgot password” option or link.

However, you need to have access to either your phone number or your email ID.

Otherwise, requesting a password will go in vain and you will not receive a password reset link.

In the process of password reset, there is an option that is, “I cannot access my email account”.

If you click that option, Facebook will tell you that you will not be able to access your FB account.

Further, they provide a link to the Help Centre of Facebook where you can learn more about the Facebook account access.

However, the given information there is not helpful.

So how will you reset your password?

In this guide, I am going to teach you how to recover your Facebook account without email and phone number so you will be able to reset your account password.

How to recover your Facebook account without Email

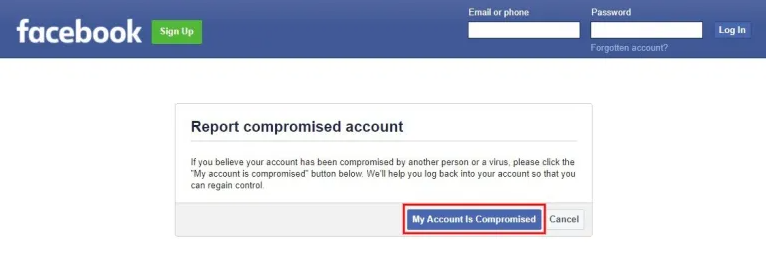
You need to go to “Report Compromised Account” page to recover your Facebook account without email and phone.

The page will allow you to reset your password if you provide the previous/old password.

The page asks you to enter your email address or mobile number as per your choice.

There is no problem if you do not have access to phone or email because you will not receive a password reset link.

On the contrary, the password will be reset soon after you enter your old password.

Unluckily, if you have forgot your old password, you cannot reset your password.

If you have successfully reset your password, you will be able to log in to your account using your new password.

Here is a step by step guide on how to recover your facebook account without email and phone number.

Step 1: Navigate to “Report Compromised Account”

First of all, open a web browser on your laptop/pc such as Google chrome.

Do not use a mobile browser otherwise, you will be restricted to certain actions later.

The next step is to Google for “Facebook account compromised” or visit this link directly.

In the search results, click on the result “Report Compromised Account – Facebook”.

Furthermore, you can also go to the page directly from here: https://www.facebook.com/hacked.

 This page enables the users to recover their account if they believe their account is compromised.

In addition, Facebook will also allow you to log into your account to get access of your account again.

Further, the page also allows you to reset the Facebook password without a phone number and email.

After opening that page, click on “My Account is compromised”.

Step 2: Enter your email address or mobile number and old password

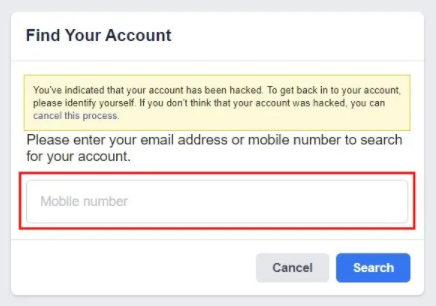
After clicking on “My Account is Compromised”, it will open the page “Find Your Account”.

The page asks you to enter your email or mobile number.

The process enables Facebook to find your account.

In the “Mobile number” field, you need to enter your email address or mobile number.

There is nothing to worry if you do not have access to your email or phone, Facebook will not send anything.

After entering your email or mobile number, hit the “Search”.

You will come across your name and email address when you click on “Search”.

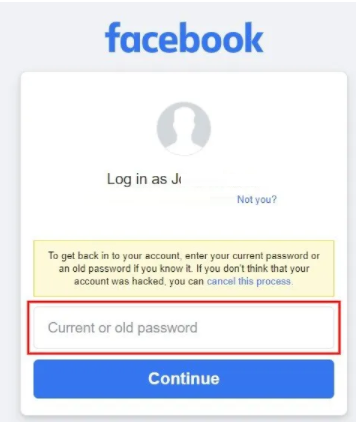
You need to enter your current password to get access to your account.

Apart from the current password, the old password can also be used.

The process is necessary to prove that you are the owner of the account.

In the “Current or old password” field, you need to put your current or old password.

Now, click on “Continue” to move on to the next step.

Step 3: Tell Facebook what’s happening

After entering your old or current password, you will reach on the recovery tool

This enables you to not only recover your account but also secure it.

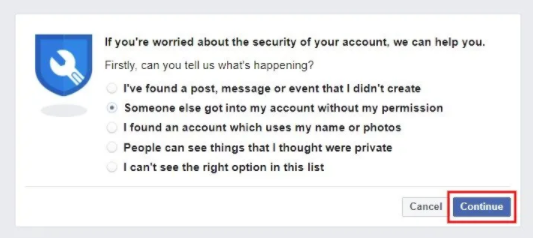
First of all, you need to tell Facebook what is happening.

There are five options and you can choose one of them.

Select the most relevant option keeping in view your problem.

If your account is hacked or you think so, then, choose this option “Someone else got into my account without my permission”.

If the relevant option is not available then you can choose this option “I can’t see the right option in the list”.

Now, click on “Continue” to move on to the next step.

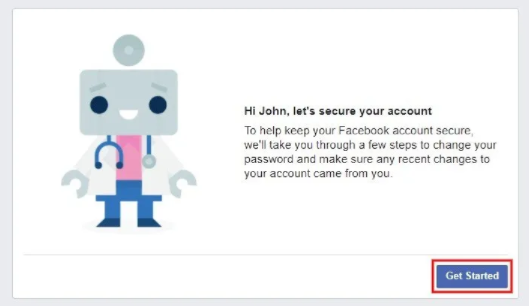
After telling Facebook what is happening, you will be able to see the description of the tool.

It will show that it will take you through a few steps in order to change the password.

The tool will also ensure that the recent changes to your account made by you.

You can revert the recent changes if someone else made the recent changes to your account.

First of all, you need to click on “Get Started” to start the process of recovery.

Step 4: Change your password

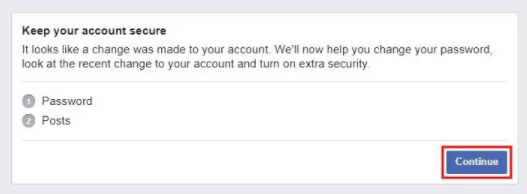
After clicking on “Get Started”, Facebook informs the user that a change was made to your account.

The tool not only helps you to change the password but also takes recent changes to your account into account.

The process includes your password and your posts.

Now, click on “Continue” to move on to the next step.

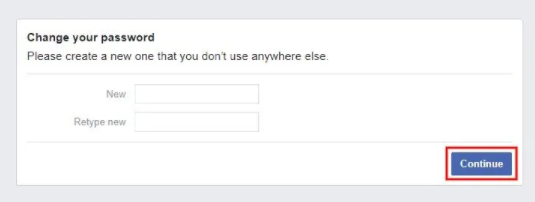
After clicking on continue, you will see “Change your password” page.

You can reset your Facebook password with the help of this page.

First of all, select a new password and enter it in the “New” field.

After doing so, retype the password in the “Retype new” field for confirmation of the previous one.

After doing the selection of a new password, click on “Continue” to move on to the next step.

Step 5: Go to News Feed

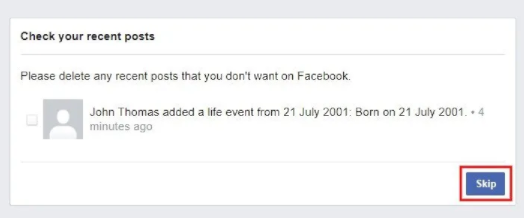
Lastly, you need to check your recent posts.

After clicking on “Continue”, you will come across “Check your recent posts” page to complete the job.

This page displays the list of your recent posts on Facebook.

If your Facebook account is hacked, they may have posted something on your profile.

Do not worry you can delete your recent posts from Facebook that you have not posted.

If you want to skip the deletion, click on “Skip” to skip this step.

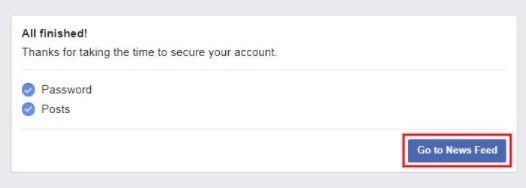
So you have gone through your recent posts, it completes the process and you see “All finished” page.

It means that you have successfully completed the process.

Now, you can log in to your Facebook account using your new password.

To visit your News Feed, click on “Go to News Feed”.

I have successfully guided you on how to recover your Facebook account without email and phone number.

Final Words

Now, if you have recovered your Facebook account successfully, you need to make some changes to keep it secure.

First of all, do not try to share your login information with anyone.

Further, check the website URL before you enter your login details.

It is because a lot of scammers create websites similar to Facebook to trick you.

The second step is to turn on two-factor authentication.

It will keep your Facebook account safe along with your password.

Whenever someone tries to log in to your account whether it is on a browser or mobile device, you will be asked to enter a special login code to bypass the security.

This process will save your Facebook account from getting hacked.

What’s Next

How to Poke Someone on Facebook

Fake Email for Facebook Account

Arsalan Rauf
Arsalan Rauf

Arsalan Rauf is an entrepreneur, freelancer, creative writer, and also a fountainhead of Green Hat Expert. Additionally, he is also an eminent researcher of Blogging, SEO, Internet Marketing, Social Media, premium accounts, codes, links, tips and tricks, etc.
www.greenhatexpert.com

Filed Under: Facebook

How to Delete a Sent Snap on Snapchat

Last Updated on August 13, 2021 By Arsalan Rauf

Did you accidentally send snap to someone that you didn’t want to send?

If yes, you might be looking for ways to delete or unsend it before the next person (receiver) opens it right?

It will be too late to delete the snap if the receiver has already opened the snap.

In 2018, after an update from Snapchat, it enables the users to delete snaps.

Before the update, you were not allowed to delete snaps.

After the update in 2018, now you can delete snaps or messages from both sides to avoid embarrassment.

In this post, you are going to learn how to delete sent snap on Snapchat.

You will also know whether you can unsend a snap or what to do if you sent a snap to the wrong person to whom you didn’t intend to send.

How to delete a sent snap on Snapchat

The first task is to find the snap you want to delete in order to delete a sent snap on Snapchat.

The next step is to tap and hold the snap, then tap on “Delete” to delete it.

After tapping on “Delete”, Snapchat will try to remove it from their servers.

When you delete a snap, it will not only be deleted from the other side but from both sides.

In other words, the snap will be deleted from both sides, your chat and also from the receiver’s chat.

It is the best thing you delete a snap before the receiver opens it.

If the receiver has already opened the snap, deleting it will not make a difference.

If the snap displays “Delivered” that shows that the receiver has not opened it yet.

However, if the snap shows “Opened”, it shows that the receiver has already opened the snap.

If the receiver has opened it then it is too late to delete it because the person has seen your snap.

I have written a step by step guide on how can you delete a sent snap on Snapchat.

1. Find the snap that you want to remove

Reach the snap that you want to delete, then tap and hold it to delete it.

Firstly, your task is to find the snap that you want to remove from both sides.

First of all, open Snapchat using your mobile device.

After opening it, tap on the chat icon to go through your chats.

Find the chat of the user that you want to delete the snap from.

After finding the user, tap on the user to open your chat with him/her.

If you have sent a snap to him/her, you will find a red arrow with a “Delivered” caption there.

If the snap shows “Delivered” that shows that the receiver has not opened it yet.

It is good news for if the user has not seen your snap, you can still delete it before the user found it.

If the snap is showing “Opened” that shows that the receiver has already opened the snap.

If the snap is opened, it does not mean that you cannot delete it, you can still remove it from the chat.

Read through to learn how to delete the snap.

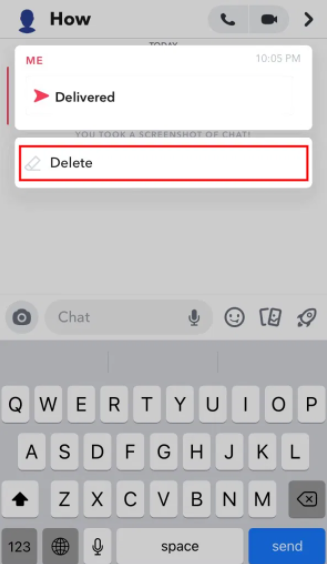
2. Tap and hold the snap, then tap on “Delete”

To delete the snap, Tap on “Delete”.

The next move is to tap and hold the snap.

This process will result in a pop-up that will show the “Delete” option on your screen.

This option can get the job done of deleting the sent snap.

Once the option appears, tap on “Delete” to delete the snap.

If you have tapped on the “Delete” option for the first time, you will come across a pop-up message.

Tap on “Okay” to close the appearing pop-up message.

When you delete a message then the pop-up appears to tell you, Snapchat will remove it from their servers.

However, this may not happen with you if you are using an older version of Snapchat or your internet connection is poor.

Apart from that, deleting a snap will work for all the time.

If you deleted a “Delivered” snap, it will be permanently deleted and the receiver will not be able to open it.

However, if you delete an “Opened” status snap, it will not make a difference because the user has already seen it.

In worst cases, the receiver might have already opened the snap and took a screenshot to get a proof.

In such a case, there is no use in deleting the snap.

Read through the post to see what happens after you have deleted a snap.

3. A message will appear that the snap is deleted

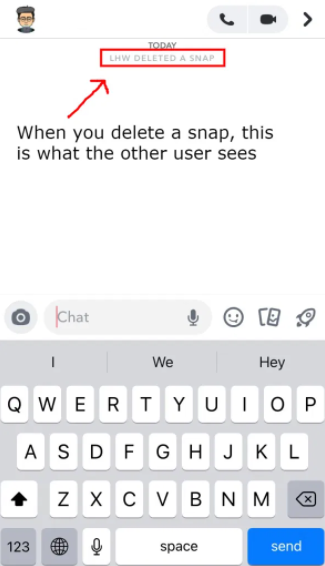
If you have deleted a snap successfully, the other will see a message “(name) deleted a snap”.

After deleting the snap, Snapchat will always show a message like Whatsapp that you have deleted it to inform the receiver.

The message will be “(name) deleted a snap”, the name is used to assume the person’s name.

For instance, if the name of the person is GHE, the message will be “GHE deleted a snap” in the chat.

It means that the snap has been successfully deleted from both sides, sender and receiver.

However, it does not make sure that the user has not seen your snap in this process.

If the snap says “Opened”, the user has already seen your snap, so there is no use to delete it.

Same is the case if the person has taken a screenshot and you see a message “(name) took a screenshot” of the snap, deleting it will make no difference.

The point is you can still delete the snap to avoid the “Opened” arrow.

I have successfully guided you how to delete a sent snap on Snapchat!

Can you unsend a snap?

Yes, you can unsend a snap from Snapchat.

Snapchat added this feature in 2018 in which they have allowed the users to delete snaps and messages.

It enables you to unsend snaps and messages that you mistakenly sent or didn’t mean to send.

The unsend process can be done by holding it and deleting it.

You need to ensure that you delete the snap before the receiver opens it.

If the person whom you sent a snap already opened the snap, it is too late to delete it.

What to do if you sent a Snapchat to the wrong person?

To avoid any problem, you can delete the Snapchat that you have sent to a wrong person.

Simply tap and hold the snap that you want to delete and tap on “Delete”.

This action will remove the snap from both sides, and the person who received it will not be able to open it.

However, you need to delete the snap immediately after sending it.

It will prevent the user to get a chance to open the snap.

Final Words

Sending snaps to people on Snapchat is the best way to socialize on this platform.

However, if you sent a snap to the wrong person, it can cause trouble.

Luckily, you can delete your snaps and messages due to their updated feature they launched in 2018.

This prevents the people from seeing your snaps that you don’t want to.

Arsalan Rauf
Arsalan Rauf

Arsalan Rauf is an entrepreneur, freelancer, creative writer, and also a fountainhead of Green Hat Expert. Additionally, he is also an eminent researcher of Blogging, SEO, Internet Marketing, Social Media, premium accounts, codes, links, tips and tricks, etc.
www.greenhatexpert.com

Filed Under: Snapchat

How to Track Facebook Visitors Profile Without any App

Last Updated on August 13, 2021 By Arsalan Rauf

I shall discuss an interesting topic. It will allow you to track Facebook visitors with an easy and simple method. Everyone on Facebook wants to check that who is visiting or quietly looking at their profile. Therefore, I have written this post for you to know the tricks that enable you to track visitor of Facebook profiles.

Now I shall show the trick to Track Facebook Profile Visitors on Facebook. This trick is not allowed by Facebook but there are many ways to track the visitor of your profile at the source Facebook page view. Facebook does not allow these cool features due to the privacy of the visitor. It does not want to disclose information about the visitor. Now you can track your visitor’s profile on Facebook by using the internet connection. People also want to know who opened their pictures, profile and status. Now you can find anyone who visits your Facebook profile.

Also, read

Create unlimited Facebook accounts without Email verification

How to watch adult videos on Youtube without signing in

How To Track Facebook Visitors Profile:

1: Login to your Facebook account.

Login Facebook

2: After login, press CTRL+U button and it will open a new window where you will see the source code of the Facebook page. Another way to do this is to press the right click of the mouse and press view page source.

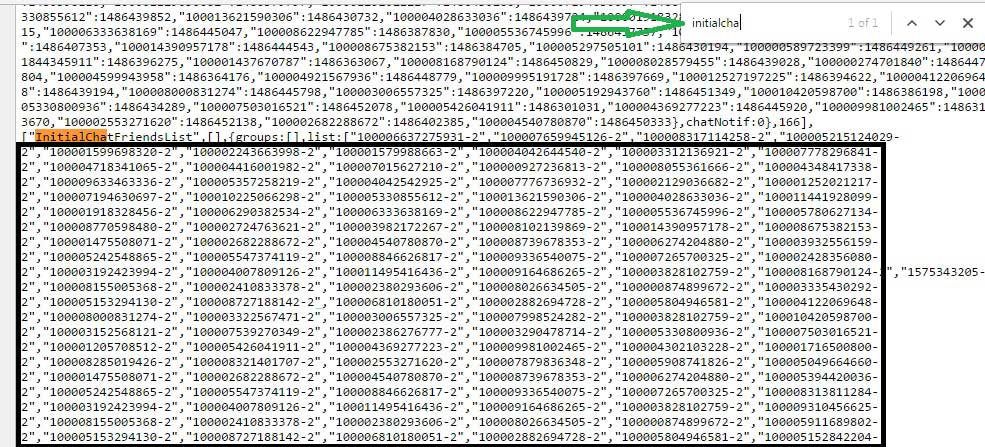
3: after doing so, press CTRL+F and search InitialChatFriendsList and you will be able to see a number of profile ID numbers which starts with 10000. These are the ids that are secretly looking at your profile.

4: you can copy the ID to see who is visiting your profile. You can see the below picture that shows how many people or who viewed your Facebook profile secretly.

facebook view source

5: Use the profile ID as www.facebook.com/ID and an example (www.facebook.com/100006637277731 ) and Paste in the URL of your browser and look at the people who visit your profile.

copy profile id

6: These are the Facebook profile IDS of the visitors who visit your Facebook profile.

7: Now select or copy the ID of each profile and use the URL and paste the id to check one by one. This method is a little bit time taking and complicated but the trick is 100% working.

The trick is very easy to understand and you can track Facebook profile visitor with ease. And will know who is viewing your profile during their spare time. It may be your friend or lover. When a person wants to attack your profile or account. It tries to get your all information including Date of birth, hobbies, friends and relatives etc. They use full force to get access to your Fb account.

To conclude, I want to tell you that Facebook does not allow you to see who is visiting Facebook profile. But now you can know who viewed your Facebook profile. It is the best and simple way to track your visitor. If you are having problems, leave it in the comment section.

I shall respond to you asap. Do not forget to share this post.

Arsalan Rauf
Arsalan Rauf

Arsalan Rauf is an entrepreneur, freelancer, creative writer, and also a fountainhead of Green Hat Expert. Additionally, he is also an eminent researcher of Blogging, SEO, Internet Marketing, Social Media, premium accounts, codes, links, tips and tricks, etc.
www.greenhatexpert.com

Filed Under: Facebook, Social Media Tagged With: facebook profile view notification, facebook profile view notification firefox, facebook profile visitor app for android, facebook profile visitors list, facebook tracker app, facebook visitor tracker, facebook visitor tracker free download, profile visitors for facebook

How to Install and Setup Facebook Comments in WordPress

Last Updated on August 21, 2022 By Arsalan Rauf

How to Install and Setup Facebook Comments in WordPress

Are you looking to add Facebook comments on your WordPress site?

Facebook is the largest social media network in the world. Therefore, top sites including TechCrunch are using Facebook comment system and avoiding default WordPress comments. In this post, I am going to show you how to install and set up Facebook comments in WordPress.

Before we get to know it, let’s take a look at why would anyone want to use Facebook comments instead of default WordPress comments.

Pros and Cons of Using Facebook Comments in WordPress

The first benefit of using Facebook comments in WordPress is that it boosts your site visibility on Facebook’s network. When someone leaves a comment on your site, they can check the box to share the comment with their Facebook friends. It can give you the potential for additional traffic.

The second benefit of using Facebook comments is that it will remove the anonymity factor, so the users will not leave spammy comments. It is because it will be published on their Facebook profile.

However, it also has a downside too. It is because users do not feel comfortable leaving a comment from their Facebook account or profile due to their sense of anonymity.

Unlike other comment systems such as Disqus, Facebook comments are neither synced to your WordPress comments nor stored. They replace WordPress comments completely. If your post has some posts with WordPress comments, those existing comments will appear after or before Facebook comments.

Now you are aware of pros and cons, now see how to install Facebook comments in WordPress.

Installing Facebook Comments in WordPress

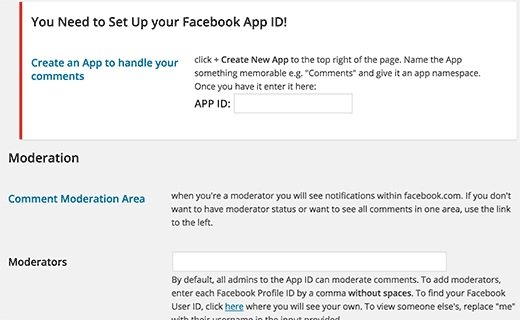
First of all, you have to install and activate the Facebook Comments plugin to your site. After activation, you need to go to Settings> Facebook Comments to setup the plugin.

fb comments plugin settings

If you want to use Facebook comments on your site, you need to create a Facebook app. If you already have created an app for your site, you can use that app ID here. Otherwise, you will have to create a new one.

First of all, visit the Facebook Apps page, then click on the create new app button to create an app.

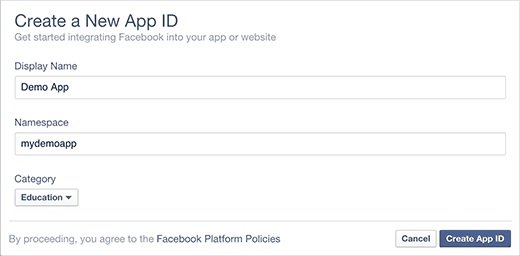
Now you have to give a name for your app and click on the create app ID button to complete it.

new fb ap

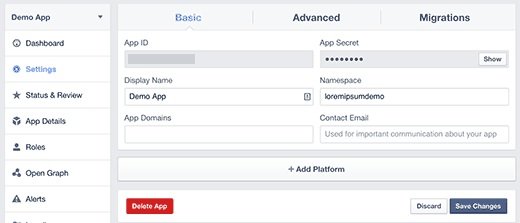
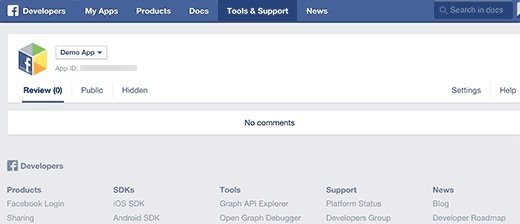
Facebook will create a new app for you to use and it will take you to app dashboard. You will see your app ID there.

Now you will copy and paste this app ID into your plugin settings. Before doing that, you have to configure the app to make it functional on your website. Now click on settings link, click on +Add platform button.

settings platform

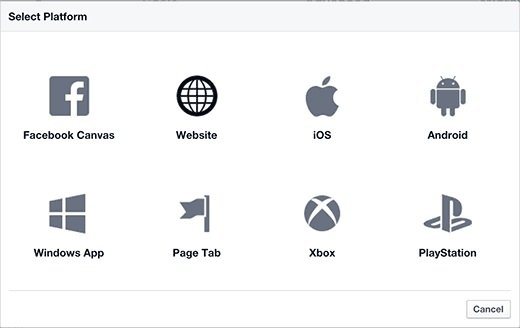
You will see a new popup window on the screen. Now click on website to select it as your platform.

platforms

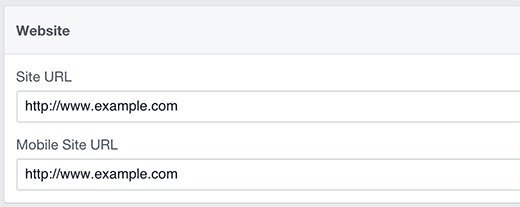
It will add a new website section in the settings of your app’s page where you can enter the address of your WordPress site.

app domain

Now save your settings, you can copy the app ID and paste it into the plugin’s settings page available on your WordPress site.

This WordPress Facebook comments plugins offer a comprehensive set of options. The default settings of the plugin work for most of the sites. If it is not working on your site, you should see the settings to see what to change.

After completing it, click the ‘save changes’ button to save your settings.

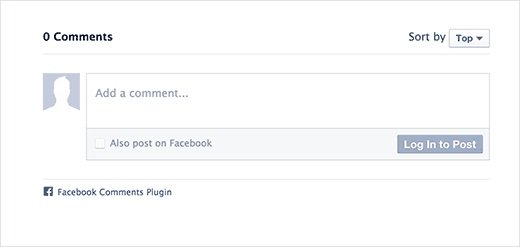
Now, go to your website to see Facebook comments in comment section on your site.

fb comments preview

Moderating Your Facebook Comments

Now you are the admin of the Facebook app, that is why you will get notifications for new comments whenever you will login or use your Facebook account. You can find the link to your Facebook comment moderation tool in the plugin’s settings page.

fb comment moderation

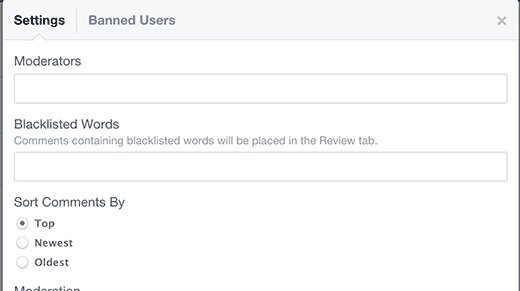
Click on the settings link in the Facebook comment moderation tool to add new comment moderators.

adding moderators

I hope that you will like this post and it will help you to install and setup Facebook comments in WordPress.

You may also want to check our guide on How to add social media icons to blogger.

Do not forget to share this post and like our Facebook Page.

Arsalan Rauf
Arsalan Rauf

Arsalan Rauf is an entrepreneur, freelancer, creative writer, and also a fountainhead of Green Hat Expert. Additionally, he is also an eminent researcher of Blogging, SEO, Internet Marketing, Social Media, premium accounts, codes, links, tips and tricks, etc.
www.greenhatexpert.com

Filed Under: Blogging, Facebook, Guide, Social Media, WordPress Tagged With: best facebook comments plugin for wordpress, facebook comments app, facebook comments on blog, facebook comments vs wordpress comments, facebook comments wordpress without plugin, how to use facebook comment in wordpress, import facebook comments to wordpress, wordpress facebook comments plugin responsive

How to Add YouTube Subscribe Button in WordPress

Last Updated on August 11, 2021 By Arsalan Rauf

In this post, I am going to show you how to add YouTube Subscribe Button in WordPress.

How to Add YouTube Subscribe Button in WordPress

Do you want to get more subscribers on your YouTube channel? If you have a blog that is getting enough traffic. You should add a subscribe button on your blog to make it an easy task for your visitors to subscribe to your channel. In this post, you will get to know how to add a YouTube subscribe button in WordPress.

Method 1: Manually Adding YouTube Subscribe Button Code

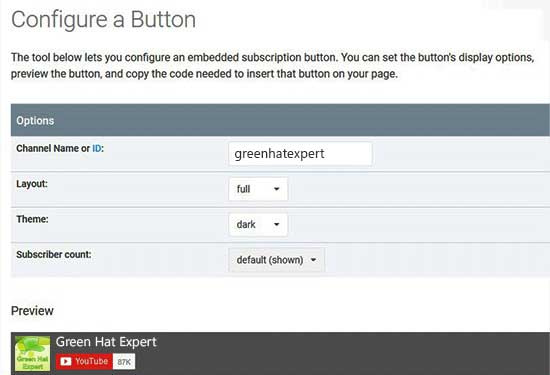
First of all, you have to visit YouTube subscribe button page on the Google Developer’s website.

config button ytsubscribe

After reaching there, enter your YouTube channel name, select a theme, layout and subscriber count option. It will give you a live preview of how your button will display on the site.

After satisfaction, you can scroll down to copy the embed code.

copy code ytsubscribe

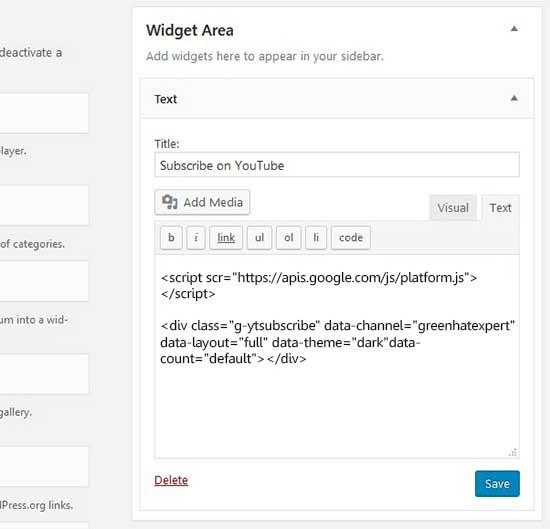
Then, go to login and login to the WordPress admin area of your site and go to Appearance> Widgets. Now you have to drag and drop a text widget to your widget area and paste the YouTube subscribe button code inside the widget.

text widget ytsubscribe

After completion, do not forget to save your changes and visit your site to see the YouTube subscribe button working.

subscribe youtube channel sidebar

Method 2: Using Plugin to Add a YouTube Subscribe Bar

There is another way to add a YouTube subscribe button on your site by adding it below every YouTube video on your website. It has additional exposure as well that can help you to increase your subscribers.

First of all, you need to install and activate the YouTube Subscribe Bar plugin.

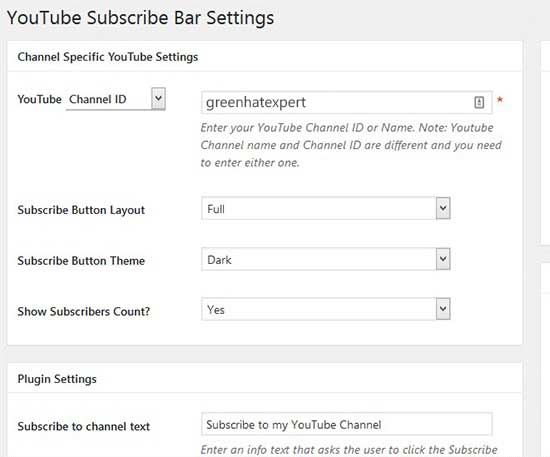
After activation of the plugin, you will go to Settings> YouTube Subscribe Bar in order to add YouTube channel ID.

Select a button theme or layout of your choice to show the subscribers count.

youtube bar settings ytsubscribe

Additionally, the YouTube subscribe bar plugin also enables you to add some text before the button and you can also edit its styling. Use this area to add a call to action such as “Subscribe to My YouTube Channel or Subscribe to My Channel”

After completing this task, make sure to click on the Save Changes button to save your settings.

So this plugin will show your YouTube subscribe bar below every YouTube video on your website. This YouTube subscribe bar will display on the videos from your channel and third-party channels, so try to share useful content on your website to attract more subscribers on your YouTube channel.

Note: YouTube subscribe bar plugin will be functional only on Embed Videos. It will not work on embedded videos by iFrame.

I hope that you have learnt how to add YouTube Subscribe button in WordPress.

You may also want to check our guide about how to add SSL and HTTPS in WordPress.

Do not forget to share this post and also like our Facebook page to get more updates.

Arsalan Rauf
Arsalan Rauf

Arsalan Rauf is an entrepreneur, freelancer, creative writer, and also a fountainhead of Green Hat Expert. Additionally, he is also an eminent researcher of Blogging, SEO, Internet Marketing, Social Media, premium accounts, codes, links, tips and tricks, etc.
www.greenhatexpert.com

Filed Under: Social Media, YouTube Tagged With: subscribe button html, subscriber forms for youtube, youtube link button for website, YouTube Subscribe Button for WordPress, youtube subscribe button in video, YouTube Subscribe Button in WordPress, youtube subscribe button link, youtube subscribe button plugin, youtube subscribe button size, youtube subscribe to download

How to View and Download Instagram Stories on PC/Computer

Last Updated on August 11, 2021 By Arsalan Rauf

How to View and Download Instagram Stories on PC/Computer

Instagram offers a number of excellent features which you can use to make users still exist in social media. It ranges from uploading videos, photos and Instagram stories to live stories.

download instagram stories di pc

One features that people usually consider the most is Instagram stories. in August 2016, it came into existence and then stories consist of a number of new features that are liked by many people.

Must check:

  • How to know who viewed your Instagram profile
  • How to Create unlimited Instagram accounts without verification

Even so, Instagram Stories currently can only be Viewed with the help of an Android

To observe someone’s story, click on their profile picture at the top of feed or on their profile image. When you see stories, they automatically scroll from one person to the next. You can click the screen to skip to the next photo or video and swipe right or left to skip between the stories of the people.

If you want to view Instagram Stories on PC / laptop, you can try the following ways.

How To View Instagram Stories on Computer

Apart from smartphone, you can also view Instagram stories from your PC/Computer browser, you can download instagram stories using Chrome browser to get them online. It means that Google Chrome browser will be used as Instagram story downloader online for you. Instagram stories download including photos or videos with ease by following these steps:

Instagram Stories in Computer

  1. First of all, you need to ensure that you are using Google Chrome browser
  2. Log in to comand login using your Instagram account credentials
  3. By default, Stories will not appear in your browser.
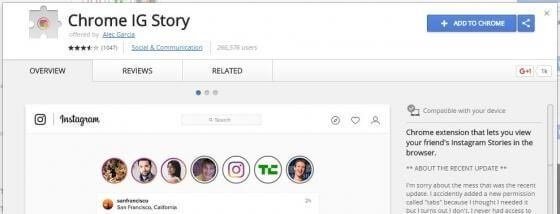
  4. To make them visible, you have to install the Chrome Extension following: Chrome IG Story
view instagram stories on PC
  1. After installing it, refreshthe page of your Instagram. Will automatically appear Stories and Live in Instagram.

How To Download Instagram Stories in Computer

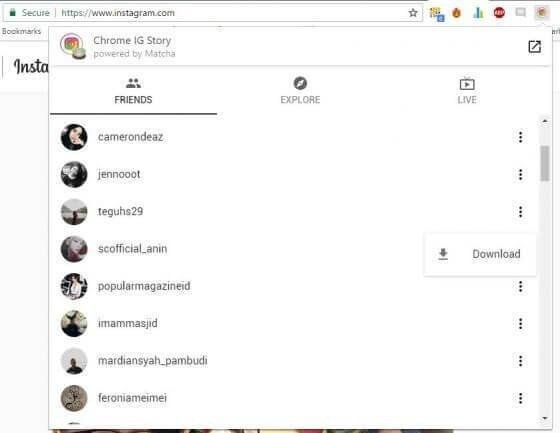
  1. Click on the Chrome extension IG Story is in the upper right (next to the address bar).
  2. Search Stories you want to download and save Instagram stories online.
instagram stories on PC
  1. Click the menu button (point 3) and click Download.
  2. Now you can download the Instagram Stories automatically.

The final words

That is it. I hope that you liked the post on how to download Instagram stories on PC in which you can download Instagram live stories as well. In addition, this process also allows you to watch Instagram stories anonymously.

Do not forget to share this post.

Arsalan Rauf
Arsalan Rauf

Arsalan Rauf is an entrepreneur, freelancer, creative writer, and also a fountainhead of Green Hat Expert. Additionally, he is also an eminent researcher of Blogging, SEO, Internet Marketing, Social Media, premium accounts, codes, links, tips and tricks, etc.
www.greenhatexpert.com

Filed Under: Instagram, Social Media Tagged With: download instagram highlights, download instagram live stories, download instagram stories chrome, download instagram stories online, instagram stories firefox, instagram story downloader online, save instagram stories online, watch instagram stories anonymously

How to Embed a Facebook Video in WordPress

Last Updated on August 21, 2022 By Arsalan Rauf

How to Embed a Facebook Video in WordPress

Do you want to embed a Facebook video in WordPress?

Due to the recent popularity of Facebook videos and Facebook live platform, people also want to embed Facebook videos in WordPress. In this post, I shall show you how to embed Facebook videos in WordPress with ease and Facebook live video in WordPress.

Why Add Facebook Videos in WordPress?

I suggest to my friends and followers that they should not upload videos to WordPress. I also suggest using a video sharing site like YouTube.

Currently, Youtube is the largest video hosting platform in the world, Facebook is the biggest social network and their videos are growing very fast. Recently Facebook has introduced Facebook live video and Facebook auto-play features. Marketers are paying attention to these features from all over the world. It is because they increase user engagement and overall reach.

By using Facebook videos, you can increase the likes on your Facebook page. For more social experience, you can install Facebook comments, add Facebook page plugin, and add Facebook like button on your WordPress website.

After this discussion, let’s take a look how to embed Facebook videos on a WordPress website.

Embedding Facebook Videos in WordPress

First of all, you need to select the video that you want to embed on your website.

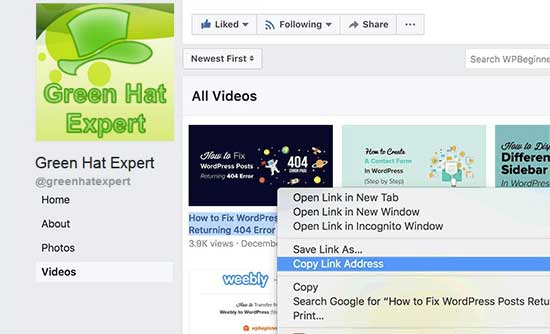
Now use the right click on the video date or name, and copy the link address.

copy video url

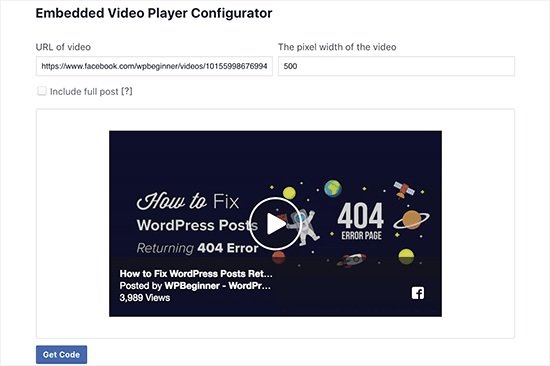
After doing so, you have to go to Facebook embedded video player website and scroll down to reach code generator section.

Now paste the URL that you copied earlier while clicking on the video name or date.

embed code generator

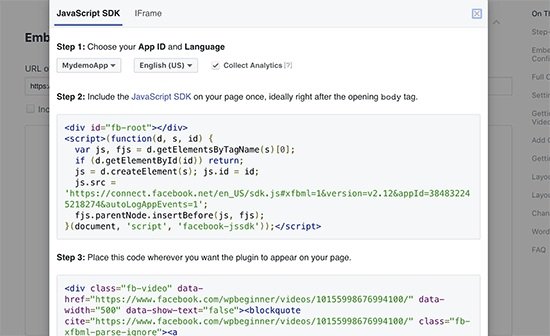
The next step is to click on the get code button and it will show you a popup of two boxes that contain code.

embed code

The first part of the code will go in the header section of your site.

There are several ways to add this code to your site.

If you are comfortable with editing files of theme, then you can add it to your theme and you need to edit header.php file and paste it after the <body> tag.

In addition, you can also install Insert Headers and Footers plugin to add it. For more details, see our post on how to install a WordPress plugin.

After activation, now go to the settings>Insert Headers and Footer page in admin of your WordPress and paste the code in the footer box. And press save changes to save it.

Note: You only have to add the first part of the code one time. For the next time, you need to add a Facebook video, to do that, you will copy and paste the second part of the code.

So go to the Facebook video embedder page to copy the second part of the code to paste it.

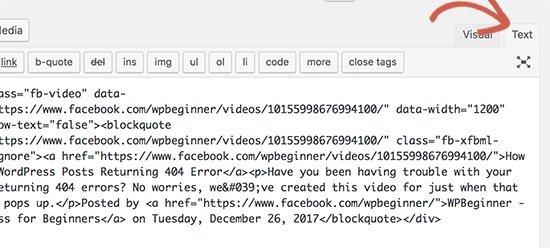
You can add the code in your pages, posts and even a sidebar widget of your WordPress site. While adding the code to your page and posts, you will have to go to the text editor, otherwise, WordPress visual editor will mishandle the code.

switch to text

Now go to your site to see the Facebook video embedded.

How to Embed Facebook Live Video in WordPress

You can embed the Facebook live video as well as a regular video let’s see how to do it. The difference is, you need to get the link of your Facebook live video.

The question is how to get the URL of Facebook live video?

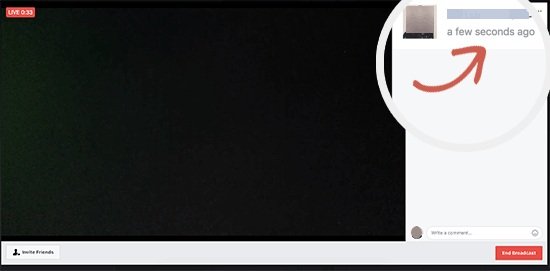
Facebook does not enable you to get a URL of your live video before you launch the live video. If you want to broadcast your live video of Facebook on your site, you need to go live.

You need to do the same procedure after going live, right click on the date and select the copy link address to copy the URL of live video.

facebook video embed preview

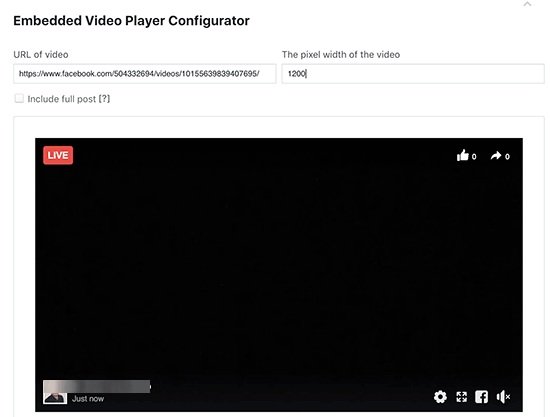
After getting the URL, you need to visit Facebook embedded video player website and paste the link in the ‘URL of video’ field.

fb live video url

Then the video embed code generator will fetch and show a preview of live Facebook video. You will have to click on the get code button and follow the rest of the instruction as described above to add these codes to your site.

After adding the Facebook live video code on your website, your visitors will be able to watch the Facebook live video from your site directly and also in their Facebook feeds.

live video embed code

I hope that you liked the post and you learn how to embed Facebook videos in WordPress. You may want to see our guide on Voice Search SEO.

Arsalan Rauf
Arsalan Rauf

Arsalan Rauf is an entrepreneur, freelancer, creative writer, and also a fountainhead of Green Hat Expert. Additionally, he is also an eminent researcher of Blogging, SEO, Internet Marketing, Social Media, premium accounts, codes, links, tips and tricks, etc.
www.greenhatexpert.com

Filed Under: Facebook, Guide, WordPress Tagged With: embed facebook live stream, embed facebook live video wordpress, embed facebook video wordpress plugin, facebook embedded video, facebook this video can t be embedded, facebook video embed autoplay, facebook video embed tool, wordpress facebook video gallery

  • « Previous Page
  • 1
  • …
  • 34
  • 35
  • 36
  • 37
  • Next Page »


Recent Posts

  • Free DeepSeek Accounts 2025
  • Free Zoho Mail Accounts 2025
  • Acudepot Discount Codes 2025
  • Free Blackshot Accounts 2025
  • Free GMX Email Accounts 2025
  • Songtrust Discount Codes 2025
  • Uzicases Discount Codes 2025
  • Cardillo Promo Codes 2025
  • Free DriverFix License Keys 2025
  • Avast Secureline VPN Activation Codes 2025

Recommended Posts

Create a Gmail Account Without Phone Number

Free Course Hero Account

Crunchyroll Accounts

Cracked Apps

Free Pokemon Go Accounts
Onlyfans Free Accounts
Free Chegg Accounts
Free Paypal Accounts
Free Gmail Accounts
Funny Steam Names

Categories

  • Apps
  • Apps for PC
  • Blogging
  • Discord
  • Facebook
  • Gaming
  • Grammar
  • Guide
  • How to
  • Instagram
  • Messaging
  • OnlyFans
  • Pinterest
  • Reddit
  • SEO
  • Snapchat
  • Social Media
  • Spotify
  • Steam
  • Telegram
  • TikTok
  • Twitch
  • Twitter
  • Whatsapp
  • WordPress
  • YouTube
  • Home
  • Social Media
  • Messaging
  • About
  • Submit Guest post