Green Hat Expert

  • Home
  • Social Media
    • Instagram
    • TikTok
    • Snapchat
    • Facebook
    • YouTube
    • Twitter
  • Messaging
    • Discord
    • Telegram
    • Whatsapp
  • About
  • Submit Guest post
You are here: Home / Archives for Social Media

Top 6 TikTok Viewers Online

Last Updated on January 1, 2024 By Arsalan Rauf

Are you finding TikTok viewers online?

It is because the platform of TikTok enables you to watch videos whether you have an account or not.

However, if you want to leave a comment on any TikTok video or like it, the account is imperative.

There are other online viewers available that can help you to watch TikTok videos online other than tiktok.com.

They do not ask for sign in and also free to use too.

The for you page (FYP) will not be changed if you use these TikTok viewers online.

In short, the videos will be reset available on your FYP.

This post has the 6 best TikTok online viewers that can be used to watch TikTok videos without an account.

1. Brainans.com

It is a Tiktok viewer online and downloader.

It enables the users to browse TikTok videos and provides the best experience.

It allows you to search for profiles, videos, music, and followers free of cost.

Here are the features of Brainans’:

  • You can download content – download tiktok videos or music from TikTok for free.
  • Anonymous Browsing – allows you to watch videos, hashtags, and users anonymously without going through the sign in process.
  • Search everything – using the search engine, you can search with the help of hashtags, users, music, and so on.
  • Analyze it – Check the view statistics, TikTok users, comments, and so on.

Additionally, scrolling the website will also enable you to see top tags, trending profiles and popular videos.

To download a TikTok video, open the video and click on the three dots, and click the “Download” option.

You need to know that Brainans uses the TikTok API to allow you to browse videos but it is not certified by TikTok.

2. UrleBird.com

It is another TikTok viewer that helps you to explore and analyze TikTok in a different way.

UrleBird has designed an algorithm that enables you to analyze the TikTok viewer statistics.

In the end, the process will help to improve your videos.

There are a number of categories on UrleBird including “Hashtags”, “Trending”, “Users”, “Videos”, “Music” and “I’m Feeling Lucky!”.

The “Trending” category has the videos which are trending on TikTok and you can see trending videos while the “Videos” category displays the newest videos.

If you are searching for the most popular users on TikTok, click on the category of “Users” followed by “Popular”.

Alternatively, if you are curious to know about the popular music on TikTok, click the category of “Music” followed by “Popular”

In the end, you can also click on the “I’m Feeling Lucky!” category that will show a random video to you.

You need to remember that Urlebird is not connected to Tiktok.

The content available on the site is hosted on the servers of TikTok.

3. TikTok.com

To watch the videos of TikTok online, you can also go to the official TikTok website.

To watch videos on the site, you don’t need to have a TikTok account.

You need to simply visit TikTok.com and scroll through your FYP.

Just remember that your FYP will not depend on the interests if you are not signed in.

Instead, your FYP shows you the videos keeping in view your location.

If you are not signed in to TikTok, you’ll be browsing TikTok as a guest.

Being a guest user, you can still use a lot of features of TikTok.

The features are searching for videos, users, and hashtags.

However, you will not be allowed to like, comment, or follow any users on TikTok.

The same is the case with TikTok mobile application, which enables you to watch videos without signing in.

The application can be downloaded on the App Store and the Google Play Store.

4. OnlineTik.com

It is the best source to download TikTok videos.

They not only provide the best download feature for TikTok videos but also pay attention to quality and efficiency.

OnlineTik came into existence in 2020 and still working fine.

This website contains users from all around the globe.

You can view the videos as well as download them.

In addition, you can watch a TikTok video on the site before you start downloading it.

If you browse the front page of the site and scroll it down, it will show you the most popular TikTok users and hashtags.

OnlineTik also has options to search for users and hashtags.

The users can be found using you need to search for “@username” (e.g. @arsalan).

And hashtags can also be found, you can search for hashtags with “#hashtag” (e.g. #music).

You can download videos from OnlineTik, to download video, search for the user, navigate to the user’s video that you want to download and download it.

You need to keep in mind that Onlinetik.com is not linked to Tiktok.

5. TikyToky.com

TikyToky enables you to find TikTok videos.

It’s another online TikTok viewer that allows you to search for users, videos, followers and hashtags anonymously.

In addition, you can also get TikTok user stats and metrics.

First of all, use the search bar to search for a user or hashtag.

You need to use “#tag” command to search for a hashtag.

In order to search a user, use “@user”.

TikToky contains multiple categories such as “Discover”, “Influencers”, and “Search”.

You can discover popular TikTok videos from the “Discover” category.

Click on the “influencers” category If you want to explore the top influencers on TikTok.

The “Influencers” page will give you a list of the top 100 most popular TikTok users.

In the end, click on the “Search” category and search for users or hashtags with the help of a search bar.

In addition, TikToky does not host videos of TikTok on its servers.

6. TikToker.io

The last online TikTok viewer in this list is TikToker.io.

It is the easiest method to download TikTok videos without a logo.

After downloading them, they can be used to repost to Pinterest, YouTube Shorts, Instagram Reels, and so on.

This io extension website also enables you to search for users, hashtags, or video URLs.

When you search for a user using the username (e.g. @arsalan), you’ll come across a list of their videos.

Before you start downloading them, you can watch each video.

It contains three download options—”Download”, “Download (no watermark)”, and “Download Music”.

When you click on “Download (no watermark)”, it will download the video without the TikTok logo.

Alternatively, if you click on “Download Music”, the music from the video will be downloaded.

Final Words

The ideal method to view TikTok videos is to download the TikTok application on mobile, create an account, and log in to it.

It will personalize your FYP keeping in view your interests.

Furthermore, if you watch TikTok as a guest, it will not show the personalized videos.

Additionally, you won’t be able to like, comment, or follow any users as a guest.

You can use the other way to watch TikTok videos, use other TikTok online viewers like OnlineTik, Brainans, UrleBird and so on.

These online viewers will help you to watch TikTok videos without signing in.

Related Posts

How to See Your Watch History on TikTok

Good, Cool, And Aesthetic TikTok Usernames

How to Go Live on TikTok Without 1000 Followers

Arsalan Rauf
Arsalan Rauf

Arsalan Rauf is an entrepreneur, freelancer, creative writer, and also a fountainhead of Green Hat Expert. Additionally, he is also an eminent researcher of Blogging, SEO, Internet Marketing, Social Media, premium accounts, codes, links, tips and tricks, etc.
www.greenhatexpert.com

Filed Under: TikTok

How to Change a Tiktok Username Before 30 Days

Last Updated on March 15, 2022 By Arsalan Rauf

A number of people are looking for an answer, how to change your TikTok username before 30 days or without waiting for 30 days, don’t worry we have a solution to solve the issue.

How to Change a Tiktok username Before 30 Days

  1. Firstly, unlock your phone and go to “Settings”.
  2. Scroll down and tap “System”, you will see the option at the bottom of the settings page. “If you are a Samsung user, you need to go to General Management instead.”
  3. Tap on the “Date and Time” option.
  4. Now, disable “Automatic Date and Time” option.
  5. Tap on “Set Date” and the calendar will pop up.
  6. Just choose any date but make sure it is 30 days further from the current date.
  7. Click on “Done” or “Save” to save changes.
  8. Now visit your TikTok application and follow the above-mentioned steps to change your username.

Username is a part and parcel of anyone’s social profile. Whether you want to share your profile with someone or someone searches for your profile, the username helps the people to find your profile with ease.

A number of people customize their usernames to add a personal touch or style. I often add symbol of @ at the end of usernames because my name starts from it.

How to Change my TikTok Username before 30 days?

Tiktok only enables the users to change the username only one time in 30 days. But if you are one of those users who change their username frequently. Then this is the right place for you to get the answer to your question. I have listed all the possible steps to change the username without waiting for 30 days.

How to Change TikTok username on iPhone before 30 days

  • First of all, unlock your iPhone and go to “Settings”.
  • Now tap on “General” and then open “Date and Time”.
  • Now you need to change the time of your phone. But before changing the time of your phone, just turn off the “Automatically Adjust” option.
  • Select any date but make sure it is 30 days further from the current date.
  • Now follow the above-mentioned steps to change the username and now you are good.

How to Change the TikTok Username on Android Device before 30 days

  1. First of all, unlock the android device and go to “Settings”.
  2. Scroll down and tap “System”. You will see this option at the bottom of the settings page. If you are a Samsung user, you have to go to General Management instead.”
  3. Tap on the “Date and Time” option.
  4. Now disable “Automatic Date and Time” option.
  5. Tap on “Set Date” and the calendar will pop up.
  6. Just choose any date but it should be 30 days further from the current date.
  7. Click on “Done” or “Save” to save the settings.
  8. Now go back to TikTok application and follow the above-mentioned steps to change the username.

Also read: How to Check Who Viewed Your Tiktok Account

How to Change the username on TikTok App?

It is a very easy task to change the username on Tiktok app. You just follow these steps that I have listed and it should be done in that specific order too, from the top to the bottom.

  1. First of all, go to TikTok app and click on the Profile icon available at the bottom right corner of the screen.
  2. Look for a button “Edit Profile”.
  3. Tab on the “username” field and delete your present username.
  4. After entering your desired username (new one), click on”Save”
  5. If your username is valid and available, tiktok will give you a notification that it is successfully changed.

That’s it, I hope that you have got the solution and you will be able to follow the steps with ease. Now, you know how to change the TikTok username before 30 days. Now if you are interested in usernames, I also have frequently asked questions related to usernames.

Frequently Asked Questions:

What should your TikTok username be?

It is an interesting question, everyone likes to have a really attractive name on TikTok and it should be cool as well easy to memorize or remember.

So, if you are spending too much time finding a good nickname, just go to nickfinder.com and get the best username you want for your profile. It is replete with the database of usernames and you can select your desired username.

In addition, if you have any suggestions for usernames, you can also add them too.

I am glad that I could help you in this regard.

How do I find my TikTok user ID?

Click on the bottom right corner of the screen and tap on edit profile, this will display your username aka user ID under the username section.

How many times a TikToker can change his/her TikTok username?

As per rules, the platform allows you to change it once in 30 days, but in this post, I have given the best method to uplift this restriction.

Can I have someone else’s username as my TikTok username?

No, you cannot use anyone’s username on TikTok, it is because it has to be unique and distinguishing to segregate the users from one another, you can change the username slightly but cannot get the same.

How long a TikTok username can be?

The TikTok guidelines state that it should be between 2 to 24 characters for now.

That’s it guys, I hope you liked the article on how to change your TikTok username before 30 days, do not forget to share it with your TikTok friends and share your love.

Arsalan Rauf
Arsalan Rauf

Arsalan Rauf is an entrepreneur, freelancer, creative writer, and also a fountainhead of Green Hat Expert. Additionally, he is also an eminent researcher of Blogging, SEO, Internet Marketing, Social Media, premium accounts, codes, links, tips and tricks, etc.
www.greenhatexpert.com

Filed Under: Social Media, TikTok

150+ Best, Nice, and Good Facebook Comments

Last Updated on March 16, 2022 By Arsalan Rauf

Do you want to post good Facebook comments on the post of your Facebook friend?

Leaving a nice comment on a facebook post is a great way of showing the likeness of the post.

However, if you like the post, it will not portray your thoughts and ideas.

You can make your friend’s day by posting something nice on the post.

The comment should be simple rather than complicated for example, “I like this photo”.

However, it can be a hard nut to crack to post a good comment.

This post has the best, nice and good facebook comments for boys, girls, friends, spouses and so on.

This guide will enable you to learn what is the best comment for Facebook and how to comment on a beautiful picture.

What is the best comment on Facebook?

The best comment on fb is simple and positive.

For instance, “I like this”. This is one of the examples of a nice facebook comment.

You do not have to put a lot of thought to compose a simple comment.

If you are unable to come up with the comment, you should comment the first thing that pings your mind but it should be positive one.

For instance, if the first thing that clicks your mind is “This is a nice dress”, you can post a comment “Nice outfit!”.

In some cases, the best friends leave the negative comments too as a joke.

How do you post comment on a beautiful picture on Facebook?

If you see a beautiful picture on FB, you can post an emoji or you can use adjectives too.

Here is an example of a comment that is posted on a beautiful picture that is, “Incredible!

Furthermore, you can also use both to show your thoughts, emojis as well as adjectives.

The fire emoji is one of the best emojis to choose from and it can be useful in most of the pictures.

Good Facebook comments

  • Oh man!
  • A great chart
  • Very cool guy energy
  • Gorgeous boy
  • So badass
  • Nice one!
  • This photo goes hard af
  • So cool
  • Always looking good
  • Yo that’s so cool
  • That energy 
  • Love these shots so much!
  • This is amazing!
  • Gorgeous gal
  • Just casually hanging out
  • You forgot my invite
  • I love you say it back
  • This is dope
  • Love this look!
  • So fashionable
  • Capital cuteness
  • Natural beauty 
  • Looks like u had a blast!
  • Omg obsessed
  • Love seeing you thrive
  • You look so happy
  • Preach it!
  • Your style omg
  • The coolest of the cool
  • Perseverance and faith hit different
  • Always the wisest words to hear doing these times
  • In your element 
  • Absolute perfection 

Best Facebook comments

  • My favorite! 
  • I love you!
  • Very pretty!
  • Stunning !
  • Looking good!
  • Natural beauty 
  • So adorable! <3 
  • Saved to phone
  • Amazing! 
  • Loving it!
  • So beautiful! 
  • My girl for girl and My Boy for boy
  • My idol
  • Fashion icon
  • The best
  • I love so much <3
  • Looking adorable
  • Why u so fine
  • My Gal
  • Showing how it’s done!
  • Beautiful pics 
  • That’s amazing
  • Looking awesome my man!
  • You look fantastic!
  • Absolutely Stunning!
  • Looking classy 
  • Looking good
  • Looking great
  • So fabulous
  • Hot girl fall 
  • You just made a post
  • Welcome to the club
  • You’re perfect
  • What a masterpiece—you and the background
  • Number one/1 (thumbs up)
  • Livin’ that life!
  • Epic! 
  • Way to go
  • Big moves 
  • It’s happening!
  • Absolute legend
  • Kingship
  • That’s so awesome!
  • You’re awesome!
  • Stoked for you!
  • Let’s go! 
  • So damn fine
  • Not first, but still commenting
  • Notice me please
  • Did not disappoint
  • Legend brother
  • Your style is impeccable!
  • When u smile, I smile
  • Oh damn lookin fresh as hell
  • You finally posted
  • Woah you are perfect
  • I’m down bad
  • Shimmy Shimmy Shimmy yay, Shimmy yah
  • I love that shirt <3
  • Did you hear they pass a law banning ice cream? Don’t worry, it was ruled un-cone-stitutional!
  • Great view!
  • First 
  • Monumental 
  • The hottest
  • Love you man
  • Cooler than the other side of my pillow
  • Magnificent creature you are, keep up the good work 
  • Doing big things as always
  • You are insane for this 
  • Angel baby 
  • All your outfits are stunning 
  • So cute 
  • Fire fit check
  • Dope
  • Much love
  • Literally bomb
  • So beautiful
  • Bro these pics are awesome
  • Fine
  • Fire pic as always
  • Is it even possible to be that perfect?
  • You look so good
  • This looks so good
  • So beautiful
  • These pics are cold 
  • The greatest of our time
  • Always and forever
  • Beautiful smile <3
  • Love the photo
  • Love the fit
  • You inspire me
  • Nice picture!
  • Hope you’re having a good day <3
  • Pop off!
  • What are you looking at?
  • Hey, nice fit
  • Love these shots
  • Am waiting for my cookies
  • The fit is 

Nice Facebook comments

  • Love you soooo much!
  • Heavenly
  • That’s my type
  • Striking 
  • Love it 
  • This is literally fire
  • Wonderful
  • You deserve the best
  • You are killin’ it
  • Let’s go
  • So precious!
  • I’m not crying you are
  • Livin’ the life
  • If you need a canddy
  • U R literally flawless!
  • You look amazing
  • You look so fire
  • Issa banger
  • New beginnings can’t be hard when you look like that
  • You deserve the whole world
  • So hot 
  • Let’s go
  • Pure charm!
  • Have a blast!
  • All of the pictures are marvelous and charmistic
  • Blessings
  • Sharpening the game
  • Vibes asf 
  • Have the best time
  • Fly guy
  • Amazing pics!
  • Views are insane! 

Final Words

In a nutshell, a good facebook comment does not have to be complicated.

You can post a simple emoji of love or fire and show your concern.

If you like someone’s post, it means that you know that this person is posting and you are noticing it.

A lot of people who are friends on Facebook like the posts and scroll the post.

Alternatively, a comment is a sign of engagement with someone on the social media.

It takes an extra effort to share your thoughts on the post.

What’s Next

Good Instagram Comments

Funny Gaming Names

Arsalan Rauf
Arsalan Rauf

Arsalan Rauf is an entrepreneur, freelancer, creative writer, and also a fountainhead of Green Hat Expert. Additionally, he is also an eminent researcher of Blogging, SEO, Internet Marketing, Social Media, premium accounts, codes, links, tips and tricks, etc.
www.greenhatexpert.com

Filed Under: Facebook

How to See Your Watch History on TikTok

Last Updated on February 18, 2022 By Arsalan Rauf

Did you refresh the “For You” page on TikTok while watching a video and you have done it accidentally?

If yes, you might want to see the previous video you have watched.

It can be difficult to find that video that you have the last watch if you did not find it interesting.

However, if you liked the video, it will be available in your liked videos.

To find it, simply go to your profile and tap on the heart icon.

If you did not like the video, you will have to find another way to find it out.

On other social media sites such as YouTube, you can see your watch history using the “History” tab.

Does TikTok offer a “History” tab in the app?

In this post, you will learn how to see your watch history on TikTok by following 5 simple steps.

How to Check your watch history on TikTok

You need to request your data file available on the application to see your watch history on TikTok,

Once you receive the data file, download it and open the file named as “Video Browsing History”.

TikTok does not offer “Watch History” tab like other social media sites including YouTube.

You need to request the data file on the application of TikTok to see your watch history.

When you request for it, it takes more or less 24 hours to arrive and when it arrives you can download it.

The data file also features your personal data including like list, followers list, login history and so on.

It also features a “Video Browsing History” file.

You can see all the videos that you have watched on TikTok by going through the “Video Browsing History” file.

I have written a step by step guide on how you can see your watch history on TikTok so read through the post:

1. Navigate to “Privacy”

First of all, open TikTok app on your android.

You cannot use TikTok on a desktop as it does not have your settings.

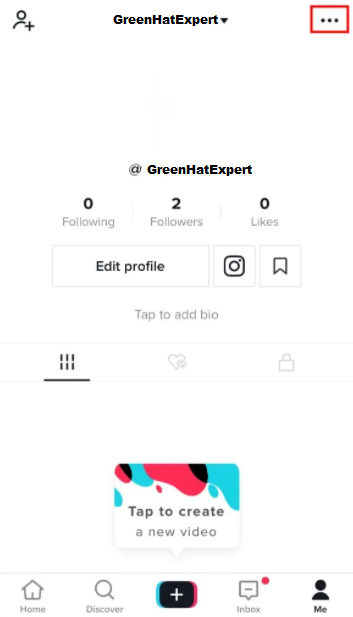
When you get in, tap on the “Me” icon available on the bottom navigation bar.

It will lead you to your own profile.

You will see three dots available on the top navigation bar of your profile.

Tap on the three dots to go to the privacy menu in settings.

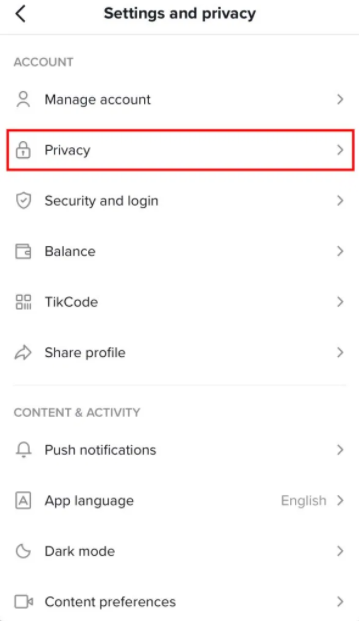
The tapping will lead you to the settings and privacy menu.

The menu has a number of options including “Privacy”, “Manage account”, “Security and Login” and so on.

You need to request your data file, then you need to go to the “Privacy” option available under the account.

The process will lead you to your privacy settings where you can find your personalization data.

Go to your next step to know how to find your personalization and data.

2. Navigate to “Download your data”

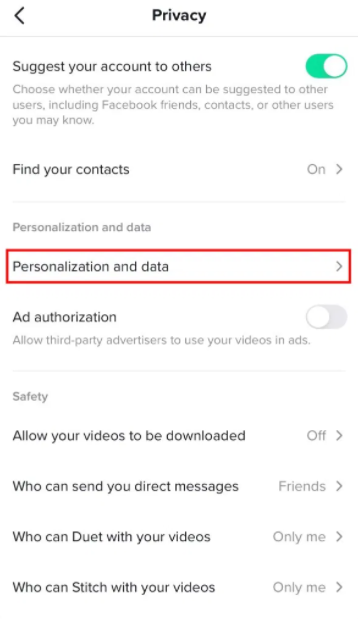
Tapping on “Privacy” option will lead you to the privacy page.

The privacy page contains three headings including  “Safety”, “Discoverability” and “Personalization and data”.

The “Personalization and data” option is available under the heading of “Personalization and Data”.

To see the personalization and data on the application, you need to tap on the “Personalization and data” option.

It will open the “Personalize and data” page for you.

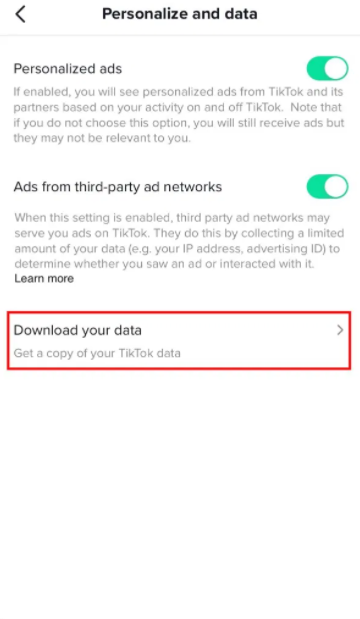
On this page, you will come across three options such as “Personalized Ads”, “Ads from third party ad networks”, and “Download your data”.

The personalized ads option enables TikTok to serve ads keeping in view your activity.

You can disable it if you do not want to watch personalized ads on the app.

The next option is “Ads from third-party ad networks”, enables third-party ad networks to serve ads to you by using your limited data.

In the end, “Download your data” option is available enable you to get the copy of your TikTok data.

To download your data, tap on “Download your data”, it will take you to the download page.

3. Request data file & download it after 24 hours

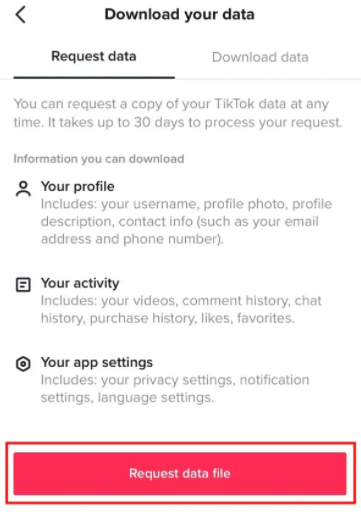
After tapping on “Download your data”, you will be redirected to “Request data” tab.

You can request your data file any time that is available on the “Request Data” tab.

It will allow you to download your profile (photo, username, profile description and contact info).

Further, you can download your activity such as (watch history) and app settings.

To request your data file from the app, tap on “Request data file”, then wait for 24 hours for it to ready.

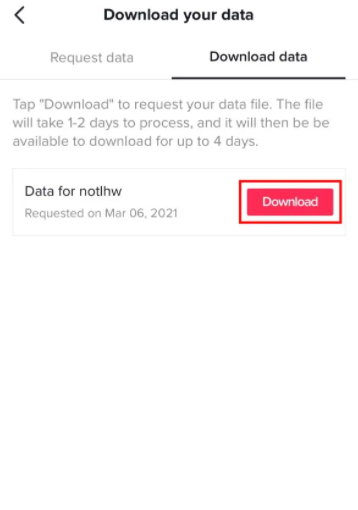
After requesting the data file, tap on the “Download data” tab.

You will see a “pending” button there instead of “Download” button.

The pending button indicates that your data is being processed by the TikTok app/server.

Usually, the data file is available within 24 hours span.

When the data file is available, the “Pending” button will change into a “Download” button on the same tab.

To download your data file, tap on “Download”. 

There is another point you need to keep in mind that the download is available for 4 days, so download it as early as possible.

Proceed to the next step to see how to download your data file.

4. Log in to your existing TikTok account

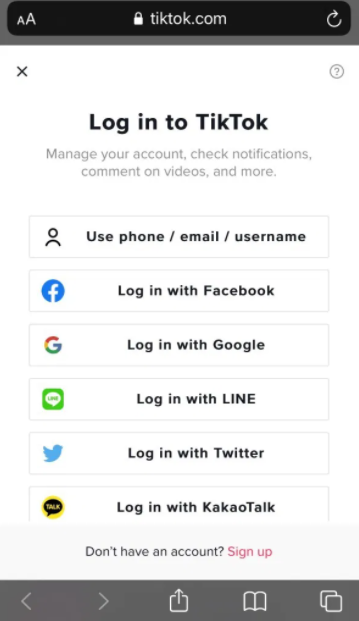
After tapping on the “Download” button, you will be taken to the login screen of TikTok (on a web browser).

Log in to your existing TikTok account with the help of the option you used to create your account.

For instance, if you have created your account using Gmail, tap on “Log in with Google”.

On the other hand, if you have used Facebook to sign up for your TikTok account, tap on “Log in with Facebook”.

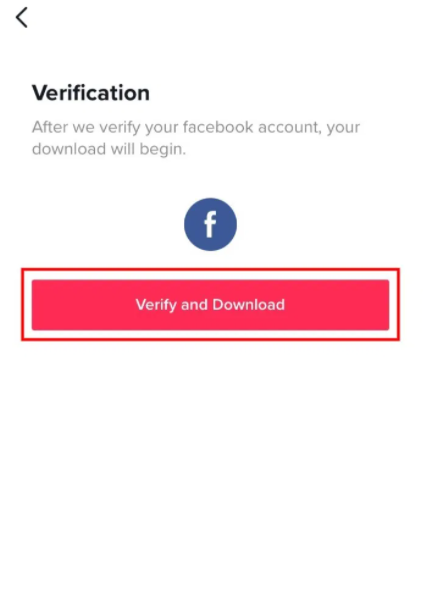
After going through the log in process, you might need to verify your account.

For instance, if you have logged in using Facebook account, you need to verify your FB account.

Tap on “Verify and Download” button to verify account.

It is imperative to get your downloaded data.

Move on to the next step to learn how to download your data and find your watch history on TikTok.

5. Download data from app & open the “Video Browsing History” file

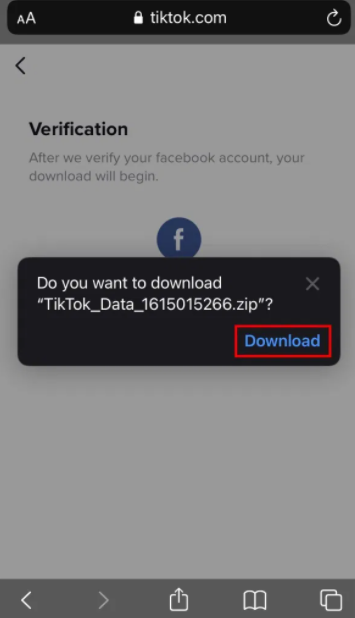
After going through the verification process, you will be taken to download your TikTok data via a pop-up message.

The pop-up message will look like this, “Do you want to download “TikTok_Data_161501866.zip?”.

To download your TikTok data, tap on “Download”.

If you are an iPhone user, your data will be downloaded in the “Files” application.

After finishing the downloading, open the zip file.

If you cannot open it on your mobile, send it to yourself using Whatsapp/Email/Google Drive and open it on your PC or desktop.

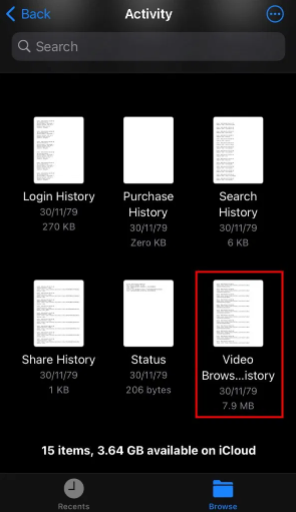
After opening the zip file, you will come across many “.txt” files that you can open.

Scroll down to the bottom unless you find the “Video Browsing History” file there.

Now open the file, it may take a while to load the file.

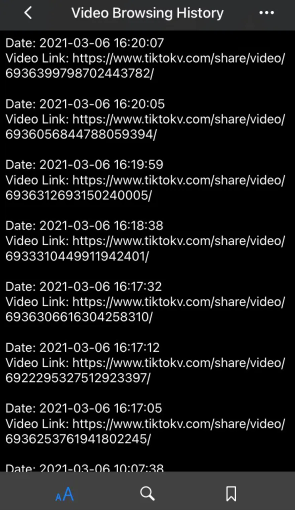
The “Video Browsing History” file has all the videos that you have ever watched on TikTok app.

Further, by going through the “Video Browsing History”, you can also see the date, time and link of every video that you have ever watched on the app.

You can copy the link of the video and paste in on the web browser to see it.

You have successfully learned how to see your watch history on Tiktok.

Final Words

Sometimes, you watch a video on your “For You” page that is different and entertaining from the rest of the videos.

If you forgot to like it, or you have refreshed your “For You” page accidentally, it is difficult to find it back.

Luckily, TikTok enables its user to copy the user’s data.

In the data file, you can find the video browsing history to find a video you lost on TikTok.

What’s Next

How to Contact TikTok Support

Arsalan Rauf
Arsalan Rauf

Arsalan Rauf is an entrepreneur, freelancer, creative writer, and also a fountainhead of Green Hat Expert. Additionally, he is also an eminent researcher of Blogging, SEO, Internet Marketing, Social Media, premium accounts, codes, links, tips and tricks, etc.
www.greenhatexpert.com

Filed Under: TikTok

How to Fix Facebook Lock Profile Not Working or Showing

Last Updated on January 15, 2023 By Arsalan Rauf

Is the Facebook lock profile option not working, showing, or available for you and you want to fix it?

In May 2020, Facebook first released the feature to lock your profile.

The feature enables the users to safeguard their information on the FB.

When you lock your FB profile, your information will not be visible to people who are not on your friend list.

Facebook mentioned that the feature is designed to be the successor of the “Profile Picture Guard” option.

Ankhi Das, the public security director of Facebook India said that they know the concerns of people in India.

The “Lock Profile” feature helps people to control and ensure their privacy.

However, every country does not have this feature.

In this post, I will tell you why is the Facebook lock profile option not working or showing and how to fix it.

Why is the Facebook lock profile option not working?

The Facebook lock profile option is not working because the feature is not available everywhere right now.

According to Facebook, you are allowed to lock your profile in certain countries.

As a privacy feature, the feature was first introduced in India.

In 2022, Facebook has made it available in 7 more countries.

The countries are Egypt, Iraq, Morocco, Saudi Arabia, Sudan, and Turkey.

Unfortunately, if you’re not from one of these countries, the lock profile option will not be shown to you.

Therefore, you have to wait until the lock option is released in your country.

On the other hand, you can control your privacy settings.

For instance, if you don’t want visitors to see your posts, you can limit them by enabling the “Limit Past Posts” option.

Your posts will only be visible to your friends when you enable “Limit Past Posts”.

Why is the Facebook lock profile option not showing?

The Facebook lock profile option is not showing because the option is not available for your country yet.

According to Facebook, the option is only present in some countries.

The countries which are supported this feature are Egypt, Iraq, Morocco, Saudi Arabia, Sudan, and Turkey.

If you come across a lock icon on someone’s profile, it shows that they’ve chosen to lock their profile.

By locking the profile, FB will show a limited version of their profile to the people.

You can also limit the visitors by locking your own FB profile.

Unfortunately, if the option is not available for you, you need to wait until it is released in your area.

Otherwise, you can use other privacy options of FB.

How to fix Facebook lock profile not working

To fix the Facebook lock profile option not working, there is nothing you can do except wait for Facebook to release it for your country.

On the other hand, you can use the privacy options available on Facebook for now.

In 2022, the ability to lock your Facebook profile is only available for some countries.

The feature is not rolled out globally yet.

Therefore, you need to wait until FB releases the option globally.

Currently, I don’t know when Facebook will do this and they did not mention it anywhere so you need to be patient for it.

If you don’t want to wait for update, you can control your privacy using your privacy settings.

There are various privacy settings that you can change or enable.

For instance, if you want to hide your posts from the public, you can change who you share your posts, photos, and other information.

You can also turn on Tag Review, Profile Review, & Profile Picture Guard.

Profile Picture Guard will stop users from sharing, copying, or downloading your DP or profile picture.

In which countries Facebook profile lock is available?

The Facebook profile lock is currently available in Saudi Arabia, Egypt, Iraq, Morocco, Sudan, and Turkey.

If you are from any of these countries, you can lock your Facebook profiles.

Therefore, most users cannot have the ability to lock their Facebook profiles yet.

If you do not have this feature, you need to wait until the feature is available in your country.

Currently, there is no update about when Facebook might launch the lock feature on a global level.

Final Words

The lock profile option on Facebook is same as the setting your Instagram account to private.

In 2022, there is no information why Facebook hasn’t released the lock profile option/feature globally yet.

You can find out whether the option is available for you or not by visiting your FB app, going to your profile and tapping on the three dots.

Unfortunately, if you’re living in a country that does not support it, you won’t be able to lock your FB profile.

As I already stated above, you can only wait for Facebook to release the feature or use other privacy settings.

You can manage your privacy settings by following these steps: go to Facebook app > Menu > Settings & Privacy > Settings > Audience and visibility.

By making use of the “Audience and visibility” section, you can control who can see your posts, stories, and profile.

What’s Next

Best, Nice, and Good Facebook Comments

How to Find Recently Watched Videos on Facebook

How to Change Your Background or Theme on Messenger

Arsalan Rauf
Arsalan Rauf

Arsalan Rauf is an entrepreneur, freelancer, creative writer, and also a fountainhead of Green Hat Expert. Additionally, he is also an eminent researcher of Blogging, SEO, Internet Marketing, Social Media, premium accounts, codes, links, tips and tricks, etc.
www.greenhatexpert.com

Filed Under: Facebook

How to See Dislikes on YouTube Again

Last Updated on January 6, 2022 By Arsalan Rauf

Youtube has launched a new update regarding the dislike count on Nov 10, 2021, the purpose of the update is to discontinue the dislikes count and it will no longer be public.

In short, you cannot see the count of dislikes on any video on YouTube.

However, the button of dislike is still there and you can still dislike the videos if you don’t like them.

The purpose of the update as stated by the YouTube team is to mitigate the harassment and dislike attacks.

It has become a controversy as well too.

The former co-founder of YouTube, Jawed, criticized the update using a video.

In short, the co-founder stated that the removal of dislikes will stop the users from quickly identifying the bad content on YouTube.

For instance, if you want to watch a tutorial on anything on YouTube – you will consider it reliable by looking at the ratio of likes and dislikes.

If the video gets more dislikes than likes, there is a great chance that the tutorial is outdated or not reliable.

Whether you want to quickly check the dislikes count on a video or try to identify the bad content – in this guide, we are going to teach you how to see YouTube dislikes again.

How to see dislikes on YouTube again

To get dislikes back on YouTube, you need to install “Return YouTube Dislike” on Google Chrome.

It is one of the chrome add-ons that return the dislikes ability on the YouTube platform.

It is ideal and accurate for videos uploaded on YouTube before 13th December, 2021.

You need to keep in mind that this add-on is in an active development phase.

That is why you might experience some problems with it.

If you think there is a bug, you can report it on the “return-youtube-dislike” Github page or on Discord.

After adding the “Return YouTube Dislike” extension to your Chrome browser, go to the video that you want to see the dislikes counts.

The last step is to refresh the page in order to see the dislike count of that video.

Here’s a step by step guide on how to see YouTube dislikes again:

Step 1. Add “Return YouTube Dislike” extension to Chrome.

add to chrome

Firstly, you need to add “Return YouTube Dislike” to your Google Chrome.

“Return YouTube Dislike” is a Chrome add-on that enables you to see dislikes on YouTube again.

The first step is to open the Chrome web browser and click on the “Apps” icon available on the bottom navigation bar.

After clicking on the “Apps” icon on chrome store, you will see that “Apps” page is open.

There are plenty of Google apps On the “Apps” page.

It has “Web Store”, “Slides”, “Sheets”, and so on.

To visit the chrome web store, you need to click on “Web Store”.

After opening or reaching the Chrome Web Store, search for the term “Return YouTube Dislike”.

In the end, click on “Add to Chrome” to add the “Return YouTube Dislike” add-on to Chrome.

On the other hand, you can go to this link directly in order to download the extension: https://chrome.google.com/webstore/detail/return-youtube-dislike/gebbhagfogifgggkldgodflihgfeippi.

Step 2. Go to a YouTube video and refresh the page

After clicking on “Add to Chrome” button, the “Return YouTube Dislike” extension will be installed in the extensions of Chrome.

You can also pin the extension, click on the puzzle icon on the top navigation bar of Chrome and pin it.

When you will click on the puzzle icon, scroll down until you find the YouTube Dislike” extension and click on the pin icon.

After doing so, you need to visit the YouTube video that you want to see the dislikes of.

For instance, if you want to see the dislikes of “YouTube Rewind 2021”, search for the term “YouTube Rewind 2021” and open the video.

Now, open that YouTube video which you want to see the dislikes of, to check the dislikes, you need to refresh the page.

Click on the refresh icon to refresh the page of that YouTube video on Chrome.

Step 3. The dislikes of the video will now be available

After clicking on the refresh button, the video will be refreshed.

Now, the dislike count should be shown on the video.

If you are not able to see the dislike count, try to restart the chrome browser.

The “Return YouTube Dislike” is a new Chrome extension, so it might take a while to show the dislikes on a video.

In most cases, you can see the dislikes of a video right after adding the extension to Chrome and going through the refresh process of the page.

We have completed the guide on how to recover/bring back/re-enable/see YouTube dislikes again!

How do you view dislikes on YouTube?

After the update in December 2021, the user can only view the dislikes of their own videos in creator studio.

You cannot see the dislikes of the rest of the YouTube videos.

The user has to add the “Return YouTube Dislike” extension to Chrome in order to bypass this.

This extension will enable you to see dislikes on YouTube videos.

Are dislikes back on YouTube?

No, As of Nov 10, 2021, YouTube removed the dislikes on the YouTube videos, so they are not back on YouTube and will not be back too.

Although the dislikes are hidden now, you can still dislike a video.

Furthermore, the video you are disliking, the creator of that video can see the dislikes count in their YouTube creator studio.

Final Words

If you go through tutorials regularly on the YouTube platform, it is necessary to enable the dislike ratio of the videos.

A good like to dislike ratio can help you to identify the reality of the video.

If a video has fewer likes and more dislikes, it clearly shows that the video or information in it is not reliable.

In the end, whatever information is in the video can be misleading or outdated.

You can go through this step-by-step guide to re-enable YouTube dislikes.

If you want to save yourself from this process of seeing dislikes again, the ideal method to determine the video content is to check the comments on the video.

What’s Next

How to change your channel name on YouTube

Cool YouTube Channel Names

Arsalan Rauf
Arsalan Rauf

Arsalan Rauf is an entrepreneur, freelancer, creative writer, and also a fountainhead of Green Hat Expert. Additionally, he is also an eminent researcher of Blogging, SEO, Internet Marketing, Social Media, premium accounts, codes, links, tips and tricks, etc.
www.greenhatexpert.com

Filed Under: YouTube

How to Contact Snapchat Support

Last Updated on April 8, 2022 By Arsalan Rauf

Are you facing any issue on Snapchat and do you want to resolve it?

Usually, the person tries to find the solution to resolve it but if the problem is too complex, the best way to solve it to contact Snapchat support for help.

For instance, if you think your Snapchat account is hacked and you want to restore it so you need to contact Snapchat support to restore it.

But before you contact Snapchat, you need to try to solve the problem by yourself first.

Sometimes, you get a solution to your issue when you Google it.

It will save you from the trouble of waiting for the response of Snapchat.

In this post, I am going to teach you how to contact Snapchat support and there are three ways to do it. further, you get answers to questions like does Snapchat have a live chat and how long does it take for Snapchat support to respond etc.

How to contact Snapchat

You can go to the Snapchat support website to contact them or report a problem on the application and you can also contact them on the twitter account of “Snapchat Support”.

The website of Snapchat support has answers to common questions.

To find the answer to your question, you need to use the search bar.

There are a number of topics that can assist you such as “Privacy”, “Snapstreaks”, and “Stories”.

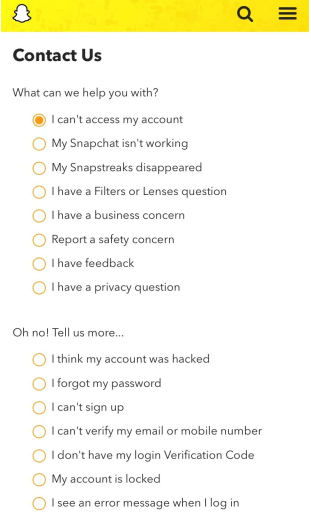
However, if you do not find the answer to your query, you can always contact Snapchat on the website directly using the “Contact us” tab.

Further, you can also report a problem on the app as well.

If you are log in to your account, you can report an issue using the application.

The last way is to tweet your queries to “Snapchat Support” on Twitter.

The Snapchat support frequently replies on Twitter to its users, so tweeting is a good method to attract them.

There are three ways to contact Snapchat support:

Method 1: Go to the Snapchat Support website

The first method to contact Snapchat is to go to the support website of Snapchat.

First of all, Google the term “Snapchat support” and click the first search result.

In addition, you can directly visit the URL: https://support.snapchat.com/.

Once you open it, it will display the popular support topics.

Furthermore, you can use the search bar to get answers to your queries.

Click on “Contact Us” available on the page.

On the other hand, you can also contact them using this URL: https://support.snapchat.com/i-need-help.

After clicking on “Contact Us”, you will reach that page.

Now, choose the topic that is relevant to your problem and follow the instructions carefully.

Certain topics enable the users to send a message to Snapchat.

If you are able to send the message, you need to ensure that you include your email, username, mobile number and description (when needed).

Method 2: Report a problem on the app

This is the second way to contact Snapchat by reporting a problem on the application.

First of all, you need to open Snapchat and log in (usually it is already log in).

If you do not have access to your account, you cannot follow this method to get into contact with support.

So you need to consider using the previous or last method in the guide.

After opening Snapchat, tap on your Bitmoji available on the top bar.

After tapping on it, you will be able to see your Snapchat profile.

You will see your name, username and snap score when you open your profile.

A gear icon can also be seen on the top right of the profile.

To visit the Settings, tap on the gear icon.

After tapping on the gear icon, you will reach the settings portion.

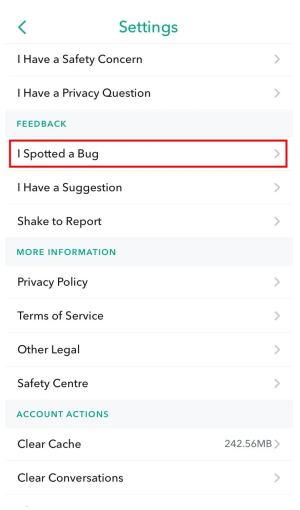
On the settings tab, there are several headers there such as “My Account”, “Additional Services”, “Who Can…”, and so on.

You need to scroll down the page unless you reach “Feedback” header.

After finding the “Feedback” header, tap on “I spotted a Bug”.

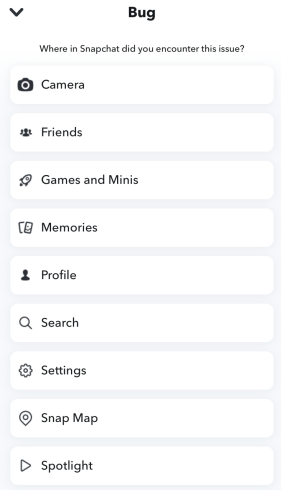
After tapping on this option, you will be able to see the options on “Bug” page.

It has several topics that you can select from.

Now, choose the topic related to your issue.

For instance, if you have any problem with camera on Snapchat, tap on “Camera” option.

After doing the selection of the related topic to your problem that you are facing, report it to Snapchat.

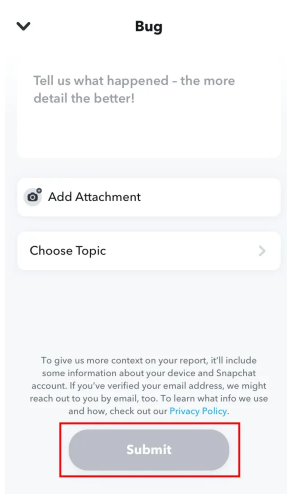
Describe the issue on the report page for better understanding.

The description should be in detail to make it easy for them to understand.

The next step is to add a screenshot of the problem that you are experiencing.

Tap on “Add attachment” to add the screenshot.

After doing so, choose another relevant topic of your problem.

In order to choose the topic, tap on “Choose Topic” and choose the relevant topic.

In the end, tap on “Submit” to forward the report to Snapchat support.

Method 3: Ping Snapchat Support on Twitter

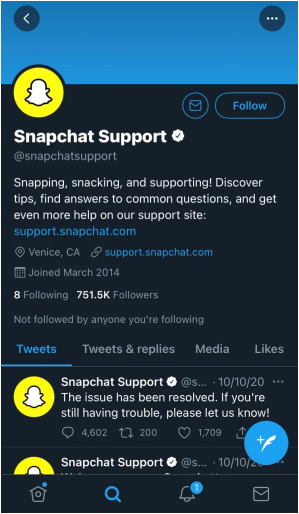
snapchat twitter support

This is the final method to contact Snapchat that is, Tweet them on Twitter.

They have Twitter account on Twitter named Snapchat Support.

Further, they are very responsive to the users on Twitter, so if you are having trouble or queries regarding Snapchat, you can compose a tweet and tag them.

Here’s an example of a written tweet, “Hi, my Snapchat account is not opening or locked. Please unlock it for me @SnapchatSupport”.

The support usually replies to you within an hour or two depends on the “Tweets & replies” activity.

On the other hand, you can also send them a direct message on Twitter by clicking on the mail icon.

Not only in Tweets but Snapchat also responds to the direct messages too.

Does Snapchat have live chat?

No, currently Snapchat does not offer a live chat service.

They do not have this feature and they are also not going to be implemented it any soon on their support site.

The closest way to approach them is to send a direct message on Twitter to Snapchat support.

Furthermore, you can also post a tweet on their Twitter and tag them @SnapchatSupport for help.

How long does it take for Snapchat support to respond?

The support of Snapchat takes one to three business days to reply keeping in view the load of reports they are getting.

However, if you contact them using Twitter, you may get a reply within an hour or two.

The response is based on their “Tweets & replies” activity.

Therefore, if you want to get an immediate response from them, use the Twitter method.

Final Words

If you are having trouble using Snapchat, it will cause irritation when you cannot use the app in a proper manner.

Contacting Snapchat is easy as compared with other social media platforms.

The reason behind it Snapchat is very responsive to the users on Twitter.

They reply to the Tweets @SnapchatSupport on a daily basis even in hours.

Therefore, I recommend the method of pinging them on Twitter is the best way to get a quick response.

What’s Next

How to Contact OnlyFans

How to Contact Coinbase

How to Contact Discord

Arsalan Rauf
Arsalan Rauf

Arsalan Rauf is an entrepreneur, freelancer, creative writer, and also a fountainhead of Green Hat Expert. Additionally, he is also an eminent researcher of Blogging, SEO, Internet Marketing, Social Media, premium accounts, codes, links, tips and tricks, etc.
www.greenhatexpert.com

Filed Under: How to, Snapchat

How to Hide Your Following List on Instagram

Last Updated on November 5, 2021 By Arsalan Rauf

Your following list of Instagram displays the people you are following.

If you have set your profile to the public then the users on Instagram will be able to see your list.

It can be done by going to your profile and by tapping on following.

However, the users who are able to see your following list cannot sort your following list only you can sort them.

If you are a private person, you might want to hide your followers or following list on Instagram.

You can hide your following list on platforms like Tiktok by going to your privacy settings.

Instagram does not offer who can see your following list feature on its privacy settings.

So, you need to use an alternative method to hide your following list on the platform.

In this post, I am going to teach you how to hide your following list and followers on Instagram.

How to hide your following list on Instagram

You need to visit your profile and open the menu to hide your following list on Instagram.

After opening the menu, you go to your privacy settings and shift your account to private.

You can hide your following list on TikTok by setting it to only me.

It will stop other Tiktok users from seeing your list.

Instagram does not offer this feature like TikTok.

The only step you can take to hide your following is to change your account to private.

The process of switching your account to private will hide your followers and following list from other users.

However, your followers can still see them.

Here is a step by step guide to hide your following list on Instagram.

Step 1: Open the menu

The first thing you need to do is to open the menu.

To get started, open Instagram app and login to your account if you are not already login.

After logging in, you need to visit your profile.

Tap on your profile picture available on the bottom navigation bar to go to your profile.

This step will open your Instagram profile.

You will come across menu icon at the top right corner of your profile.

To open the menu, tap on the menu icon.

Step 2: Go to your settings

When you will tap on the menu icon, it will open the navigation menu.

The menu has multiple options such as “Settings”, “Archive”, “Your activity” and so on.

You need to visit the settings to hide your following list.

Go to your settings by tapping on “Settings”.

Step 3: Tap on “Privacy”

When you tap on settings it will take you to your settings.

You will see many options on the settings page.

The options are “Notifications”, “Business” and “Privacy”.

You need to visit your privacy settings to hide your following list.

To visit your privacy settings tap on “Privacy”.

Step 4: Switch your account privacy

When you tap on privacy, it will open the privacy settings.

While landing on the privacy settings, you can control your privacy.

You can control the privacy of your account, interactions and connections.

You will come across a private account option under the “Account privacy” header.

So, you have to enable the “Private Account” option.

To enable it, you need to tap on the switch of “Private account”.

Step 5: Tap on “Switch to Private”

When you tap on the switch, it will open a navigation drawer.

It will ask you whether you want to switch to a private account.

When you change your account to a private account, only your followers can see your videos and photos on Instagram.

Additionally, it will hide your followers and following list from the rest of the users.

So, when the users go to your profile, they cannot see your followers or following list.

However, it will not change who can tag message or mention you.

To move your account to a private account, you need to tap on “Switch to private”.

This is how you will hide your following list on the platform.

How to hide your followers on Instagram

  1. First of all visit your Instagram profile and tap on the menu icon.
  2. Now tap on “Settings”.
  3. Now tap on “Privacy”.
  4. Enable “Private account”.
  5. Now switch your account to private by tapping on “Switch to Private”.

After moving your account to a private account, Instagram will not show your followers to other users.

You can move back to public account settings whenever you want.

Final Words

If you are looking to hide your followers and following list from users on Instagram then this guide is for you.

However, if you want to hide your followers from specific persons you need to block them.

It can be done by going to your Instagram profile.

When you reach your profile, tap on the three dots available in the top right corner.

Now tap on “Block” to block them.

When you block anyone on Instagram, they cannot locate or find your profile again.

In the end, they cannot track who you are following on Instagram.

Instagram does not offer any feature until now that enables you to hide your following list on Instagram without switching your account to private from public.

What’s Next

How to Create Unlimited Instagram Accounts

How to find Someone on Instagram without their Username

How to find Someone on TikTok by Phone Number

Arsalan Rauf
Arsalan Rauf

Arsalan Rauf is an entrepreneur, freelancer, creative writer, and also a fountainhead of Green Hat Expert. Additionally, he is also an eminent researcher of Blogging, SEO, Internet Marketing, Social Media, premium accounts, codes, links, tips and tricks, etc.
www.greenhatexpert.com

Filed Under: Instagram

What Does “User not found” Mean on Instagram?

Last Updated on November 5, 2021 By Arsalan Rauf

Have you come across a “User not found” error on Instagram when you try to view someone’s profile?

The error can also occur when you message someone but when you try to go to their profile and you come across this error message.

Or maybe you tried to search for someone on Instagram but the user is not found there.

There are many causes for this error and it does not mean that you are blocked from that user.

In this post, I am going to tell you 5 different reasons why did you get “User not found error” on Instagram. In the end of this post, you will come to know why did you see the error.

What Does “User not found” Mean on Instagram?

“User Not Found” error on Instagram is an indication that the user has blocked you or changed their username, deleted their account or their account is disabled or their account is suspended.

If the user has blocked you on Instagram, you will come across “User not Found” error when you try to go to their profile.

The same is the case if the person has changed their username or their account is suspended or disabled or the user has deleted the account or profile and it is not available on Instagram anymore.

Below I am going to discuss the five reasons why you got the error message on your Instagram.

Reason 1: Username has changed

The first reason can be the user has changed their username that is why Instagram says “User not found”.

If someone changes their username, you cannot find them from their old username.

The profile of someone who has changed the username may result in the “User not found” error.

It happens because their old username is no longer available on Instagram.

So, in order to find that person you need to search for them using their new username.

You will not be able to find them if you try to search for their old username on Instagram.

But in case if you have found them using the old username in the search results when you will visit their profile, you will come across “User not found” error.

You may need to contact them to find their new profile on Instagram.

When you get in touch with them, ask for the new username and search them on Instagram.

When you do that you will be able to visit their profile and you will not receive that error message again.

Reason 2: You’re blocked

The next reason you are facing “User not found” error is because you are blocked, therefore, you are restricted to visit the profile of that user.

This is one of the most common reasons why users get this error.

If any user blocks you on Instagram, you will have to face “User not found” error.

You cannot find them on Instagram or able to visit their profile when the user blocks you on Instagram.

Even if you search for their username in the search engine, you will not be able to see their profile in the search results.

However, if you had messaged them earlier if their profile is in your recent messages, you can still send the messages.

For instance, if you were messaging the user while they blocked you, you can still see their profile from your direct messages.
But when you try to visit their profile from your messages, “User not found” error message will be shown.

In addition, if you have their profile in your search results, you can still go to their profile.

The same result will happen whether you visit their profile from your recent or visit their profile from your direct messages, you will receive “User not found” error.

In short, there is a high chance that you are facing “User not found” error because the person has blocked you when you visit their profile.

Reason 3: Account is deleted

The third reason is that the user has deleted the account.

Whenever the user deletes the account on Instagram not only the profile but all of their posts are also gone.

In short, the username of the user is no longer available on Instagram.

So, if they deleted their account, you will not be able to visit their profile and get the “User not found” error.

If the account is deleted, it means that the username no longer exists on Instagram.

However, if you messaged them earlier or you have their profile in your recent, you can still go to their profile.

But the result will be “User not found” error.

Reason 4: Account is suspended

The fourth reason of this error can be suspension or disabled account.

In a nutshell, the account is permanently disabled, suspended or banned by Instagram.

When the account is banned, the profile will also be disabled and you cannot found them on Instagram.

The most common cause of this suspension on Instagram can be the violation of one or more guidelines of Instagram.

For instance, the user might have posted inappropriate content that result in a permanent suspension.

Instagram does not give warning to accounts that violates the Instagram terms of use or guidelines.

If the user gets reported for violation multiple times or AI detects it, the account will be banned.

In this scenario, when you visit the profile of that user which is recently suspended will give you “User not found” error.

Reason 5: Disabled account

The last reason which is why you get the “User not found” error while visiting an Instagram profile is that Instagram user has disabled its account.

It is a temporary thing, disabling doesn’t mean deleting.

When someone disables the account, their profile as well as their post will be hidden from the platform.

It means that the profile is hidden from Instagram users unless the user reactivates it.

So, when you go to someone’s profile on Instagram that just got disabled recently, you will see the error message of “User not found”.

How can you tell if you have been blocked on Instagram?

You cannot search the profile if the user has blocked you on Instagram.

However, you can still go to their profile if they are in your recent contacts or you have messaged them directly.

From your direct message list, you can still go to their profile.

But it will not prevent “User not found” error if you are blocked by the user.

Additionally, you can also go to their profile if you have recently searched them in Instagram search engine.

The same is the case when you will get the error if you are blocked by the user.

Why can’t I find an Instagram user?

The main reason can be the user has blocked you on Instagram that is why you cannot find the user.

You can use another account to confirm that whether you are blocked on Instagram or not.

First of all, search for their username from your main account.

If they have blocked you, their account will not be visible to you.

Then try to use another account to find the profile of that person.

If you are able to find it from an alternative account, it means that your main account is blocked by them.

Why can’t I find someone on Instagram if I’m not blocked?

If you are not blocked, there are four reasons that you cannot find someone on Instagram.

The person might have either deleted the account or changed the username.

Otherwise, their account might have been disabled or suspended by them.

Final Words

It is a common error on Instagram that is, “User not found” error.

In this post, I have described 5 different reasons why you got this error.

In short, here are the reasons:

  1. The user has blocked you.
  2. The user has changed their username.
  3. The user has disabled their account.
  4. Their account is deleted.
  5. Their account is suspended by Instagram.

Do not conclude anything before asking the correct reason from the person.

What’s Next

How to Hide Your Following List on Instagram

How to Create Unlimited Instagram Accounts

How to see watch history on TikTok

Arsalan Rauf
Arsalan Rauf

Arsalan Rauf is an entrepreneur, freelancer, creative writer, and also a fountainhead of Green Hat Expert. Additionally, he is also an eminent researcher of Blogging, SEO, Internet Marketing, Social Media, premium accounts, codes, links, tips and tricks, etc.
www.greenhatexpert.com

Filed Under: Instagram

How to See When You Subscribed to a YouTube Channel

Last Updated on October 14, 2021 By Arsalan Rauf

If you are a user of YouTube for a while there is a great chance that you want to see when you subscribe to a YouTube channel.

In short, you might want to know that how long you have been subscribed to a channel on this platform.

However, YouTube does not display the date of subscribing to your channel.

When you click on “All” on the subscriptions page, you can see the list of channels that you have subscribed until now.

However, you will be able to sort the list by “New activity”, “Most relevant” or “A to Z”.

YouTube does not have a feature to sort your subscriptions by “Oldest first” or “Newest first”.

Therefore, you cannot know when you subscribe to a YouTube channel on the platform itself.

In this post, I am going to teach you how to see when you subscribed to a YouTube channel with another method than YouTube.

How to see when you subscribed to a YouTube channel

To complete this process, the first step is to make your subscriptions public.

After doing so, you need to copy the link of your channel and paste it on this link xxluke.de.

Xxluke.de is a third party tool that enables you to see the date when you subscribe to a channel on YouTube.

This can be helpful when you want to know about your interest that when were you interested in this channel.

The only thing you need to do is to give the link of your YouTube channel and the tool will show you your subscriptions and the date of your subscriptions.

As I already told you that YouTube does not have a “Newest first”, “Oldest first” feature to sort your subscriptions.

Therefore you need to use a third party tool to do that.

Here is a step-by-step guide to see when you subscribe to a YouTube channel.

# 1: Make the subscriptions public

The process includes Channel settings > Privacy > Disable “Keep all my subscriptions private”.

First of all, you need to make your subscriptions public.

This will enable the third party tool to go through your subscriptions.

If you will keep the subscription private the tool will not do the job.

YouTube offers the changing of the privacy settings on the channel including your subscriptions as well as playlist.

This allows you to keep your subscription public or private.

  1. To get started you need to open the application of YouTube on your mobile device.
  2. On the top navigation bar, you need to tap on the profile picture of your channel.
  3. Choose “Your channel”
  4. The next step is to tap on the “Edit Channel” button.
  5. Under privacy, you need to disable the “Keep all my subscriptions private” option to make them public.

The option is enabled by default on YouTube.

So, in order to show your subscriptions to others, the best way is to disable the option by tapping on the switch.

After disabling this option, you need to visit your channel to move on to the next step.

# 2: Copy your channel’s URL/Link

The process includes Your channel > three dots > Copy link/URL.

The next step you need to follow is to copy the link of your channel.

You need to copy the URL because you will need it for the last step.

On the YouTube app, go to the homepage of YouTube and tap on the profile picture of your channel.

Now, tap on “Your Channel” to visit your channel.

After reaching your channel, you need to tap on the three dots available on the top navigation bar.

When you tap on them, it will show a navigation drawer.

It will show you two options when you tap on it including “Share” and “Help and feedback”.

To share your YouTube channel, you need to tap on share.

It will show several sharing options that you can select from such as WhatsApp, Twitter, “Copy link” and so on.

As you need the link of your channel, you need to tap on copy link.

It will copy the link of your channel to your clipboard.

Now move on to the next step, which will tell you how to use a third-party tool to find your subscriptions.

# 3: Paste your link of Channel on the subscription history tool

The process includes visit xxluke.de/subscription-history > Paste your channel’s URL > Continue.

Now that you have copied your YouTube channel link now it’s time to put it on this URL xxluke.de.

It is a third party tool that allows you to watch your YouTube subscription history.

The tool finds your subscriptions from your channel and it is only possible when you set them to public.

  1. Now visit this link xxluke.de/subscription-history which is a YouTube subscription history tool.
  2. Paste your YouTube channel URL.
  3. Tap on “Continue”.

After tapping on continue, it will show your subscriptions under the “Subscriptions” header.

It will also display the date that you subscribed to a channel under the name of your channel.

It will also sort the list from newest to oldest.

So, if you want to see the first channel you have subscribed from your channel, you need to scroll to the bottom.

You need to keep in mind that the tool will not work if your subscriptions are private.

If the tool is not working, you need to check whether your subscriptions are private or public.

If they are private ensure that you disable it before putting your URL in the tool.

This is how you will successfully know how to see when you are subscribed to a YouTube channel.

How do I make my subscriptions public?

Here is a step-by-step guide to make your subscriptions public on YouTube:

  1. Go to the homepage of YouTube on the app.
  2. On the top navigation bar you need to tap on the profile picture of your channel.
  3. Now, select “Your channel”.
  4. The next step is to Tap on the “Edit Channel” button”.
  5. Under privacy, you need to disable the “Keep all my subscriptions private” option to make them public.

After disabling the option “keep all my subscriptions private” settings, now your subscriptions are public.

Is xxluke safe?

Yes, the tool is available on the website as well as the website itself is safe as it contains an active SSL certificate.

Your task is to provide the URL of your YouTube channel to see the subscription history.

Additionally, it will not steal any of your personal information so do not worry about it.

I have checked that the site gets more than four hundred thousand visitors every month.

Final Words

The process of knowing when you subscribe to a YouTube channel can be helpful for you for two reasons.

First of all, it will help you to remember why did you subscribe to any channel.

For instance, if you are into new music videos a few years ago there is a great chance that you subscribe to a music channel on YouTube that year.

The second reason to know when you subscribe to a YouTube channel shows your faith in it.

If you are subscribed to a channel that means you like it very much.

What’s Next

Cool YouTube Channel Names

How to Change your Channel Name on YouTube

How to Download Private Videos on Youtube

Arsalan Rauf
Arsalan Rauf

Arsalan Rauf is an entrepreneur, freelancer, creative writer, and also a fountainhead of Green Hat Expert. Additionally, he is also an eminent researcher of Blogging, SEO, Internet Marketing, Social Media, premium accounts, codes, links, tips and tricks, etc.
www.greenhatexpert.com

Filed Under: YouTube

  • « Previous Page
  • 1
  • …
  • 33
  • 34
  • 35
  • 36
  • 37
  • Next Page »


Recent Posts

  • Free DeepSeek Accounts 2025
  • Free Zoho Mail Accounts 2025
  • Acudepot Discount Codes 2025
  • Free Blackshot Accounts 2025
  • Free GMX Email Accounts 2025
  • Songtrust Discount Codes 2025
  • Uzicases Discount Codes 2025
  • Cardillo Promo Codes 2025
  • Free DriverFix License Keys 2025
  • Avast Secureline VPN Activation Codes 2025

Recommended Posts

Create a Gmail Account Without Phone Number

Free Course Hero Account

Crunchyroll Accounts

Cracked Apps

Free Pokemon Go Accounts
Onlyfans Free Accounts
Free Chegg Accounts
Free Paypal Accounts
Free Gmail Accounts
Funny Steam Names

Categories

  • Apps
  • Apps for PC
  • Blogging
  • Discord
  • Facebook
  • Gaming
  • Grammar
  • Guide
  • How to
  • Instagram
  • Messaging
  • OnlyFans
  • Pinterest
  • Reddit
  • SEO
  • Snapchat
  • Social Media
  • Spotify
  • Steam
  • Telegram
  • TikTok
  • Twitch
  • Twitter
  • Whatsapp
  • WordPress
  • YouTube
  • Home
  • Social Media
  • Messaging
  • About
  • Submit Guest post