Green Hat Expert

  • Home
  • Social Media
    • Instagram
    • TikTok
    • Snapchat
    • Facebook
    • YouTube
    • Twitter
  • Messaging
    • Discord
    • Telegram
    • Whatsapp
  • About
  • Submit Guest post
You are here: Home / Archives for WordPress

How to Optimize for Google’s Featured Snippets to Build More Traffic

Last Updated on July 27, 2022 By Arsalan Rauf

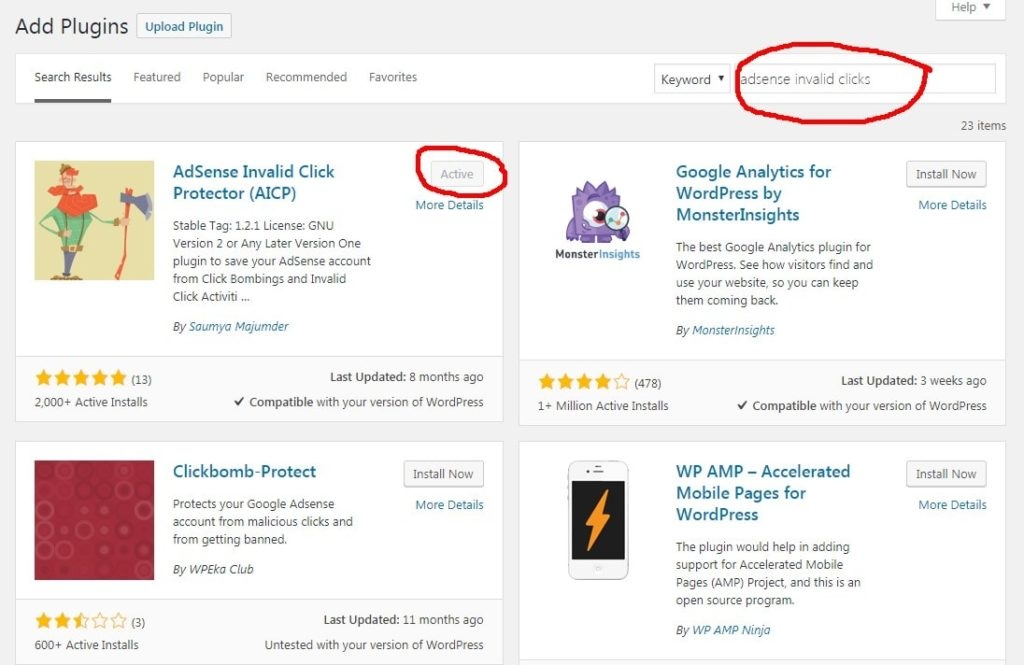
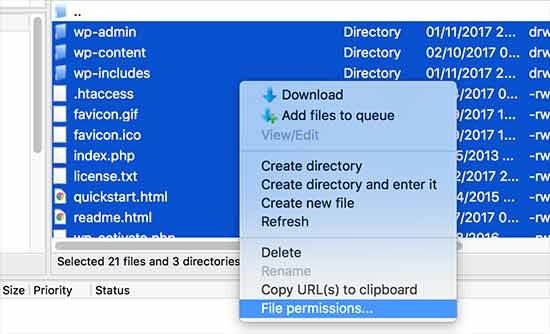
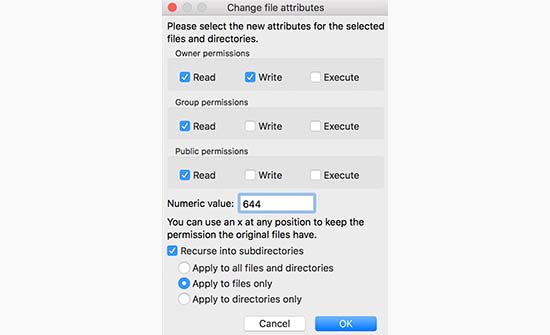
Have you noticed that it has become a hard nut to crack to build referral traffic from Google?

It is because the competition has become tougher than before.

Google search results or Google search engine is not generating as much traffic as it used to generate in the past.

How do you adapt?

This post will teach you how to optimize your content to one of the most recent changes of Google that is, featured snippets.

What are featured snippets?

Featured snippets are selected results by the Google bot for the top of Google’s organic results below the ads in a box.

The objective of featured snippets is to answer the question of the user. They are also known as ‘answer boxes’. Being featured means getting additional brand exposure in Google search results.

There are two studies confirming the claim:

  • Ben Goodsell reports that CTR or click through rate on a featured page increased from 2 to 8 % once it is placed in an answer box, with revenue from organic traffic increasing by 677%.
  • Eric Enge highlights an increase of 20-30% in traffic for Confluentforms.com when they held the position of featured snipped for the query.

Types of featured snippets

There are three major types of featured snippets:

  • Paragraph (an answer is given in text). It can be a box contains text inside or a box with both image and text inside.
  • Table (an answer is given in a table)
  • List (an answer is available in a form of a list)

Here is an example of paragraph snippet with an image:

Image

According to Getstat, the most popular featured snippet is “paragraph” type:

Image

Featured snippets or answer boxes?

Since we are dealing with a pretty new thing, so the terminology is pretty loose for this one.

Many people refer featured snippets as answer boxes and it is because there is an answer available in a box.

So there is nothing wrong with the terminology. It creates a confusion in Google because it shows a quick answer, an estimate or a definition etc on the top without linking to the source:

Image

Let’s stick to the term ‘featured snippet’ in order to avoid the confusion. When there is a URL featured in a box because it gives an extra exposure to the linked site. It is an important thing for content publishers.

Image

Do I have a chance to get featured?

According to research by Ahrefs, 99.58% of featured pages already rank in top 10 of Google. So if you are already rank high for related search queries, you have good chance to get your featured snippet.

On the other hand, Getstat also claims that 70% of the snippets are from outside of the first position in Google. Therefore, it is necessary to be ranked in top 10. In order to get featured, you do not have to be at #1.

There is no doubt in saying that the most featured site is Wikipedia.org. If Wikipedia is already featured for the search query, it will be extremely hard for you to beat it. It does not mean that you lose heart and you should not try.

According to the analysis performed in a study, there are some types of search queries get featured snippet results most often:

  • DIY processes
  • Health
  • Financial
  • Mathematical
  • Requirements
  • Status
  • Transitional

Ahref’s study expands the list of popular topics using their most frequently words which appear in featured snippets:

Image

The following types of search queries usually do not have answer boxes:

  • Images and videos
  • Local
  • Shopping

To sum up the above discussion:

  • You need to be in the top 10 ranking to get featured. So the big part of being featured is to improve your overall rankings in Google. It includes long-tail informational queries and they are your lower-hanging fruit.
  • If your niche is health, DIY or finance, you have the highest chance of getting featured.

Identify all kinds of opportunities to be featured

Start with good old keyword research

According to the multiple studies, the majority of featured snippets are from long tail keywords. The more words you type in the Google search box, the higher the chances there will be a snippet.

It is a good idea to begin with researching your keywords.

When performing keyword research with featured snippets in mind, note that:

  • You need to start with question type search queries. It should contain words such as why, what, and how etc. It is because they are easiest to identify.
  • Target informational things not only focus on questions. The aim of featured snippets is to answer the question of the user immediately. Question type queries are not only the reason that builds featured results. According to Ahref’s study, most of the long tail queries with no questions trigger featured snippets in search engine.

It helps if you use a keyword research tool that shows you whether the query makes the featured results or not. Serpstat is one of the best keyword research tools and it combines the keyword research with featured snippet research let’s take an example of keywords that trigger answer boxes:

Image

Use Serpstat to filter the best performing keywords or queries of your competitors by the presence of answer boxes:

Image

This will help you in future for competition too, it will allow you to see the weaknesses and strengths of competitors.

Browse Google for more questions

If you want to further explore the topic, you need to go through Google’s ‘People also ask’ sections whenever you observe one in search results. It gives a huge insight into the questions that Google relates to the topic.

Image

Once you start expanding the questions in Google to see the answer, it will add more and more questions to the bottom of the box:

Image

Identify search queries where you already rank high

First of all, you need to identify the phrases for which you are already ranked highly. It will be the easiest way to get featured snippet after you optimize for answer boxes.

Google Search Console also shows that which search queries are sending you traffic. To get that report you need to click ‘search traffic’ and then ‘search analytics’.

Then check the boxes that will show the position of your pages in Google. You can also see the top performing queries too:

Image

Use the filters to find some question type queries among those:

Image

Go beyond traditional keyword research tools: Ask people

All the above methods are already used for discoveries. Your competitors are also ranking high for those opportunities. What if you go beyond that? Ask your audience, followers, customers how they search and what or which questions they ask.

MyBlogU: Ask people outside your immediate reach

Go away from your target users and select random people to ask what kind of questions they have on a specific topic and what will be their concerns. If you look out of the box, it will give you a fresh understanding.

MyBlogU is a great way to do that. You need to post a new project in the “Brainstorm” section and ask members to contribute their thoughts.

Image

Seed Keywords: Ask your friends and followers

Seed keywords is another tool that enables you to find related keywords with help from your followers and friends. Simply create a search plot, share it on social media and ask your audience and followers to type in the keywords they will use to solve it.

Do not lead your search scenario. It means that you need to avoid guiding people to search the phrase according to your thinking.

Here is an example of a scenario:

Image

And here are the suggestions from real people:

Image

Additionally, you can also create similar surveys using Google Forms or SurveyMonkey.

Monitor questions people ask on Twitter

To monitor questions people ask on Twitter is another way to discover more opportunities. Twitter search supports question mark (?), search operator will filter the results containing a question. You need to put a space between your search term and question mark (?).

Image

I suggest using Cyfe to archive and monitor Twitter results because it gives a minimal dashboard which I can use to get unlimited searches on Twitter.

Image

Once you lack article ideas, you need to log in to Cyfe to see the archive and you can proceed with the above keyword research tools to get exposure to any idea.

Use spreadsheets to organize keyword phrases and questions you discover (see more on this below). Some of these questions may become the whole piece of content and some of them will be subsections of broader articles:

  • I personally do not analyze the search volume to conclude whether any of these questions need to be covered in a separate article or a subsection. According to Ahrefs research, there is no direct correlation between the popularity of the term and whether it will give rise to a featured snippet.
  • Use your best judgement based on your research and niche knowledge. How much you will be able to tell or answer any particular question. If it has a lot to do, you need to separate the article and use the keyword research to identify subsections of the future piece.

Optimizing for featured snippets

Start with on-page SEO

There is no magic button available that can lead your site to get featured. Of course, you need to start with SEO best practices. It is simple because you will get featured if you are ranking high in Google search results for the query.

Randy Milanovic did a good overview of tactics to make your content findable with ease. Do not forget to go through our SEO guide.

How about structured markup?

There are a lot of people who suggest using Schema.org. According to the Ahrefs study, as discussed earlier, there is no correlation between the featured results and structured markup.

So the best way to optimize for featured snippets is to give a better answer. Here are a few actionable tips:

1. Aim at answering each question concisely

In my opinion and observation, Google gives preference to feature an answer that was given within one paragraph.

According to the study of AJ Ghergich cites, the average length of a paragraph snippet is 45 words and the maximum of 97 words. So you need to keep it in mind that how long each answer should be in order to get featured:

Image

It does not mean that your articles should be one paragraph long. Google also gives more preference to long form content that is also known as cornerstone content. It is also a better way to describe it, it is not only about content but it also includes attention grabbing images. Even if you do not believe that cornerstone content gets special treatment in SERPs, paying attention to long articles will help you to encompass more related questions in one piece.

You need to adjust the blogging style of yours:

  • Ask the question in your article (that may be a subheading)
  • Immediately answer the question with a one-paragraph answer
  • Elaborate further in the article

These tactics are also result in higher user retention and it is the best way to make your post well structured. It will be much easier to read as well.

To quote AJ Ghergich,

“When you use data to fuel topic ideation, content creation becomes more about resources and less about brainstorming”.

2. Be factual and organize well

Google loves lists, numbers and steps. I have seen this again and again: for example, answer boxes will list the actual ingredients, time to cook, number of steps, year and city of birth etc.

In your paragraph where you are answering the question, make sure to list useful names and numbers. Get very factual.

In fact, according to the study of AJ Ghergich, the comparison charts and lists are easier way to get featured snippet in Google because Google loves well structured content.

In fact, even for branded queries when a user is searching a particular brand, Google will pick up the table from another website if it has a table, and not from the brand site itself:

Image

It only shows that Google loves well structured, number driven and factual content.

There is no standard markup to structure your content. Google seems to pick up <table>, <ul>, and <ol> and does not require any other pointers.

3. Make sure one article answers many similar questions

In the research of featured snippets by Ahrefs, it is found that once a page gets featured, there is a great chance that it will get featured in a lot of similar queries. So it should be structured and worded in such a way that it can address a number of related queries.

Google is very good at analyzing the synonymic and closely related terms and questions. There is no need to create a separate page that answers each specific question.

Image

Creating a single solid post addressing different related questions is a smart strategy. If you want to get featured in answer boxes. It leads us to the next tactic:

4. Organize your questions properly

In order to combine closely related questions in one post, you need to organize the queries in a proper way. It will also help you to structure your content.

I have a multi level keyword organization strategy which you can apply here as well:

  • A generic keyword makes a section or a category of the blog
  • A more specific search query becomes the title of the post
  • Even more specific queries determine the subheadings of the article and thus define its structure
  • There will be a number of queries which are so closely related and they will all go under a single subheading.

For example:

Image

Serpstat is a helpful tool in this regard, it is helpful in discovering an article idea and then breaking it into subtopics as well. it has questions section that can give hundreds of questions containing your core term and then generate a tag cloud of other popular terms that come up in those questions:

Image

When you click any tag cloud it will filter results to those questions that only have that word in them. These are subsections for your post or article:

Image

Here is a good example of how related questions can help you structure the article:

Image

5. Make sure to use eye-grabbing images

Paragraph featured snippets with images are eye-catching as compared to the regular featured snippets. You will be wondering how can you make an image to be featured in your content in snippets. You are helpless here, it is because Google seems to pick up a random image from your post.

So in order to take care of this section, you need to make sure that all of your images in-article are eye-catching, annotated and branded well. So it does not matter which image Google will feature. You need to visualize your content, put together charts, tables and graphs while working on your post.

Use Bannersnack to create eye-catching images for your brand. I love the functionality of their image editing. It allows you to create graphics quickly and resize them to reuse as banners and social media images and organize them in folders:

Image

6. Update and re-upload the images (WordPress)

WordPress adds dates to image URLs, so if you will update an article using new information, the images will be considered as old. I managed to get a couple of paragraph featured snippets using images once I started updating my images too:

Image

7. Monitor how you are doing

Ahrefs enables you to monitor the queries for which your domain is featured for, so you need to keep an eye on those. When they grow then new ones appear:

Image

Conclusion

It will take a lot of planning and research and you cannot be sure when you will see the results. Especially if you do not possess too many top 10 ranking in Google. So being featured in Google search results is your incentive to work harder on your content, consider it this way. You will also achieve more important goals your way there:

  • You will discover hundreds of new content ideas (and thus will rank for a wider variety of various long-tail keywords)
  • You will learn to research each topic more thoroughly (and thus will build more incoming links because people tend to link to indepth articles)
  • You will learn to structure your articles better (and thus achieve a lower bounce rate because it will be easier to read your articles)

Have you been featured in Google search results yet? Please share your tips and tricks in the comments below.

Do not forget to share this post

Arsalan Rauf
Arsalan Rauf

Arsalan Rauf is an entrepreneur, freelancer, creative writer, and also a fountainhead of Green Hat Expert. Additionally, he is also an eminent researcher of Blogging, SEO, Internet Marketing, Social Media, premium accounts, codes, links, tips and tricks, etc.

www.greenhatexpert.com

Filed Under: Blogging, SEO, WordPress Tagged With: benefits of featured snippets, featured snippet definition, featured snippet example, featured snippets examples, google featured snippets api, google snippets, how to create featured snippets, how to get a featured snippet, how to track featured snippets, types of featured snippets, what is a featured snippet

Best Adsense Invalid Click Protector Plugins for Bloggers

Last Updated on June 25, 2022 By Arsalan Rauf

Every blogger knows about Google Adsense. It is a program powered by Google and it enables you to show ads on your website or blog. When someone clicks on your ads then you earn money. It seems to be an easy task but Adsense is very strict for invalid click activities on Adsense account. In this post, I am going to share best WordPress plugins to protect Adsense or Adsense invalid click protector plugins.

If you want to know about Google Adsense

Read our posts about:

  • How to create an Adsense account
  • Google Adsense Account approval process

Invalid clicks are common all over the world. According to the report, invalid clicks are targeting Asian bloggers most of the time. If you are also facing invalid clicks on your WordPress site, you can protect Adsense account from invalid clicks using plugins. It will also prevent it. Go through this post to know the best WordPress plugins to protect invalid clicks, how to use them etc.

What is Click bombing or Invalid Clicks?

Click bombing or invalid clicks stand for getting more clicks on your ads than previous days. For example, usually, you get 15 clicks on your ads on daily basis. The very next day you observe that you are getting 40 to 50 clicks. It is known as click bombing. If your Adsense account shows CTR of 5, 10 or 15 that is more than normal CTR. It means that click bombing is going on.

In other words, if you are getting clicks from a single IP address can lead to click bombing and invalid clicks. This activity can disable or ban your Google Adsense account.

How to Protect Your Adsense Account from Invalid Clicks?

There are a number of plugins available on WordPress that can help you to protect your Adsense account from invalid clicks or activity. I give preference to two of them that are super easy to use. So let’s see them. If you do not know how to install a plugin, see our guide on how to install a plugin on WordPress.

Plugins to Protect Your AdSense from Invalid Clicks

1. AdSense Invalid Click Protector (AICP)

I personally use this plugin on my websites. Adsense Invalid Click Protector for blogger is super easy to use and it can protect your Adsense account from invalid click activities.

Adsense Invalid Click Protector plugin which is also known as AICP. It will protect your Google Adsense account from invalid clicks and click bombing. According to Google Adsense terms, Google does not claim any liability towards this invalid click activity or click bombing and call Adsense publisher into question. It considers him/her responsible for this activity. So you need to put an end to this issue for good.

How to Use AdSense Invalid Click Protector?

First of all, you need to install the plugin on your WordPress website by searching it on WordPress plugins like this:

Add AICP

Now click on activate, you will be able to see the plugin in your WordPress menu area:

AICP icon

Now click on the plugin to see an interface that will show settings. You need to set the Ad click limit, set the visitor ban duration and click counter cookie expiration time. Simply fill the settings according to your own wish or you can use these settings.

AICP interface

2. ClickBomb Protect

Clickbomb protect is another Adsense click bombing protection plugin. It is also known as Google Adsense click bomb barrier and protection plugin. It is easy to use. This plugin responds to any suspicious activity on your ads and prevents it. As a result, it stops the click capacity of advertisements on your post or page. You can set the number of clicks from the same IP, time of banning the user and so on.

Clickbomb protect also has the ability to work with any topic as well as format. This plugin will not let your Adsense account ban. In addition, it can block IPS that are doing any suspicious activity on your page or post and makes that user handicap.

Clickbomb Protect

How to Use Clickbomb-Protect?

Follow the same instructions for this plugin too. Just search it from WordPress directory and install it.

Click bomb Protect plugin search

Upon activation of this plugin, you will be able to see the plugin in the plugins section like this:

Clickbomb plugin in dashboard

You need to click the plugin and it will show you an easy interface where you can do configuration. It includes click duration, click limit and ban duration etc.

Complete the settings according to your wish and relax from the headache of invalid clicks.

Clickbomb interface

Google is always strict about invalid click or click fraud and will not allow that user to show ads if they caught him.

In addition, you need to pay attention to your Adsense report and details on daily basis. You may see variation in your CTR and it seems to be invalid activity for you.

So these were the best WordPress plugins to protect Adsense from invalid clicks and click bombing.

Am I missing something?

Do not hesitate to share your ideas.

Do you know any other best plugin to protect your Adsense?

I hope that you liked this post. Do not forget to share this post.

Arsalan Rauf
Arsalan Rauf

Arsalan Rauf is an entrepreneur, freelancer, creative writer, and also a fountainhead of Green Hat Expert. Additionally, he is also an eminent researcher of Blogging, SEO, Internet Marketing, Social Media, premium accounts, codes, links, tips and tricks, etc.

www.greenhatexpert.com

Filed Under: Blogging, WordPress

9 Best Testimonial Plugins for WordPress

Last Updated on August 21, 2022 By Arsalan Rauf

9 Best Testimonial Plugins for WordPress

Are you searching for the best testimonial plugins for your WordPress website?

Testimonials add social proof to your site that enables the visitors to trust your website. in this post, I have selected carefully the best WordPress testimonial plugins which you can use on your site.

1. Testimonial Rotator

Testimonial Rotator

Testimonial Rotator is the first WordPress testimonial plugin in my list which is easy to use. It enables you to create a testimonial carousel and add rotating testimonials anywhere on your site. In addition, you can also make multiple rotators and manually enter the data of customer including job title, feedback, and photo.

2. Easy Testimonials

Easy Testimonials

Do you want to allow your customers to submit reviews and display them on your website?

If yes, then you are at the right place.

It is because Easy Testimonials enables you to add customer feedback form to your site. So in this way, you can collect testimonials. You can also enter testimonials from the admin area of your WordPress manually.

After doing so, you can show testimonials using a simple shortcode with ease.

3. Testimonials Widget

Testimonials Widget

Testimonials Widget is another flexible WordPress testimonial plugin for your WordPress site. Apart from its name, it enables you to add testimonials anywhere on your site.

It has a sidebar widget allowing you to show testimonials in sidebars with ease. Testimonials are shown in a carousel with a beautiful slide-in and fade effects.

4. Strong Testimonials

Strong Testimonials

Strong Testimonials is another WordPress testimonial plugin for WordPress which is the most customizable plugin. It has multiple display options such as grid layout, testimonial slider, masonry layout, single column layout and so on.

It also has a custom form that enables your customers to add their testimonials and reviews with ease. If your customers are giving reviews on social media, then this plugin can also embed Twitter, Facebook and Youtube etc.

5. Testimonial Basics

Testimonial Basics

It is a complete testimonial management solution for your website and it is the 5th plugin in this list. It supports multiple display styles including sidebar widget and a feedback form to get user testimonials. User submitted testimonials use Gravatar to get the photo of the client. However, you can upload photos directly from the admin area of your WordPress manually.

6. WP Testimonials with rotator widget

WP Testimonials with rotator widget

WP Testimonials is one of the Best testimonial plugins for WordPress which is also highly customizable. It enables you to add testimonials and sort them into tags and categories.

After creating testimonials, you can show them with a shortcode. This shortcode has several parameters that enable you to customize the appearance of testimonials. The plugin also has a widget like a shortcode.

7. BNE Testimonials

BNE Testimonials

BNE Testimonials is also an easy option to use, to add testimonials on your site. It also has a shortcode and a sidebar widget to show testimonials with ease.

It consists of a slider and plain list layout for testimonials that inherits the style of your theme for display.

8. Testimonial

Testimonial

Testimonial has simple options that is why it is a straight forward WordPress testimonial plugin. You can select your own colors in it.

It supports draggable box items and enables you to select different fonts, text color, font sizes and featured photo. The plugin does not contain a rotator or slider therefore, testimonials will be shown in grid or list style.

9. Testimonial Slider

Testimonial Slider

Testimonial Slider seems to be a modern WordPress testimonial slider which improves the user experience. It has a slider as well as plain list layout. In addition, you can also add a front-end contact form to get customer testimonials.

You can add testimonials anywhere using the sidebar widget or shortcode. Testimonial slider is mobile friendly and works great on all size of screens.

I hope that you liked the post on Best Testimonial Plugins for WordPress.

You may also want to see my best PDF plugins for WordPress.

Do not forget to share this post.

Arsalan Rauf
Arsalan Rauf

Arsalan Rauf is an entrepreneur, freelancer, creative writer, and also a fountainhead of Green Hat Expert. Additionally, he is also an eminent researcher of Blogging, SEO, Internet Marketing, Social Media, premium accounts, codes, links, tips and tricks, etc.

www.greenhatexpert.com

Filed Under: WordPress Tagged With: Best Testimonial Plugins, dt testimonials plugin, easy testimonials, simple testimonial plugin wordpress, strong testimonials, strong testimonials wp plugin, testimonial rotator plugin wordpress, testimonials wordpress plugin free download, wordpress testimonial slider plugin

How to Deactivate All Plugins When Not Able to Access WP-Admin

Last Updated on August 21, 2022 By Arsalan Rauf

How to Deactivate All Plugins When Not Able to Access WP-Admin

While troubleshooting, often several websites will suggest deactivate all the plugins and activate them one by one.

What is the worst part?

At times, you get locked out of your WordPress admin area, then you cannot deactivate a single plugin with this easy way. If you have ever seen a white screen of death, then you can think exactly what I am talking about. In this post, I shall show you how to deactivate all WordPress plugins when you are unable to access wp-admin area.

There are two ways to disable your plugins. One needs you to use phpMyAdmin and the other one needs to use FTP.

Deactivate All Plugins Using FTP

In this way, you will have to use FTP client or file manager of your host.

First of all, you have to connect your site using File Manager in cPanel or FTP client. After connecting, you need to go to /wp-content/ folder.

wp content ftpview

When you open wp-content folder, you will see a folder named plugins. That is the place where WordPress stores all the plugins you installed on your site.

Rename the plugins folder by doing right click. Change the name of the folders of plugin according to your own choice. In my opinion, I call it ‘plugins deactivate’. After doing this, all the plugins of your site will be deactivated.

deactivate plugins

Generally, this method is useful when you are locked out of your admin area in WordPress. If the issue was due to your plugins, then you should go to admin area of WordPress by login to it.

After doing that, go to your /wp-content/ folder and rename ‘plugins deactivate’ back to plugins. Now activate one by one plugin untill your website breaks again. While doing it, you will know exactly which plugin is causing the problem with ease.

Deactivate all plugins using phpMyAdmin

In my opinion, the FTP method is easier one but you can also deactivate all plugins using phpMyAdmin.

First of all, you need to login to the dashboard of your web hosting. in this example, I am showing you a cPanel dashboard. The dashboard of your hosting account may look different.

You need to click on phpMyAdmin icon available under ‘Databases’ section.

cpanel phpmy admin

it will launch phpMyAdmin in a new browser window. You need to choose your WordPress database, if it is not already selected. Now you will be able to see database tables of WordPress.

php my admin db view

As you can see that all tables in the database contain wp- prefix before table name. Your tables may consist of different prefix.

You need to click on wp- options table, there are rows of different options inside wp- options table. Now find the option ‘active plugins’ and then click on ‘Edit’ link text to it.

edit option

On the next screen, you need to change option-value field to a:0:{} and now hit Go button to save the settings.

reset plugins

That is how you have deactivated all WordPress plugins using phpMyAdmin successfully. If it was a plugin which was stopping you from accessing the admin area of WordPress, then you should be able to login now.

I hope that you liked the post and it helped you to deactivate all plugins in WordPress.

You may want to see our Best WordPress backup plugins.

Do not forget to share this post.

Arsalan Rauf
Arsalan Rauf

Arsalan Rauf is an entrepreneur, freelancer, creative writer, and also a fountainhead of Green Hat Expert. Additionally, he is also an eminent researcher of Blogging, SEO, Internet Marketing, Social Media, premium accounts, codes, links, tips and tricks, etc.

www.greenhatexpert.com

Filed Under: How to, WordPress Tagged With: activate wordpress plugin via ftp, disable wordpress plugin without dashboard, how do i deactivate plugins in wordpress, how to activate wordpress plugin from cpanel, how to disable wordpress plugin from cpanel, wordpress activate plugin from database, wordpress deactivate plugin from database, wordpress deactivate plugin programmatically

How to Fix the WordPress Failed to Open Stream Error

Last Updated on August 21, 2022 By Arsalan Rauf

How to Fix the WordPress Failed to Open Stream Error

Are you facing failed to open stream error in WordPress?

If yes, then you are at the right place.

This error generally points out the location of the scripts where the error occurs. However, it is a hard task for newbie users to understand it. in this post, I shall show you how to fix the WordPress failed to open stream error.

Why Failed to Open Stream Error Occurs?

Before I try to fix this error, it is necessary for you to know that what causes failed to open stream error in WordPress.

This error arises when WordPress is not able to load the file mentioned in the code of site. When this error occurs, at times WordPress will show a warning message will continue to load the website. sometimes, it will display a fatal error and will not load anything else.

The phrase of the message can be different because it depends on the location of error and the reason for failure. In addition, it also gives you clues about what do you need to fix.

Typically, this message will appear something like this:

1
2
3
Warning: require(/home/website/wp-includes/load.php): failed to open stream: No such file or directory in /home/website/wp-settings.php on line 19
Fatal error: require(): Failed opening required ‘/home/website/wp-includes/load.php’ (include_path=’.:/usr/share/php/:/usr/share/php5/’) in /home/website/wp-settings.php on line 19

Here is another example:

1
Last Error: 2018-04-04 14:52:13: (2) HTTP Error: Unable to connect: ‘fopen(compress.zlib://https://www.googleapis.com/analytics/v3/management/accounts/~all/webproperties/~all/profiles?start-index=1): failed to open stream: operation failed’

After the previous discussion, let us take a look how to troubleshoot and fix failed open stream error in WordPress.

Fixing Failed to Open Stream Error in WordPress

As I described earlier, the error can be a result of a number of reasons and the error message will also be different. It depends on the location and cause of the file which is causing the error.

In every example, failed to open stream phrase will be a result of a certain reason. For instance, no such file or directory, permission denied, operation failed and so on.

Now if your error message consists of ‘no such file or directory’, then you need to go through the code to find out which file is mentioned at the specific line.

If it is a theme file or plugin, then it means that the theme files or the plugin were either not installed properly or deleted. Simply deactivate and reinstall the plugin/ theme to fix the error.

However, there is also a chance that WordPress is unable to find the files because of a missing .htaccess file available in the root folder. In this situation, you need to visit Settings>Permalinks page in admin of your WordPress and click on save settings button to regenerate .htaccess file.

fix ht access

If the error message is something like ‘Permission denied’, then it means that WordPress does not have the right permission to access the directory referenced in the code or file.

To resolve this, you need to go through our post on Fix File and Folder permissions in WordPress and correct them if required.

In the end, there are some WordPress plugins that load scripts from third party sources including Facebook APIs, Google Analytics, Google Maps and other APIs.

Some of these APIs may need authentication or may have changed the way of accessing them by developers. A failure or authenticate or incorrect access method will result in WordPress failing to open the needed files.

To resolve this issue, you need to contact the author of the plugin to get support. They will be able to help you and fix the error.

I hope that you liked the post, and you learn how to fix WordPress ‘failed to open stream’ error. You may want to see our post on How to change the WordPress Database prefix to improve security.

Do not forget to share this post.

Arsalan Rauf
Arsalan Rauf

Arsalan Rauf is an entrepreneur, freelancer, creative writer, and also a fountainhead of Green Hat Expert. Additionally, he is also an eminent researcher of Blogging, SEO, Internet Marketing, Social Media, premium accounts, codes, links, tips and tricks, etc.

www.greenhatexpert.com

Filed Under: Guide, How to, WordPress Tagged With: failed to open stream no such file or directory in wordpress, failed to open stream: no such file or directory laravel, failed to open stream: permission denied

Fix WordPress Memory Exhausted Error – Increase PHP Memory

Last Updated on August 21, 2022 By Arsalan Rauf

Fix: WordPress Memory Exhausted Error – Increase PHP Memory

Are you getting an allowed memory size exhausted error in WordPress?

If yes, then you are at the right place.

It is one of the most common WordPress errors, you can get rid of it with ease. You need to increase php memory limit in WordPress to solve the issue.

In this post, I shall show you how to fix WordPress memory exhausted error by increasing PHP memory.

What is WordPress Memory Exhausted Error?

WordPress is composed in PHP that is a server side programming language. Every site requires a WordPress hosting server for it to make it functional.

Web servers are similar to other computers. They require memory to run multiple apps at the same time in a smooth way. Server administrators allot specific memory size to different apps including PHP.

When your WordPress code needs more memory than the default alloted memory, you will see an error.

1
Fatal error: Allowed memory size of 33554432 bytes exhausted (tried to allocate 2348617 bytes) in /home4/xxx/public_html/wp-includes/plugin.php on line xxx

memory exhuasted error

WordPress automatically tries to increase PHP memory limit if is less than 64 MB by default. However, it is not sufficient enough.

After above discussion, let’s see how to increase PHP memory limit in WordPress to fix memory exhausted error.

Increase PHP Memory Limit in WordPress

First of all, you need to edit your wp-config.php file on your WordPress website. The location of this file is in the root folder of WordPress website and you need to use FTP client or file manager in the control panel of your web hosting.

Next, you need to paste the coding in wp-config.php file before the line that states

1
define( 'WP_MEMORY_LIMIT', '256M' );

This code will enable WordPress to increase the memory limit of PHP to 256MB. After completing it, you need to save the changes and upload your wp-config.php file back to your server.

Visit the WordPress site now and memory exhausted error should be resolved or disappear now.

Note: If this solution is not working for you, it means your web hosting provider does not enable WordPress to increase the memory limit of PHP. You need to ask the web hosting provider to increase the limit of your PHP memory manually.

That is it. I hope that you liked this post on how to fix WordPress memory exhausted error – increase PHP memory. And it will enable you to increase the PHP memory limit. You may want to see our guide on how to fix 404 error in WordPress.

Arsalan Rauf
Arsalan Rauf

Arsalan Rauf is an entrepreneur, freelancer, creative writer, and also a fountainhead of Green Hat Expert. Additionally, he is also an eminent researcher of Blogging, SEO, Internet Marketing, Social Media, premium accounts, codes, links, tips and tricks, etc.

www.greenhatexpert.com

Filed Under: Guide, WordPress Tagged With: allowed memory size of 41943040 bytes exhausted, fatal error: allowed memory size of 67108864 bytes exhausted godaddy, fatal error: allowed memory size of 67108864 bytes exhausted opencart, fatal error: allowed memory size of 67108864 bytes exhausted wordpress, fatal error: allowed memory size of bytes exhausted wordpress, fatal error: out of memory wordpress, increase wordpress memory limit godaddy, wordpress memory limit

How to Change the WordPress Database Prefix to Improve Security

Last Updated on August 21, 2022 By Arsalan Rauf

How to Change the WordPress Database Prefix to Improve Security

WordPress database seems to be the brain fo your full website. It is because every amount of information is available there and it can become the target of those people who want to get over your system. Spammers run automated codes for SQL injections. Unluckily, there are several website owners who do not change the database prefix while installing WordPress.  It enables the bots to mass attack by targeting the defaul prefix that is, wp-admin. It is a smart move to protect the database of WordPress by changing its prefix which is an easy task while setting up your website. You need to follow few steps to change the WordPress database prefix in a proper way. In this way, you will not mess with your established website.

Preparation

I suggest that you create a backup of your WordPress database before you act on anything I am going to suggest in this post. It is necessary to create a backup of your website on daily basis. BackupBuddy is a highly recommended plugin for this purpose. Next thing I suggest is that you redirect your visitors to a temporary maintenance page.

Change Table Prefix in wp-config.php

Open your wp-config.php file that is available in your WordPress root directory. Change the table prefix line from wp- to something else like wp-greenhat

So the line will look like this:

1
$table_prefix  = 'wp_a123456_';

Note: You can only change it to letters, numbers, and underscores.

Change all Database Tables Name

You have to access your database using phpMyAdmin, then change the table names to one I specified in wp-config.php file. If you have cPanel WordPress hosting, you can find the phpMyAdmin link available in your cPanel. See the image:

phpmyadmin

There are 11 default WordPress tables available in total, therefore, to change them manually is a hard task.

sql

Therefore, in order to make things fast, I have a SQL query that you can use.

1
2
3
4
5
6
7
8
9
10
11
12
RENAME table `wp_commentmeta` TO `wp_a123456_commentmeta`;
RENAME table `wp_comments` TO `wp_a123456_comments`;
RENAME table `wp_links` TO `wp_a123456_links`;
RENAME table `wp_options` TO `wp_a123456_options`;
RENAME table `wp_postmeta` TO `wp_a123456_postmeta`;
RENAME table `wp_posts` TO `wp_a123456_posts`;
RENAME table `wp_terms` TO `wp_a123456_terms`;
RENAME table `wp_termmeta` TO `wp_a123456_termmeta`;
RENAME table `wp_term_relationships` TO `wp_a123456_term_relationships`;
RENAME table `wp_term_taxonomy` TO `wp_a123456_term_taxonomy`;
RENAME table `wp_usermeta` TO `wp_a123456_usermeta`;
RENAME table `wp_users` TO `wp_a123456_users`;

You may have to add lines for other plugins because they may use their own tables in the database of WordPress. The idea is that you change all tables prefix to your desired one.

The Options Table

I have to search the options table for any other fields that is using wp- as a prefix, so we can change them. To make the process easy use this query:

1
SELECT * FROM `wp_a123456_options` WHERE `option_name` LIKE '%wp_%'

It will return a plenty of results, you need to go one by one to change these lines.

UserMeta Table

Next, the need is to search the user meta for all fields that are using wp- as a prefix, so you can change it. Use this SQL query to perform this:

1
SELECT * FROM `wp_a123456_usermeta` WHERE `meta_key` LIKE '%wp_%'

The number of entries may differ depends on how many plugins you are using. Simply change everything that has wp- to the new prefix.

Backup and Done

So you are up to test the website. If you have followed the above steps explained by me, it should be working fine. After doing so, you need to create a new backup of your website to stay on safe side.

Do not forget to share this post.

Arsalan Rauf
Arsalan Rauf

Arsalan Rauf is an entrepreneur, freelancer, creative writer, and also a fountainhead of Green Hat Expert. Additionally, he is also an eminent researcher of Blogging, SEO, Internet Marketing, Social Media, premium accounts, codes, links, tips and tricks, etc.

www.greenhatexpert.com

Filed Under: Guide, How to, WordPress Tagged With: change db prefix plugin, change wordpress table prefix after install, database prefix mysql, get wordpress table prefix, how to change table prefix in phpmyadmin, wordpress change table prefix plugin, wordpress plugin to change database table prefix, wordpress table prefix generator

How to Fix File and Folder Permissions Error in WordPress

Last Updated on August 21, 2022 By Arsalan Rauf

How to Fix File and Folder Permissions Error in WordPress

Do you want to fix the file and folder permissions error in WordPress? or

Are you trying to fix the file and folder permissions error in WordPress?

If yes, then you are at the right place.

Incorrect file and folder permissions can generate errors on your site while uploading. In this post, I shall show you how to easily fix file and folder permissions error in WordPress.

How File and Folder Permissions Work in WordPress?

Your self-hosted WordPress website works on a PC run by your WordPress hosting company. This PC works as a server and uses a software that is, Apache. It uses this software to manage your files and serve them to browsers.

File and folder permissions inform the server who can run, read and modify files hosted on your account. WordPress requires permissions to manage files and make folders on the server.

Incorrect file permissions will block WordPress from uploading images, creating folders or run scripts. In addition, it can also compromise security of WordPress website.

In some cases, WordPress will try to warn you that it cannot create a folder, edit a file or cannot write to disk etc. However, at times, you may not see any error messages.

Correct File and Folder Permissions in WordPress

The correct set of file and folder permissions enable WordPress to make files and folders. The following settings are suggested for most of the users.

755 for all folders and sub-folders.
644 for all files.

Let’s take a bird’s eye view of how to fix file and folder permissions in WordPress.

Fix File and Folder Permissions in WordPress Using FTP

First of all, you need to connect to your WordPress website with FTP client.

After connecting, visit the root folder of your site.

After doing so, select all folders in root directory and then press right click to select ‘File Permissions’.

file permissions

It will bring up the file permissions dialog box.

Now you have to put 755 in the numeric value field. After doing it, you will have to click on ‘Recurse into subdirectories’ checkbox and then select ‘Apply to directories only’ option.

folder permissions

Click the OK button to keep going. Your FTP client will begin setting file permissions to folders as well as sub-folders. You need to wait for it to complete.

Now, you have to select all files and folders in the root folder of your WordPress website and then right-click to select the file permissions.

file permissions 2

The file permissions dialog box will become visible.

Now you need to put 644 in numeric value. After doing so, you will click on ‘Recurse into subdirectories’ checkbox and then select ‘Apply to files only’ option.

set files permission

Click on OK to continue.

Your FTP client will now begin setting file permission to all files on your WordPress website.

I hope that you liked the post and you learn how to fix file and folder permissions error in WordPress.


Arsalan Rauf
Arsalan Rauf

Arsalan Rauf is an entrepreneur, freelancer, creative writer, and also a fountainhead of Green Hat Expert. Additionally, he is also an eminent researcher of Blogging, SEO, Internet Marketing, Social Media, premium accounts, codes, links, tips and tricks, etc.

www.greenhatexpert.com

Filed Under: Guide, How to, WordPress Tagged With: correct file permissions for wordpress, fix file ownership wordpress, fix wordpress permissions ssh, ubuntu wordpress permissions, wordpress localhost file permissions, wordpress permissions nginx, wordpress permissions plugin, wordpress permissions script

How to Completely Remove Comments From Your WordPress Site

Last Updated on August 21, 2022 By Arsalan Rauf

Do you want to remove comments from your WordPress website completely?

If yes, this post is for you.

If you only use static pages on your site or do not want people to comment on your posts then you can disable all the comments in WordPress with ease. In this post, I shall show you how to entirely remove comments from your WordPress site.

Why Remove Comments in WordPress?

Most of the WordPress users are small business owners who do not usually add a blog section on their site. Their site contains static pages only that makes the comment useless.

While you can disable comments on your WordPress pages with ease but it does not mean that it will remove the comments completely from your WordPress site.

There are some bloggers who do not want to use comments at all. According to their opinion, comments are a distraction and their blogs can do without getting comments.

Now the issue is that most WordPress themes give built-in support for comments. It means that even if you have turned off the comments manually, they still pop up to and fro.

Want to get rid of comments with a single click?

Let’s go for how to completely remove WordPress comments from your site without leaving any traces.

Disabling Comments in WordPress

First of all, you need to install and activate the Disable Comments plugin. For more details, go through our step by step guide on how to install a WordPress plugin.

After activation, you need to visit Settings>Disable Comments page to configure the settings of plugin.

disablecomments

The settings page has two sections.

You can get rid of comments everywhere on your WordPress site or you can selectively disable them on pages, posts or any custom post types.

Choose the first option to disable WordPress comments on your website completely.

Do not forget to click on the save changes button to save your settings.

Diable comments plugin will now disable comments on your site completely. Now go to any post or page of your site to see this plugin in action.

commentsremoved

Since comments will not be shown, there is no need to delete the existing comments.

This plugin will also remove the comments menu item and all mentions of comments from the admin area of your WordPress site.

commentdisabled

Removing ‘Comments Are Closed’ and Existing Comments in WordPress

Disable comments plugin will stop showing existing comments, remove comment form and remove messages like ‘comments are closed’ from old posts.

However, if your WordPress theme is not checking the status of comment, then it may show existing comments, the comment form or comments are closed message.

You can ask the developer of your theme to fix this because it is not a standard compliant approach.

Alternatively, you can also try to fix it yourself by following the instructions below:

First of all, you need to connect to your site using FTP client or File manager in cPanel. Now navigate to your current theme folder which will be available in /wp-content/themes/folder.

In the theme folder, you have to find the file comments.php and rename it to comments_old.php.

renamecommentstemplate

Next, you will have to right click and choose ‘create new file’ option in your FTP client.

newcommentstemplate

Name your new file comments.php and click the OK button.

This trick will serve an empty comments template for your WordPress theme so no comment related messages or comments will be displayed.

If your WordPress theme does not support comments.php file or does not have it. Then you need to ask the developer of your theme which file you need to edit.

That is it. I hope that post will help you to learn how to completely remove comments from your WordPress site.

You may also want to see our post on Best Backup plugins for WordPress.

Arsalan Rauf
Arsalan Rauf

Arsalan Rauf is an entrepreneur, freelancer, creative writer, and also a fountainhead of Green Hat Expert. Additionally, he is also an eminent researcher of Blogging, SEO, Internet Marketing, Social Media, premium accounts, codes, links, tips and tricks, etc.

www.greenhatexpert.com

Filed Under: Guide, How to, WordPress Tagged With: disable comments wordpress plugin, disable comments wordpress without plugin, how do i remove the comment box in wordpress?, wordpress delete all comments, wordpress disable comments completely, wordpress disable comments on media, wordpress disable comments sitewide, wordpress remove comments section, wordpress remove leave a reply

What is Gravatar and Why You Should Start Using it Right Away

Last Updated on August 21, 2022 By Arsalan Rauf

Often people search how the grey icon that shows up next to their name. sometimes people also ask how can they turn this grey thing off. This grey icon stands for gravatar. In this post, I shall discuss what is gravatar and why you should start using it and how to change the default Gravatar on WordPress.

What is Gravatar and Why You Should Start Using it Right Away

History: Avatar

Before I discuss what is Gravatar, I should first discuss what is an avatar. An avatar gives a graphical representation of the user. It can be a random icon they want to associate with or the picture of the person. In past, when web was sort of anonymous, people used icons for the sake of identification.

Still it is the case in the gamer community. It is also one of the coolest parts about discussion forums, boards. It enables you to recognize the users who are active due to their avatar. While it is a hard task to remember names, but it is an easy thing to identify the specific image.

If you were part of numerous discussion forums or boards, you will start to recognize same group of people everywhere. As the web evolved and blogging has become more common, it was a hard task to get an identity as a commenter.

With forums and other services, users were asked to register. Every user had his own profile, so they could easily add an avatar to their profile. However, blog commenting does not ask registration in most of the cases.

So how do we identify users?

That is where Gravitar gets in.

What is a Gravatar?

Gravatar is known as Globally Recognized Avatar. It is globally recognized because millions of sites and people use them. Most popular applications like WordPress has built in support for Gravatar. When a user leaves a comment using email on the website that supports Gravatar, it pulls their globally recognized avatar from Gravatar servers. Then the picture is also available next to the comment. It allows each commenter to get their identity throughout the world wide web.

gravatar

Why Should I add Gravatar?

If you want to be identified on the internet, you should use gravatar. If you are a blogger, small business, non-profit, or anyone who wants to build a brand, you should start using gravatar. In the beginning, your gravatar may not get much attention. But if the same person sees your comment at various websites they read, they will definitely visit your site.

In my opinion, gravatar makes your comment stand out.

How can I get a Gravatar?

It is free and simple. Simply go to Gravatar’s website. Signup using that email which you use often to comment on any site. Add an avatar of yourself. It could be the logo of your company, or a picture of yourself or something unique. You need to do it one time. Chances are you will not change your avatar a lot. So it is like you set it and forget it.

Most of WordPress themes support gravatar integration with comments. If your theme does not support it, you should consider it to add it. For further branding purposes, you can change the default mystery man gravatar on your website and come up with something else.

If you have a gravatar, make a comment below so I will be able to recognize you.

How to Change the Default Gravatar on WordPress

Do you want to change the default gravatar on your WordPress site?

If you will add your own default gravatar image, it can make your comments section branded. In this post, I shall show you how to change the default gravatar in WordPress and replace it with your own custom default gravatar image.

What is Default Gravatar and Why Change it?

Gravatar is a web service and the creator of gravatar is WordPress co-founder Matt Mullenweg’s company known as Automattic. It enables anyone to create a profile and associate avatar images to their email addresses.

This avatar image will be shown on all WordPress blogs where users leave comments or write a blog post.

WordPress websites have built-in support for Gravatars and it shows the users avatars automatically when they leave a comment or write a post.

However, if a user does not have a gravatar image then WordPress will show the default image of gravatar. The default option is to show an image aka the mystery man. It looks like this:

default mystery man

If you do not like the mystery man and do not want to use it as default image. Then you can replace it with your brand image.

Now let’s see that how can you change the default gravatar image on WordPress website, so you can use a custom default gravatar image.

Changing Default Gravatar Image in WordPress

First of all, you need to go to Settings>Discussion page and scroll down to avatars section. This is where you can change and configure gravatar setting on your website.

gravatar settings

You will be able to observe a few choices under the default avatar option. These avatars are used when you do not have a gravatar associated with your email address. WordPress itself uses the icon of mystery person by default. You can change it to gravatar logo or blank.

There are some other options present too. These are the images which are autogenerated and available in different designs. These images use email address and the name of author to generate a new or unique gravatar image.

Do not forget to click on save changes button after changing your default gravatar.

Using Custom Default Gravatar Image in WordPress

WordPress also lets you use your own default gravatar images. Here is how you can add your own custom default gravatar image with ease in WordPress.

First of all, you need to create an image that you want to use as a default gravatar. This image should be of 250×250 pixels and in a square.

Next, you have to upload this image to your WordPress website. Go to Media>Add New and upload your custom default gravatar image.

upload edit

After uploading the image, you need to click on edit link text to the image.

WordPress will open new image for editing. You need to copy the URL of image file and paste it in a plain text editor like notepad.

copy file url

Now you have to add some coding to your WordPress website.

Add the following code to your functions.php file of your theme or a site specific plugin.

1
2
3
4
5
6
add_filter( 'avatar_defaults', 'wpb_new_gravatar' );
function wpb_new_gravatar ($avatar_defaults) {
$myavatar = 'http://example.com/wp-content/uploads/2017/01/wpb-default-gravatar.png';
$avatar_defaults[$myavatar] = "Default Gravatar";
return $avatar_defaults;
}

Do not forget to replace myavatar value to the URL of the custom gravatar image that you uploaded earlier.

Now visit Settings>Discussion page and you will see your custom default avatar added to default avatar choices.

custom default gravatar

Choose your custom default avatar image, then click on save changes button to save it.

WordPress will now use your image for users who do not have their gravatar associated with their email address.

custom avatar

I hope that you liked the post. It will help you to learn what is gravatar and how to change the default gravatar on WordPress.

You may also want to see my post on How to set custom avatars for users in WordPress.

Do not forget to share this post.

Arsalan Rauf
Arsalan Rauf

Arsalan Rauf is an entrepreneur, freelancer, creative writer, and also a fountainhead of Green Hat Expert. Additionally, he is also an eminent researcher of Blogging, SEO, Internet Marketing, Social Media, premium accounts, codes, links, tips and tricks, etc.

www.greenhatexpert.com

Filed Under: Guide, WordPress Tagged With: 3 patti game free download for laptop, 3 patti game free download for windows 10, 3 patti game online play, 3 patti gold free download for android, 3 patti gold game free download for laptop, 3 patti gold game free download for pc facebook, 3 patti gold mod apk download, 3 patti gold old version

  • « Previous Page
  • 1
  • 2
  • 3
  • 4
  • Next Page »


Recent Posts

  • Free DeepSeek Accounts 2025
  • Free Zoho Mail Accounts 2025
  • Acudepot Discount Codes 2025
  • Free Blackshot Accounts 2025
  • Free GMX Email Accounts 2025
  • Songtrust Discount Codes 2025
  • Uzicases Discount Codes 2025
  • Cardillo Promo Codes 2025
  • Free DriverFix License Keys 2025
  • Avast Secureline VPN Activation Codes 2025

Recommended Posts

Create a Gmail Account Without Phone Number

Free Course Hero Account

Crunchyroll Accounts

Cracked Apps

Free Pokemon Go Accounts
Onlyfans Free Accounts
Free Chegg Accounts
Free Paypal Accounts
Free Gmail Accounts
Funny Steam Names

Categories

  • Apps
  • Apps for PC
  • Blogging
  • Discord
  • Facebook
  • Gaming
  • Grammar
  • Guide
  • How to
  • Instagram
  • Messaging
  • OnlyFans
  • Pinterest
  • Reddit
  • SEO
  • Snapchat
  • Social Media
  • Spotify
  • Steam
  • Telegram
  • TikTok
  • Twitch
  • Twitter
  • Whatsapp
  • WordPress
  • YouTube
  • Home
  • Social Media
  • Messaging
  • About
  • Submit Guest post