How to Deactivate All Plugins When Not Able to Access WP-Admin
While troubleshooting, often several websites will suggest deactivate all the plugins and activate them one by one.
What is the worst part?
At times, you get locked out of your WordPress admin area, then you cannot deactivate a single plugin with this easy way. If you have ever seen a white screen of death, then you can think exactly what I am talking about. In this post, I shall show you how to deactivate all WordPress plugins when you are unable to access wp-admin area.
There are two ways to disable your plugins. One needs you to use phpMyAdmin and the other one needs to use FTP.
Deactivate All Plugins Using FTP
In this way, you will have to use FTP client or file manager of your host.
First of all, you have to connect your site using File Manager in cPanel or FTP client. After connecting, you need to go to /wp-content/ folder.
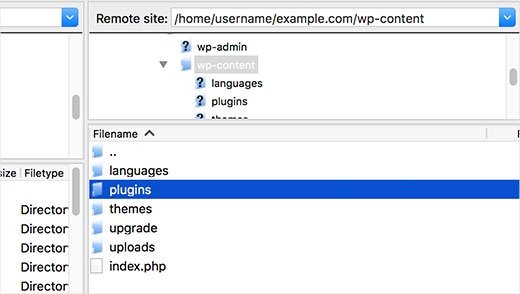
When you open wp-content folder, you will see a folder named plugins. That is the place where WordPress stores all the plugins you installed on your site.
Rename the plugins folder by doing right click. Change the name of the folders of plugin according to your own choice. In my opinion, I call it ‘plugins deactivate’. After doing this, all the plugins of your site will be deactivated.
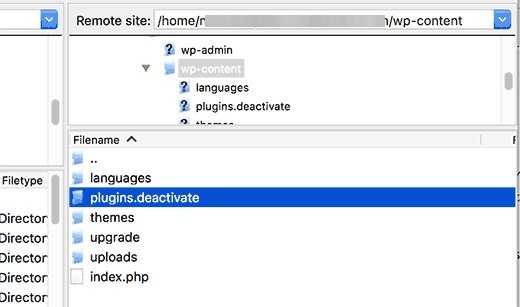
Generally, this method is useful when you are locked out of your admin area in WordPress. If the issue was due to your plugins, then you should go to admin area of WordPress by login to it.
After doing that, go to your /wp-content/ folder and rename ‘plugins deactivate’ back to plugins. Now activate one by one plugin untill your website breaks again. While doing it, you will know exactly which plugin is causing the problem with ease.
Deactivate all plugins using phpMyAdmin
In my opinion, the FTP method is easier one but you can also deactivate all plugins using phpMyAdmin.
First of all, you need to login to the dashboard of your web hosting. in this example, I am showing you a cPanel dashboard. The dashboard of your hosting account may look different.
You need to click on phpMyAdmin icon available under ‘Databases’ section.
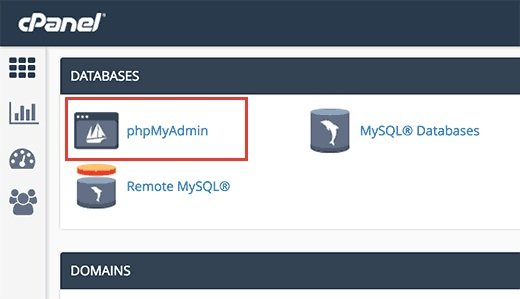
it will launch phpMyAdmin in a new browser window. You need to choose your WordPress database, if it is not already selected. Now you will be able to see database tables of WordPress.
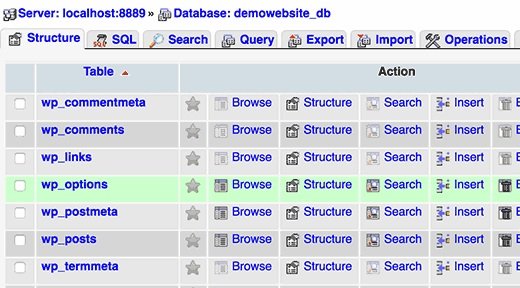
As you can see that all tables in the database contain wp- prefix before table name. Your tables may consist of different prefix.
You need to click on wp- options table, there are rows of different options inside wp- options table. Now find the option ‘active plugins’ and then click on ‘Edit’ link text to it.
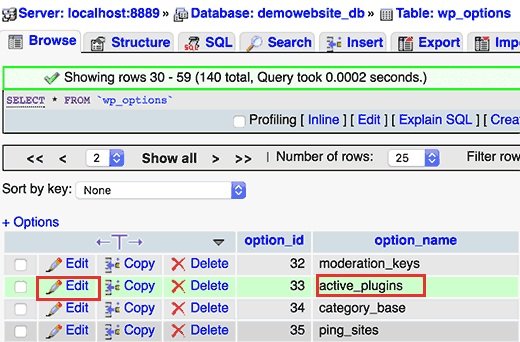
On the next screen, you need to change option-value field to a:0:{} and now hit Go button to save the settings.
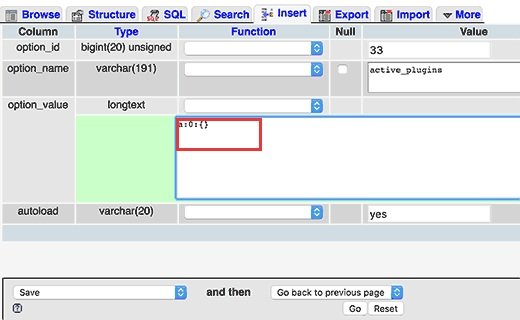
That is how you have deactivated all WordPress plugins using phpMyAdmin successfully. If it was a plugin which was stopping you from accessing the admin area of WordPress, then you should be able to login now.
I hope that you liked the post and it helped you to deactivate all plugins in WordPress.
You may want to see our Best WordPress backup plugins.
Do not forget to share this post.
Arsalan Rauf is an entrepreneur, freelancer, creative writer, and also a fountainhead of Green Hat Expert. Additionally, he is also an eminent researcher of Blogging, SEO, Internet Marketing, Social Media, premium accounts, codes, links, tips and tricks, etc.