Green Hat Expert

  • Home
  • Social Media
    • Instagram
    • TikTok
    • Snapchat
    • Facebook
    • YouTube
    • Twitter
  • Messaging
    • Discord
    • Telegram
    • Whatsapp
  • About
  • Submit Guest post
You are here: Home / Archives for How to

How to Exit Genshin Impact on PC/PlayStation/Mobile

Last Updated on May 24, 2022 By Arsalan Rauf

Do you play Genshin impact on your Playstation, PC or mobile device?

If you do, while playing the game you might be thinking about how to close quit or shutdown or exit genshin impact.

The controls of the game can be different depending on the device you are using to play the game.

For instance, you need to press “Esc” button if you are playing the game on the computer.

There are a lot of users who do not know how to exit Genshin impact so you are not alone.

There is another question you may be thinking about while playing the game that whether your progress will be saved or not when you quit the game.

Genshin impact does not give you information about it.

In this post, I am going to teach you how to quit, shutdown, close or exit Genshin impact on PlayStation PC or mobile device.

You will also come to know that whether you have to quit Genshin impact or you have to manually save it.

How to exit Genshin Impact

The first step is to open the Paimon menu and click on the exit icon in order to exit Genshin impact.

When you click on the exit icon you need to confirm that you want to quit, click on the power icon and click on “ok” to end the game.

You will see a popup message when you click on the power icon.

The message will be displayed to ask you whether you want to logout of Genshin impact.

However, you cannot logout of Genshin impact by clicking on “ok” button.

The button will close the game and you will remain login.

The game will automatically save your progress when you exit it.

It means that you do not have to save your progress manually.

When you open the game again, it will start from where you left off the Genshin impact.

Here is a step by step guide to exit Genshin impact.

Step 1: Open the Paimon menu and click on the exit icon

Open the Paimon menu to get started.

If you are using computer for Genshin impact, you need to press “Esc” to open the Paimon menu.

If you are playing the game on PlayStation, you need to press the options button using your controller.

On the other hand, if you are using a mobile device, you need to tap on the Paimon icon on the minimap.

There are multiple icons available on the left sidebar once you open the Paimon menu.

It has a gear, camera and an exit icon.

To quit tension impact, you need to click on the exit icon available on the left sidebar.

Step 2: Confirm that you want to quit

After clicking on the exit icon, you will see a pop up message.

The popup message will ask “Are you sure you want to quit?”.

The message will come up with a couple of options.

The options are the “Confirm” option and the “Cancel” option.

If you want to quit Genshin impact, you need to click on “Confirm” to confirm it.

When you will quit it, it will save your progress automatically.

It means that you do not have to worry about saving it manually.

Step 3: Click on the power icon

When you click on “Confirm”, you will be taken to the starting screen of Genshin impact.

The starting screen will show you the current server that you are playing on.

For instance, if you are using “Europe” server, it will show the “Europe” button.

There is a power button available on the bottom left of the screen.

On the bottom left of the screen, click on the power button.

Step 4: Click on the “Ok” button

When you click on the power button, it will open a popup.

The popup will ask, “Do you want to log out?”.

It will come up with a couple of options that you can select from.

It has an “OK” button and the “Cancel” button.

To exit Genshin impact, click on “OK”.

You need to remember that clicking on “OK” will not log you out from Genshin impact.

Instead, it will close the tab of Genshin impact.

Therefore, you do not have to enter your login credentials if you want to play the game again.

You have successfully exit or quit Genshin impact.

Can I just quit Genshin Impact?

The simple answer to this question is yes, you can just exit Genshin impact.

When you will do that, it will save your progress automatically.

So, when you start playing the game again, you can continue your game where you left it.

In a nutshell, you don’t have to start over again.

Does Genshin Impact Autosave or you have to manually save it?

No, you don’t have to save the progress manually in Genshin impact.

The services of Genshin impact will automatically save your progress when you quit it.

They save it automatically because it is an online game rather than an offline game.

Additionally, it does not offer a feature where you can save your progress manually.

Final Words

You can follow this step by step guide to exist Genshin impact if you are stuck there.

There is another point to consider that the controls are different in terms of devices you are using to play.

For instance, if you’re playing Genshin Impact on a Computer, Laptop or PC, press “Esc” to open the Paimon menu.

The Paimon menu has multiple options including exiting the game.

The Paimon menu contains an exit icon available on the left sidebar.

The progress will be saved automatically when you exit the game.

That is why you do not have to be concerned about losing your progress.

Use the Windows search box in order to re-open Genshin impact on your computer.

If you have installed the Genshin impact icon on your desktop, you can use it to begin gaming.

What’s Next

Genshin Impact Usernames Ideas

How to Refund Items on Roblox

How to Find Your Genshin Impact Username

Arsalan Rauf
Arsalan Rauf

Arsalan Rauf is an entrepreneur, freelancer, creative writer, and also a fountainhead of Green Hat Expert. Additionally, he is also an eminent researcher of Blogging, SEO, Internet Marketing, Social Media, premium accounts, codes, links, tips and tricks, etc.
www.greenhatexpert.com

Filed Under: Gaming, How to

How to Deactivate All Plugins When Not Able to Access WP-Admin

Last Updated on August 21, 2022 By Arsalan Rauf

How to Deactivate All Plugins When Not Able to Access WP-Admin

While troubleshooting, often several websites will suggest deactivate all the plugins and activate them one by one.

What is the worst part?

At times, you get locked out of your WordPress admin area, then you cannot deactivate a single plugin with this easy way. If you have ever seen a white screen of death, then you can think exactly what I am talking about. In this post, I shall show you how to deactivate all WordPress plugins when you are unable to access wp-admin area.

There are two ways to disable your plugins. One needs you to use phpMyAdmin and the other one needs to use FTP.

Deactivate All Plugins Using FTP

In this way, you will have to use FTP client or file manager of your host.

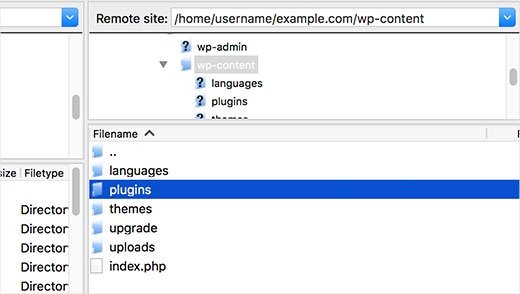
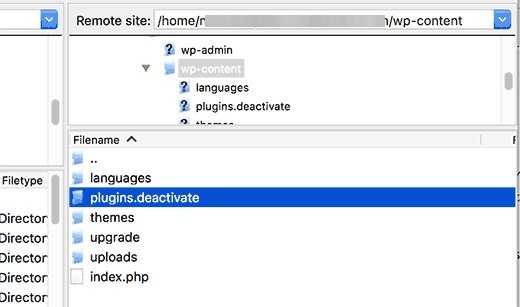
First of all, you have to connect your site using File Manager in cPanel or FTP client. After connecting, you need to go to /wp-content/ folder.

wp content ftpview

When you open wp-content folder, you will see a folder named plugins. That is the place where WordPress stores all the plugins you installed on your site.

Rename the plugins folder by doing right click. Change the name of the folders of plugin according to your own choice. In my opinion, I call it ‘plugins deactivate’. After doing this, all the plugins of your site will be deactivated.

deactivate plugins

Generally, this method is useful when you are locked out of your admin area in WordPress. If the issue was due to your plugins, then you should go to admin area of WordPress by login to it.

After doing that, go to your /wp-content/ folder and rename ‘plugins deactivate’ back to plugins. Now activate one by one plugin untill your website breaks again. While doing it, you will know exactly which plugin is causing the problem with ease.

Deactivate all plugins using phpMyAdmin

In my opinion, the FTP method is easier one but you can also deactivate all plugins using phpMyAdmin.

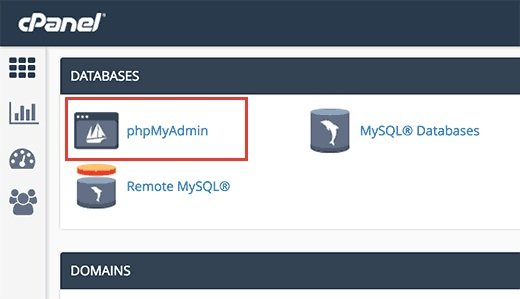
First of all, you need to login to the dashboard of your web hosting. in this example, I am showing you a cPanel dashboard. The dashboard of your hosting account may look different.

You need to click on phpMyAdmin icon available under ‘Databases’ section.

cpanel phpmy admin

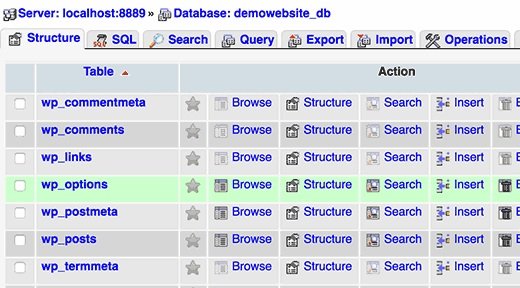
it will launch phpMyAdmin in a new browser window. You need to choose your WordPress database, if it is not already selected. Now you will be able to see database tables of WordPress.

php my admin db view

As you can see that all tables in the database contain wp- prefix before table name. Your tables may consist of different prefix.

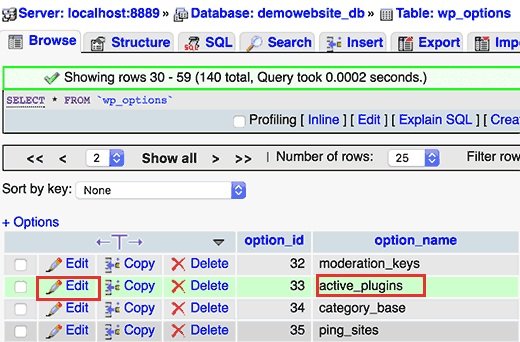
You need to click on wp- options table, there are rows of different options inside wp- options table. Now find the option ‘active plugins’ and then click on ‘Edit’ link text to it.

edit option

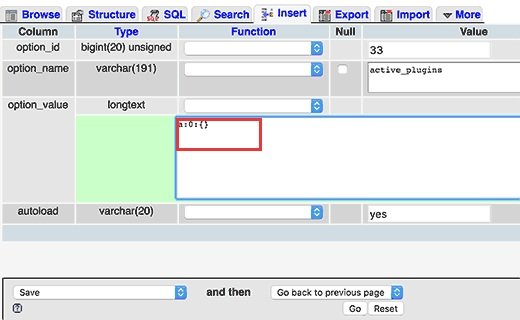
On the next screen, you need to change option-value field to a:0:{} and now hit Go button to save the settings.

reset plugins

That is how you have deactivated all WordPress plugins using phpMyAdmin successfully. If it was a plugin which was stopping you from accessing the admin area of WordPress, then you should be able to login now.

I hope that you liked the post and it helped you to deactivate all plugins in WordPress.

You may want to see our Best WordPress backup plugins.

Do not forget to share this post.

Arsalan Rauf
Arsalan Rauf

Arsalan Rauf is an entrepreneur, freelancer, creative writer, and also a fountainhead of Green Hat Expert. Additionally, he is also an eminent researcher of Blogging, SEO, Internet Marketing, Social Media, premium accounts, codes, links, tips and tricks, etc.
www.greenhatexpert.com

Filed Under: How to, WordPress Tagged With: activate wordpress plugin via ftp, disable wordpress plugin without dashboard, how do i deactivate plugins in wordpress, how to activate wordpress plugin from cpanel, how to disable wordpress plugin from cpanel, wordpress activate plugin from database, wordpress deactivate plugin from database, wordpress deactivate plugin programmatically

How to Fix the WordPress Failed to Open Stream Error

Last Updated on August 21, 2022 By Arsalan Rauf

How to Fix the WordPress Failed to Open Stream Error

Are you facing failed to open stream error in WordPress?

If yes, then you are at the right place.

This error generally points out the location of the scripts where the error occurs. However, it is a hard task for newbie users to understand it. in this post, I shall show you how to fix the WordPress failed to open stream error.

Why Failed to Open Stream Error Occurs?

Before I try to fix this error, it is necessary for you to know that what causes failed to open stream error in WordPress.

This error arises when WordPress is not able to load the file mentioned in the code of site. When this error occurs, at times WordPress will show a warning message will continue to load the website. sometimes, it will display a fatal error and will not load anything else.

The phrase of the message can be different because it depends on the location of error and the reason for failure. In addition, it also gives you clues about what do you need to fix.

Typically, this message will appear something like this:

1
2
3
Warning: require(/home/website/wp-includes/load.php): failed to open stream: No such file or directory in /home/website/wp-settings.php on line 19
Fatal error: require(): Failed opening required ‘/home/website/wp-includes/load.php’ (include_path=’.:/usr/share/php/:/usr/share/php5/’) in /home/website/wp-settings.php on line 19

Here is another example:

1
Last Error: 2018-04-04 14:52:13: (2) HTTP Error: Unable to connect: ‘fopen(compress.zlib://https://www.googleapis.com/analytics/v3/management/accounts/~all/webproperties/~all/profiles?start-index=1): failed to open stream: operation failed’

After the previous discussion, let us take a look how to troubleshoot and fix failed open stream error in WordPress.

Fixing Failed to Open Stream Error in WordPress

As I described earlier, the error can be a result of a number of reasons and the error message will also be different. It depends on the location and cause of the file which is causing the error.

In every example, failed to open stream phrase will be a result of a certain reason. For instance, no such file or directory, permission denied, operation failed and so on.

Now if your error message consists of ‘no such file or directory’, then you need to go through the code to find out which file is mentioned at the specific line.

If it is a theme file or plugin, then it means that the theme files or the plugin were either not installed properly or deleted. Simply deactivate and reinstall the plugin/ theme to fix the error.

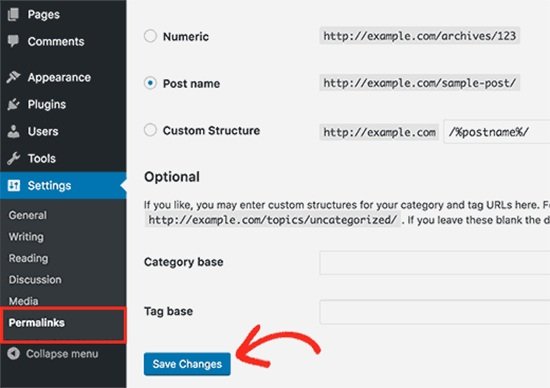
However, there is also a chance that WordPress is unable to find the files because of a missing .htaccess file available in the root folder. In this situation, you need to visit Settings>Permalinks page in admin of your WordPress and click on save settings button to regenerate .htaccess file.

fix ht access

If the error message is something like ‘Permission denied’, then it means that WordPress does not have the right permission to access the directory referenced in the code or file.

To resolve this, you need to go through our post on Fix File and Folder permissions in WordPress and correct them if required.

In the end, there are some WordPress plugins that load scripts from third party sources including Facebook APIs, Google Analytics, Google Maps and other APIs.

Some of these APIs may need authentication or may have changed the way of accessing them by developers. A failure or authenticate or incorrect access method will result in WordPress failing to open the needed files.

To resolve this issue, you need to contact the author of the plugin to get support. They will be able to help you and fix the error.

I hope that you liked the post, and you learn how to fix WordPress ‘failed to open stream’ error. You may want to see our post on How to change the WordPress Database prefix to improve security.

Do not forget to share this post.

Arsalan Rauf
Arsalan Rauf

Arsalan Rauf is an entrepreneur, freelancer, creative writer, and also a fountainhead of Green Hat Expert. Additionally, he is also an eminent researcher of Blogging, SEO, Internet Marketing, Social Media, premium accounts, codes, links, tips and tricks, etc.
www.greenhatexpert.com

Filed Under: Guide, How to, WordPress Tagged With: failed to open stream no such file or directory in wordpress, failed to open stream: no such file or directory laravel, failed to open stream: permission denied

How to Change the WordPress Database Prefix to Improve Security

Last Updated on August 21, 2022 By Arsalan Rauf

How to Change the WordPress Database Prefix to Improve Security

WordPress database seems to be the brain fo your full website. It is because every amount of information is available there and it can become the target of those people who want to get over your system. Spammers run automated codes for SQL injections. Unluckily, there are several website owners who do not change the database prefix while installing WordPress.  It enables the bots to mass attack by targeting the defaul prefix that is, wp-admin. It is a smart move to protect the database of WordPress by changing its prefix which is an easy task while setting up your website. You need to follow few steps to change the WordPress database prefix in a proper way. In this way, you will not mess with your established website.

Preparation

I suggest that you create a backup of your WordPress database before you act on anything I am going to suggest in this post. It is necessary to create a backup of your website on daily basis. BackupBuddy is a highly recommended plugin for this purpose. Next thing I suggest is that you redirect your visitors to a temporary maintenance page.

Change Table Prefix in wp-config.php

Open your wp-config.php file that is available in your WordPress root directory. Change the table prefix line from wp- to something else like wp-greenhat

So the line will look like this:

1
$table_prefix  = 'wp_a123456_';

Note: You can only change it to letters, numbers, and underscores.

Change all Database Tables Name

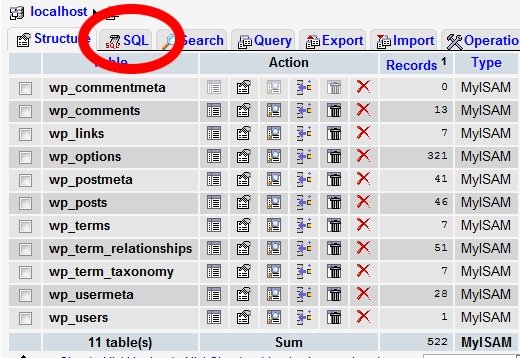
You have to access your database using phpMyAdmin, then change the table names to one I specified in wp-config.php file. If you have cPanel WordPress hosting, you can find the phpMyAdmin link available in your cPanel. See the image:

phpmyadmin

There are 11 default WordPress tables available in total, therefore, to change them manually is a hard task.

sql

Therefore, in order to make things fast, I have a SQL query that you can use.

1
2
3
4
5
6
7
8
9
10
11
12
RENAME table `wp_commentmeta` TO `wp_a123456_commentmeta`;
RENAME table `wp_comments` TO `wp_a123456_comments`;
RENAME table `wp_links` TO `wp_a123456_links`;
RENAME table `wp_options` TO `wp_a123456_options`;
RENAME table `wp_postmeta` TO `wp_a123456_postmeta`;
RENAME table `wp_posts` TO `wp_a123456_posts`;
RENAME table `wp_terms` TO `wp_a123456_terms`;
RENAME table `wp_termmeta` TO `wp_a123456_termmeta`;
RENAME table `wp_term_relationships` TO `wp_a123456_term_relationships`;
RENAME table `wp_term_taxonomy` TO `wp_a123456_term_taxonomy`;
RENAME table `wp_usermeta` TO `wp_a123456_usermeta`;
RENAME table `wp_users` TO `wp_a123456_users`;

You may have to add lines for other plugins because they may use their own tables in the database of WordPress. The idea is that you change all tables prefix to your desired one.

The Options Table

I have to search the options table for any other fields that is using wp- as a prefix, so we can change them. To make the process easy use this query:

1
SELECT * FROM `wp_a123456_options` WHERE `option_name` LIKE '%wp_%'

It will return a plenty of results, you need to go one by one to change these lines.

UserMeta Table

Next, the need is to search the user meta for all fields that are using wp- as a prefix, so you can change it. Use this SQL query to perform this:

1
SELECT * FROM `wp_a123456_usermeta` WHERE `meta_key` LIKE '%wp_%'

The number of entries may differ depends on how many plugins you are using. Simply change everything that has wp- to the new prefix.

Backup and Done

So you are up to test the website. If you have followed the above steps explained by me, it should be working fine. After doing so, you need to create a new backup of your website to stay on safe side.

Do not forget to share this post.

Arsalan Rauf
Arsalan Rauf

Arsalan Rauf is an entrepreneur, freelancer, creative writer, and also a fountainhead of Green Hat Expert. Additionally, he is also an eminent researcher of Blogging, SEO, Internet Marketing, Social Media, premium accounts, codes, links, tips and tricks, etc.
www.greenhatexpert.com

Filed Under: Guide, How to, WordPress Tagged With: change db prefix plugin, change wordpress table prefix after install, database prefix mysql, get wordpress table prefix, how to change table prefix in phpmyadmin, wordpress change table prefix plugin, wordpress plugin to change database table prefix, wordpress table prefix generator

How to Fix File and Folder Permissions Error in WordPress

Last Updated on August 21, 2022 By Arsalan Rauf

How to Fix File and Folder Permissions Error in WordPress

Do you want to fix the file and folder permissions error in WordPress? or

Are you trying to fix the file and folder permissions error in WordPress?

If yes, then you are at the right place.

Incorrect file and folder permissions can generate errors on your site while uploading. In this post, I shall show you how to easily fix file and folder permissions error in WordPress.

How File and Folder Permissions Work in WordPress?

Your self-hosted WordPress website works on a PC run by your WordPress hosting company. This PC works as a server and uses a software that is, Apache. It uses this software to manage your files and serve them to browsers.

File and folder permissions inform the server who can run, read and modify files hosted on your account. WordPress requires permissions to manage files and make folders on the server.

Incorrect file permissions will block WordPress from uploading images, creating folders or run scripts. In addition, it can also compromise security of WordPress website.

In some cases, WordPress will try to warn you that it cannot create a folder, edit a file or cannot write to disk etc. However, at times, you may not see any error messages.

Correct File and Folder Permissions in WordPress

The correct set of file and folder permissions enable WordPress to make files and folders. The following settings are suggested for most of the users.

755 for all folders and sub-folders.
644 for all files.

Let’s take a bird’s eye view of how to fix file and folder permissions in WordPress.

Fix File and Folder Permissions in WordPress Using FTP

First of all, you need to connect to your WordPress website with FTP client.

After connecting, visit the root folder of your site.

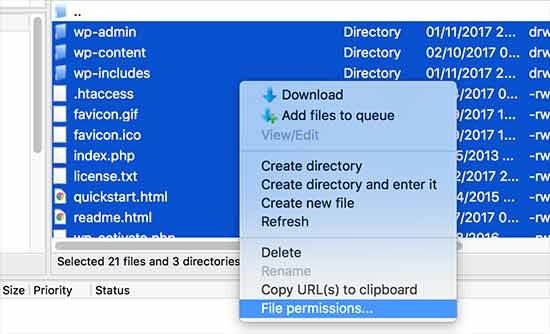
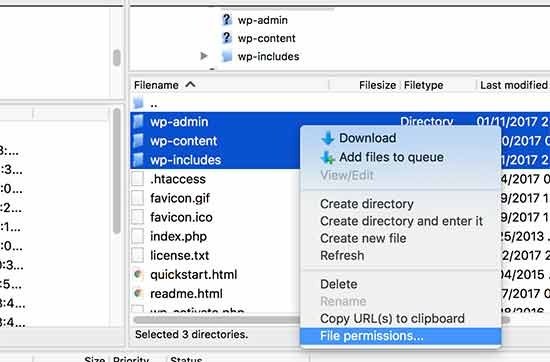
After doing so, select all folders in root directory and then press right click to select ‘File Permissions’.

file permissions

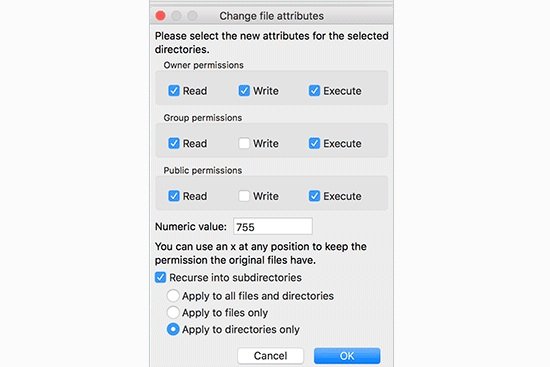
It will bring up the file permissions dialog box.

Now you have to put 755 in the numeric value field. After doing it, you will have to click on ‘Recurse into subdirectories’ checkbox and then select ‘Apply to directories only’ option.

folder permissions

Click the OK button to keep going. Your FTP client will begin setting file permissions to folders as well as sub-folders. You need to wait for it to complete.

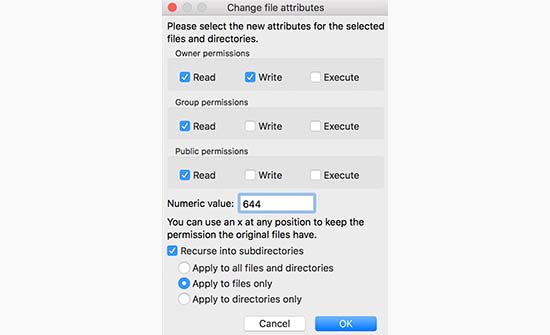
Now, you have to select all files and folders in the root folder of your WordPress website and then right-click to select the file permissions.

file permissions 2

The file permissions dialog box will become visible.

Now you need to put 644 in numeric value. After doing so, you will click on ‘Recurse into subdirectories’ checkbox and then select ‘Apply to files only’ option.

set files permission

Click on OK to continue.

Your FTP client will now begin setting file permission to all files on your WordPress website.

I hope that you liked the post and you learn how to fix file and folder permissions error in WordPress.


Arsalan Rauf
Arsalan Rauf

Arsalan Rauf is an entrepreneur, freelancer, creative writer, and also a fountainhead of Green Hat Expert. Additionally, he is also an eminent researcher of Blogging, SEO, Internet Marketing, Social Media, premium accounts, codes, links, tips and tricks, etc.
www.greenhatexpert.com

Filed Under: Guide, How to, WordPress Tagged With: correct file permissions for wordpress, fix file ownership wordpress, fix wordpress permissions ssh, ubuntu wordpress permissions, wordpress localhost file permissions, wordpress permissions nginx, wordpress permissions plugin, wordpress permissions script

How to Completely Remove Comments From Your WordPress Site

Last Updated on August 21, 2022 By Arsalan Rauf

Do you want to remove comments from your WordPress website completely?

If yes, this post is for you.

If you only use static pages on your site or do not want people to comment on your posts then you can disable all the comments in WordPress with ease. In this post, I shall show you how to entirely remove comments from your WordPress site.

Why Remove Comments in WordPress?

Most of the WordPress users are small business owners who do not usually add a blog section on their site. Their site contains static pages only that makes the comment useless.

While you can disable comments on your WordPress pages with ease but it does not mean that it will remove the comments completely from your WordPress site.

There are some bloggers who do not want to use comments at all. According to their opinion, comments are a distraction and their blogs can do without getting comments.

Now the issue is that most WordPress themes give built-in support for comments. It means that even if you have turned off the comments manually, they still pop up to and fro.

Want to get rid of comments with a single click?

Let’s go for how to completely remove WordPress comments from your site without leaving any traces.

Disabling Comments in WordPress

First of all, you need to install and activate the Disable Comments plugin. For more details, go through our step by step guide on how to install a WordPress plugin.

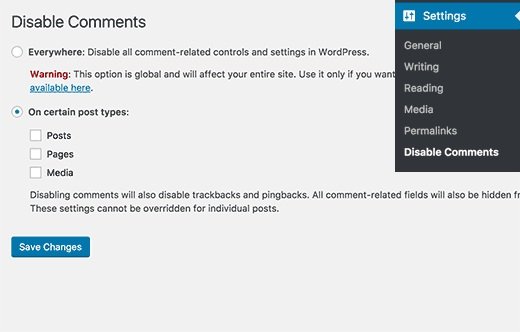
After activation, you need to visit Settings>Disable Comments page to configure the settings of plugin.

disablecomments

The settings page has two sections.

You can get rid of comments everywhere on your WordPress site or you can selectively disable them on pages, posts or any custom post types.

Choose the first option to disable WordPress comments on your website completely.

Do not forget to click on the save changes button to save your settings.

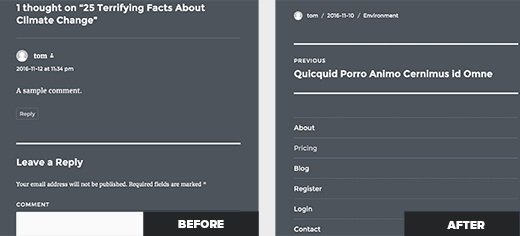
Diable comments plugin will now disable comments on your site completely. Now go to any post or page of your site to see this plugin in action.

commentsremoved

Since comments will not be shown, there is no need to delete the existing comments.

This plugin will also remove the comments menu item and all mentions of comments from the admin area of your WordPress site.

commentdisabled

Removing ‘Comments Are Closed’ and Existing Comments in WordPress

Disable comments plugin will stop showing existing comments, remove comment form and remove messages like ‘comments are closed’ from old posts.

However, if your WordPress theme is not checking the status of comment, then it may show existing comments, the comment form or comments are closed message.

You can ask the developer of your theme to fix this because it is not a standard compliant approach.

Alternatively, you can also try to fix it yourself by following the instructions below:

First of all, you need to connect to your site using FTP client or File manager in cPanel. Now navigate to your current theme folder which will be available in /wp-content/themes/folder.

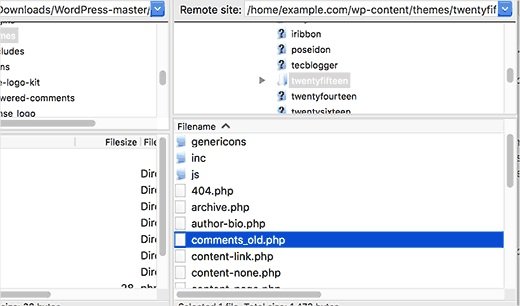
In the theme folder, you have to find the file comments.php and rename it to comments_old.php.

renamecommentstemplate

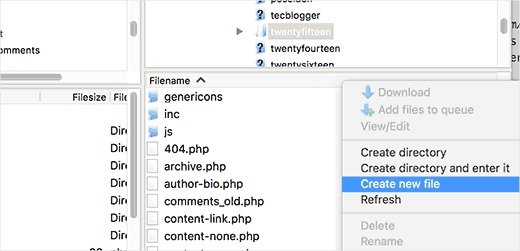
Next, you will have to right click and choose ‘create new file’ option in your FTP client.

newcommentstemplate

Name your new file comments.php and click the OK button.

This trick will serve an empty comments template for your WordPress theme so no comment related messages or comments will be displayed.

If your WordPress theme does not support comments.php file or does not have it. Then you need to ask the developer of your theme which file you need to edit.

That is it. I hope that post will help you to learn how to completely remove comments from your WordPress site.

You may also want to see our post on Best Backup plugins for WordPress.

Arsalan Rauf
Arsalan Rauf

Arsalan Rauf is an entrepreneur, freelancer, creative writer, and also a fountainhead of Green Hat Expert. Additionally, he is also an eminent researcher of Blogging, SEO, Internet Marketing, Social Media, premium accounts, codes, links, tips and tricks, etc.
www.greenhatexpert.com

Filed Under: Guide, How to, WordPress Tagged With: disable comments wordpress plugin, disable comments wordpress without plugin, how do i remove the comment box in wordpress?, wordpress delete all comments, wordpress disable comments completely, wordpress disable comments on media, wordpress disable comments sitewide, wordpress remove comments section, wordpress remove leave a reply

How To Download Getty Images For Free Without Watermark

Last Updated on October 28, 2023 By Arsalan Rauf

Like Shutterstock and adobe stock, Getty images is also one of the most popular stock photo sites on the web. The website has been in business for more or less 25 years and they are consistent when it comes to providing the stock photographs and also supporting the best photographers as well.

If you have found the ideal image for your work and are unable to download Getty images without watermark, in this article, I am going to share a free Getty images downloader to help you with this.

What are Getty Images?

Getty Images is an online site that allows you to sell videos, photos and music there. These types of websites are one of the top methods to connect yourself with photographers, videographers and content creators directly. Getty is very beneficial for photographers because it does not only sell their photographs but also advertises them free of cost.

Every image you come across on Getty images, you will see that the image is available in different qualities and you can buy it. Each image with different quality comes with a different price tag that is keeping in view the actual picture size and pixel density.

This tip is for buyers to get royalty-free images in different resolutions. It allows the buyer to choose the image as per his requirement. The media content available on this site is already edited and you need to download them in order to use them instantly. In addition, you can also edit the images as per your requirement too.

How To Download Full-Size Getty Images?

If you have an existing account on Getty Images, you can download the full-sized images on Getty without watermarks. The payment will be shown to you and you can get a digital copy of the image directly by using your account.

Here is a step by step guide:

  1. Open GettyImages.com and log into your account.
  2. After logged in, go to the image that you like, or search for a new image with the search bar at the top.
  3. Now, click on the image that you like, by clicking on it you will land on the licensing page for that image.
  4. Select the quality of the image from the right as per your requirements.
  5. Make the payment and you will get the image according to the delivery type that you select. 

Getty Images Free Download

If you want to use the Getty Images for non-commercial purposes, there are some web-based services you can use to get the images and save them on your PC or computer. One of the sites I have found on the web is tomato.to. I consider it a web-based Getty images downloader.

For Getty images free download use this step by step guide:

  1. Open the Gettyimages.com, and go to the photo that you want to download.
  2. Now, go to the purchase page of the image and copy the URL of the image from the address bar of the browser.
  3. Now, open Tomato.to website on a new tab of the browser.
  4. Paste the link in the search bar that you copied from Getty.
  5. Now, click on the Generate link button to create a download link for the image.
  6. Click on Download once the link is generated, it will take you to a web page containing a full-sized image.
  7. Finally, right-click on the image and use the Save Image option from the menu.

Remove Getty Images Watermark

If you have downloaded an image from Getty images with a watermark, you can still remove the watermark with the help of some tips. Use the watermark removers available on the web and search for them on Google and I hope that you will find one.

Additionally, you can also use photoshop or similar photo editing software to get rid of watermarks.

Final Words

I hope that after going through this guide you know about Getty images downloader. Comment below if you have any further ideas or if you found this useful.

Related Read

How to Download Shutterstock Images Free Without Watermark

Free Shutterstock Accounts

Arsalan Rauf
Arsalan Rauf

Arsalan Rauf is an entrepreneur, freelancer, creative writer, and also a fountainhead of Green Hat Expert. Additionally, he is also an eminent researcher of Blogging, SEO, Internet Marketing, Social Media, premium accounts, codes, links, tips and tricks, etc.

www.greenhatexpert.com

Filed Under: How to

How to Properly Change Your WordPress Username (Step by Step)

Last Updated on August 21, 2022 By Arsalan Rauf

Do you want to change your WordPress username for security reasons?

Have you ever tried to change it?

Do you want to change it?

If you want to change it, you are at the right place. This post is for you. In this post, I shall show you three different methods to change your WordPress username.

Method 1: Create a New User and Delete The Old One

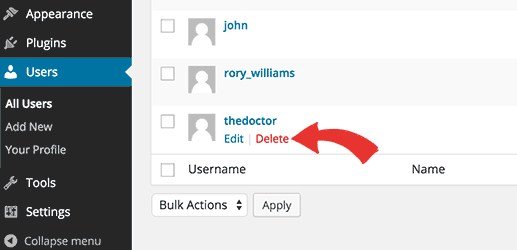
Creating a new user with your desired username with the administrator is the easiest way to change your WordPress username. You have to use a different email address than the one used by the old account. Now logout from the existing username and login with the new user account which you created. Go to Users section and click on Delete link under the old username.

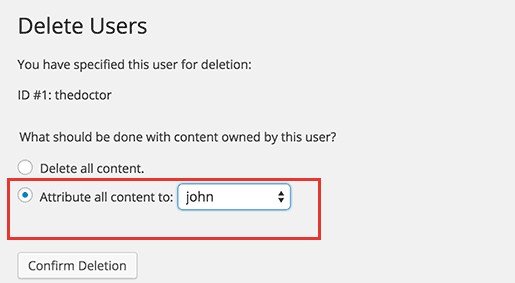
delete user wp

When you will do it, WordPress will ask what you want to do with their data or content. You need to make sure that you click on “Attribute all content to:” option and select the new user/username that you just created. Now click on “Confirm deletion” button to delete the old user account.

That’s it. You have changed your WordPress username with ease. Now if you want to change the email address of your new user, you can now use the old email address which was associated with the old account.

Method 2: Change Username by Using a Plugin

Using a plugin to change your WordPress username is another simple way to do this task. If you do not want to keep the plugins or want to install it. Then you can safely delete this plugin after changing your WordPress username.

First of all, you need to install and activate the Username Changer plugin.

After activation, go to Users>Username Changer page.

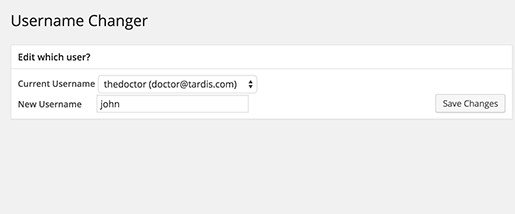
wp username changer

Now select the username which you want to change and enter the new username. When you are done then click on the save changes button.

Method 3: Change Your WordPress Username Using phpMyAdmin

The third method is a little bit complicated because it needs to make direct changes to your WordPress database. I usually do not suggest users to make changes directly to their database of WordPress. However, at times, you may not have another option. For example, if you have forgotten your WordPress username and email address, you will not get access to the admin dashboard to change the existing username.

By using this method, you will be able to find the username and will also be able to change it.

I have forgotten my WordPress username and password what should I do or how to recover it?

So this method will help you if you have forgotten your WordPress username.

First of all, you need to login to your cPanel. Scroll down to the databases section and click on phpMyAdmin.

php my admin

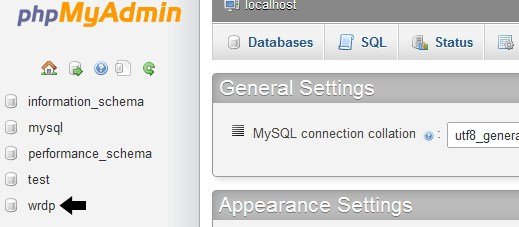
Now you have to select the database that your blog is hosted in.

php my admin select db

You will see your database tables of WordPress. WordPress database tables use wp_as prefix before each table’s name by default. It is also possible that you may have been using any other prefix.

Now click on the table wp_users on the left hand side. Now click on edit the username which you want to edit.

edit user name

Change the user_login value according to your wish. For example, you can replace “admin” to “user” or “bob”

change user login

Press the Go button and you have completed it.

I hope that you have liked this article and it will be beneficial for you.

Do not forget to share this post.

Arsalan Rauf
Arsalan Rauf

Arsalan Rauf is an entrepreneur, freelancer, creative writer, and also a fountainhead of Green Hat Expert. Additionally, he is also an eminent researcher of Blogging, SEO, Internet Marketing, Social Media, premium accounts, codes, links, tips and tricks, etc.
www.greenhatexpert.com

Filed Under: Blogging, How to, WordPress Tagged With: change wordpress username and password phpmyadmin, how to find wordpress username, what is my wordpress username, wordpress change username plugin, wordpress username ideas, wordpress username requirements, wordpress usernames cannot be changed change wordpress admin username

How to Change the Font Size in WordPress

Last Updated on August 21, 2022 By Arsalan Rauf

Do you want to change the font size in WordPress posts and pages?

If yes, you are at the right place. There are a few ways to decrease or increase font size and text formatting in WordPress. In this post, I shall show you how to change the font size in WordPress with ease.

Method 1: Using the Paragraph Headings

Most of the people want to show bigger font size in WordPress to attract the readers, especially for heading elements. You need to use different font size when you write a post and you can use heading size.

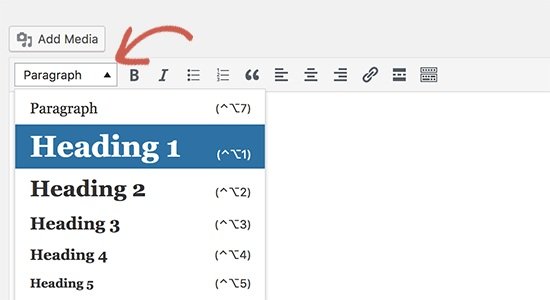
Using visual editor mode, you can see all the available items under the tab known as Paragraph as displayed in the screenshot below:

paragraph visual editor

These sizes are controlled by the stylesheet file (style.css) of the theme to make sure that font size is logical with everything. In most of the cases, the heading sizes can do the job.

If you use heading in your posts, it gives a good user experience. In the meanwhile, it also makes the WordPress posts SEO friendly.

Method 2: TinyMCE Advanced Plugin

For this method, I shall use a WordPress plugin to get a better control on overall font sizes and text formatting while writing content.

First of all, you need to install and activate the TinyMCE advanced plugin. For more details, see my step by step guide on how to install a WordPress plugin.

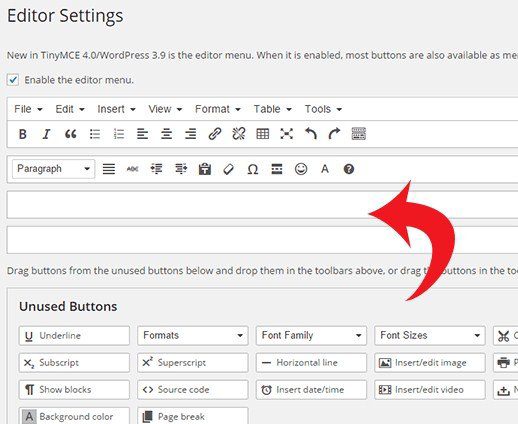
After activation, go to Settings>TinyMCE Advanced to configure the editor settings.

You will see TinyMCE editor toolbar with buttons on this page.

In addition, you will also see unused buttons below.

Font Size Button Tinymce wp

Now you have to drag and drop the font size button from the unused buttons to any row in the toolbar. After doing so, click the save changes button.

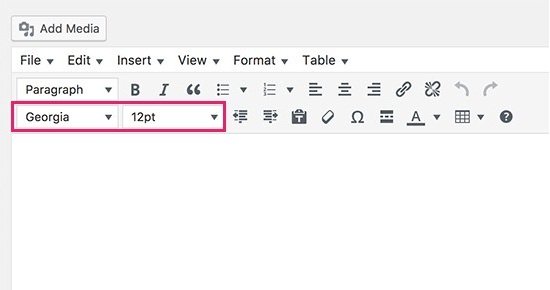
If you want to see the button whether it is functional or not. You need to create a new post or edit an existing one and you will observe that default WordPress visual editor is changed by the TinyMCE advanced editor with font size button.

tinymce font size

As you can observe in the above screenshot that you can choose any font size you like from the drop down. It provides you more freedom over things because now you can choose the smaller font size than the normal body font like 8pt or 10pt.

There is a downside to this method that is, if you ever change your theme, you will have to account for all the font size changes that you made in any post.

Method 3: Change Overall Font Size of Paragraphs Using CSS

If you do not like the font size of your them and want to change it for paragraphs. You need to do it using CSS.

So you have to add the following custom CSS to your WordPress theme.

1
2
3
p {
font-size:16px;
}

Note: This change will be effective on all paragraphs in your WordPress theme and you will lose your change when you will switch your theme.

I hope that you have liked this post.

Still, having issues? Leave them in the comment section.

Do not forget to share this post.

Arsalan Rauf
Arsalan Rauf

Arsalan Rauf is an entrepreneur, freelancer, creative writer, and also a fountainhead of Green Hat Expert. Additionally, he is also an eminent researcher of Blogging, SEO, Internet Marketing, Social Media, premium accounts, codes, links, tips and tricks, etc.
www.greenhatexpert.com

Filed Under: How to, WordPress Tagged With: how to change font color in wordpress theme, how to change font size in wordpress pages, how to change font size in wordpress theme, how to change font style in wordpress, how to change site title font size in wordpress, wordpress change font size css, wordpress font size code, wordpress font size plugin

How to Fix WordPress Posts Returning 404 Error

Last Updated on August 21, 2022 By Arsalan Rauf

WordPress is a powerful CMS. At times, a slight problem can make your site inaccessible. However, to find a solution for every WordPress problem is an easy task. I am trying to cover most of the problems of WordPress for our users.

Like internal server error or error establishing database connection.

WordPress posts returning a 404 error is another common problem that most of the WordPress users are facing these days. In this post, I shall show you how to fix WordPress posts returning 404 error.

In this occasion, a user can access his WordPress admin area and the main page of site. When the user goes to a single post, he gets a 404 not found error. Firstly, you do not need to panic because most of the time your posts are still there and entirely safe. It happens when something went wrong with rewrite rules or your .htaccess file got deleted. You need to fix your permalinks settings.

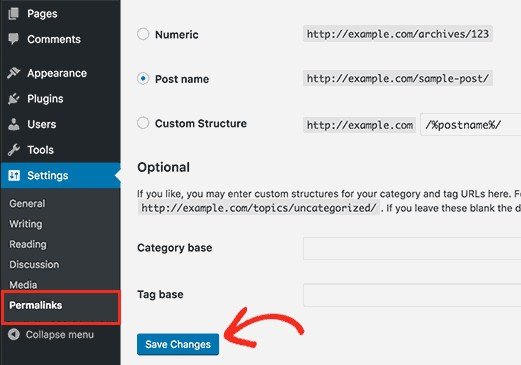
Go to Settings > Permalinks, and simply click on Save Changes button.

update perma links

This process will flush rewrite rules and update your permalinks settings. In most of the cases, this solution fixes the WordPress posts 404 error. However, if it does not work for you, then you have to update your .htaccess file manually.

Login to your server by using FTP and modify the .htaccess file which is available in the same location where folders like /wp-content/ and /wp-includes/ are present. You need to make the file writeable temporarily by changing the permissions to 666 that is the easiest way. Now repeat the original solution. Do not forget to change the permissions back to 660. You can also add this code in your .htaccess file manually:

1
2
3
4
5
6
7
8
9
10
# BEGIN WordPress
<IfModule mod_rewrite.c>
RewriteEngine On
RewriteBase /
RewriteRule ^index\.php$ - [L]
RewriteCond %{REQUEST_FILENAME} !-f
RewriteCond %{REQUEST_FILENAME} !-d
RewriteRule . /index.php [L]
</IfModule>
# END WordPress

Fix for Local Servers

Developers and designers often install WordPress on their PC/computer using a local server due to testing purposes. If you want to use permalinks, then you have to enable the rewrite_module in the Apache configuration of your WAMP, MAMP or XXAMP.

I hope that this post will help you to resolve posts returning 404 error in WordPress.

Did this solution work for you?

Do you have any other solution for 404 error or issue?

Kindly share it in the comment section.

Do not forget to share this post.


Arsalan Rauf
Arsalan Rauf

Arsalan Rauf is an entrepreneur, freelancer, creative writer, and also a fountainhead of Green Hat Expert. Additionally, he is also an eminent researcher of Blogging, SEO, Internet Marketing, Social Media, premium accounts, codes, links, tips and tricks, etc.
www.greenhatexpert.com

Filed Under: Blogging, How to, WordPress Tagged With: 404 error wordpress login, 404 error wordpress permalinks, wordpress 404 after migration, wordpress 404 error after changing permalinks, wordpress 404 error on all pages, wordpress 404 error on all pages except home, wordpress page not found but it exists, wordpress page not found error

  • « Previous Page
  • 1
  • …
  • 77
  • 78
  • 79
  • 80
  • 81
  • Next Page »


Recent Posts

  • Free DeepSeek Accounts 2025
  • Free Zoho Mail Accounts 2025
  • Acudepot Discount Codes 2025
  • Free Blackshot Accounts 2025
  • Free GMX Email Accounts 2025
  • Songtrust Discount Codes 2025
  • Uzicases Discount Codes 2025
  • Cardillo Promo Codes 2025
  • Free DriverFix License Keys 2025
  • Avast Secureline VPN Activation Codes 2025

Recommended Posts

Create a Gmail Account Without Phone Number

Free Course Hero Account

Crunchyroll Accounts

Cracked Apps

Free Pokemon Go Accounts
Onlyfans Free Accounts
Free Chegg Accounts
Free Paypal Accounts
Free Gmail Accounts
Funny Steam Names

Categories

  • Apps
  • Apps for PC
  • Blogging
  • Discord
  • Facebook
  • Gaming
  • Grammar
  • Guide
  • How to
  • Instagram
  • Messaging
  • OnlyFans
  • Pinterest
  • Reddit
  • SEO
  • Snapchat
  • Social Media
  • Spotify
  • Steam
  • Telegram
  • TikTok
  • Twitch
  • Twitter
  • Whatsapp
  • WordPress
  • YouTube
  • Home
  • Social Media
  • Messaging
  • About
  • Submit Guest post