Green Hat Expert

  • Home
  • Social Media
    • Instagram
    • TikTok
    • Snapchat
    • Facebook
    • YouTube
    • Twitter
  • Messaging
    • Discord
    • Telegram
    • Whatsapp
  • About
  • Submit Guest post
You are here: Home / Archives for How to

How to Ask Readers to Add Your WordPress Blog Icon on iPhone

Last Updated on August 21, 2022 By Arsalan Rauf

People also search for how to add the little notification which asks their iPhone users to add a blog icon to their home screen. Most popular sites use this feature including TechCrunch and others. If your site has a great responsive design on your WordPress site or blog, and you have enough mobile users, then it is a sensible move to implement this technique. In this post, I shall show you how to ask your reader to add your WordPress blog icon on their iPhone or iPad home screen.

It encourages your users to visit your site more often because they will get one-click access to your site like an app.

Note: Please implement it if your mobile site is functional and look very good. Otherwise, it can irritate the users.

adding home screen icon to iphone

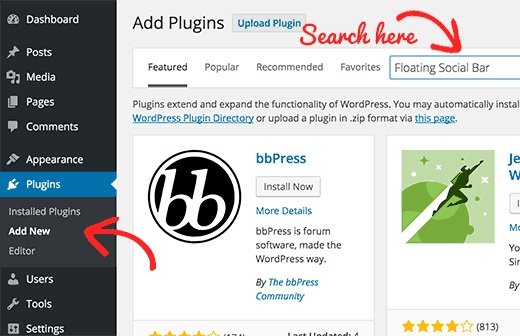
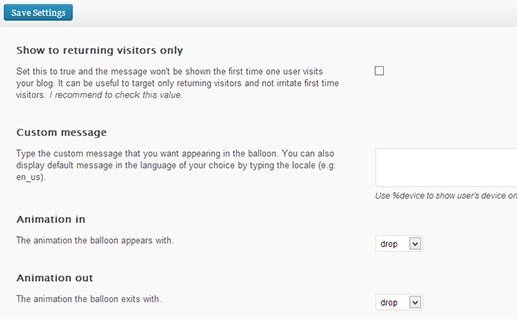
First of all, you need to install and activate the Add to home screen WP Plugin. After activation, you will see a new settings page under Settings>ATHS options. This setting page enables you to control the functionality and behavior of the plugin. In the settings tab, you can add the icon of your website. You need the icon to be recognizable easily because your user will see the icon on their home screen.

To add an icon go to Media>Add New in your admin area. Upload the image file with exact (144×144 pixels) dimensions. Copy the URL of this image file and paste it into the plugin settings page.

add to iphone settings

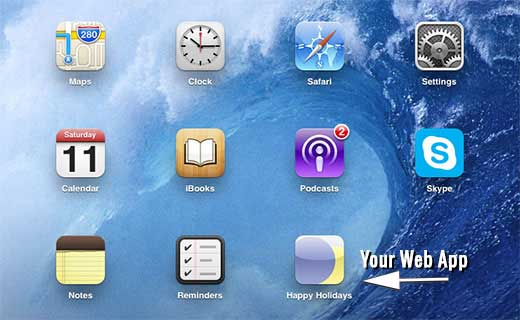
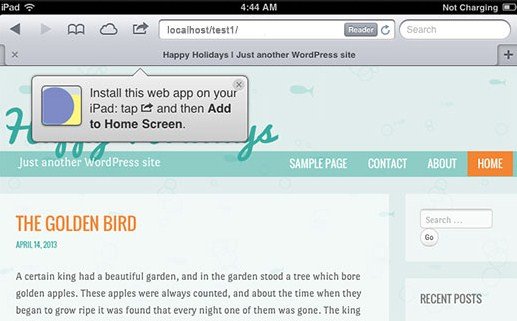
After doing that, you are good to go. This plugin will work on iPad, iPhone, iPod and touch devices. However, it will be functional only on the safari browser. When a user will visit your site, he will get a notification asking them to add your site’s link as a web app on their device. He needs to tap on the notification to install the website as a web app. If you have given the icon on the plugin settings page, it will be used as the home screen icon.

Otherwise, the plugin will use a snapshot of your web page as an icon.

ballon notification

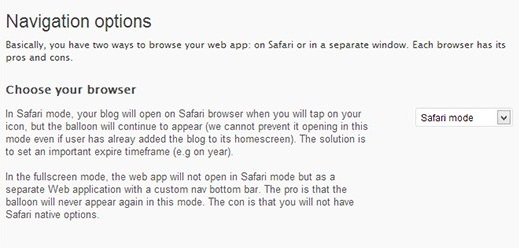
Add to home screen WordPress plugin gives you an option to open your site in the fullscreen web app mode rather than of Safari web browser.

It is suggested that you select the fullscreen mode so that the users who have already added your site will not see the balloon notification every time he visits your site.

To do that go to Settings > ATHS Options page.

Scroll down to Navigation options, and choose fullscreen mode from choose your browser app drop down menu.

fullscreen mode

I hope that you will like this post about how to add a notification that ask your readers to add your WordPress blog icon on their iPhone.

Do you ever add them to your iPhone?

Will you add this to your website?

What are your feelings about these balloon notifications?

Share your opinion with us.

Do not forget to share this post.

Arsalan Rauf
Arsalan Rauf

Arsalan Rauf is an entrepreneur, freelancer, creative writer, and also a fountainhead of Green Hat Expert. Additionally, he is also an eminent researcher of Blogging, SEO, Internet Marketing, Social Media, premium accounts, codes, links, tips and tricks, etc.

www.greenhatexpert.com

Filed Under: Blogging, How to, WordPress Tagged With: add to home screen programmatically, add to home screen wordpress plugin android, add to home wordpress plugin, ios add to home screen, official add to homescreen, wordpress add to homepage, WordPress Blog Icon on iPhone, wordpress homescreen icon, wordpress web app plugin

How to Add Your WordPress Site to Google Webmaster Tools

Last Updated on August 21, 2022 By Arsalan Rauf

To add your WordPress site to Google Webmaster tools is an important step to optimize your site for search engines. Many people search for SEO Tips and how to increase organic search traffic on their sites. I will provide other tips with usage of Google webmaster tools. In this post, I shall show you how to add your WordPress site to Google Webmaster tools.

What is Google Webmaster Tools

Google Webmaster tools is a set of tools powered by Google in order to give an overview of your site. How people see your site and how search engines observe it. It gives data and reports which can help you to find out the pages which are appearing in the search engine or search results. It provides you the search queries and you will be able to get the keywords and search results. How people click it.

This data allows you to improve your older posts, create new content, and formulate a content strategy for your site. You can also submit XML sitemap of your site using Google websmaster tools. You can also help Google to display the most important content of your site. Google will also notify you if there is a problem with your site that stops Google from indexing and crawling your web pages.

How to Add your WordPress Site to Google Webmaster Tools

Go to Google Webmaster tools website and sign in with a Google account.

After signing in, you need to add the URL of your website and click the add a Property button.

add the URL of your website

Now enter your website url

Add a Property to google webmaster tools

On the next screen, you will see the option to verify the ownership of the website that you are adding. You can upload an HTML file to the root directory of your site using FTP or click on alternate method to get a meta tag which you can paste to your WordPress website.

verify the ownership

In order to add meta tag with ease to your website, you need to install and activate Insert Headers and Footers plugin.

Copy the meta tag line given by webmaster tools which will look something like this:

<meta name=”google-site-verification” content=”VerificationKeyCode” />

Now go to Settings » Insert Headers and Footers and paste the meta tag line into the header field.

Now save the changes and go back to Google webmaster tools in order to Verify your site. Click on verify site button.

If you are using WordPress SEO plugin by Yoast, you can copy the verification key in content part of the meta tag and paste it in Yoast SEO plugin. Click on SEO option in your WordPress dashboard sidebar and scroll down to webmaster tools section to paste the unique key in the Google webmaster tools field.

Save the changes and go back to Google webmaster tools to verify your site.

Put verification key in yoast

After verifying your site, you will need to add your XML sitemap.

Don’t have a sitemap or don’t know what is sitemap?

Check our post about How to Create XML sitemaps in WordPress.

After adding the sitemap, it may take a while for Google to show your site data.

This is how you add your WordPress site to Google Webmaster tools.

Still have questions? Do not hesitate to ask them in the comment section.

Do not forget to share this post.

Arsalan Rauf
Arsalan Rauf

Arsalan Rauf is an entrepreneur, freelancer, creative writer, and also a fountainhead of Green Hat Expert. Additionally, he is also an eminent researcher of Blogging, SEO, Internet Marketing, Social Media, premium accounts, codes, links, tips and tricks, etc.

www.greenhatexpert.com

Filed Under: Blogging, How to, WordPress Tagged With: google disavow tool, google site verification, google site verification meta tag wordpress, google sitemap submit, how to upload google html verification file wordpress, how to upload html verification file to my website, submit url to google search engine, verify wordpress site with google, webmaster tools verification, website verification services wordpress

How to Add Google Maps in WordPress

Last Updated on August 21, 2022 By Arsalan Rauf

You can add all kind of content into your WordPress blog, site or website. At Green Hat Expert, I have shown you how to add audio files, videos, PDF and Spreadsheets in WordPress.

You can create highly useful and interactive content by adding content from external sources. In this post, I shall show you how to add Google Maps in WordPress.

Manually Adding a Google Map in WordPress

Go to Google Maps website, now search for a location that you want to add by typing its address. After finding the location, you need to click on the link button in the right hand panel. It will give you an embed code. Copy the iframe code or you can also click on ‘customize and preview the embedded map’ to customize the appearance of the map on your website.

google maps embed iframe

Now go to your WordPress site and paste the code in a page, post or a template. Now save the post/page in order to see the Google map live on your website.

Adding Google Maps in WordPress Using a Plugin

The first is method is good if you only want to show a single Google map to one location on your WordPress blog. If the map is a part and parcel of your site, and you need to add them frequently basis. Then you I will recommend use a plugin for this purpose.

First of all, you need to install and activate MapPress Easy Google Maps plugin. Edit a page/post where you want to add the map. Now scroll down to MapPress section on your page or post edit screen and press the New Map button.

mappress google maps plugin


It will open MapPress editor where you need to enter an address or click on MyLocation link to enable the plugin to detect your location automatically.

Choose the size of the map and give a title to your map. After doing all the work, click on the save button and click on insert into post button to add the map into your post. Publish or update your post and you can preview it.

By using MapPress, you can add many maps to a post or page. It will also add plugin settings menu in your WordPress admin sidebar and it also works out of the box. Change the plugin settings by clicking on it including map border, type, alignment and controls etc.

mappress settings

Adding Google Maps in a Widget and a Lightbox

Add Google maps to your WordPress with ease by installing Google Maps Widget plugin.

After activating the plugin, go to Appearance > Widgets and drag and drop Google Maps Widget to your sidebar.

google maps widget settings

Now enter the address that you want to display on the map in Widget settings. You can also select the size of the map, pin color and zoom level etc. configure the lightbox settings by clicking on the lightbox tab.

Lastly, click on the save button to save the widget settings.

Visit your website to see the widget in action.

google maps widget

I hope that you have learned how to add Google maps in your WordPress site.

Still have questions or problems?

Leave them in the comment section.

Do not forget to share this post.

Arsalan Rauf
Arsalan Rauf

Arsalan Rauf is an entrepreneur, freelancer, creative writer, and also a fountainhead of Green Hat Expert. Additionally, he is also an eminent researcher of Blogging, SEO, Internet Marketing, Social Media, premium accounts, codes, links, tips and tricks, etc.

www.greenhatexpert.com

Filed Under: Blogging, How to, WordPress Tagged With: Add Google Maps in WordPress, contact form with google map wordpress plugin, embed google map wordpress plugin, How to Add a Favicon to Your WordPress Blog, how to add google map api in wordpress, how to add google map in wordpress contact page, how to add google map in wordpress without plugin, how to use wp google maps, update google map wordpress, wordpress map plugin multiple locations

How to Add a Favicon to Your WordPress Blog

Last Updated on August 21, 2022 By Arsalan Rauf

Favicon is also known as site icon which is a tiny image which appears next to your site title in browser. It will help the users to identify your site. Most of the users will recognize your site with that tiny image. It will establish your brand among the users and you will be able to build trust among your users.

If you are not adding a favicon on your site, you are doing the most common WordPress mistake. In this post, I shall show you how to add a favicon to your WordPress site.

Why you should Add a Favicon to Your WordPress Site?

As I mentioned earlier that it builds your website’s identity.

In addition, it also improves the user experience and site’s usability. This image will help you to understand it in a better way:

favicons

Many users usually open multiple tabs in their browser. When the number of tabs increases, it hides the title of your website. If you will use a favicon, the user will easily identify your website and move quickly to the tab he wants.

Your site favicon or icon is also used when a visitor adds your website to his homescreen on a mobile device. You can also ask the users to add your site to their homescreen.

home screen site icon

How to Create a Favicon

You can use the logo of your brand as your favicon or site icon. The recommended size for your site icon image is at least 512 pixels in both height and width. The icon image of the site should be a square, you can also use a larger rectangular image and WordPress will enable you to crop the image when you will add it.

creating site icon wordpress

I suggest using an image editor or editing software like Gimp or Adobe Photoshop to create an icon of exact 512×512 pixels. That is the way to create maintain the proportions of your image. In addition, you can also fill the image with a background color or use transparent image of your choice. This image can be in JPEG, PNG or GIF format.

Adding Your Site Icon or Favicon in WordPress

After the launch of WordPress 4.3 version, you can add a favicon or site icon from WordPress dashboard.

You need to go to Appearance>Customize and click on the Site Identity tab.

site identity

In this site identity section, you can change the title, description and control whether you want to display it in the header or not.

It also enables you to upload the site icon of your site. Click on the select file button to upload the image that you want to use as favicon or icon.

adding site icon

If you are uploading an image that is exceeding recommended size, you can also crop it to use it. If your image is matching the suggested size, then save your changes.

After doing so, you can now preview your site to see your favicon.

Additionally, you can also visit your site on mobile phone and by using browser menu you can choose “add to homescreen”. You will see your site icon on the homescreen.

Adding Favicon to Older WordPress (4.2 or below)

If you are using older WordPress version 4.2 or below, you need to upload favicon to the root directory of your website using FTP. After that, you need to paste the code into the header of your theme in header.php file.

1
2
<link rel="icon" href="https://www.greenhatexpert.com/favicon.png" type="image/x-icon" />
<link rel="shortcut icon" href="https://www.greenhatexpert.com/favicon.png" type="image/x-icon" />

Replace Greenhatexpert.com with your site’s Url and you are done.

If your theme does not have a header.php file or you are unable to find it. Then do not worry, I have a plugin for you.

Install and activate Insert Headers and Footers plugin.

After activating the plugin go to Settings » Insert Headers and Footersand paste the code provided above in the header section and save your settings.

If you do not want to deal with FTP, then you have to use the plugin known as All in One Favicon.

I hope that you have learned that how to add favicon to your WordPress site.

Still having problems?

Leave your problems in the comment section.

Do not forget to share this post and like our Facebook page to get the latest updates.

Arsalan Rauf
Arsalan Rauf

Arsalan Rauf is an entrepreneur, freelancer, creative writer, and also a fountainhead of Green Hat Expert. Additionally, he is also an eminent researcher of Blogging, SEO, Internet Marketing, Social Media, premium accounts, codes, links, tips and tricks, etc.

www.greenhatexpert.com

Filed Under: Blogging, How to, WordPress Tagged With: create favicon, How to Add a Favicon to Your WordPress Blog, site icon wordpress, wordpress add favicon functions php, wordpress favicon change, wordpress favicon not showing, wordpress favicon plugin, wordpress favicon size, wordpress site icon not working

How to Minify CSS & JavaScript Files in WordPress

Last Updated on August 21, 2022 By Arsalan Rauf

Do you want to minify files on your WordPress site?

You are at the right place.

Minifying your WordPress CSS and JavaScripts files can enable your site to load faster. It also speeds up your WordPress site. In this post, I shall show you how to minify CSS JavaScript files in WordPress to improve the performance and speed of your site.

What is Minify and When Do You Need it?

Minify is a term which is used to describe a method that makes your website file size smaller. It completes this task by removing lines, white spaces and unnecessary characters from the source code.

Usually, it is suggested to use only for files which are sent to user’s browsers. It includes JavaScript, CSS and HTML files. In addition, you can also minify PHP files too. PHP is a server side programming language and if you minify it, it will not improve the load speed for your users.

The main advantage of minifying files is to improve the performance and speed of WordPress.

Compact files load faster and improve the speed of your site.

Some experts are of the view that the performance improvement is very small for most websites.

The minification process only decreases few kilobytes (kb) of data on WordPress websites. You can also reduce the pageload time by optimizing images for web..

Here is an example of normal CSS code:

body {
margin:20px;
padding:20px;
color:#333333;
background:#f7f7f7;
}
h1 {
font-size:32px;
color#222222;
margin-bottom:10px;
}

After minifying the code it will look like this:

body{margin:20px;padding:20px;color:#333;background:#f7f7f7}h1{font-size:32px;margin-bottom:10px}

If you want to achieve 100/100 score on Google PageSpeed insights or GTMetrix tool. Then minifying JavaScript and CSS will improve your score.

Now take a look at how to minify CSS/JavaScript on your WordPress site easily.

Minify CSS/Javascript in WordPress

First of all, you need to install and activate the Better WordPress Minify plugin.

For more details, see our step by step guide on how to install a WordPress plugin.

After activation, this plugin will add a new menu item named “BWP Minify” to your WordPress admin bar. When you will click on it, it will take you to plugin’s settings.

bwpminify settings

On the settings page, you have to check the first two options to minify JavaScript and CSS files automatically on your WordPress site.

Now click on save changes button to save changes.

Advanced options are also available on this page. The default settings should work for most of websites, but you can change these options depending on a case basis.

Now go to your website. Right click anywhere then select ‘view page source’ from browser options.

view page source

You will be able to see HTML source code generated by your WordPress site. When you look closely, you will see that this plugin will load CSS/JavaScript files from plugin’s own folder in lieu of your WordPress plugins and themes.

These are the minified versions of your original CSS and JavaScript files. Better WordPress minify plugin will keep them cached and serve the minified versions to user’s browsers.

Still having problems? Type your problems in the comment section.

Do not forget to share this post and like our Facebook page for more updates.

Arsalan Rauf
Arsalan Rauf

Arsalan Rauf is an entrepreneur, freelancer, creative writer, and also a fountainhead of Green Hat Expert. Additionally, he is also an eminent researcher of Blogging, SEO, Internet Marketing, Social Media, premium accounts, codes, links, tips and tricks, etc.

www.greenhatexpert.com

Filed Under: Guide, How to, SEO, WordPress Tagged With: best wordpress minify plugin, better wordpress minify, how to minify javascript and css in wordpress without plugin, inline small javascript wordpress, js css compression wordpress, minify css wordpress without plugin, minify html wordpress, minify javascript and css wordpress htaccess

How to Install a WordPress Plugin – Step by Step for Beginners

Last Updated on August 21, 2022 By Arsalan Rauf

After installing WordPress on your site, if you are a beginner, you need to learn how to install a WordPress plugin. Plugins have the ability to add new features to your WordPress website including slideshow and gallery etc. There are numerous paid and free plugins available for WordPress. In this post, I shall show you how to install a WordPress plugin.

Before You Start

If you are a user of WordPress.com, you cannot install plugins.

I have seen people complaining about plugins that they cannot see the plugins menu in their dashboard. It is because they are using WordPress.com and it has limitations. You need to upgrade to business plan of WordPress.com in order to install plugins.

On the other hand, you can install and activate any plugin you want to use on self hosted WordPress.org website.

How to Install a WordPress Plugin

You need to follow these instructions which can allow you to learn step by step how to install a WordPress plugin.

I have covered all three methods: uploading a WordPress plugin, installing a WordPress plugin using search and manually installing a WordPress plugin using FTP.

Install a Plugin using WordPress Plugin Search

To install the WordPress plugin in the easiest way, use the plugin search method. The downside of this option is that it should be available in the WordPress plugin directory which is limited to only free plugins.

First of all, go to your WordPress admin area and click on plugins>Add>New

search plugins

You will see a screen as above in the screenshot. You need to find the plugin by typing its name or functionality to find it like I did. After putting the name, you will find a number of listings like this:

plugin search results

Pick the plugin of your choice. in our search, we were finding floating social bar plugin which is the first plugin. I shall click the ‘install now’ button.

WordPress will start the download and install the plugin. After installation, you will see the button to activate the plugin.

activate plugin

You can install a WordPress plugin on your site but it will not work until you activate it. So click on the activate button to activate the plugin on your site.

That’s it. You have installed the first WordPress plugin on your site.

The next step is to configure the settings of plugin. These settings are different for each plugin that is why I cannot cover that in this post.

Install a Plugin using the WordPress Admin Plugin Upload

Paid WordPress plugins are not available in WordPress plugin directory. You cannot install these plugins by using the search method or first method.

Therefore, WordPress has given us the upload method to install such plugins. I shall also show you how to install WordPress plugin using the upload option or method in WordPress.

First of all, you have to download the plugin from the source that is available in zip format or file. Now, you have to go to WordPress admin area and click plugins>Add new page.

After that, click the upload plugin button at the top of the page.

upload plugin wp admin

It will lead you to the plugin upload page. Now click choose file button to select the file or plugin you want to upload from your computer.

plugin upload page

After selecting the file, now click on the install now button to begin the process.

WordPress will upload the plugin file from your computer and install it. You will see the success message after the completion of installation.

plugin installed manual

After installation, you have to click the activate plugin button to start using it.

You need to configure the settings according to your needs. The settings are different for every plugin I shall not be able to cover that in this post.

Manually Install a WordPress Plugin using FTP

At times, your WordPress hosting provider may restrict the files which can limit your ability to install the plugin from the admin area.

In such cases, you need to install the plugin manually using FTP.

FTP manager method is the least friendly for beginners.

First of all, download the plugin file which is in zip format. Now extract the zip file on your computer.

When you will extract it the plugin will create a new folder using the same name. That is the folder you need to upload manually to your website by FTP client.

You have to access your host using FTP manager. If you do not possess a FTP username and password, contact your WordPress hosting provider to get them.

Use the login credentials to connect to your website and open the FTP client on your PC or computer. After connecting, access the path /wp-content/plugins/

Now upload the extracted folder from the zip file to this directory /wp-content/plugins/ on your web server.

ftp plugin upload

After uploading the files, go to your WordPress admin area and visit plugins link in the menu. Now you will see that you have installed the plugin successfully on plugins page.

installed plugins

Now click on the activate button to activate the plugin. After activation, you may need to configure it. Every WordPress plugin comes with its own settings which are different from one another. So I shall not discuss it in this post.

I hope that you have learned how to install WordPress plugins.

If you are having any problems kindly post it in the comment section. I shall respond to you asap.

Do not forget to share this post.

Arsalan Rauf
Arsalan Rauf

Arsalan Rauf is an entrepreneur, freelancer, creative writer, and also a fountainhead of Green Hat Expert. Additionally, he is also an eminent researcher of Blogging, SEO, Internet Marketing, Social Media, premium accounts, codes, links, tips and tricks, etc.

www.greenhatexpert.com

Filed Under: Guide, How to, WordPress Tagged With: add new plugin wordpress missing, can you add plugins to free wordpress, how to add plugin in wordpress page, how to add plugins to wordpress free blog, how to install wordpress plugins manually, how to use plugin in wordpress, no option to add plugin wordpress, why can't i install plugins on wordpress

How to Fix Eliminate render-blocking JavaScript and CSS in WordPress

Last Updated on August 21, 2022 By Arsalan Rauf

In this post of Green Hat Expert, we shall discuss How to Fix Eliminate render-blocking JavaScript and CSS in WordPress.

How to Fix Eliminate render-blocking JavaScript and CSS in WordPress

Do you want to eliminate render-blocking JavaScript and CSS in WordPress?

When you put your website on Google pagespeed insights, you may face the problem of eliminate render-blocking scripts and CSS.

In this post, I shall show you how to easily fix render blocking JavaScript and CSS in WordPress to increase Google pagespeed score.

What is Render-Blocking JavaScript and CSS?

Every WordPress site consists of theme and plugins which adds JavaScript and CSS files to the front side of your site.

So these scripts can slow your website and increase the load time and also block rendering of the page.

The browser of the user has to load the scripts and CSS before loading the HTML on the page.

It means that those users who have slow connection will wait for a few milliseconds to see the page.

The stylesheets and scripts are known as render-blocking JavaScript and CSS.

Bloggers or site owners will have to fix this issue in order to get 100/100 Google PageSpeed score.

What is Google PageSpeed Score?

Google PageSpeed Insights is an online tool by Google in order to help the users to optimize their sites on mobile as well as on desktop.

This tool will test your websites for Google’s guidelines to check the speed of your site and how to improve it.

Google calculates your score on the number of rules that your site passes.

Most of the sites get 50-70 score.

There are some users who want to achieve 100 that is the highest page score.

Do You Really Need the Perfect “100” Google PageSpeed Score?

Google pagespeed insights give you guidelines to improve the performance and speed of your website.

You do not have to follow these rules strictly.

The speed has become one of the main SEO metrics in Google and it tells Google how to rank your site.

The speed of the site improves the user experience on your website.

A better user experience does not depend on just speed. You have to provide useful information, better user interface with engaging content, text, videos and images.

Your task is to create a fast site which gives great user experience.

So you need to focus on speed as well as improving the user experience.

We suggest that you should use Google Pagespeed insights rules as recommendation. If you can implement on your site without ruining the user experience. Then it is a great thing. Otherwise, do as much as you can do.

Now let’s take a look at what we can do to fix render blocking JavaScript and CSS in WordPress.

I shall give you two methods to fix the render blocking JavaScript and CSS in WordPress. You can select the one that suits you and your site.

  1. Fix Render Blocking Scripts and CSS with Autoptimize

It is a simple method and recommended for most of the users.

First of all, you need to install and activate Autoptimize plugin.

After activation, you need to go to the Settings » Autoptimize page to configure the plugin settings.

autoptimize settings

Begin with checking the box next to CSS and JavaScript options and click the save changes button after doing so.

Use the pagespeed tool to test your website. If you are still having render blocking scripts, you need to go to the plugin’s settings page. Then click on show advanced settings button which is at the top.

autoptimize advanced js

Now you can allow the plugin to include inline JS and remove scripts which are excluded by default like seal.js or jquery.js.

Scroll down to CSS option and allow plugin to aggregate inline CSS.

Then click “save changes and empty cache” button in order to save the changes and empty cache.

After completing it, go ahead to check your site again using PageSpeed tool.

Now thoroughly check your website to see that if anything is broken by optimizing your CSS and JavaScripts.

How does it work?

Autoptimize combines all enqueued JavaScript and CSS. After doing that, it creates minified CSS and JavaScripts files and gives cached copies to your website as deferred or async.

It allows you to fix the render blocking scripts and styles issues or problems. But you need to keep in view that it can also affect the appearance and performance of your website.

2. Fix Render Blocking JavaScript using W3 Total Cache

This method needs a little more work and suggested for users who are already using W3 Total Cache plugin on their site.

First of all, you need to install and activate the W3 Total Cache plugin.

Then, visit Performance>General Settings page and scroll down to minify section.

w3tc enable minify

Firstly, check the option “enable” next to minify option and select manual for minify mode option.

Click on save all the settings button to save your settings.

Your next task is to add the scripts and CSS which you want to minify.

Get the URLs of all the stylesheets and scripts which are render blocking from Google pagespeed insights tool.

You may also like our guide about

How to Score 100/100 in Google Pagespeed insights

You will see under the suggestions where it displays the error ‘Eliminate render-blocking JavaScript and CSS in above the fold content’, click on ‘show how to fix’. It will show you the list of scripts and stylesheets.

script urls

Use your mouse to a script and it will show you the full URL. Select the URL and press CTRL+C from your keyboard to copy the URL.

Now go to your WordPress admin area and go to Performance>Minify page.

First of all, add JavaScript files which you want to minify or to be minified. Scroll down to JS section and under the ‘operations in areas’ set the embed type to ‘Non-blocking async’ for the head section.

add scripts

Now click on the ‘add script’ button and start adding the script URLs which you copied from Google PageSpeed tool.

After doing that, scroll down to CSS section and click the button “Add a stylesheet”. Now start adding stylesheet URLs which you copied from Google PageSpeed tool.

add style sheets

Now hit “save settings and purge cache” button to save your settings.

Go to Google PageSpeed tool to test your site again.

Also, check your website thoroughly to see that everything is functional and working fine on your website.

Troubleshooting

It depends on how your WordPress themes and plugins use JavaScript and CSS? It can be challenging to completely fix all render blocking JavaScript and CSS issues in WordPress.

The above tools can be helpful and your plugins may require certain scripts at a different level to work in a proper way.

In that case, the above mentioned solutions can behave unexpectedly or break your plugins.

Google may still show you certain issues like optimizing CSS delivery for above the fold content. Autoptimize can enable you to fix this by adding manually inline CSS needed to display the above fold area of your theme.

However, it can be a difficult task to find what CSS code you will require to display above the fold content.

I hope that this article will help you to learn how to fix Eliminate render blocking JavaScript and CSS in WordPress.

Do not forget to share this post and also like our Facebook page.


Arsalan Rauf
Arsalan Rauf

Arsalan Rauf is an entrepreneur, freelancer, creative writer, and also a fountainhead of Green Hat Expert. Additionally, he is also an eminent researcher of Blogging, SEO, Internet Marketing, Social Media, premium accounts, codes, links, tips and tricks, etc.

www.greenhatexpert.com

Filed Under: Blogging, How to, SEO, WordPress Tagged With: eliminate render-blocking css, Eliminate render-blocking JavaScript and CSS, eliminate render-blocking javascript and css in above-the-fold content magento, eliminate render-blocking javascript and css in above-the-fold content php, eliminate render-blocking javascript and css in above-the-fold content shopify, eliminate render-blocking javascript and css in above-the-fold content w3 total cache, eliminate render-blocking javascript and css using htaccess, eliminate render-blocking javascript and css wordpress, remove render-blocking javascript wordpress without plugin

How to Mod the Google Snake Game

Last Updated on April 24, 2023 By Arsalan Rauf

To mod the Google Snake Game, first of all, you need to download the Google Snake Menu Mod on GitHub.

The mod comes with additional menu options.

After installing the mod, you need to import it to your bookmarks.

On the other hand, you can paste the code from custom.js into the console, after doing so, you need to type this in the console, “window.snake.customMenuStuff();”.

In the end, play the Google Snake Game and open “More Menu Stuff” to use the mod.

To access the mod in the Google Snake Game, you need to click on the gear icon.

Here is a step by step guide to mod the Google Snake Game:

Step 1. Download the Google Snake Menu Mod

To get started, the first thing is to download the Google Snake Menu Mod on Chrome.

You need to know that this guide will only work on Google Chrome.

Hence, using other web browsers like Microsoft Edge or Firefox will not work.

First of all, visit the GitHub page of the Google Snake Menu Mod by using this direct URL: https://github.com/DarkSnakeGang/GoogleSnakeCustomMenuStuff/releases/tag/Permanent.

You will see many assets once you open the page.

The assets are “MoreMenu.html”, “Source code (zip)”, and “Source code (tar.gz)”.

I will activate the Google Snake Menu Mod by importing it as a bookmark for the sake of this post.

To download the mod, click on “MoreMenu.html”.

Step 2. Go to your bookmark manager

After downloading “MoreMenu.html”, the next task is to import it to your bookmarks.

You need to visit your bookmark manager to get started.

Firstly, you need to click on the three dots available on the top navigation bar of Google Chrome.

It will show a menu that has multiple options such as “New tab”, “New window”, “New incognito window”, and many others.

In order to open the bookmarks, you need to click on “Bookmarks”.

There are multiple options available in the “Bookmarks” menu such as “Bookmark this tab…”, “Bookmark all tabs…”, “Show bookmarks bar”, and so on.

To visit your bookmark manager, you need to click on “Bookmark manager”.

Step 3. Click on the three dots

After clicking on the “Bookmark manager”, the list of your bookmarks will be shown.

Now, all you need to do is to import the Google Snake Menu Mod to your bookmarks.

Click on the three dots available on the top navigation bar to import the mod.

Step 4. Click on “Import bookmarks”

When you will click on the three dots, it will show you multiple options.

The options will be “Sort by name”, “Add new bookmark”, and “Add new folder”.

You can also import and export bookmarks.

In order to import a bookmark, click on “Import bookmarks”.

Step 5. Open “MoreMenu”

When you click on the “Import bookmarks”, it will open the File Explorer.

Now, you need to find the “MoreMenu.html” file.

In most cases, the file is available in the “Downloads” folder.

To check the recent downloads, you need to click on “Downloads”.

In the end, click on “MoreMenu”, and click on “Open” to import it to your bookmarks.

Step 6. Open “More Menu Stuff”

After importing the “MoreMenu.html” to your bookmarks, now it is available for you to use.

First of all, open the Google Snake Game by searching for the term “Snake game” on Chrome.

To play it, click on “Play”.

Once you have begun the game, click on the three dots available on the top bar of Google Chrome.

Now, click on “Bookmarks” to check the list of your bookmarks.

Then, click on “Imported” to check the imported bookmarks.

Now, click on “More Menu Stuff” to activate the Google Snake Game Mod.

In the end, open the mod menu by clicking on the gear icon.

On the other hand, you can paste the code from custom.js into the console, then type this in the console, “window.snake.customMenuStuff();”.

To get access to console, click on the three dots available on the top bar of Chrome > More tools > Developer tools > Console.

Step 7. Use the mod menu

The mod menu will open when you will click on the gear icon.

You will see a number of options to select from after doing the activation of the Google Snake Game Mod.

The options are more food, maps, animals, and much more cool stuff!

I hope that you have learned how to install mods in the Google Snake Game!

Final Words

Modding the Google Snake Game will make the game more interesting and fun!

There will be a lot of options to select from.

You need to bear in mind that you can only use the Chrome browser to install Google Snake Game mods.

If you are using other browsers like Yandex, Firefox, you will not be able to install the mod.

What’s Next

Funny, Cool and Best Gaming Names

How to Unblur Course Hero

How to Fix “Your Windows license will expire soon” on Windows 10

Arsalan Rauf
Arsalan Rauf

Arsalan Rauf is an entrepreneur, freelancer, creative writer, and also a fountainhead of Green Hat Expert. Additionally, he is also an eminent researcher of Blogging, SEO, Internet Marketing, Social Media, premium accounts, codes, links, tips and tricks, etc.

www.greenhatexpert.com

Filed Under: Gaming, How to

How to Contact OpenSea

Last Updated on April 8, 2022 By Arsalan Rauf

Do you have any issues on OpenSea?

OpenSea is one of the most popular NFT marketplaces.

However, the marketplace is more likely to develop bugs and face downtime.

It may take a while for OpenSea support to give you a response due to a large number of users and requests.

Therefore, you might need to wait for many days to get your issue resolved.

Luckily, there is not a one method to contact OpenSea but more than one ways.

In this post, I am going to tell you how to contact OpenSea for support, what is OpenSea’s email and can you call them.

How to contact OpenSea

To contact OpenSea, you can use their Twitter account or a request, or you can join their Discord server.

On the other hand, you can also use the official email of OpenSea at contact@opensea.io.

OpenSea contains a help center where you can submit a request.

It is the best way to get help from Opensea.

If they have not responded or resolved your ticket for many days, you can ping them on Twitter too.

The official Twitter account of OpenSea for support is @opensea_support.

Unluckily, the direct messages are disabled by them, but you can still tag them in a tweet.

In addition, you can also reply to one of their existing tweets with your ticket ID so they can address your issue.

There are several ways to contact OpenSea:

Method 1. Submit a request

The first method to get OpenSea support is to submit a request.

First of all, you can contact them using the Opensea “Submit a request” page available on the help center.

On the other hand, you can submit a request directly here: https://support.opensea.io/hc/en-us/requests/new.

After reaching the “Submit a request” page, you need to choose what you need help with.

There are several categories or options that you can select from.

The categories are “Account”, “Wallet and Transaction Errors”, “Buying NFTs”, and so on.

If you are having issue with your OpenSea account, you need to select the “Account” category to get help.

After selecting the category that you need help with, the next thing is to complete the rest of the form.

It will ask you about your email address, a sub-category, and your wallet address.

Also, you also have to enter the subject and a description of your problem on Opensea.

Additionally, If you want to add screenshots for better help, you can upload them under “Attachments (optional)”.

In the end, you need to submit the request and wait for the team of OpenSea to reply.

The process may take several days to get response from them.

Opensea will use your email to reply you that you have given while contacting them.

Method 2. Tag OpenSea on Twitter

If you are unable to get Opensea attention after multiple days, you can tag them on Twitter.

This option will help you to get a response quicker.

There are two OpenSea Twitter accounts.

The accounts are @opensea and @opensea_support.

The Twitter account that you should tag is @opensea_support.

Unluckily, you cannot send a DM to @opensea_support because they no longer receive direct messages and direct messages are disabled.

However, you can still ping them on Twitter or get response from them by replying to their tweets.

Compose a tweet that tells about your issue and tag @opensea and @opensea_support to contact them on Twitter.

The issue can also be discussed with them by replying to one of their tweets.

All you need to do is provide them with your ticket ID so that they can get in touch with you accordingly.

Method 3. Join the OpenSea Discord server

OpenSea also contains a Discord server where you can get assistance regarding your issues and also provide feedback.

However, the help will be provided by the community on their server.

First of all, you need to join the OpenSea Discord server from this URL: https://discord.com/invite/opensea.

You need to agree to the rules before you can start chat on the server.

After accepting the rules, reach the “community-help” channel.

If you have a question about Opensea, you can ask their community for assistance.

If you are facing a bug, you can report that in the “bugs” channel.

What is OpenSea’s email?

The official email address of OpenSea is contact@opensea.io.

If you need help with your issue, you can get in touch with OpenSea at contact@opensea.io and they’ll respond to you request as early as possible.

You need to check the email address of the Opensea account, if you have received an email from them, check the sender’s email.

It is because OpenSea will not contact you via email address unless you’ve recently submitted a request.

Can you call OpenSea?

No, a call option is not available for Opensea.

No, you cannot call OpenSea.

It is because OpenSea does not have a phone number that you can use to call them.

The fastest way to get in touch with OpenSea, you need to submit a request on this URL: https://support.opensea.io/hc/en-us/requests/new.

It is one of the ideal ways to get help from OpenSea.

Final Words

Try to solve your issue by yourself before you try to contact Opensea.

This can be done by using the OpenSea help center directly here: https://support.opensea.io/.

The help center offers multiple help categories that you can select from.

For instance, if you want to know how to buy an NFT, you need to click on the “Buying” category.

The whole help center has many helpful articles for your assistance.

Search bar can also be used to get the help related to your category.

If you are unable to solve your issue by yourself, you need to use Opensea submit a request option.

Due to an increase in requests, it may take a while to get a response from Opensea on your request.

What’s Next

How to Contact MetaMask

How to Contact Coinbase

3 Ways to Contact TikTok

Arsalan Rauf
Arsalan Rauf

Arsalan Rauf is an entrepreneur, freelancer, creative writer, and also a fountainhead of Green Hat Expert. Additionally, he is also an eminent researcher of Blogging, SEO, Internet Marketing, Social Media, premium accounts, codes, links, tips and tricks, etc.

www.greenhatexpert.com

Filed Under: Guide, How to

How to Contact MetaMask

Last Updated on April 8, 2022 By Arsalan Rauf

Do you have any issue or problems on MetaMask?

There is a chance that your transaction is pending or stuck.

Or maybe the token balance is not displayed to you.

Either way, you need to contact MetaMask for the sake of assistance.

Before you try contacting MetaMask, you can visit the FAQ page for help.

It is because the FAQ page has answers to commonly asked questions on MetaMask.

In addition, assistance is also available on the MetaMask community.

You need to create a new account in order to post there.

In this article, I am going to tell you how to contact MetaMask, whether they provide support, and what is their email address for help.

How to Contact MetaMask

To contact MetaMask, you can use the email, or submit a request or contact them on Twitter.

On the other hand, you can get help from the MetaMask community too.

You can contact them by submitting a request, MetaMask has a “Submit a request” page.

Try to add as much information as possible when you’re submitting a request to them.

The information will reduce the delays in replies.

The email address of MetaMask is support@metamask.io.

You can use the email in order to report a bug or you need help with something.

The last method is to use MetaMask’s official Twitter account for support @MetaMaskSupport.

You can post a tweet and tag @MetaMaskSupport if you have any problems and you want to bring them into their notice.

Here are 3 methods to contact MetaMask:

Method 1. Submit a request

The first method to get MetaMask support is to submit a request.

You can contact them using the MetaMask “Submit a request” page.

While submitting your request, you need to ensure that you have put all the details to describe your issue.

First of all, visit the “Submit a request” page by clicking on this direct URL: https://metamask.zendesk.com/hc/en-us/requests/new.

After reaching the page, you need to select the issue you are facing (e.g. MetaMask Extension).

After doing so, enter your email address and select the version of your MetaMask.

You can locate it by right-clicking “MetaMask” and clicking on “Manage Extension”.

After doing so, you need to choose the network and the purpose of contacting MetaMask.

Then, include the subject, description, and attachments to get an overview of your problem.

In the end, click on “Submit” to submit your request to MetaMask.

After submitting your request, you need to wait for a few days to get response from MetaMask.

They will use email to reply to you.

Method 2. Email MetaMask

The second method is to use the email address to contact MetaMask.

Email them to get in touch with them and MetaMask’s official email address is support@metamask.io.

When a user wants to send them a bug report, this email address is mainly used for this purpose.

However, it can also be used for the sake of reporting an issue you are experiencing.

The issues can be related to transactions, glitches, questions and so on.

You need to provide the maximum details to get your issue solved via email.

This action will prevent the delays in getting response.

After sending the email, wait for some days to get the response from MetaMask.

Method 3. Use Twitter for MetaMask Support

The last method in this list to contact MetaMask is to tweet them by using Twitter.

To get official support from MetaMask, you need to use the official Twitter account for support that is, @MetaMaskSupport.

The MetaMask Twitter account is verified, so you need to ensure that it has a verification badge before you post a tweet.

Now, you can do couple of things.

First of all, you can tag them @MetaMaskSupport by posting a tweet about the issue that you’re facing.

It is an ideal way to attract their attention.

Secondly, you can also reply to one of their existing or new tweets.

In the reply, you can send them the problem you are facing.

After going through their tweets and replies, I come to know that @MetaMaskSupport is very active.

Is there a MetaMask support?

Yes, MetaMask does have a user support.

There are some channels you can use to reach them.

The main channels to reach them are the “Submit a request” page and their Twitter account @MetaMaskSupport.

You can contact MetaMask support directly by using their “Submit a request” page.

On the other hand, you can also use their email and contact them at support@metamask.io.

What is MetaMask email?

The official email address of MetaMask is support@metamask.io.

The email address can be used to report a bug or if you are having any trouble with the extension of MetaMask.

You need to check the email address of the sender if you have received an email from MetaMask.

It is because sometimes even if the email is from support@metamask.io, it might be fake.

The second thing you need to keep in mind that MetaMask will never ask you for your secret recovery phrase.

Final Words

Before you try contacting MetaMask, it is highly suggested that you visit their Help Center first.

You can get help from the Help Center because it has multiple help categories that you can select from.

The categories are “Getting Started”, “Managing my Account”, “Token Swaps”, and many more.

You need to choose the category that you need help with and read the available article that is related to your issue.

Again, you need to keep in mind that MetaMask support will never ask you to reveal your secret recovery phrase.

If someone is asking for it then it will be a scammer online that asks you for your secret recovery phrase.

You need to stay away from them because if you share your recovery phrase with them, your funds will be stolen.

A scam example of such email is, you may receive an email saying that your wallet will be suspended.

What’s Next

How to Contact Coinbase

3 Ways to Contact TikTok

6 Working Methods to Contact OnlyFans

Arsalan Rauf
Arsalan Rauf

Arsalan Rauf is an entrepreneur, freelancer, creative writer, and also a fountainhead of Green Hat Expert. Additionally, he is also an eminent researcher of Blogging, SEO, Internet Marketing, Social Media, premium accounts, codes, links, tips and tricks, etc.

www.greenhatexpert.com

Filed Under: Guide, How to

  • « Previous Page
  • 1
  • …
  • 78
  • 79
  • 80
  • 81
  • Next Page »


Recent Posts

  • Free DeepSeek Accounts 2025
  • Free Zoho Mail Accounts 2025
  • Acudepot Discount Codes 2025
  • Free Blackshot Accounts 2025
  • Free GMX Email Accounts 2025
  • Songtrust Discount Codes 2025
  • Uzicases Discount Codes 2025
  • Cardillo Promo Codes 2025
  • Free DriverFix License Keys 2025
  • Avast Secureline VPN Activation Codes 2025

Recommended Posts

Create a Gmail Account Without Phone Number

Free Course Hero Account

Crunchyroll Accounts

Cracked Apps

Free Pokemon Go Accounts
Onlyfans Free Accounts
Free Chegg Accounts
Free Paypal Accounts
Free Gmail Accounts
Funny Steam Names

Categories

  • Apps
  • Apps for PC
  • Blogging
  • Discord
  • Facebook
  • Gaming
  • Grammar
  • Guide
  • How to
  • Instagram
  • Messaging
  • OnlyFans
  • Pinterest
  • Reddit
  • SEO
  • Snapchat
  • Social Media
  • Spotify
  • Steam
  • Telegram
  • TikTok
  • Twitch
  • Twitter
  • Whatsapp
  • WordPress
  • YouTube
  • Home
  • Social Media
  • Messaging
  • About
  • Submit Guest post