Green Hat Expert

  • Home
  • Social Media
    • Instagram
    • TikTok
    • Snapchat
    • Facebook
    • YouTube
    • Twitter
  • Messaging
    • Discord
    • Telegram
    • Whatsapp
  • About
  • Submit Guest post
You are here: Home / Archives for How to

How to Find the File Location for Stray

Last Updated on August 3, 2022 By Arsalan Rauf

It is necessary to find the file location for Stray on your PC for multiple things.

You can backup, mod, or add essential files to Stray if the game contains issues.

To backup the game, you need to download the folder of “SaveGames”.

The folder has your progress and other data in Stray.

By backing up the game, you can reinstate it to the previous state if something goes wrong.

Some Steam games contain a myriad of mods that can also be installed.

Before you install a mod to the game, it is necessary to back up your game file before you add it.

In this post, I will tell you how to find the game folder, directory, or file location for Stray on Steam.

How to find the file location for Stray

Here is a step by step guide on how to find the file location for Stray

  1. Firstly, search for “%appdata%” from Windows Search.
  2. Click on “AppData” in the URL field.
  3. Open “Local”.
  4. Open “Hk_project”.
  5. Now, open “Saved”.
  6. Lastly, open “SavedGames” to see your game data.

As a backup for Stray, you can save the “SavedGames” folder.

If you want to restore it in the future, remove the current “SavedGames” folder and change it to the old folder.

As a result, your progress will start from the old “SavedGames” folder when you start the game.

How to find the Stray folder

Here is a step by step guide on how to find the Stray folder

  1. Search for “%appdata%” from Windows Search.
  2. Click on “AppData” in the URL field.
  3. Now, open “Local”.
  4. Lastly, open “Hk_project”.

Finding the Stray folder is the same as finding the file location for it.

However, you don’t have to perform steps 5 and 6.

The reason behind it is that the “Hk_project” folder is the Stray folder.

“Hk_project” has a “Saved” folder that you’ll have to open to view the rest of the folders.

What’s Next

How to Fix Stray Crashing on PC

How to Fix Stray UE4-HK Project Game Has Crashed

Funny, Cool, And Best Gaming Names

Arsalan Rauf
Arsalan Rauf

Arsalan Rauf is an entrepreneur, freelancer, creative writer, and also a fountainhead of Green Hat Expert. Additionally, he is also an eminent researcher of Blogging, SEO, Internet Marketing, Social Media, premium accounts, codes, links, tips and tricks, etc.

www.greenhatexpert.com

Filed Under: Gaming, How to

How to Fit Text in Google Sheets

Last Updated on August 2, 2022 By Arsalan Rauf

When you type some text in a cell in Google Sheets, the text will not fit in automatically.

The text will move out of the cell and overflow to the next column.

Unluckily, there is no shortcut to keep or fit the text into a cell.

Therefore, it is a manual process to wrap the text to prevent it from overflowing.

To fit text in Google Sheets, you need to resize the columns or wrap the text to fit the data.

Here are two ways that can be used to fit text in Google Sheets.

#1: Wrap text

Here is a step by step guide on How to fit text in Google Sheets by wrapping them:

  1. Firstly, select all of the columns/rows (shift + click).
  2. Click “Format” on the top bar.
  3. Now, select “Wrapping”.
  4. Lastly, select “Wrap”.

After selecting the “Wrap”, the text you have selected in the columns will be wrapped.

Wrapping will fit/keep the text in a cell keeping in view the width of the column.

Therefore, the text will not overflow out of the cell.

If you’re writing in a new column, the text should be wrapped in it again.

#2: Fit to data

Here is a step by step guide on how to fit text in Google Sheets by fitting them to the data:

  1. Firstly, select all of the columns/rows (shift + click).
  2. Right-click a column/row.
  3. Now, select “Resize columns X – Y”.
  4. Select “Fit to data”.
  5. Lastly, click “OK” to save your changes.

After selecting “Fit to data”, all text will fit in all cells.

The process is the same as wrapping, the text will fit based on the width of each column.

The size of a column can be edited by right-clicking it and clicking on “Resize columns”.

Instead of selecting “Fit to data”, choose “Enter new column width in pixels” and enter the width that you want to use for the columns.

What’s Next

How to Center Text in The Middle in Google Docs

How to Make Text Vertical in Google Docs

How to Remove Table Borders in Google Docs

Arsalan Rauf
Arsalan Rauf

Arsalan Rauf is an entrepreneur, freelancer, creative writer, and also a fountainhead of Green Hat Expert. Additionally, he is also an eminent researcher of Blogging, SEO, Internet Marketing, Social Media, premium accounts, codes, links, tips and tricks, etc.

www.greenhatexpert.com

Filed Under: How to

How to Remove Table Borders in Google Docs

Last Updated on August 1, 2022 By Arsalan Rauf

Google Docs contains a feature where you can insert a table.

The table is of 1×1, 3×3, 6×6, or any rows and columns.

The table option can be used to center a text horizontally and vertically.

You can do it by editing the “Minimum row height” in the table properties.

However, if you want to only display the text, your task is to remove the table borders.

In this post, I will tell you how to remove table borders/lines in Google Docs.

How to remove table borders in Google Docs

Here is a step by step guide on how to remove table borders in Google Docs

  1. Firstly, go to Google Docs.
  2. Insert a table.
  3. Now, highlight the entire table.
  4. Click on the “Border Width” option on the top navigation bar.
  5. Lastly, select “0pt”.

After selecting “0pt”, it will remove the table borders/lines.

Now, only the text in the table will be available.

However, you can still edit the text as you do.

Changing the border width to “0.5pt” can bring back the table border.

I hope that you have learned how to remove table borders in Google Docs!

How to remove table lines in Google Docs

Here is a step by step guide on how to remove table lines in Google Docs

  1. Firstly, highlight the entire table.
  2. Now, click on the “Border Width” option on the top navigation bar.
  3. Select “0pt”.

The steps above are the same as the first method.

When you set the “Border Width” to “0pt”, it will be removed from the table.

However, the text in the table will be there.

The alignment of the table can be changed by right-clicking it and selecting “Table properties”.

What’s Next

Free Netflix Accounts and Passwords

How to Start Page Numbers on Page 3 in Google Docs

How to Recover Gmail Password Without Phone Number And Recovery Email

Arsalan Rauf
Arsalan Rauf

Arsalan Rauf is an entrepreneur, freelancer, creative writer, and also a fountainhead of Green Hat Expert. Additionally, he is also an eminent researcher of Blogging, SEO, Internet Marketing, Social Media, premium accounts, codes, links, tips and tricks, etc.

www.greenhatexpert.com

Filed Under: How to

How to Play MultiVersus in Asia

Last Updated on August 1, 2022 By Arsalan Rauf

Do you want to play MultiVersus in Asia or South East Asia (SEA)?

Are you a resident of Singapore, the Philippines, Malaysia, or another country in Asia?

MultiVersus contains 6 dedicated servers such as North America and Europe.

However, the game does not have a dedicated server for Asia due to its limited resources.

However, there is a method you can use to bypass the region block that allows you to play MultiVersus anywhere.

In this post, I will tell you how to download and play MultiVersus in Asia and if the game is coming to SEA.

Will MultiVersus be available in Asia?

According to Tony Huynh, Asia is currently not supported in MultiVersus, so you cannot access it there.

If you’ve purchased the game from Asia, a refund can be requested from them.

The game director of Multiversus is Tony Huynh.

He stated that the goal is to allow everyone to play the game.

However, their team is small with limited resources.

Whenever they introduce a new area, it stretches their team further.

Tony also stated that they plan to add more servers for different locations when the game is more stable.

How to play MultiVersus in Asia

To play MultiVersus in Asia, the best way is to use a free VPN like ProtonVPN.

Using a VPN enables you to uplift the region block and download MultiVersus.

The only task you need to perform is to connect to a region where the game is available in.

MultiVersus is available in the United States, so connect to a free United States VPN to access it.

After downloading the game, it will be found in your Steam library.

#1: Use a free VPN like ProtonVPN

  1. You need to download a free VPN like Proton VPN from this URL: https://protonvpn.com/download.
  2. After downloading, open Proton VPN and create a new account.
  3. Connect to a VPN where Multiversus is available such as US-FREE#1.

Proton VPN contains multiple free VPNs that you can use.

MultiVersus is accessible in the United States, so it is highly recommended to connect to a US VPN.

You can also use a Europe VPN.

#2: Get the game on the store.steampowered.com

  1. Firstly, visit store.steampowered.com.
  2. Search for “Lost Ark”.
  3. Now, click on “Play Game” or purchase the game.

If you’re using a VPN country where Multiversus is available, you’ll be able to view and download it.

However, you can only use the browser version of Steam (store.steampowered.com) for this.

The reason behind it is that a VPN is not supported on the Steam desktop app.

#3: Click on “Yes, Steam is installed”

After clicking on “Play Game”, a pop-up will open.

The pop-up has two options which are “Yes, Steam is installed” and “No, I need Steam”.

If you have installed the Steam desktop app, you need to click on “Yes, Steam is installed”.

If it is not, you need to download it and sign in to your account.

#4: Install the game and play it

After clicking on “Yes, Steam is installed”, an installation pop-up will be shown.

Now, you need to install MultiVersus by viewing the instructions on the screen.

Once the game is installed, it will be located in your Steam library.

You can play the game while using the VPN.

Since the game contains dedicated US servers, it is necessary to stay connected to a US VPN to play it.

Otherwise, you’ll face the “Connection Lost” MultiVersus error”.

I hope that you have learned how to download and play MultiVersus in Asia!

What’s Next

Best Perks for LeBron James in MultiVersus

How to Fix “Easy Anti Cheat is not installed” in MultiVersus

How to Fix “You have disconnected” Error in MultiVersus

Arsalan Rauf
Arsalan Rauf

Arsalan Rauf is an entrepreneur, freelancer, creative writer, and also a fountainhead of Green Hat Expert. Additionally, he is also an eminent researcher of Blogging, SEO, Internet Marketing, Social Media, premium accounts, codes, links, tips and tricks, etc.

www.greenhatexpert.com

Filed Under: How to, Steam

How to Play Lost Ark in South East Asia (SEA)

Last Updated on August 1, 2022 By Arsalan Rauf

Do you want to play Lost Ark in South East Asia (SEA)?

Are you resident of Singapore, the Philippines, Malaysia, or another country in Asia?

Lost Ark is only available in 4 regions including North America, Europe, Latin America, and Oceania.

According to Lost Ark, Amazon is not given the right to publish the game in any other regions.

However, there is a method you can use to bypass the region block that allows you to play the game anywhere.

In this post, I will tell you how to download and play Lost Ark in South East Asia (SEA).

Is Lost Ark coming to SEA?

According to the official Twitter account of Lost Ark, they have no plans to add dedicated servers for OCE or SEA.

Another tweet published by them, they stated that Amazon does not have the right to publish the game in any other regions.

Therefore, if you’re in SEA, you won’t be able to download the game without using a VPN.

Since there isn’t an OCE or SEA server, the players from those regions get a very high ping.

A username named @xXHELIUM tweeted, “250 ping makes PvP and end game content substantially more difficult”.

Another username @Kolossus92 tweeted, “Sounds like a poor decision—not maximizing your reach”.

How to play Lost Ark in South East Asia

To play Lost Ark in South East Asia, the best way is to use a free VPN such as ProtonVPN.

Using a VPN enables you to uplift the region block and download Lost Ark.

The only task you need to perform is to connect to a region where the game is available in.

Lost Ark is available in the United States, so connect to a free United States VPN to access it.

After downloading the game, it will be found in your Steam library.

#1: Use a free VPN like ProtonVPN

  1. You need to download a free VPN like Proton VPN from this URL: https://protonvpn.com/download.
  2. After downloading, open Proton VPN and create a new account.
  3. Connect to a VPN where Lost Ark is available such as US-FREE#1.

Proton VPN contains multiple free VPNs that you can use.

Lost Ark is accessible in the United States, so it is highly recommended to connect to a US VPN.

You can also use a Europe VPN.

#2: Get the game on the store.steampowered.com

  1. Firstly, visit store.steampowered.com.
  2. Search for “Lost Ark”.
  3. Now, click on “Play Game” or purchase the game.

If you’re using a VPN country where Lost Ark is available, you’ll be able to view and download it.

Just remember that you can only use the browser version of Steam (store.steampowered.com) for this.

The reason behind it is that a VPN is not supported on the Steam desktop app.

#3: Click on “Yes, Steam is installed”

After clicking on “Play Game”, a pop-up will open.

The pop-up has two options which are “Yes, Steam is installed” and “No, I need Steam”.

If you have installed the Steam desktop app, you need to click on “Yes, Steam is installed”.

If it is not, you need to download it and sign in to your account.

#4: Install the game and play it

After clicking on “Yes, Steam is installed”, an installation pop-up will be shown.

Now, you need to install Lost Ark by viewing the instructions on the screen.

Once the game is installed, it will be located in your Steam library.

You can play the game while using the VPN.

Since the game contains dedicated US servers, it is necessary to stay connected to a US VPN to play it.

I hope that you have learned how to play Lost Ark in SEA on Steam!

What’s Next

How to Fix “You have disconnected” Error in MultiVersus

How to Fix “Easy Anti Cheat is not installed” in MultiVersus

Best Perks for LeBron James in MultiVersus

Arsalan Rauf
Arsalan Rauf

Arsalan Rauf is an entrepreneur, freelancer, creative writer, and also a fountainhead of Green Hat Expert. Additionally, he is also an eminent researcher of Blogging, SEO, Internet Marketing, Social Media, premium accounts, codes, links, tips and tricks, etc.

www.greenhatexpert.com

Filed Under: How to, Steam

How to Center Text in The Middle in Google Docs

Last Updated on August 1, 2022 By Arsalan Rauf

Currently, Google Docs does not support a vertical alignment feature for text.

To center text in the middle of the page in Google Docs, your task is to insert a 1×1 table and set a minimum row height.

To calculate the minimum row height, your task is to subtract the top and bottom margins from the height of the page.

After setting a minimum row height, you have to align the text to the center and remove the border from the table.

Change the border width to 0pt to remove the border from the table.

In this post, I will tell you how to center a text in the middle of a page in Google Docs (horizontal and vertical alignment).

#1: Insert a 1×1 table

  1. Firstly, go to Google Docs.
  2. Click on “Insert”.
  3. Now, select “Table”.
  4. Lastly, select a “1×1” table.

You must always select the “1×1” table because multiple lines can be written in it.

You don’t have to use a “1×3” table if you want to write more than one line.

#2: Edit the table properties

  1. Firstly, enter the text in the table.
  2. Right-click the table.
  3. Lastly, select “Table Properties”.

In the table, you can write multiple lines of text.

You can also create paragraphs in the table by using the “Enter” button on your keyboard.

#3: Minimum row height and vertical alignment

  1. Expand the “Row” property.
  2. Then, tick “Minimum row height”.
  3. Set the “Minimum row height” according to your page setup (e.g. 6 inches).
  4. Expand the “Alignment” property.
  5. Now, select “Middle” for “Cell vertical alignment”.

You can calculate the minimum row height by subtracting the top and bottom margins from the height of the page.

You can see the height of the page by going to File > Page setup.

If you don’t want to involve in any calculations, you can use the trial and error method to find the right minimum row height.

If you’re using a Letter (8.5 in x 11 in) paper size, the appropriate minimum row height is generally 6 inches.

#4: Center align and remove border

  1. Highlight the text in the table.
  2. Next, click on “Center align” on the top bar.
  3. Click on the “Border width” option.
  4. Set the border width to “0pt”.

After setting the border width to “0pt”, it will remove the border.

I hope that you have learned how to center text in the middle of the page in Google Docs!

What’s Next

How to Start Page Numbers on Page 3 in Google Docs

Free Netflix Accounts and Passwords

How to Recover Gmail Password Without Phone Number And Recovery Email

Arsalan Rauf
Arsalan Rauf

Arsalan Rauf is an entrepreneur, freelancer, creative writer, and also a fountainhead of Green Hat Expert. Additionally, he is also an eminent researcher of Blogging, SEO, Internet Marketing, Social Media, premium accounts, codes, links, tips and tricks, etc.

www.greenhatexpert.com

Filed Under: How to

How to Make Text Vertical in Google Docs

Last Updated on August 1, 2022 By Arsalan Rauf

When you add a text in Google Docs, the text is automatically horizontal.

To make a text vertical in Google Docs, your task is to insert a new drawing and add a text box.

After adding a text box, rotate it by 180 degrees and align it to the center.

In the end, align the text to the left, center, or right of the page.

Just remember that the vertical text cannot be moved manually.

In this post, I will tell you how to change the text direction in Google Docs from horizontal to vertical.

#1: Insert a new drawing

  1. Firstly, go to Google Docs.
  2. Click on “Insert”.
  3. Select “Drawing”.
  4. Lastly, click on “New”.

After clicking on “New”, you can add a new drawing.

A text can be made vertical by adding a text box and rotating it.

#2: Add a text box and rotate it

  1. Firstly, click on the text box icon.
  2. Now, type something in the text box.
  3. Rotate the text box by 180 degrees by clicking and dragging the pin.
  4. Lastly, click on “Save and Close”.

Any text box can be rotated by clicking and dragging the pin on top of it.

When you hover over the pin icon, it will transform your cursor into a “+” icon.

When your cursor changes into a “+” icon, you can begin rotating the text box.

#3: Align the text

  1. Firstly, click on the text box.
  2. Align the text box to your desire.

You can align the text box with the help of the alignment tools on the top bar of Google Docs.

You can align the text to the left, middle, or right of the page.

I hope that you have learned how to make a text vertical in Google Docs!

What’s Next

How to Start Page Numbers on Page 3 in Google Docs

How to Recover Gmail Password Without Phone Number And Recovery Email

Free Netflix Accounts and Passwords

Arsalan Rauf
Arsalan Rauf

Arsalan Rauf is an entrepreneur, freelancer, creative writer, and also a fountainhead of Green Hat Expert. Additionally, he is also an eminent researcher of Blogging, SEO, Internet Marketing, Social Media, premium accounts, codes, links, tips and tricks, etc.

www.greenhatexpert.com

Filed Under: How to

How To Check Your Own Mobile Number On Airtel, Idea, Vodafone, Aircel, BSNL, Docomo, Reliance, Virgin, Jio, Videocon

Last Updated on August 21, 2022 By Arsalan Rauf

How To Check Your Own Mobile Number On Airtel, Idea, Vodafone, Aircel, BSNL, Docomo, Reliance, Virgin, Jio, Videocon

In this post, I shall tell you how to find or check your own mobile number. It includes the services of Airtel, Reliance, Idea, Vodafone, Jio, Videocon, Docomo, BSNL, Aircel and Virgin. Whenever you buy a sim, they will provide you a new number. Everyone cannot memorize her/his own new mobile number instantly. At the same time, if someone asks for your mobile number for any reason, it may be quite embarrassing for you if you are unable to recall it or find it instantly.

In order to deal this situation, I and going to give you the list of USSD codes of all the telecom to check your own number. There is no need to say that it is always easy to remember 3 or 4 digit code as compared to 10 digit mobile number.

How to Check or Find Your Own Mobile Number

If you want to purchase a new sim in order to change the telecom then you can also port your current number to another telecom and you do not have to change your number for this purpose.

List of all telecom service provider’s USSD Code to know your Own Number:

USSD code to check your own Virgin Number: *1#

How to check your own Uninor Number: *555# *1# *444#

How to check your own Airtel Number: 1401600#  Or 282# Or *1219#

How to check your own Aircel Number: 1# or *2344#

Way to check your own Vodafone Number: 1112#

How to check your own Videocon Number: *1#

How to check your own MTNL Number: *8888#

Know How to check your own TATA Docomo Number:*1# or *580# or *124#

Know How to check your own BSNL Number: *1# Or *99#

How to check your own Reliance Number: *1#

How to check your own Idea Cellular Number: *1# or *789#

USSD code to check your own MTS Number: Type NUM and send SMS to 51230

How to check your own t24 Number: *1#

Know How to check your own Tata Indicom Number: *1#

How to check your own JIO Number : *1#

How To Check Your Own Mobile Number [All Operators]

If the above method is not working then do not worry just use the USSD below to get your own mobile number. It is a simple method to check your own mobile number.

How to Check Your Airtel Mobile Number

airtel

To Check your own airtel number dial the codes given below

  • *121*9
  • *282#
  • *141*123#
  • *400*2*1*10#
  • *140*1600#
  • *140*175#

So that is it, use any of the above codes in order to get your mobile number. I have checked my airtel number with the help of this code (*121*9#). So I hope this is the answer to your question how to check your own mobile number on Airtel network or sim.

Read more:

  • Disable UC browser notifications

How to Check your Idea Mobile Number

Check your Idea Mobile Number

To Check your own idea number type the codes given below

  • *131#
  • *1#
  • *789#
  • *147*8*2#
  • *100#
  • *131*1#
  • *125*9#
  • *147*1*3#
  • *147*2*4#
  • *147#
  • *616*6#

That is it. use any of the above mentioned codes in order to find your mobile number. I have checked my idea number with the help of this code *789# in my location. Try all of these codes so one of them will show your mobile number on your screen. So this is the method to check your own mobile number on Idea sim or network.

How to Check Your Reliance Mobile Number

Check Your Reliance Mobile Number

To Check your own Reliance number type the codes given below

  • *111#
  • *1#

That is it. use one of the above mentioned codes to check your own mobile number that will appear on your screen. This answers to your question how to check your own mobile number on Reliance network or sim.

Read more:

  • Best Wifi File transfer app for Android

How to Check Your Vodafone Mobile Number

Check Your Vodafone Mobile Number

To check your own Vodafone number type the codes given below

  • *111*2#
  • *777*0#
  • *131*0#
  • *555#
  • *555*0#

That is it. use one of the above mentioned codes, you can get your own phone number. I have checked my Vodafone number with the code *111*2# in my area. Diall all the above codes until it shows you your mobile number on you screen. So this section is to tell you how to check your own mobile number on Vodafone sim or network.

Read more:

  • Best Android Emulators to Run Apps on PC/Computer

How to Check Your BSNL Mobile Number

Check Your BSNL Mobile Number

To check your own BSNL number type the codes given below

  • *222#
  • 164
  • *1#
  • *99#

That is it. use one of the above mentioned codes, you can get your own phone number. To check BSNL number of your phone, you need to use USSD code, I think *1# works for most of the people. It is the answer to your question that how to check your own mobile number on BSNL sim or network.

How to Check Your Aircel Mobile Number

Check Your Aircel Mobile Number

To check your own Aircel number type the codes given below

  • *234*4#
  • *1#
  • *888#
  • *122*131#
  • *131#

That is it. use one of the above mentioned codes, you can get your own phone number. To check Aircel mobile number, you need to use USSD code like *122*131# and *234*4# because they work for most of the people. This is how you check or know your own mobile number on Aircel sim or network.

Read more:

  • Create Whatsapp Account without Phone Number

How to Check Your Tata Docomo Mobile Number

Check Your Tata Docomo Mobile Number

To check your own Tata Docomo number type the codes given below

  • *580#
  • *888#
  • *1#
  • *124#

That is it. use one of the above mentioned codes, you can get your own phone number. Use any of the USSD codes to track your Tata Docomo mobile number. This code *580# works for most of the people. This is how you check  your own mobile number on Docomo sim or network.

Read  more:

  • Indian Disposable Phone Numbers

How to Check Your Videocon Mobile Number

Check Your Videocon Mobile Number

To check your own Videocon number type the codes given below

  • *1#

Use the above mentioned code to check your Videocon mobile number on your mobile screen. This is how you know your own mobile number on Videocon sim.

How to Know Your Virgin Mobile Number

To check your own Virgin mobile number type the codes given below

  • *1#

Use the above mentioned code to check your Virgin mobile number on your mobile screen. This is the method to know your own mobile number on Virgin sim or network.

How to Know your Uninor Mobile Number

To check your own Uninor number type the codes given below

  • *555#
  • *1#

Use the above mentioned code to check your Uninor mobile number on your mobile screen. This is the best method to check your own mobile number on Uninor sim or network.

How to Know Your Loop Mobile Number

To check your own Loop number type the codes given below

  • *222#
  • *001#
  • *1#

Use the above mentioned code to check your Loop mobile number on your mobile screen. This is the answer to your question that how to check your own mobile number on Loop sim.

How to Check Your MTNL Mobile Number

To check your own MTNL number type the codes given below

  • *8888#

Use the above mentioned code to check your MTNL mobile number on your mobile screen. This is the answer to your question how to check your mobile number on MTNL sim or network.

How to Check Your Smart Mobile Number

To check your own smart number type the codes given below

  • *1#
  • *111*2#

Use the above mentioned code to check your Smart mobile number on your mobile screen. This is the answer to your question how to check your own mobile number on Smart network or sim.

How to Know Your BPL Mobile Number

To check your own BPL number type the codes given below

  • *222#
  • *1#
  • *001#

Use the above mentioned code to check your BPL mobile number on your mobile screen. This is the answer to your question that how to check your own number on BPL network or sim.

Arsalan Rauf
Arsalan Rauf

Arsalan Rauf is an entrepreneur, freelancer, creative writer, and also a fountainhead of Green Hat Expert. Additionally, he is also an eminent researcher of Blogging, SEO, Internet Marketing, Social Media, premium accounts, codes, links, tips and tricks, etc.
www.greenhatexpert.com

Filed Under: How to Tagged With: airtel number check ussd code, all sim number check code, Check Your Own Mobile Number, how to check bsnl mobile number details, how to check bsnl prepaid number, how to check mobile number from sim, how to check mobile number from sim vodafone, how to check my idea number, how to check own number in idea sim card

How to Run Multiple Accounts of The Same App on Android Mobile

Last Updated on August 21, 2022 By Arsalan Rauf

How to Run Multiple Accounts of The Same App on Android Mobile

Hello visitors, here I shall make a guide on how to run multiple accounts of same application on Android device using the similar space.

Do you want to run 2 Whatsapp accounts on 1 Android or smartphone?

Do you want to run multi account gaming on 1 Android phone?

If yes, then you are at the right place. Today I shall show you one of these apps are cool and compatible with such situation.

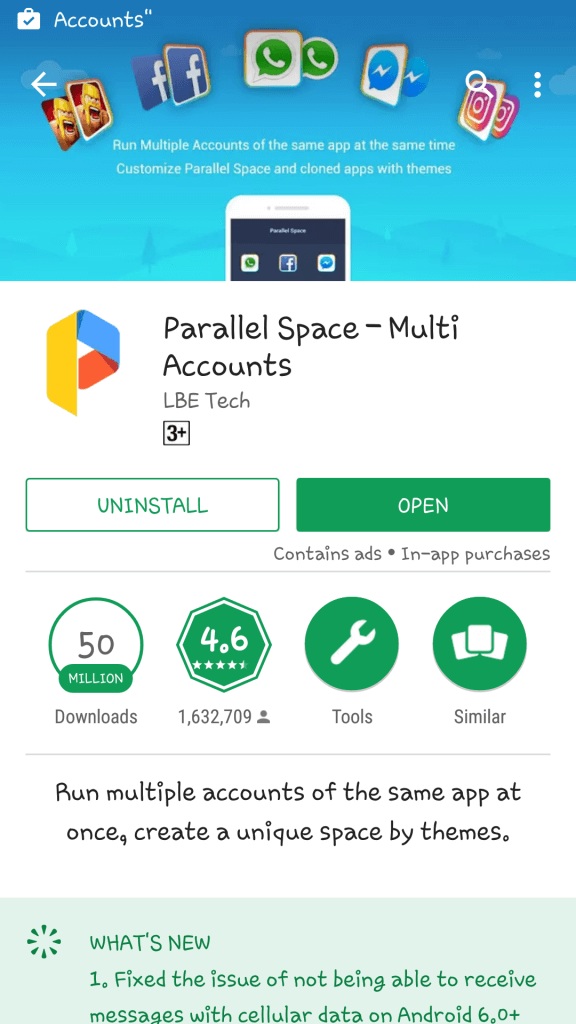
What is Parallel space?

Parallel space or multiple accounts is an Android application which is available on Google play store. the task of this app is to create clone of apps that we actually need.  Actually, there are plenty of ways to make a good clone app available in play store or online. In my opinion, this app is easy to use it is because it does not need access to the root. It will be like having smartphone in your smartphone. This app also has a security (password), app theme and so on. Parallel space is available all around the world including India that is why you can download it from Google play store.

Also Read:

  • Best apps to search Job in India
  • Best Wifi file transfer app for Android
  • How to Create unlimited Instagram account without verification

How To Run Multiple Accounts of Same App on Android Device using Parallel Space or how to Install same app twice on Android

  1. Download the application “Parallel Space” from Google PlayStore.

Download QR-Code

Parallel Space-Mehrfachkonten

Developer: LBE Tech

Price: Free of cost

Run Multiple Accounts of Same App on Android Device using Parallel Space

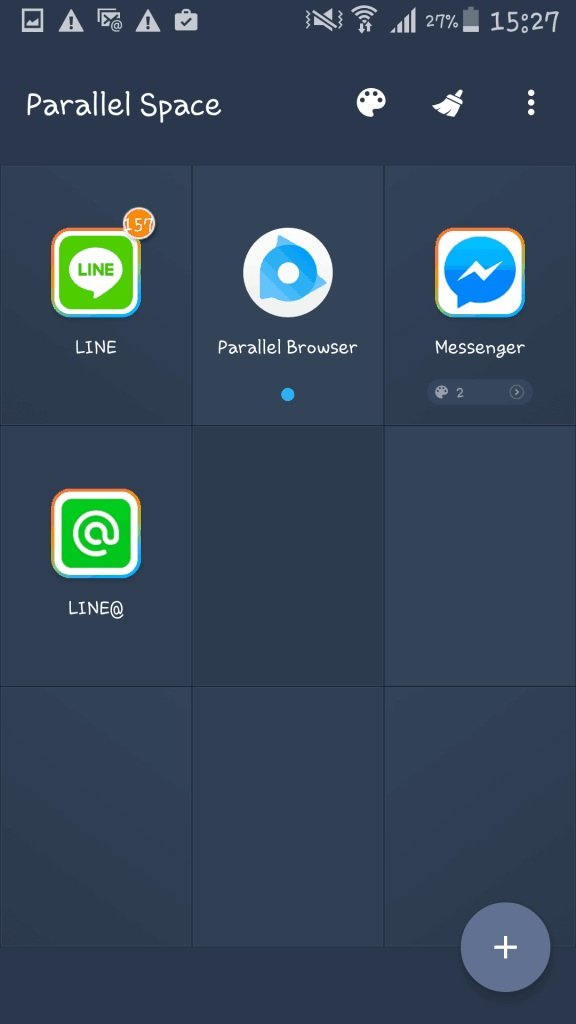
  1. Once the downloading of the app is completed, open the app and will appear as shown below. This is the main home page of the parallel space.


  1. Click the “+” and will appear as below:

Run Multiple Accounts of Same App on Android Device using Parallel Space1


  1. Select the application you want to clone the app or to install two versions of the same app android. Select by clicking on the app so that there is a check in the right corner. Once completed the new click ” Add to Parallel Space”
  2. Application which you selected earlier will appear in the start menu and click on the application earlier. It is easy right?

Note: This application is only able to clone your app once. It means that there are only two similar applications in Android phone.

That is it. I hope that you liked the post on how to run multiple apps on same Android or smartphone.

Do not forget to share this post.

Arsalan Rauf
Arsalan Rauf

Arsalan Rauf is an entrepreneur, freelancer, creative writer, and also a fountainhead of Green Hat Expert. Additionally, he is also an eminent researcher of Blogging, SEO, Internet Marketing, Social Media, premium accounts, codes, links, tips and tricks, etc.
www.greenhatexpert.com

Filed Under: How to Tagged With: dual app, dual whatsapp app download, how to install same app twice on android, install two versions of the same app android, multiple accounts app for iphone, multiple accounts app ios, two snapchat accounts on one android, use two snapchat accounts on one iphone

How to Fix “This item is currently unavailable in your region”

Last Updated on January 1, 2024 By Arsalan Rauf

Are you facing a “This item is currently unavailable in your region” error on Steam?

The beginning part of the error is, “An error was encountered when processing your request”.

The error message occurs when the game is not released in your country or region yet.

For instance, if the game is available to Asia, you won’t be able to download it in Singapore, India, Japan, and so on.

In this post, I will tell you what does “This item is currently unavailable in your region” mean and how to fix/bypass it.

What does “This item is currently unavailable in your region” mean?

The “This item is currently unavailable in your region” error message means that the game is not available in your country yet.

Consequently, you cannot view or download it on Steam.

Some games are only present in selected regions.

For instance, Lost Ark is unavailable in Asia but available in the United States.

Therefore, if you’re trying to download the game in Asia, you will not be able do it.

You can check the available regions of the game on the website of the game.

How to fix “This item is currently unavailable in your region”

To fix “This item is currently unavailable in your region”, the best way is to use a free VPN like ProtonVPN.

You can bypass the error message by using VPN and downloading a game if it is unavailable in your region.

The next thing is to connect to a country where the game is available.

For instance, if the game is available in the United States, you need to connect to the United States country in a VPN.

After downloading the game, it will be visible in your Steam library.

#1: Use a free VPN such as ProtonVPN

  1. You need to download a free VPN like from this URL: https://protonvpn.com/download.
  2. Open Proton VPN and create a new account.
  3. Lastly, connect to a country in VPN where the game is available in (for example, US-FREE#1).

Proton VPN contains multiple free VPNs that you can use to connect.

You can download most games in the United States, so connecting to a US VPN is suggested for this purpose.

The reason behind it is that most games give preference to their release in the US.

#2: Get the game on the store.steampowered.com

  1. Firstly, visit store.steampowered.com.
  2. Find the game that you want to download (for instance, Lost Ark).
  3. Lastly, click on “Play Game” or purchase the game.

If you’re using a VPN where the game is available, you’ll be able to see and download it.

Just remember that you can only use the browser version of Steam (store.steampowered.com) to do this.

The reason behind it is that a VPN does not work on the Steam desktop app.

#3: Click on “Yes, Steam is installed”

After clicking on “Play Game”, it will open a pop-up.

The pop-up has two options such as “Yes, Steam is installed” and “No, I need Steam”.

You need to click on “Yes, Steam is installed” if you’ve already installed the Steam desktop app.

Otherwise, you have to download it and log in to your account.

#4: Install the game and play it

After clicking on “Yes, Steam is installed”, it will open an installation pop-up.

Now, you need to install the game by following the given instructions on the screen.

After installing the game, it will be located in your Steam library.

The game can be played with or without a VPN.

However, if the game only contains US servers, you need to connect to a US country in a VPN to play it.

I hope that you have learned how to bypass the “This item is currently unavailable in your region” error on Steam!

What’s Next

How to Fix “Easy Anti Cheat is not installed” in MultiVersus

How to Fix “You have disconnected” Error in MultiVersus

Best Perks for LeBron James in MultiVersus

Arsalan Rauf
Arsalan Rauf

Arsalan Rauf is an entrepreneur, freelancer, creative writer, and also a fountainhead of Green Hat Expert. Additionally, he is also an eminent researcher of Blogging, SEO, Internet Marketing, Social Media, premium accounts, codes, links, tips and tricks, etc.

www.greenhatexpert.com

Filed Under: How to, Steam

  • « Previous Page
  • 1
  • …
  • 70
  • 71
  • 72
  • 73
  • 74
  • …
  • 81
  • Next Page »


Recent Posts

  • Free DeepSeek Accounts 2025
  • Free Zoho Mail Accounts 2025
  • Acudepot Discount Codes 2025
  • Free Blackshot Accounts 2025
  • Free GMX Email Accounts 2025
  • Songtrust Discount Codes 2025
  • Uzicases Discount Codes 2025
  • Cardillo Promo Codes 2025
  • Free DriverFix License Keys 2025
  • Avast Secureline VPN Activation Codes 2025

Recommended Posts

Create a Gmail Account Without Phone Number

Free Course Hero Account

Crunchyroll Accounts

Cracked Apps

Free Pokemon Go Accounts
Onlyfans Free Accounts
Free Chegg Accounts
Free Paypal Accounts
Free Gmail Accounts
Funny Steam Names

Categories

  • Apps
  • Apps for PC
  • Blogging
  • Discord
  • Facebook
  • Gaming
  • Grammar
  • Guide
  • How to
  • Instagram
  • Messaging
  • OnlyFans
  • Pinterest
  • Reddit
  • SEO
  • Snapchat
  • Social Media
  • Spotify
  • Steam
  • Telegram
  • TikTok
  • Twitch
  • Twitter
  • Whatsapp
  • WordPress
  • YouTube
  • Home
  • Social Media
  • Messaging
  • About
  • Submit Guest post