Green Hat Expert

  • Home
  • Social Media
    • Instagram
    • TikTok
    • Snapchat
    • Facebook
    • YouTube
    • Twitter
  • Messaging
    • Discord
    • Telegram
    • Whatsapp
  • About
  • Submit Guest post
You are here: Home / Archives for How to

How to Contact OnlyFans – (6 Working Methods)

Last Updated on April 23, 2023 By Arsalan Rauf

Are you looking for a solution to your issue or question on Onlyfans website?

If yes, you are at the right place.

You might want to know why you have not received your funds yet.

Further, you can face issues while uploading a video on the site.

The best way to solve these issues is to contact Onlyfans support.

Other social media platforms including Instagram, contacting customer support is a hard nut to crack.

Contacting Onlyfans is easier as compared with Instagram and the response will be given by a human.

In this post, I am going to teach you how to contact OnlyFans support to solve your problem or questions and there are five ways to do it.

How to contact OnlyFans

You can either email them or create a ticket or message them on Twitter to contact Onlyfans.

Furthermore, you can also get answers to your queries in their help center in FAQs (frequently asked questions).

You need to log in to your OnlyFans account to create a ticket.

After logging in, you need to go to the help center and choose the “Take me to support” link.

You can also contact them through the email address and it is available on their Twitter account.

Further, you can also mention them in a tweet or send them a direct message on their Twitter account.

There is no estimation that how much time they will take to respond to you but it is the best option that you use the previous ways first.

If they do not respond to you within 2 business days, you should consider using other methods to contact them.

This post will help you to know how can you contact OnlyFans support.

Method 1: Create a ticket

The steps are Log in to OnlyFans account> profile icon> Help and Support> Take me to support> All tickets> Create Ticket> Select a question> Add details> attach file> Create Ticket.

The first method you can use to contact Onlyfans is to create a ticket.

To create a ticket, visit the official OnlyFans website and log in to your account.

After logging in, choose the profile icon on the bottom navigation bar.

After selecting the profile icon, you will see an opened menu.

There are many options that you can choose from – My profile, Bookmarks and so on.

Scroll down until you see the option “Help and Support”.

To go to the help center of OnlyFans, Select “Help and support”.

Now, again scroll down unless you come across “Take me to support” link.

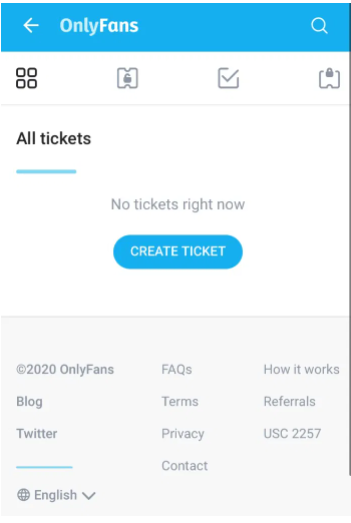
On the help center, click on that link and it will show the history of your tickets.

Select the “Create Ticket” button available on the tickets page to create a new ticket.

After doing so, choose a question from the help center and add the details regarding your problem.

In the end, you can attach the image of the issue (optional) and select the “Create Ticket” to create one.

After creating the ticket, the ticket will be moved to “Open Tickets” tab.

OnlyFans tickets are responded in 1-3 business days.

If they have solved your ticket, it will be available in “Solved tickets” tab.

On the contrary, if they have closed the ticket, it will be available in “Closed Tickets” tab.

This is how you contact OnlyFans support by creating a ticket.

Apart from this method, there are two more methods to contact OnlyFans support including email or Twitter.

Recommended: Can You Screenshot on OnlyFans?

Method 2: Email OnlyFans

Email your questions and problems to support@onlyfans.com.

The second method to contact OnlyFans is by using email.

The official emails of OnlyFans are – support@onlyfans.com & media@onlyfans.com.

The user can post their questions on this email support@onlyfans.com.

Apart from users, the media and press can contact them using the mail media@onlyfans.com.

In addition, if you have any other problems or questions regarding the website of OnlyFans, you can contact them via email support@onlyfans.com.

You need to ensure the subject line of your inquiry, details about it and the attachments are also available (optional).

You need to explain the issue in as much detail as possible and also ask your question in detail.

After sending the email, wait for 1-3 business days to get the response.

You need to be patient and do not send a follow-up email.

Method 3: Ping them on Twitter

Go to Twitter> Write a Tweet> Ask question/explain the problem>tag@OnlyFansSupport> post.

Or Go to Twitter> go to @OnlyFansSupport> mail icon> send your issue/question.

This is the final method to contact OnlyFans that is, using the Twitter platform.

There are two ways of doing it.

First of all, you can write a tweet about your issue/question and tag @OnlyFansSupport.

On the other hand, you can also send them a direct message with an explanation of the question or issue.

To post a tweet of your issue/question, click on the tweet icon (on the desktop version), tap on the feather icon (on a mobile device).

After doing so, explain your problem in detail, and tag OnlyFans using @OnlyFansSupport in your tweet.

Here is an example, “How do I deactivate my OnlyFans account? @OnlyFansSupport”.

You can also send them a direct message to contact them on Twitter effectively.

It can be done by visiting their Twitter support page on Twitter and choosing the mail icon available on the profile.

Then, ask your question in detail by sending them a direct message.

There is a great chance that you will get a human response in one to three business days.

You need to tag @OnlyFansSupport rather than @OnlyFans.

If you tagged @OnlyFans instead of @OnlyFansSupport, they might not respond to you or entertain your problems.

Method 4: Use Contact Form

You can also use the OnlyFans Contact Form to contact them.

Go to this link https://onlyfans.com/contacts and fill out the form and send the request.

METHOD 5: Message them on Instagram Account

This is another way to send Direct Message to OnlyFans and you can access their Instagram on https://www.instagram.com/onlyfans/ OR using @onlyfans

BONUS METHOD: Use Physical Mail Service

This method can be used as an insurance policy, OnlyFans has a physical address that is written below:

Fenix International Limited
4th Floor Imperial House,
8 Kean Street,
London,
WC2B 4AS

OnlyFans is a company that is operated and owned by Fenix International Limited founded in London.

Further, if you have tried all the previous methods and did not get any serious response, you can also visit their parent company website to contact them the URL is: https://fenixinternational.com/

Frequently Asked Questions (FAQs)

What is OnlyFans’ email?

There are two OnlyFans’ official email addresses:

For user issues/queries: support@onlyfans.com.

For Media and Press related inquiries: media@onlyfans.com.

If you want to get the answer to your queries, post a question through email via support@onlyfans.com.

Alternatively, if your concern is regarding press and media inquiries, contact them via media@onlyfans.com.

Does OnlyFans have Twitter?

Yes, Onlyfans contains two official accounts on Twitter.

Here are the official OnlyFans’ Twitter accounts:

OnlyFans’ official Twitter: @OnlyFans.

OnlyFans’ support Twitter: @OnlyFansSupport.

The @OnlyFans Twitter account is used for creator announcement purposes on their site.

Alternatively, to announce the issues/bugs, the official Twitter account is @OnlyFansSupport.

Does OnlyFans have a Customer Support Phone Number?

No, this option is currently unavailable which is why you cannot contact them using a phone number.

Final Words

If you are having trouble with OnlyFans application, the ideal way to get help is to contact OnlyFans support.

You can contact them either by pinging them on Twitter, creating a ticket on the Help center, using the contact form, messaging them on Instagram or emailing them on their email.

If you don’t get a reply from them after 3 business days, try using another method from these methods.

Due to the massive amount of users, you need to be patient and prepared to wait for a while to get a reply from them.

What’s Next

How to Contact Snapchat

How to Contact Coinbase

How to Contact Discord

Arsalan Rauf
Arsalan Rauf

Arsalan Rauf is an entrepreneur, freelancer, creative writer, and also a fountainhead of Green Hat Expert. Additionally, he is also an eminent researcher of Blogging, SEO, Internet Marketing, Social Media, premium accounts, codes, links, tips and tricks, etc.

www.greenhatexpert.com

Filed Under: How to, OnlyFans

How to Fix NBA 2K23 Crashing on PS5

Last Updated on September 14, 2022 By Arsalan Rauf

Is NBA 2K23 crashing on PS5, PS4, Xbox, or PC and do you want to fix it?

Is the game freezing or you’re getting a blue screen when it reaches halftime on the next-gen my career 1st game?

A lot of players are complaining the error message on several social media sites including Twitter, and YouTube. Here are some examples:

“Every time I try to get on it, it keeps crashing @2KSupport”.

“NBA 2K23 keeps crashing on my PS5 when I launch it or start my career. What is going on with the game?”

“Wow, @NBA2K is unplayable on my PS5, crashes every time I launch it now. What is happening? Can I get a refund, the game just won’t play anymore. It was good for like 2 hours, but now it just keeps crashing. #nba2k23”.

In this post, I will tell you why is NBA 2K23 crashing on PS5 and how to fix it.

Why is NBA 2K23 crashing on PS5?

NBA 2K23 is crashing on PS5 due to a bug.

The bug is affecting the players who have more than 100 blocked players through the PlayStation Network.

If you have blocked over 100 players, launching the game or starting your career will crash the game.

The issue is known to the NBA2K team and they are currently trying to fix it.

The team of the game stated that they will release a solution for it in a post-launch update.

How to Fix NBA 2K23 Crashing on PS5

How to fix NBA 2K23 crashing on PS5:

  1. Firstly, press the PlayStation button.
  2. Select “Game Base” on the bottom carousel.
  3. Press the options button on “Friends”.
  4. Choose “Game Base” again.
  5. Scroll to the right and select “Game Base Settings”.
  6. Now, select “Blocked Players”.
  7. Unblock players until your count of blocked players reaches less than 100.

If you have over 100 blocked players on the PlayStation network, the game will crash.

To fix it from crashing, the best way is to unblock everyone or unblock players until you have less than 100 blocked players.

This fix is temporary until the NBA2K team releases a fix for it as they stated, in the post-launch update.

To get updates about the fix, you can follow @NBA2K on Twitter for more updates.

What’s Next

How to Fix NBA 2K22 Error Code 727e66ac

How to Fix “Couldn’t complete your purchase” on Google Play Store

How to Fix “Looks like another app is blocking access to Google Play”

Arsalan Rauf
Arsalan Rauf

Arsalan Rauf is an entrepreneur, freelancer, creative writer, and also a fountainhead of Green Hat Expert. Additionally, he is also an eminent researcher of Blogging, SEO, Internet Marketing, Social Media, premium accounts, codes, links, tips and tricks, etc.

www.greenhatexpert.com

Filed Under: Gaming, How to

How to Fix Something Went Wrong “0x80049dd3” on Windows

Last Updated on September 13, 2022 By Arsalan Rauf

Are you facing a “Something went wrong” or “Please try again later” error on Windows 10/11?

The error code is, “0x80049dd3” or “ca33bb14-c113-001-13fe-50ca13c1d801”.

You get the error message when you try to type from your voice (voice-typing).

A lot of users are reporting the issue on forums including Reddit and the Microsoft Community. Here are some examples:

“When I try to use my MIC for speech to text, I keep getting this message and the message box “locks up” on screen!”.

“I’ve been trying to figure out how to get my microphone to start working again. It stopped working out of the blue.”

In this post, I will guide you on how to fix “0x80049dd3” for the text-to-speech/voice-typing feature on Windows.

How to Fix Something Went Wrong “0x80049dd3” on Windows

How to fix “0x80049dd3” on Windows

  1. Go to your computer settings.
  2. Select “Accounts”.
  3. Select “Family & other users”.
  4. Now, click on “Add account” under “Other users”.
  5. Add/create a new user for your PC.
  6. Change the account type of the new user to “Administrator”.
  7. Move to the new account.

You have to create a new administrator account and switch to it in order to bypass the error.

After moving to a new account, it will fix the “0x80049dd3” error and the “Win+H” Windows speech-to-text feature will work.

Just remember that this is a temporary solution for the error code.

Currently, the Microsoft team is working on a fix to resolve the code.

You might get the fix in the next update.

Several users are facing the error message and report it on forums.

An answer by Microsoft Agent is, “Regarding the issue of using MIC for speech-to-text, we have submitted feedback on this issue. You can continue to follow this thread. Follow-up progress will be posted here. Thank you for your patience and cooperation”.

Another user stated that “It’s a glitch because many people are complaining about the same error”.

If you don’t want to create a new user, the best bet is to wait until Microsoft fixes the bug from their end.

What’s Next

How to Fix KB5016691 Update Not Installing on Windows 11

How to Fix “VMProtectSDK32.dll is Missing”

How to Fix “Looks like another app is blocking access to Google Play”

Arsalan Rauf
Arsalan Rauf

Arsalan Rauf is an entrepreneur, freelancer, creative writer, and also a fountainhead of Green Hat Expert. Additionally, he is also an eminent researcher of Blogging, SEO, Internet Marketing, Social Media, premium accounts, codes, links, tips and tricks, etc.

www.greenhatexpert.com

Filed Under: How to

How to Fix “Ask your parent for help” in Fortnite

Last Updated on September 13, 2022 By Arsalan Rauf

Are you getting a “Ask your parent for help” error in Fortnite and do you want to fix it?

The last part of the message is, “Once your parent has given permission, you will be able to continue using this Epic Games account”.

If you don’t complete the process, your account will be deleted in 30 days.

In this process, your parent needs to confirm that they are an adult and it can be done by paying $0.50 using a credit or debit card.

They can also give their last 4 digits of SSN.

You can also use your own credit or a debit card, if you have one.

In this post, I will tell you why Fornite says “Ask your parent for help” and how to fix it.

Why does Fornite say “Ask your parent for help”?

Fornite says “Ask your parent for help” because recently, you have downloaded Fall Guys.

Recently, Fall Guys has become a free to play game and they also collaborated with Epic Games.

To get rewards and cosmetics in Fortnite, you can perform challenges in Fall Guys.

However, to play both games, your age should be at least 13 years old.

If you’re under 13 years old, you will require your parent’s permission in order to play the game.

It can be done by proving that they are an adult by paying $0.50 or giving the last 4 digits of their SSN.

When you first download Fall Guys, you need to enter your DOB (date of birth).

If your age indicated that you’re under 13 years old, you’ll face the “Ask your parent for help” error message.

As a result, your Epic Games account will be temporarily locked.

How to Fix “Ask your parent for help” in Fortnite

  1. Firstly, you need to enter the email address of your parent or guardian.
  2. After that, ask your parent or guardian to check their email.
  3. They will get an email with “Parental Permission for an Epic Games Account” as the subject line.
  4. Click on “Continue”.
  5. Then, click on “Continue” again.
  6. Select “Yes” to allow your child to use Sign In with Epic.
  7. Now, select “Last 4 digits of SSN” or “Credit or Debit card” (recommended).
  8. If you’ve selected “Credit or Debit Card”, you need to provide your card information.
  9. Lastly, you need to pay a small amount of money like $0.50.

You will get a refund of the amount you have paid in 8-13 business days.

After you (the parent) have given the last 4 digits of your SSN or paid a small amount of money, you will get an email.

The email will state that you have verified their identity successfully.

In addition, a confirmation message will also be received by you, “Your child’s Epic Games account has been restored. Your child can now log in”.

After that, when your child opens Fortnite, they will not encounter the “Ask your parent for help” error message again!

In their Epic Games account, they will get access to all of their skins on Fortnite and games.

What’s Next

Free Fortnite Accounts

Good Apex Legends Names

Good, Cool, and Aesthetic Discord Server Names

Funny, Cool, And Best Gaming Names

Arsalan Rauf
Arsalan Rauf

Arsalan Rauf is an entrepreneur, freelancer, creative writer, and also a fountainhead of Green Hat Expert. Additionally, he is also an eminent researcher of Blogging, SEO, Internet Marketing, Social Media, premium accounts, codes, links, tips and tricks, etc.

www.greenhatexpert.com

Filed Under: Gaming, How to

How to Fix “That item isn’t available for purchase in your region” on Google Play Store

Last Updated on September 13, 2022 By Arsalan Rauf

Are you facing a “That item isn’t available for purchase in your region” error on the Google Play Store?

The next part of the error message is, “Couldn’t complete your purchase”.

You can get it when you’re trying to install an App from the Google Play Store.

A lot of users are reporting the issue on the internet.

A username named @ymansour on Twitter tweeted that: “@GooglePlay I can’t install any app. The apps are free but the message: “Couldn’t complete your purchase” appears always when I press Install”.

In this post, I will guide you on how to fix “That item isn’t available for purchase in your region” on Google Play Store and why you got the error.

Why does Google Play Store say “That item isn’t available for purchase in your region”?

Google Play Store says “That item isn’t available for purchase in your region” because there is a great chance that the app developer hasn’t made the app available in your country.

In that case, you will not be able to do in-app purchases or install the app on Google Play.

You can change your Google Play country in order to install the app and you can do it if you shift to a new country.

The error message can also occur due to a bug/glitch on Google Play.

If it is happening due to a bug, you can contact Google help from this URL: https://support.google.com/googleplay/gethelp.

How to fix “That item isn’t available for purchase in your region” on Google Play Store

How to fix “That item isn’t available for purchase in your region” on Google Play Store:

  1. Firstly, install a free VPN app such as Secure VPN – Safer Internet.
  2. Connect to a free VPN and use the countries like US, UK.
  3. Force close the Google Play Store app.
  4. Re-open the Google Play Store app.
  5. Now, try installing the app once again.

You can bypass the country restricted apps by using a VPN.

Let’s suppose the app is available in the US/UK but it’s not yet rolled out in India.

In this case, you need to use a UK VPN to install the app.

After connecting to a UK VPN, you can install the app.

Don’t forget to force close the Google Play Store app before try installing the app for this time.

It can be done by swiping up from the middle of your screen and closing all apps.

Otherwise, the app might not start to install again because your VPN is not synced to the Google Play Store yet.

What’s Next

How to Fix “Couldn’t complete your purchase” on Google Play Store

How to Fix Something Went Wrong “0x80049dd3” on Windows

How to Fix “Looks like another app is blocking access to Google Play”

Arsalan Rauf
Arsalan Rauf

Arsalan Rauf is an entrepreneur, freelancer, creative writer, and also a fountainhead of Green Hat Expert. Additionally, he is also an eminent researcher of Blogging, SEO, Internet Marketing, Social Media, premium accounts, codes, links, tips and tricks, etc.

www.greenhatexpert.com

Filed Under: How to

How to Fix “Couldn’t complete your purchase” on Google Play Store

Last Updated on September 13, 2022 By Arsalan Rauf

Are you facing a “Couldn’t complete your purchase” error on the Google Play Store?

The next part of the error message is, “That item isn’t available for purchase in your region“.

You can get it when you’re trying to install an App from the Google Play Store.

A lot of users are reporting the issue on the internet.

An example of username @ymansour who tweeted on Twitter: “@GooglePlay I can’t install any app. The apps are free but the message: “Couldn’t complete your purchase” appears always when I press Install”.

In this post, I will tell you how to fix “Couldn’t complete your purchase” on Google Play Store and why you got the error.

Why does Google Play Store say “Couldn’t complete your purchase”?

Google Play Store says “Couldn’t complete your purchase” probably because the developer of the app has restricted the app and not made it available in your country.

In that case, you will not be able to do in-app purchases or install the app on Google Play.

If you have shifted to a new country, you can update your Google Play country to install the app.

The error message can also occur due to a bug/glitch on Google Play.

If it is happening due to a bug, you can contact Google for help from this link: https://support.google.com/googleplay/gethelp.

How to fix “Couldn’t complete your purchase” on Google Play Store

How to fix “Couldn’t complete your purchase” on Google Play Store:

  1. Firstly, download a free VPN app from the play store, for example, Secure VPN – Safer Internet.
  2. Connect to a free VPN and use the countries like US, UK in which the app is available.
  3. Force quit the Google Play Store app.
  4. Re-open the Google Play Store app.
  5. After doing that, try to install the app again.

You can bypass the country restricted apps by using a VPN.

Let’s suppose the app is available in the US but it’s restricted to India.

In this case, you need to use a USA VPN to install the app.

After connecting to a US VPN, you can install the app.

You need to make sure to force quit the Google Play Store app before you start the installation.

Otherwise, the app might fail to install again because the process is necessary to sync the VPN.

What’s Next

How to Fix Something Went Wrong “0x80049dd3” on Windows

How to Fix KB5016691 Update Not Installing on Windows 11

How to Fix “Looks like another app is blocking access to Google Play”

Arsalan Rauf
Arsalan Rauf

Arsalan Rauf is an entrepreneur, freelancer, creative writer, and also a fountainhead of Green Hat Expert. Additionally, he is also an eminent researcher of Blogging, SEO, Internet Marketing, Social Media, premium accounts, codes, links, tips and tricks, etc.

www.greenhatexpert.com

Filed Under: How to

How to Fix “VMProtectSDK32.dll is Missing”

Last Updated on September 5, 2022 By Arsalan Rauf

Are you facing a “VMProtectSDK32.dll is Missing” error with Roblox?

The full system error message is, “The program can’t start because VMProtectSDK32.dll is missing from your computer”.

Accompanied by “Try reinstalling the program to fix this problem”.

A lot of users are reporting the error on social media sites and here are some examples:

“I am really curious why is this happening and if it’s happening to most people”.

“For Roblox, it means that your injector or .dll is outdated”.

In this post, I will guide you on how to fix “VMProtectSDK32.dll is missing” or if you can’t start Roblox.

How to Fix “VMProtectSDK32.dll is Missing”

To fix “VMProtectSDK32.dll is missing”, you have to download it and add it to System32.

It can be copied and pasted to the Roblox file location.

If the error is still there, you have to download Directx and Visual C++ Redistributable.

Step 1. Download VMProtectSDK32.dll

  • Visit this link https://www.dll-files.com/vmprotectsdk32.dll.html and download “VMProtectSDK32.dll”.
  • Open the ZIP file and copy “VMProtectSDK32.dll”.
  • Go to File Explorer > This PC > Local Disc (C:) > Windows > System32.
  • Paste “VMProtectSDK32.dll” into the System32 folder.

Step 2. Paste VMProtectSDK32.dll to the Roblox folder

  1. Visit this URL: https://www.dll-files.com/vmprotectsdk32.dll.html and download “VMProtectSDK32.dll”.
  2. Open the ZIP file and copy “VMProtectSDK32.dll”.
  3. Right-click the Roblox Player > Open file location.
  4. Paste “VMProtectSDK32.dll” into the Roblox folder.

Step 3. Download Directx and Visual C++

  1. Download DirectX End-User Runtime: https://www.microsoft.com/en-us/download/details.aspx?id=35.
  2. Download Microsoft Visual C++ Redistributable: https://docs.microsoft.com/en-us/cpp/windows/latest-supported-vc-redist?view=msvc-170.

The Microsoft Visual C++ Redistributable contains multiple download links.

You have to download it according to the Bit that your PC is.

It can be checked by right-clicking on the Windows icon > System > System type.

In most cases, your system will be a 64-bit operating system.

Therefore, you have to download the X64 Microsoft Visual C++ Redistributable program for it.

After installing both programs, you need to restart your computer.

What’s Next

How to Fix KB5016691 Update Not Installing on Windows 11

How to Fix “Plugin Load Error” on OBS

How to Mod the Google Snake Game

Arsalan Rauf
Arsalan Rauf

Arsalan Rauf is an entrepreneur, freelancer, creative writer, and also a fountainhead of Green Hat Expert. Additionally, he is also an eminent researcher of Blogging, SEO, Internet Marketing, Social Media, premium accounts, codes, links, tips and tricks, etc.

www.greenhatexpert.com

Filed Under: How to

How to Fix “Behavior:Win32/Hive.ZY” on Windows

Last Updated on September 5, 2022 By Arsalan Rauf

Are you facing a “Behavior:Win32/Hive.ZY” error message on Windows?

The error’s detail is, “A threat or app was removed from this device”.

“This program is dangerous and executes commands from an attacker”.

“Affected items: behavior: pid:25924:74439979291537.

It displays that the threat is blocked and that the status of it is “Severe”.

In this post, I will guide you on what is the “Behavior:Win32/Hive.ZY” threat on Windows Defender and how to fix it.

What is Behavior:Win32/Hive.ZY?

Behavior:Win32/Hive.ZY is a bug that is occurring due to the latest Microsoft Defender Antivirus update.

If you’re encountering the threat, you do not have to worry about it because it’s not an actual virus.

A lot of users are reporting the error on different forums including Reddit and the Microsoft Community.

Here is a comment from Apptils Horray, “Every time I open any chromium-based program, Windows Defender notifies me that it’s found and removed the win32/hive.zy malware”.

On Reddit, here is an example u/tooshiftyforyou, “A few minutes ago, I got a “threat detected” from Windows Defender for “Behavior:Win32/Hive.ZY”. The notification quickly disappeared and it said that the threat had been taken care of”.

“20 seconds later the same threat notification popped up again”.

The post contains more than 1,600 upvotes in less than 9 hours and contains over 910 comments.

You will get the error message every time you open Google Chrome, Discord, Spotify and so on.

Don’t panic as it’s a bug with Electron-based or Chromium-based apps.

You are getting it because there is a false entry in the Windows Defender antivirus’ database.

How to fix “Behavior:Win32/Hive.ZY” on Windows

To fix “Behavior:Win32/Hive.ZY” on Windows, your best bet is to wait for a new Microsoft Defender Antivirus update.

According to DaveM121, an Independent Advisor for the Microsoft Community, users are facing the threat due to the latest Microsoft Defender update.

The update is KB2267602 (Version 1.373.1508.0).

The threat is a false positive and it’s a bug and thousands of users are reporting it around the globe.

For now, the Microsoft Defender Team is investigating the bug and the patch will be released soon for it.

You shouldn’t click “Allow a threat” through Defender.

Do not try to update Chrome or Edge as the issue will not be fixed.

The bug is from Microsoft’s side, and it affects more than just Chromium-based apps.

The error gets out when you open other apps like Windows Settings.

Currently, there is nothing you can do except waiting until Microsoft fixes the bug and releases a new update for Microsoft Defender.

Update: A fix has been released with the follow up update (Version: 1.373.1537.0), please “select Check for updates” in the “Windows Security Virus & threat protection” screen to update it.

What’s Next

How to Fix Error Code 46 in Valorant

How to Fix KB5016691 Update Not Installing on Windows 11

How to Mod the Google Snake Game

Arsalan Rauf
Arsalan Rauf

Arsalan Rauf is an entrepreneur, freelancer, creative writer, and also a fountainhead of Green Hat Expert. Additionally, he is also an eminent researcher of Blogging, SEO, Internet Marketing, Social Media, premium accounts, codes, links, tips and tricks, etc.

www.greenhatexpert.com

Filed Under: How to

How to Fix “Plugin Load Error” on OBS

Last Updated on April 23, 2023 By Arsalan Rauf

Are you facing a “Plugin Load Error” or “Plugins failed to load” on OBS?

If you are getting it, you will not be able to use certain plugins.

Usually, the error message occurs when you update OBS to the latest version.

For instance, if you’ve updated OBS from 27.2.4 to 28.0, you may experience the error.

The error will be, “The following OBS plugins failed to load“.

Accompanied by the plugin names like “obs-websocket”, “StreamDeckPlugin”, “StreamFX”, etc.

In this post, I will guide you on why do plugins fail to load on OBS and how to fix the “Plugin Load Error“.

Why do plugins fail to load on OBS?

Plugins fail to load on OBS due to their incompatibility with the latest version of OBS.

According to OBS, some plugins are not compatible with the newest update.

The list of compatible plugins can be checked here: https://obsproject.com/kb/obs-studio-28-plugin-compatibility.

If the plugin is marked as “Not Available”, it indicates that the developer of the plugin has not updated its compatibility yet.

If you see an “In Progress” status, that shows the plugin’s developer is working on an update and it is in progress.

You are more likely to get compatibility issues on the Mac operating system as compared to the Windows operating system.

Therefore, if you have Mac OS, the plugin might not be compatible with OBS.

It seems to be plugins like “OBS-RTSPServer”, “PTZ Controls”, “Instant Replay”, and others are incompatible with the latest OBS update.

If your plugins are not compatible, you’ll get the “Plugin Load Error”.

How to fix “Plugin Load Error” on OBS

To fix “Plugin Load Error”, you have to downgrade OBS.

  1. Visit this link https://github.com/obsproject/obs-studio/releases/tag/27.2.4.
  2. Scroll down and download the previous version of OBS (for instance, OBS-Studio-27.2.4-Full-Installer-x64.exe).
  3. Run the installer and it will downgrade the OBS Studio to 27.2.4 (an older version).

After downgrading OBS to an older version, your plugins will be able to run and the plugin load error will be resolved.

Your previous settings will not be changed too.

In case, you don’t want to downgrade OBS, the only way to deal with it is to update your plugins to the latest version.

In most cases, you need to update them manually.

For instance, if you’re using the Elgato Stream Deck plugin, you need to update it manually from this link: https://help.elgato.com/hc/en-us/articles/8815141056013.

If one or more of your plugins does not contain a new update, it is better you wait for one.

From your plugins folder, you can also delete the incompatible plugins too.

For instance, if the Stream Deck plugin is incompatible, you have to remove “StreamDeckPlugin.dll” and “StreamDeckPlugin.pdb”.

The location of Windows default plugin for OBS is C:\Program Files\obs-studio\obs-plugins\64bit\.

You may have a different location if you installed OBS somewhere else.

What’s Next

How to Fix Error Code 46 in Valorant

How to Fix KB5016691 Update Not Installing on Windows 11

How to Mod the Google Snake Game

Arsalan Rauf
Arsalan Rauf

Arsalan Rauf is an entrepreneur, freelancer, creative writer, and also a fountainhead of Green Hat Expert. Additionally, he is also an eminent researcher of Blogging, SEO, Internet Marketing, Social Media, premium accounts, codes, links, tips and tricks, etc.

www.greenhatexpert.com

Filed Under: How to

How to Get Midlander Claymore Billet in Genshin Impact

Last Updated on September 1, 2022 By Arsalan Rauf

Genshin Impact contains multiple missions/quests that you need to complete for rewards.

The game also contains side quests, cutscenes, stories, and so on.

Some quests may look easy to you, but they are very hard in reality.

For instance, you might not be able to solve a puzzle.

However, the solution to the puzzle is clear.

In other cases, some puzzles or tasks are hard to complete as there are little or no hints for them.

You need to acquire a weapon in the game that is the Midlander Claymore Billet.

However, you might not have any idea where to get the weapon part.

The reason behind it is that you will not get any directions.

In this post, I will guide you on how to get the Midlander Claymore Billet in Genshin Impact.

How to get Midlander Claymore Billet in Genshin Impact

How to get Midlander Claymore Billet in Genshin Impact

  • Level up the Tree of Dreams, Vanarana to level 14 to get the “Midlander Claymore Billet”.

How to craft Midlander Claymore Billet in Genshin Impact

  1. Get a Northlander Claymore Billet and 2 Dream Solvents (both dropped by weekly bosses).
  2. Reach the crafting bench and interact with it.
  3. Craft the Midlander Claymore Billet.

To craft the Midlander Claymore Billet, a Northlander Claymore Billet and 2 Dream Solvents are required.

You can defeat weekly bosses to get the Northlander Claymore Billet and Dream Solvents.

If the required items are available to you, you can craft the Midlander Claymore Bollet at any crafting table.

There are many crafting table locations such as Mondstadt (Fountain Plaza), Liyue Harbor (Chihu Rock), Inazuma City, and so on.

The Midlander Claymore Billet is one of the items that you need to craft the Forest Regalia, a great sword that can cut down the enemies of the forest.

50 Crystal Chunks, 50 White Iron Chunks, and 500 Mora are the other items.

What’s Next

Funny Genshin Impact Signatures

How to Get Midlander Catalyst Billet in Genshin Impact

How to Get Midlander Polearm Billet in Genshin Impact

Arsalan Rauf
Arsalan Rauf

Arsalan Rauf is an entrepreneur, freelancer, creative writer, and also a fountainhead of Green Hat Expert. Additionally, he is also an eminent researcher of Blogging, SEO, Internet Marketing, Social Media, premium accounts, codes, links, tips and tricks, etc.

www.greenhatexpert.com

Filed Under: Gaming, How to

  • « Previous Page
  • 1
  • …
  • 56
  • 57
  • 58
  • 59
  • 60
  • …
  • 81
  • Next Page »


Recent Posts

  • Free DeepSeek Accounts 2025
  • Free Zoho Mail Accounts 2025
  • Acudepot Discount Codes 2025
  • Free Blackshot Accounts 2025
  • Free GMX Email Accounts 2025
  • Songtrust Discount Codes 2025
  • Uzicases Discount Codes 2025
  • Cardillo Promo Codes 2025
  • Free DriverFix License Keys 2025
  • Avast Secureline VPN Activation Codes 2025

Recommended Posts

Create a Gmail Account Without Phone Number

Free Course Hero Account

Crunchyroll Accounts

Cracked Apps

Free Pokemon Go Accounts
Onlyfans Free Accounts
Free Chegg Accounts
Free Paypal Accounts
Free Gmail Accounts
Funny Steam Names

Categories

  • Apps
  • Apps for PC
  • Blogging
  • Discord
  • Facebook
  • Gaming
  • Grammar
  • Guide
  • How to
  • Instagram
  • Messaging
  • OnlyFans
  • Pinterest
  • Reddit
  • SEO
  • Snapchat
  • Social Media
  • Spotify
  • Steam
  • Telegram
  • TikTok
  • Twitch
  • Twitter
  • Whatsapp
  • WordPress
  • YouTube
  • Home
  • Social Media
  • Messaging
  • About
  • Submit Guest post