Green Hat Expert

  • Home
  • Social Media
    • Instagram
    • TikTok
    • Snapchat
    • Facebook
    • YouTube
    • Twitter
  • Messaging
    • Discord
    • Telegram
    • Whatsapp
  • About
  • Submit Guest post
You are here: Home / Archives for How to

How to Fix Roblox 2 Step Verification Not Sending

Last Updated on April 24, 2023 By Arsalan Rauf

To fix Roblox 2-step verification not sending, check your spam as well as junk mail.

You need to check your junk and spam mail because the email sent by Roblox may land there.

Therefore, it is necessary for you to check them in case the email is received there.

The email should be in your inbox in less than 5 minutes.

You can try to resend the code if it has not arrived.

Click on “Resend Code” to resend the code.

If you still didn’t receive the 2-step verification code, the next thing is to contact Roblox for help.

You can report the 2-step verification is not working on the contact form of Roblox.

Here’s a step by step guide on how to fix the Roblox 2-step verification code not sending or receiving on PC/mobile via email or the authenticator app.

Method 1. Check your junk and spam mail

The first thing you need to do is to check your junk and spam mail.

The main reason for not getting the 2-step verification code from Roblox is that it may ended up in your spam or junk mail.

When it will land there, there will be no notification for it.

Therefore, you need to check your junk and spam folder for the code manually.

If you’re an iPhone user, open the “Mail” application and tap on “Junk”.

If the code is not there, try refreshing your junk mail.

The code is usually available in less than 5 minutes.

If you’re using Gmail address, open the Gmail application, tap on the menu icon, and tap on “Spam”.

After tapping on the “Spam”, check if you’ve received the 2-step verification code there.

If the 2-step verification code is not sent to you, you will have to use the next method.

Method 2. Resend the code

The second way that you can use is to resend the 2-step verification code.

You should receive the code in less than 5 minutes to your email.

It should be available in your inbox, junk, or spam mail.

If the time barrier of 5 minutes has passed, you need to resend the code.

The reason is that the code might not be sent for the first time.

Click on “Resend Code” to resent it under “Trust this device for 30 days”.

After resending the code, check your email for it.

If it’s not landed in your inbox, you need to check your spam and junk mail too.

After receiving the code, paste it into the “Enter 6-digit Code” field and click on “Verify” in order to complete the 2-step verification process.

If you’re still facing any issue with receiving the 2-step verification code, the next step is to contact Roblox support to get assistance.

Method 3. Contact Roblox support

The last way is to contact Roblox support for assistance.

Roblox contains a contact form that you can use to contact them for help.

The contact form also has a “2-Step Verification” help category.

First of all, go to the Roblox contact form.

Just remember that you need to be logged in to your Roblox account if you want to submit the form.

If you are not logged in yet, you need to enter your Roblox login credentials.

After reaching the contact form, you need to enter your contact information.

The information is your Roblox username, first name, and email address.

After entering your contact information, you need to give them the details of the issue.

To begin with, select the device that you’re having the issue on and choose the help category.

Since you’re getting issues with the 2-step verification code, you need to select “Account Hacked or Can’t Log in” followed by “2-Step Verification”.

In the end, you have to describe that you’re not receiving the 2-step verification code and submit the form.

Here’s an example: “Hi Roblox support. I didn’t receive the 2-step verification code after trying it for multiple times. Please help me to fix this”.

After submitting the form, you need to wait for a few days to get Roblox’s response via email.

In the email, you will receive instructions for your next steps.

Final Words

The 2-step verification option on Roblox prevents others from logging into your account even if they are familiar with your password.

When you log in from a new device, it will send you a security code.

You will receive the code either in your email or the authenticator app.

Since you can only access them, only you will receive the code.

To increase the security of your Roblox account, the best thing is to enable the 2-step verification feature.

You can turn off the feature whenever you want by going to Settings > Security > 2 Step Verification > Email codes to confirm your identity > Enable.

Just remember that you need to have a verified email address to complete the process.

You need to verify your email address if you haven’t verified your email address yet.

What’s Next

Good, Aesthetic, and Cute Roblox Usernames

How to Add Roblox to Your Discord Status

How to Fix “You have been kicked due to unexpected client behavior” in Roblox

Arsalan Rauf
Arsalan Rauf

Arsalan Rauf is an entrepreneur, freelancer, creative writer, and also a fountainhead of Green Hat Expert. Additionally, he is also an eminent researcher of Blogging, SEO, Internet Marketing, Social Media, premium accounts, codes, links, tips and tricks, etc.

www.greenhatexpert.com

Filed Under: Gaming, How to

How to Get Your Hacked Roblox Account Back

Last Updated on November 29, 2022 By Arsalan Rauf

Is your Roblox account hacked and you’re not able to access it and do you want to fix it?

Did the hacker change your email address or password and you are not able to log in?

If you have given your login details to anyone, the chances are high that your Roblox account is hacked.

In this case, you have to ask for help from the Roblox support team as soon as possible.

The reason behind it is that you won’t be able to reset your password.

In the meantime, you can get a new Roblox account by creating it.

In this article, I will tell you how to get your hacked Roblox account back.

How to get your hacked Roblox account back

To get your hacked Roblox account back, you have to contact Roblox support.

In the contact form, you have to provide your contact information and provide the details of the issue.

After submitting the form, you have to wait for Roblox to respond to you.

Typically, you will get a response from Roblox in 24 hours.

However, it may longer time for Roblox to respond to you if they get a lot of outstanding support requests.

You will get response from Roblox via the email address that you’ve provided.

Therefore, it is ideal to check your email after 24 hours.

Also, go through your junk and spam mail as well.

In the email, you will get instructions from Roblox on your next steps.

In most cases, you will receive a password reset link in the email.

Click on the password reset link and reset your password to access your account again.

Here’s a step by step guide on how to get your hacked Roblox account back:

Step 1. Go to Roblox support

The first thing you need to do to get your hacked Roblox account back is to visit the Roblox support page.

First of all, use Google and search for the terms “Roblox support”.

After that, click on the search result that shows, “Support – Roblox”.

On the other hand, you can go to the Roblox support page by clicking on this direct URL: https://www.roblox.com/support.

It is the ideal way that you can use to contact Roblox directly.

Just remember that do not trust people that claim that they can help you to recover your Roblox account.

Step 2. Enter your date of birth

After opening the Roblox support page, it will show you a “MM/DD/YYYY” field.

To begin the process of contacting Roblox, you need to enter your date of birth.

On the other hand, you can sign in to Roblox to skip this step.

To get started, enter your date of birth by month, day, and year.

For instance, if your date of birth is on December 4, 2000, enter “12/04/2000”.

After providing your date of birth, click on “Next” to move on to the contact form.

Step 3. Provide your contact information

After clicking on “Next”, it will take you to the contact form.

You will have to give your contact information and details of the problem on the contact form.

In the first part, you have to provide your contact information.

The information will be your Roblox username, first name, and email address.

Firstly, provide your Roblox username in the “Username” field.

Secondly, give your first name in the “First Name” field.

Thirdly, provide your email address in the “Email Address” field.

After that, re-enter your email address in order to confirm it using the “Confirm Email Address” field.

Now, scroll down to move on to the next part of the form.

Step 4. Provide the details of the issue

After giving them your contact information, you have to give them the details regarding the issue.

The information will be your device, the type of help category, and the description of the issue.

Firstly, choose your device from the “What device are you having the problem on?” dropdown box.

For instance, if you’re using PC to play Roblox, select the “PC” option.

Secondly, choose the help category from the “Type of help category” dropdown box.

Since your Roblox account is hacked, you have to select “Account Hacked or Can’t Log in” option.

After that, you have to choose “Account Hacked” as the sub-category.

In the end, you have to describe that your Roblox account is hacked in the “Description of issue” field.

You can use this description as an example, “Hi Roblox, my account has recently been hacked. I am unable to log in because the hacker changed my login details. Please help me!”.

After completing the form, click on “Submit” to submit it.

After submitting the form, you have to wait for Roblox to get response from them.

You will get response from Roblox in 24 hours on the email address that you’ve given.

You need to check your email after 24 hours to see a response from Roblox.

In the email from Roblox, you will get instructions on how you can get your account back.

In most cases, a password reset link will be sent that can be used to reset your Roblox password.

I hope that you’ve successfully learned how to get your hacked Roblox account back!

Final Words

It is the best thing to take measures to prevent hackers from hacking your Roblox account.

The first step is to set a strong password with a combination of letters and numbers.

Having a strong password will restrict hackers from accessing your account by brute force.

The reason behind it is that they won’t be able to guess your password.

The next measure you can take is to enable 2-step verification from your settings on Roblox.

If you have 2-step verification enabled, whenever you try to sign in, you will get a code to your email.

To log into your account, you have to enter the code.

By setting a strong password and 2-step verification enabled, you can keep your Roblox account more secure.

What’s Next

How to Fix High Ping in Roblox

How to Get Your User ID in Roblox

Best Funny Steam Names

Arsalan Rauf
Arsalan Rauf

Arsalan Rauf is an entrepreneur, freelancer, creative writer, and also a fountainhead of Green Hat Expert. Additionally, he is also an eminent researcher of Blogging, SEO, Internet Marketing, Social Media, premium accounts, codes, links, tips and tricks, etc.

www.greenhatexpert.com

Filed Under: Gaming, How to

How to Fix High Ping in Roblox

Last Updated on November 28, 2022 By Arsalan Rauf

To fix the high ping in Roblox, you have to visit the “Advanced settings” in the Windows Defender Firewall.

After that, add a new inbound rule and enter “49152-65535” as the port.

In the end, re-launch Roblox, and the high ping will be fixed!

If you’re getting a high ping in Roblox, you’re having a connection problem.

According to Roblox, the issue is happening because of Firewall.

In some cases, it can be due to a low-bandwidth connection or from an inconsistent wireless connection.

The port range in Roblox is “UDP 49152 – 65535”, so your task is to add it to your Firewall settings.

This procedure will help Roblox to properly connect to your router.

Your Firewall or Anti-virus program might be causing block on Roblox too.

To fix this, you have to unblock Roblox from your security program and Firewall.

Here’s a step by step guide on how to fix the high ping in Roblox:

Step 1. Open the Windows Defender Firewall

The first thing you need to do is to open the Windows Defender Firewall.

There is a search bar available on the bottom navigation bar of your computer.

Use the search bar to search for “firewall”.

Once searching for “firewall”, a “Windows Defender Firewall” search result will be shown.

To open your Firewall, click on “Windows Defender Firewall”.

Step 2. Visit “Advanced settings”

After clicking on “Windows Defender Firewall”, it will open the Windows Defender Firewall.

It will show you the state of the Windows Defender Firewall for private networks and guest or public networks on the page.

There are multiple options present on the left sidebar.

The options are “Restore defaults”, “Advanced settings”, “Troubleshoot my network”, and so on.

To visit the Firewall advanced settings, you need to click on “Advanced settings”.

Step 3. Go to “Inbound Rules” & add a new rule

After clicking on “Advanced settings”, it will take you to the “Windows Defender Firewall with Advanced Security” page.

There are multiple options on the left sidebar, the options are “Inbound Rules”, “Outbound Rules”, and “Connection Security Rules”.

To open the inbound rules, click on “Inbound Rules”.

After opening the inbound rules, a list of inbound rules will be shown to you.

There are multiple options available on the right sidebar, the options are “New Rule…”, “Filter by Profile”, “Filter by State”, and others.

You have to add a new inbound rule in order to reduce the ping on Roblox.

Click on “New Rule…” on the left sidebar to add a new inbound rule.

Step 4. Select “Port”

After clicking on “New Rule…”, it will take you to the “Rule Type” page.

First of all, you have to choose the type of rule that you want to create.

There are 4 types of rules which are “Program”, “Port”, “Predefined”, and “Custom”.

In this article, you’ll have to select the “Port” rule type as you have to add a UDP port.

After selecting the “Port” rule type, click on “Next”.

Step 5. Select “UDP” & enter “49152-65535” as the port

After that, you have to specify the protocols and ports to which the rule applies.

The first thing is to choose whether the rule applies to TCP or UDP.

You need to add a UDP port, select the “UDP” option.

After that, you have to specify if the rule is applicable to all local ports or specific local ports.

According to the “General Connection Problems” post, the current port range for Roblox is “UDP 49152 – 65535”, so you have to select the “Specific local ports” option.

After that, enter “49152-65535” as the port and click on “Next” to move on to the next step.

Step 6. Click on “Next”

After specifying the protocols and ports to which the rule applies, you have to specify the action to be taken when a connection is same as the conditions specified in the rule.

It has three options such as “Allow the connection”, “Allow the connection if it is secure”, and “Block the connection”.

The option of “Allow the connection” is selected by default, which is the right action.

Therefore, you have to click on “Next” to move on to the next step.

Step 7. Click on “Next” again

After clicking on “Next”, you have to specify the profiles for which the rule applies.

The 3 options are “Domain”, “Private”, and “Public”.

All the options are selected by default.

Therefore, you have to click on “Next” again to move on to the next step.

Step 8. Specify the name of the rule & re-open Roblox

Lastly, you have to specify the name and description of the rule.

It is essential to specify the name of the rule.

Alternatively, it is optional to specify the description of the rule.

First of all, specify the name of the rule and put it in the “Name” field.

Here is an instance of a rule name is “Roblox High Ping Fix”.

After specifying the name of the rule, you can also add a description.

Since the addition of description is not necessary (optional), you can skip this part.

After completion, click on “Finish” to add the inbound rule.

After that, re-open Roblox and try playing the same game again.

This time, it will reduce your ping!

Final Words

A high ping on Roblox will make the game difficult to play or unplayable.

If you’re still facing a high ping in Roblox, you have to check if your location setting is correct.

The reason behind it is that setting the wrong location can result in a higher ping in Roblox.

To begin with, you have to visit your Roblox settings by clicking on the gear icon followed by “Settings”.

On the settings page, it will show your account information including your location.

If the location that is selected is not your country, update or change it.

For instance, if you are a resident of the United States, click on the location dropdown box and select “United States”.

After that, save the changes and start playing a game on Roblox.

If you require additional help, you can contact Roblox support here.

What’s Next

How to Get Your User ID in Roblox

How to Get Shaders on Roblox

Good Discord Server Rules to Copy And Paste

Arsalan Rauf
Arsalan Rauf

Arsalan Rauf is an entrepreneur, freelancer, creative writer, and also a fountainhead of Green Hat Expert. Additionally, he is also an eminent researcher of Blogging, SEO, Internet Marketing, Social Media, premium accounts, codes, links, tips and tricks, etc.

www.greenhatexpert.com

Filed Under: Gaming, How to

How to Get Chegg Free Trial

Last Updated on April 29, 2023 By Arsalan Rauf

Hey, are you a student and looking for Chegg Answers for free? If yes, you can use this method for this. In this article, I am going to tell you how to get a Chegg free trial and I will teach you step by step.

Before we begin with that, let’s know more about Chegg first.

If you are looking for Free Chegg Premium Accounts and Free Chegg Answers online, you can go through these posts.

What is Chegg?

Chegg, Inc. is also called Chegg. It is American-origin education technology. The company is situated in Santa Clara, California, and contains more than three million subscriptions. You can get digital as well as physical textbook rentals, online tutoring for your class from Chegg, and along with that other student services that make their platform suitable for students.

In October 2000, Iowa State University, located in the United States, its students including Josh Carlson, Mike Seager, and Mark Fiddleke came up with Chegg’s forerunner Cheggpost, a Craigslist-style message board for Iowa State students.

Carlson left the company in February 2006. After that, in December 2007, Rashid and his friend Penumbra rebranded it, finally launched the Chegg Inc., and Rashid became the CEO.

They closed the serviced not related to purchasing and renting textbooks and expanded this business to a national market. With the help of corporate acquisitions, Chegg managed to add goods and student services later.

What Does The Chegg Trial Offer?

Chegg’s trial can only be used for four weeks. With the Chegg trial, you will be able to avail around 30 minutes of a free tutor program. In addition, you receive seven-day exclusive access to Chegg’s textbooks database. In short, you can select any subject in order to get help from a live tutor and solve your confusions.

Apart from that, you will have access to more than 2.5 million solutions to any problem in any project. All of these come with step-by-step guide to make the learning perfect and comprehensive.

With the textbook solution option, you also get to post questions in a Question and Answer section. experts will give you replies or answer your question using their capabilities and experience. The website offers a sense of convenience with a free trial, especially for studious kids.

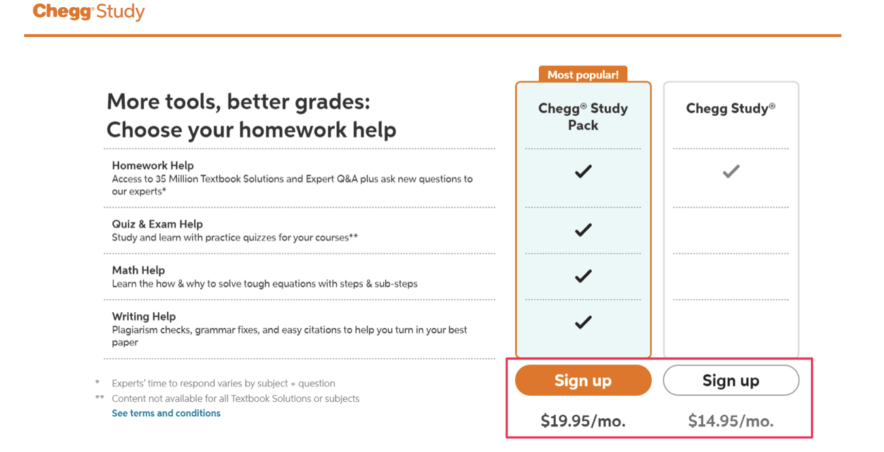
Chegg Subscription Plans Pricing

Product & ServicesPricing
Chegg StudyCosts 16.95 $/month
Chegg Math SolverCosts 9.95 $/month
Chegg WritingCosts 9.95 $/month
Chegg Tutors 48 $/month For 120 tutoring minutes
96 $/month For 240 tutoring minutes
30 $/month For 60 tutoring minutes

How to Get Free Trial in Chegg (Step by Step Guide)

So, let’s started with the guide on how to Get Chegg trail. So, follow the below steps properly:

STEP 1: The first step is to go to Chegg.com official website and go to the study section.

go to chegg study

STEP 2: “Try Chegg Study” will be the option you are going to see, now, click on it.

STEP 3: Now, use your Gmail account and password to create a Chegg account.

STEP 4: Now choose the most popular plan from Chegg and continue.

chegg study plan

STEP 5: After that, provide your Debit & Credit card information for confirmation, in the trial method, Chegg won’t charge you anything. When the trial period expires, you can cancel your subscription, you will not be charged for anything.

So, you need to follow the above steps to Get Chegg trial for free. If you are a new Chegg user then it is my recommendation to use Chegg trial before you start using Chegg premium subscription.

Can You Share The Chegg Trial?

Yes, you can use the account information to log into any platform. If you have found a free account from the platform, you can share it. However, it will be wise not to share your personal Chegg account with anyone.

What Happens After the Chegg Trial Expires?

When the trial of Chegg is over, you will be charged from them automatically for a subscription you chose for trial. That is why it is better you deactivate the subscription manually to avoid that. You can follow the procedure below to do that:

  • Sign in to your account
  • Visit the member’s profile and settings
  • Visit a membership plan and check the subscription
  • Cancel the subscription

On the other hand, if you don’t want to cancel the subscription, there are two Chegg premium plans that you can choose from:

  • Chegg Study: This package comes with textbook solutions and access to the Q&A section with experts. This is a basic package that gives you basic flashcards. You can post new questions or problems about any subject or topic.
  • Chegg Study Pack: This package comes with everything Chegg study offers. Extra benefits are premium flashcards, practice problems, guided videos, writing tools, math solvers, and live tutoring. 

These packages are different from one another in terms of cost.

Final Words:

I hope that you are able to know how to get free Chegg Trail. If you are having issues with the trail of Chegg, you can leave your problem below, I will try to help you in this regard asap. You can also share this post with friends and classmates.

Frequently Asked Question:

Can I get a free trial of Chegg?

Yes, Chegg has a free trial of 4 weeks without any fees. You can get access to all the resources without paying anything. It can be done by simply creating a new account on Chegg and use the free trial.

Can you cancel Chegg after the free trial?

When your free trial expires, Chegg will start charging you for the subscription so it is better you cancel it to avoid charges.

Arsalan Rauf
Arsalan Rauf

Arsalan Rauf is an entrepreneur, freelancer, creative writer, and also a fountainhead of Green Hat Expert. Additionally, he is also an eminent researcher of Blogging, SEO, Internet Marketing, Social Media, premium accounts, codes, links, tips and tricks, etc.

www.greenhatexpert.com

Filed Under: Guide, How to

How to Fix “Error Code e84” on Steam

Last Updated on November 21, 2022 By Arsalan Rauf

Are you facing an “Error Code: e84” on Steam when you try to log in?

The whole error message will be, “Something went wrong while attempting to sign you in”.

Accompanied by “Please try again” later.

The error message occurred after the new update from Steam that updated the sign-in UI.

In this post, I will tell you what is Steam error code e84 and how to fix it so that you can sign in.

What is Steam error code e84?

Steam error code e84 means that you come across an error when trying to sign in.

The error message is happening because of Steam’s latest update (as of early October).

The update introduced a new sign-in UI and now it has become easier to play with friends.

The new update contains the ability to search for someone by their nickname or persona.

It also has free-to-play games that have been played by your friend in the “Games to Play Together” filters.

Apart from that, the team made some minor fixes and improvements to the Steam Cloud, in-game overlay, and remote play.

On Twitter and YouTube, the users are reporting about the e84 Steam error.

Here is an example:

“@Steam I cannot log in on the website (error code: e84) but I can log in on the Windows client. What does “e84″ mean? Please help”.

How to fix “Error Code e84” on Steam

To fix “Error Code e84” on Steam, you can try adding a launch parameter to its properties (-login and -noreactlogin) or removing temporary files.

In addition, you can also end the task for the Steam app and the client service or resetting the password of steam.

If everything fails, the last resort is to reinstall Steam.

Here are 4 ways to fix the sign-in error:

  • Add a launch parameter: Steam > Properties > Target > add -login > add -noreactlogin (e.g. “C:\Program Files (x86)\Steam\Steam.exe” -login -noreactlogin) > Apply.
  • Remove/delete temporary files: Windows search > %temp% > delete all of the files there.
  • Open the task manager by pressing (CTRL + ALT + DEL) > End the task for the Steam app and the Steam Client Service (under “Background Processes”) > launch Steam > sign in.
  • Reset your Steam password.

The methods we have shared above are from the highest to the lowest priority.

Adding a launch parameter is the ideal method to fix the e84 error code.

I am saying that because many users managed to fix the sign-in issue.

If you’re still having problems with signing in, you can contact Steam for help from this URL: https://help.steampowered.com/en/.

What’s Next

Top 10 Most Popular Steam Games

Free Steam Accounts with Games

Good, Cool, And Cute YouTube Channel Names

Arsalan Rauf
Arsalan Rauf

Arsalan Rauf is an entrepreneur, freelancer, creative writer, and also a fountainhead of Green Hat Expert. Additionally, he is also an eminent researcher of Blogging, SEO, Internet Marketing, Social Media, premium accounts, codes, links, tips and tricks, etc.

www.greenhatexpert.com

Filed Under: How to, Steam

How to Fix “One of your payments accounts was cancelled” on Google AdSense

Last Updated on November 21, 2022 By Arsalan Rauf

Are you facing a “One of your payments accounts was canceled” email from Google AdSense?

Another title can be, “A payments account was canceled”.

An email will be sent with, “Your payments account “AdSense pub-x” for Google AdSense was recently canceled”.

“If your balance is greater than US$10.00, you’ll receive your final payment from the canceled payments account during the next cycle”.

“Any payments less than US$10.00 won’t be processed”.

“Any other active payments account associated with Google AdSense will not be affected”.

In this post, I will tell you how to fix “One of your payments accounts was cancelled” on Google AdSense.

Why am I getting “A payments account was canceled” from AdSense?

You’re getting “A payments account was canceled” from AdSense when your payments from YouTube have been moved to a separate tab.

Google sent the email by mistake because they thought your payment account was canceled.

YouTube knows about it and they are trying to find the problem.

If you have received the email, you do not have to worry about it because your account isn’t canceled.

YouTube payments are moved to a separate tab where you can access it.

Many YouTubers are tweeting on Twitter about this email.

Here are some examples:

“Ah, Google and its mastery of communication, letting you know that your Adsense account has been canceled without telling you that it’s been replaced by a YouTube payments account, thus creating a good 5 minutes of panic. Never change Google”.

“Hey guys, I really need your help. I received an email this morning from Google AdSense that said that my payments account was recently canceled”.

“@TeamYouTube I just received an email that says “One of your payments accounts was canceled”. Is this something that needs to be looked into or just to be ignored, given I’ve seen many people having the issue?”.

How to fix “One of your payments accounts was cancelled” on Google AdSense

To fix “One of your payments accounts was canceled” on Google AdSense, you only have to go to the “AdSense for YouTube” tab.

On the other hand, you can click on the “YouTube payments” tab available on the left sidebar.

This process will help you to see your YouTube payments.

If you encountered the “One of your payments accounts was canceled” email, do not worry, because it’s a false message.

You got this by mistake because your payments account was not canceled—the options simply moved to a separate tab because of an intended AdSense update.

The purpose of this update is to separate website ad payments and YouTube payments to ensure a better user experience.

What’s Next

Good, Cool, And Cute YouTube Channel Names

How to Fix YouTube Video Not Processing or Uploading

How to Recover YouTube Account Without Email or Password

Arsalan Rauf
Arsalan Rauf

Arsalan Rauf is an entrepreneur, freelancer, creative writer, and also a fountainhead of Green Hat Expert. Additionally, he is also an eminent researcher of Blogging, SEO, Internet Marketing, Social Media, premium accounts, codes, links, tips and tricks, etc.

www.greenhatexpert.com

Filed Under: How to, YouTube

How to Fix VAN9001 Error in Valorant

Last Updated on November 16, 2022 By Arsalan Rauf

Are you getting a “VAN9001” succeeded by “This build of Vanguard requires TPM version 2.0 and secure boot to be enabled in order to play”?

Valorant is a 5v5 tactical-based FPS game and the game developer is Riot games.

In the game, you get 13 rounds to defend and attack your side with the help of abilities and weapons.

Per round, you get only one life, so you have to pay attention faster than your enemy.

It has various modes such as competitive, unranked, deathmatch, and spike rush.

You can select between the multiple agents armed with unique abilities.

All agents will play uniquely and no highlight reels will be the same.

Every map helps you to show your intellect as it is designed for plays, teamwork and clutch moments.

In this post, I will tell you how to fix the VAN9001 Error in Valorant.

What does the VAN9001 error mean?

The VAN9001 error means that you have not enabled the secure boot on your PC.

Secure boot and Trusted Platform Module are security features that help Windows to boot programs with trust as well as safety.

Vanguard requires these two features in order to recognize the trusted state of a system.

If secure boot or TPM is not enabled, Valorant won’t launch, and you will experience the VAN9001 error.

You can inspect if secure boot is disabled or enabled by using the Windows button and searching for msinfo32 > System Summary.

The BIOS Mode must be “UEFI” and the Secure Boot State must be “On”.

If it is not the same, you have to follow the below guide to enable secure boot.

How to fix VAN9001 error in Valorant

To fix the VAN9001 error in Valorant, the only way is to enable secure boot on your computer.

To begin with, you have to reboot your PC and press “F2” to enter the BIOS, and change “Secure Boot” to “Enabled”.

Here’s a step by step guide on how to enable secure boot on your computer:

  1. Restart your computer.
  2. Press “F2” to enter the BIOS.
  3. For Alienware, Inspiron, and Vostro, visit Secure Boot > change Secure Boot to Enabled > press F10 to save and exit.
  4. For OptiPlex, Precision, Wyse, and XPS, visit Secure Boot > Secure Boot Enable > Check Secure Boot Enable > Apply > Exit > Save.

After saving and exiting the BIOS, it will reboot your PC.

Now, launch Valorant and you will not get the VAN9001 error.

What’s Next

How to Fix VAN9003 Error in Valorant

How to Fix Error Code 46 in Valorant

Best Valorant Usernames

Arsalan Rauf
Arsalan Rauf

Arsalan Rauf is an entrepreneur, freelancer, creative writer, and also a fountainhead of Green Hat Expert. Additionally, he is also an eminent researcher of Blogging, SEO, Internet Marketing, Social Media, premium accounts, codes, links, tips and tricks, etc.

www.greenhatexpert.com

Filed Under: Gaming, How to

How to Get Gil by Guilded in Roblox

Last Updated on November 16, 2022 By Arsalan Rauf

Gil is an avatar that you can get if you are a Roblox user if you have linked your accounts with Guilded.

Guilded is a messaging app that is same as Discord and designed for gamers.

The app is great for gaming with clans, friends, guilds, communities, LFG, and teams.

You can receive unlimited emotes and it contains an ideal voice chat with rooms, broadcasting and whispering.

Additionally, video chat is also available with screen sharing in high resolution and creates threads to manage your conversations.

It contains powerful servers with scheduling, calendars, roles as well as permissions.

In this post, I will guide you on how to get Gil by Guilded in Roblox, the exclusive skin by Guilded.

How to Get Gil by Guilded in Roblox

To get Gil by Guilded in Roblox, the first thing is to link your Roblox account with Guilded, the messaging app.

After linking your Roblox account with Guilded, you’ll get a code that you can redeem by visiting the code redemption page.

Here’s a step by step quick guide on how to do this:

#1 Step: Download the Guilded app

  1. Download the Guilded app from the App Store and Google Play Store.

#2 Step: Sign up for Guilded

  1. Go to Guilded and tap on the “Sign up” button.
  2. Provide your name.
  3. Enter your email address and password.
  4. Choose “I’m looking to join or find a server instead”.

#3 Step: Add Roblox to Guilded

  1. Tap on the three dots.
  2. Select “View profile”.
  3. Tap on the “+” icon under “Games”.

#4 Step: Link Roblox to Guilded

  1. Tap on “Select a game”.
  2. Find “Roblox” and select it.
  3. Tap on “Add game”.
  4. Tap on “Continue with Roblox”.
  5. Sign in to your Roblox account.
  6. Choose “Give Access”.

Note: If you’re encountering a “You are not allowed to use this application” error, follow our guide on how to fix it: https://www.greenhatexpert.com/not-allowed-to-use-this-application-on-guilded/.

#5 Step: Copy the code and redeem it via Roblox redemption page

  1. Get and copy the code in your Guilded messages.
  2. Visit Roblox redemption page: https://www.roblox.com/redeem.
  3. Sign in to your main Roblox account.
  4. Paste the code and select “Redeem”.

That is it, this is how you will successfully redeem the Gil by Guilded skin!

To get it, you need to go under Avatar > Recent > All > Gil by Guilded.

What’s Next

Free Roblox Accounts With Robux

How to Fix “You are not allowed to use this application” on Guilded

How to Fix “Launching Experience” in Roblox

Arsalan Rauf
Arsalan Rauf

Arsalan Rauf is an entrepreneur, freelancer, creative writer, and also a fountainhead of Green Hat Expert. Additionally, he is also an eminent researcher of Blogging, SEO, Internet Marketing, Social Media, premium accounts, codes, links, tips and tricks, etc.

www.greenhatexpert.com

Filed Under: Gaming, How to

How to Link Your Roblox Account to Guilded

Last Updated on November 16, 2022 By Arsalan Rauf

For limited time rewards, you can link your Roblox account to Guilded.

Guilded is a messaging app that is same as Discord and designed for gamers.

The app is great for gaming with clans, friends, guilds, communities, LFG, and teams.

You can receive unlimited emotes and it contains an ideal voice chat with rooms, broadcasting and whispering.

Additionally, video chat is also available with screen sharing in high resolution and create threads to manage your conversations.

It contains powerful servers with scheduling, calendars, roles as well as permissions.

In this post, I will guide you on how to link your Roblox account to Guilded.

How to link your Roblox account to Guilded

To link your Roblox account to Guilded, you have to install Guilded from the Google Play Store or App Store and after that, create an account.

After creating an account, see your profile, add a new game, select “Roblox”, sign in to your Roblox account and allow access to Guilded.

Here’s a quick procedure that will help you how to do this:

#1 Step: Download the Guilded app

  1. Download the Guilded app from the App Store and Google Play Store.

#2 Step: Sign up for Guilded

  1. Go to Guilded and tap on the “Sign up” button.
  2. Provide your name.
  3. Enter your email address and password.
  4. Choose “I’m looking to join or find a server instead”.

#3 Step: Add Roblox to Guilded

  1. Tap on the three dots.
  2. Select “View profile”.
  3. Tap on the “+” icon under “Games”.

#4 Step: Link Roblox to Guilded

  1. Tap on “Select a game”.
  2. Find “Roblox” and select it.
  3. Tap on “Add game”.
  4. Tap on “Continue with Roblox”.
  5. Sign in to your Roblox account.
  6. Choose “Give Access”.

After selecting “Give Access”, it will link your Roblox account to Guilded successfully!

Note: If you’re facing a “You are not allowed to use this application” error, follow our guide on how to fix it: https://www.greenhatexpert.com/not-allowed-to-use-this-application-on-guilded/.

What’s Next

Free Roblox Accounts With Robux

How to Fix “You are not allowed to use this application” on Guilded

How to Fix “Launching Experience” in Roblox

Arsalan Rauf
Arsalan Rauf

Arsalan Rauf is an entrepreneur, freelancer, creative writer, and also a fountainhead of Green Hat Expert. Additionally, he is also an eminent researcher of Blogging, SEO, Internet Marketing, Social Media, premium accounts, codes, links, tips and tricks, etc.

www.greenhatexpert.com

Filed Under: Gaming, How to

How to Fix “You are not allowed to use this application” on Guilded

Last Updated on November 16, 2022 By Arsalan Rauf

Are you facing a “You are not allowed to use this application” on Guilded?

The next part of the error is, “You can try switching accounts to continue”.

You will get this error message when you’re trying to link a Roblox account under the age of 13 to Glided.

If your age is set to under 13 on Roblox, you will not be allowed to link your Roblox account to the Guilded app.

In this post, I will tell you how to fix the “You are not allowed to use this application” on Guilded/Roblox.

How to Fix “You are not allowed to use this application” on Guilded

To fix “You are not allowed to use this application” on Guilded, the only way is to create a new Roblox account and set your age to 18 years old and above (e.g. Dec 31, 2002).

After creating a new account on Roblox, link it to Guilded, copy the code, and redeem it in your main account.

The reason behind it is that Guilded only allows you to link your Roblox account if you’re of age.

Here’s a quick step by step guide (please follow the steps below):

  1. Make a new Roblox account by visiting https://www.roblox.com/.
  2. Set your age to 18 years old or above (e.g. December 31, 2002).
  3. Download the Guilded app and sign up/register.
  4. View your Guilded profile.
  5. Tap on the “+” icon under “Games”.
  6. Search for “Roblox” and select “Add game”.
  7. Choose “Continue with Roblox” and log in to your newly made account.
  8. Complete the verification and select “Give access”.
  9. View your Guilded messages and copy the code.
  10. Sign out of your new account > log in to your main account > visit Roblox.com/redeem > paste the code > Redeem.

The code can be redeemed on your main Roblox account instead of your secondary account.

To complete this, log out of your new Roblox account, sign in to your main account, and visit the redemption page.

What’s Next

Free Roblox Accounts With Robux

How to Fix “Launching Experience” in Roblox

How to Fix “The chat filter is currently experiencing issues” in Roblox

Arsalan Rauf
Arsalan Rauf

Arsalan Rauf is an entrepreneur, freelancer, creative writer, and also a fountainhead of Green Hat Expert. Additionally, he is also an eminent researcher of Blogging, SEO, Internet Marketing, Social Media, premium accounts, codes, links, tips and tricks, etc.

www.greenhatexpert.com

Filed Under: Gaming, How to

  • « Previous Page
  • 1
  • …
  • 55
  • 56
  • 57
  • 58
  • 59
  • …
  • 81
  • Next Page »


Recent Posts

  • Free DeepSeek Accounts 2025
  • Free Zoho Mail Accounts 2025
  • Acudepot Discount Codes 2025
  • Free Blackshot Accounts 2025
  • Free GMX Email Accounts 2025
  • Songtrust Discount Codes 2025
  • Uzicases Discount Codes 2025
  • Cardillo Promo Codes 2025
  • Free DriverFix License Keys 2025
  • Avast Secureline VPN Activation Codes 2025

Recommended Posts

Create a Gmail Account Without Phone Number

Free Course Hero Account

Crunchyroll Accounts

Cracked Apps

Free Pokemon Go Accounts
Onlyfans Free Accounts
Free Chegg Accounts
Free Paypal Accounts
Free Gmail Accounts
Funny Steam Names

Categories

  • Apps
  • Apps for PC
  • Blogging
  • Discord
  • Facebook
  • Gaming
  • Grammar
  • Guide
  • How to
  • Instagram
  • Messaging
  • OnlyFans
  • Pinterest
  • Reddit
  • SEO
  • Snapchat
  • Social Media
  • Spotify
  • Steam
  • Telegram
  • TikTok
  • Twitch
  • Twitter
  • Whatsapp
  • WordPress
  • YouTube
  • Home
  • Social Media
  • Messaging
  • About
  • Submit Guest post