Green Hat Expert

  • Home
  • Social Media
    • Instagram
    • TikTok
    • Snapchat
    • Facebook
    • YouTube
    • Twitter
  • Messaging
    • Discord
    • Telegram
    • Whatsapp
  • About
  • Submit Guest post
You are here: Home / Archives for Blogging

How Google AdSense Pays in India

Last Updated on August 20, 2022 By Arsalan Rauf

Google Adsense is one of the famous monetization techniques used by website owners as well as bloggers. At times, it may be confusing for new users. Despite it has an easy to use dashboard and its help pages. There are always some problems regarding sign up, account approval, account ban and optimization etc.

There is no doubt in saying that Adsense is a plug and play advertising network. It does not mean that you do not need to learn anything about it. Learn about it and take the full advantage of the opportunity. It allows you to make a lot of money instead of pennies.

People often ask:

How does Google Adsense pays in India?

Does it pay by cheque or through local bank transfer or EFT?

AdSense Payment in India:

Adsense supports different payment options for different countries around the globe. It supports Western Union Quick cash, EFT transfer and cheque facility. It is not an easy task to get an Adsense account in countries like India and Pakistan as compared to USA, UK and Australia. It is because of spamming and fake Adsense account in Pakistan and India.

In India, Adsense was offering Cheque and EFT in the previous years. They converted your earning into INR and then make your payment. Usually, the Adsense conversion rate of USD to INR is high so you may not find it a problem for you. Adsense cheques need time to reach India from 10-15 days. It takes a couple of days for its clearance.

Now Adsense has increased its payment options in different countries and they have also introduced EFT payment for Indian users or publishers.

If you are a beginner at Adsense, you need to keep some pin points in your mind:

  • While signing up, make sure all details are accurate (name, address, etc.)
  • Your name should be the same as that you used on your bank account. The name on your AdSense cheque will be similar to your account name.
  • AdSense will send a PIN number to you at the address you used when signing up. It will be functional for an address verification too, before generating a payment.
  • With Adsense EFT payment, you can get payment to another payee name as well by changing it.
  • Adsense will soon add telephone support for all AdSense publishers. This system is already in beta testing since June, 2014.
  • You can also refer to the official guideto read more about AdSense payment policies.
  • You can update your payment preference before the 15th of a given month.
  • The user can also put a minimum payment threshold for your payment, and it should be greater than $100.

You can read a piece of writing from the official AdSense India payment page below:

AdSense users in India will get standard delivery checks mailed via the local courier service Blue Dart for no additional charge. Cheques mailed by Blue Dart should reach within 10-30 days of the cheque date. Blue Dart is not able to service all areas throughout India. If you live in a location, they do not service, your cheque will be sent by Registered Post and should arrive at you within 2-3 weeks of the mailing date.

If the cheque is already issued, you can use Bluedart tracking to keep yourself update for your cheque status. If you have not got your AdSense cheque within 60 days of the issue, you can use this form to request a re-issue of the cheque.

I hope that you liked this post about how Google Adsense pays in India. You have got the answers. Still have questions? Do not hesitate to ask in the comment section.

Do not forget to share this post.

Arsalan Rauf
Arsalan Rauf

Arsalan Rauf is an entrepreneur, freelancer, creative writer, and also a fountainhead of Green Hat Expert. Additionally, he is also an eminent researcher of Blogging, SEO, Internet Marketing, Social Media, premium accounts, codes, links, tips and tricks, etc.
www.greenhatexpert.com

Filed Under: Blogging, WordPress Tagged With: adsense wire transfer sbi, google adsense india, google adsense minimum payout, google adsense payment date in india, google adsense payment not received, google adsense payment settings, how to receive payment from google adsense, payment threshold adsense india

How To Enable Direct Bank Transfer for AdSense Payment in India

Last Updated on August 20, 2022 By Arsalan Rauf

Earlier I shared the post about how Google Adsense pays in India. I told about Adsense that they are planning to enable EFT payment for Indian Adsense users. EFT is aka Electronic fund transfer. It will make sure that your Adsense earnings will be deposited into your account directly. It will save you the time for receiving the cheque and cheque clearance time. Being an Adsense publisher, will be helpful for you and will make your work paperless. In this post, I shall explain everything you need to get EFT payment for your Adsense account.

Also read:

  • Best WordPress plugins to Protect Adsense Account

How to Configure Wire transfer for Indian AdSense publishers

The whole setup process will take more or less 15 minutes. I highly suggest it do that to save time for your future payment. Follow the instructions step by step, and keep your mobile phone near you. As you may need to call your bank customer representative to get the Swift and IFSC code. By using direct bank deposit method, you can change the payment threshold according to your own choice. And can hold the payment for up to 1 year. So let’s go through this quick tutorial to enable EFT payment for your Adsense account.

  • Log in to your AdSense account and Click on the gear box and select payments.
  • Click on Payment settings under payment page.
  • Click on add a new form of payment.

You need to enter your bank account details on the next screen. Two important details you need to get from your bank. It includes Swift BIC and IFSC code. In order to get Swift and IFSC code for your account, simply call your bank representative and ask for it. Most of the people use ICICI bank saving account, they use following swift code to get payment: ICICINBBNRI. If your bank is ICICI bank, then they will give you two swift code ICICINBBNRI for INR and CHASUS33XXX for USD. You will enter the swift code for INR and the bank will take care of the conversion. If your bank account is different from ICICI then I recommend you re-confirm it from your bank customer care. Current account for ICICI bank, you need to use ICICINBBCTS.

Click on save payment and that is all.

Now you will get money directly from your bank account. There are some more detail that you need to know due to the updated payment policy of Adsense.

  • You can update your payment method before 15th of any month.
  • You can now use any AdSense payment threshold greater than minimum ($100) payment 100$ is the minimum threshold to set.
  • You can hold your payment until any specific date; maximum up to 1 year. (Though I do not recommend using this feature, as you may face issue if AdSense decides to ban your account).

Direct bank deposit feature is used by most of the Indian Adsense publishers and it makes it easy. If you want to update your Adsense payment settings, log in to your Adsense account and update the payment settings.

FAQ about AdSense EFT Payment:

  • What is the minimum payment threshold for EFT payment?
  • Minimum payment threshold is $100
  • Is Pin verification necessary after AdSense introduced EFT payment?
  • Pin verification is essential process from AdSense to verify your address, so yes; it is!

In case if you are using another bank account such as HDFC, SBI and Axis so share the swift code in the comment section. So it will be beneficial for our other users. Do not forget to share this post with other Adsense publishers in India.

Arsalan Rauf
Arsalan Rauf

Arsalan Rauf is an entrepreneur, freelancer, creative writer, and also a fountainhead of Green Hat Expert. Additionally, he is also an eminent researcher of Blogging, SEO, Internet Marketing, Social Media, premium accounts, codes, links, tips and tricks, etc.
www.greenhatexpert.com

Filed Under: Blogging, WordPress Tagged With: adsense bank account verification, adsense payment paypal, adsense payment youtube, eft payment in india, google adsense payment date, google adsense payment not received, google adsense payment settings, how to receive payment from google adsense

Ubersuggest Review 2022 – Freemium Keyword Suggestion Tool

Last Updated on August 3, 2022 By Arsalan Rauf

Ubersuggest Review 2022 – Free Keyword Suggestion Tool by Neil Patel

Do you know that there is a new keyword research tool in the market?

If no, why not take a look at it.

Firstly, it seldom happens that you find a new tool in the market.

Secondly, most of the keyword research tools are not free of cost but do not worry newbies it is free of cost.

Ubersuggest is a new tool which is available free of cost on Neil Patel’s website.

If you have not used it for SEO and content marketing, it is the right time to update your keyword research tools list.

I personally use it for SEO and find related keywords for my terms.

Apart from free keyword research tools, there are big fish in the market like SEMrush, Moz, and Ahrefs which are paid.

UberSuggest is the best free tool that you should consider while doing SEO of your website or content.

This keyword research tool was declining but Neil Patel has turned the tables so you can get the most out of it.

He not only acquired it but also launched it on his own website therefore, it has become a part of his website.

The updated version of UberSuggest gets the suggestions from Google Suggest and Google Keyword Planner that is the reason it is rising among the bloggers, SEO experts, content marketers.

So, it is in improved shape isn’t it?

I have been using it for more than two months and I could not stop myself from praising it.

Let’s see the features of this tool which is free of cost and schway.

1: Collects Data from Google Keyword Planner

The first feature that Ubersuggest offers is the volume data that it derives from Google keyword planner.

Google Keyword Planner is no longer available free of cost, you have to run a campaign to get keyword ideas and volume data. It is surprising in nature but it is surprising in a good way.

So if you are searching for keyword research tools which fulfill your needs. Ubersuggest does it free of cost and in a convenient manner.

Ubersuggest also pulls data from Google Keyword planner but if we compare it with Google keyword planner. I highly recommend this tool due to its user-friendly interface.

Ubersuggest also provides CPC (cost per click), search volume, search engine difficulty and paid difficulty.

It is all the basic information you need for a keyword which is available there.

Furthermore, this keyword suggestion tool also shows you the percentage of your chance to rank in the top 20 results of Google.

Google SERPs are also there which show domain score, estimated visits to that ranked domain and social media shares.

Keyword also gives you suggestions to add it in your content to get more traffic which is another positive element.

2: Ubersuggest Filters:

This tool also offers filters to narrow down your research and helps you to find the suitable keyword for your SEO.

It includes search volume where you can put numbers to limit it down according to your choice.

Furthermore, you can also select the range of paid difficulty and set the range from minimum to maximum. Same is the case with CPC (cost per click) and SEO difficulty.

Lastly, you can also include and exclude keywords which you want to include and exclude. You can also apply those settings and reset them to default whenever you want.

Want to save the keywords data to your drive? Do not worry, it also gives you an option to export the file to your computer.

3: Suggestions from Google Suggest

Finding good and easy long tail keywords to rank is one of the burning questions for modern SEO and content marketers.

The search engine of Google is becoming smarter and smarter, therefore, SEO friendly content is not everything. You need to write a quality content which encompasses all the questions and answers your viewers are looking for.

Answering queries is one of the best ways to rank for Google Voice Search and it also sends a signal to Google about relevance.

For example, I want to do SEO and looking for answers to my questions, my possible questions are:

  • How to do SEO of Website?
  • How to Increase traffic of my website this year?
  • What are the best tools for SEO?
  • How to get maximum score in Google Pagespeed Insights?
  • How to do Free SEO?

And so on.

Any blogger can write good content on this topic but writing content is not a hard nut to crack.

Firstly, your task is to find the related questions and answer the questions.

When you search for term like “SEO” in the keyword research tools, you will get massively related keywords.

If we look back, old Ubersuggest would give you keywords suggestions that include SEO and other bunch of words. For example:

  • SEO 2021
  • SEO 2022
  • SEO trends
  • SEO tips

How to solve this issue in the first place? The first way is to get a paid tool. For example, you use Ahrefs, and type the term “SEO” and it will give you a bunch of keywords.

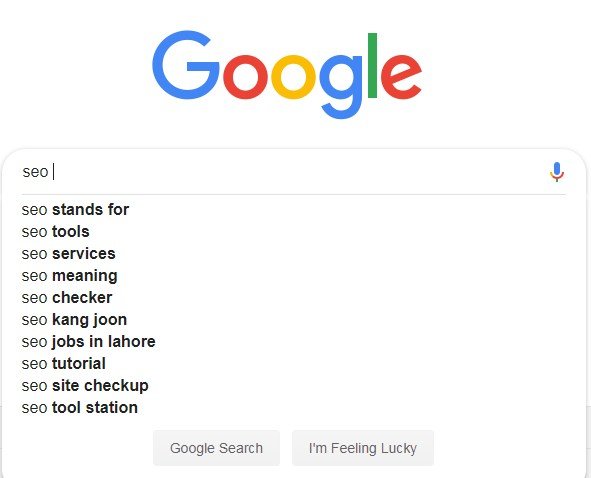
You can also visit Google to get suggestions provided by it. If you want to write content on SEO then you need to visit Google and type the term “SEO” and wait.

ubersuggest 1

Here you get ideas for waiting for a while.

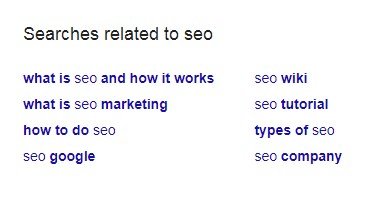
After hitting the enter, I also scroll down and look at the end to get more suggestions. According to Google, these terms are related to SEO term.

ubersuggest 2

Those are good tips to write content, but they have drawbacks.

  1. Moz is not free of cost. Most of the users/bloggers cannot afford it.
  2. Using Google’s suggestions need enough time.

In this situation, Ubersuggest comes handy and solves your problem of finding long tail keywords.

So you get everything at once place. It gives you keyword difficulty not only as search engine ranking but also as paid listings.

When you start using it, you come to know it is easy to use and you can get what you want. I personally use it and recommend it.

Ubersuggest not only gets data from Google Keyword planner but also gives you suggestions from Google aka LSI keywords.

Currently, it is in good hands and improved from the previous version. In a nutshell, Ubersuggest does all the work for you free which you expect from a premium keyword research tool.

It solves all the problem with ease.

4: Simple User Interface

Ubersuggest has the simplest and easiest interface. Just enter the term and hit enter and you are there. It gives you all the data within a couple of seconds.

You can use filters to exclude phrases from your keyword to get whatever results you want.

It is very easy to use that you do not need any demo or video to guide you. Still, there are a number of videos available on YouTube if you want to learn something.

It is available in various languages, just choose your desired language and click the search button.

5: Analyzing Your Competition

The search bar will allow you to type the domain of the competitor and analyze its traffic as well as the keywords he is getting traffic from or ranking for.

ubersuggest 4
ubersuggest 5

Scroll down to get more insights, it allows you to see the best performing pages, the social shares of that URL, and the targeting countries.

You can also see the backlink profile of that site when you visit the “Backlinks” tab and put the domain there to get the overview.

This feature also helps you to locate the referral links of your competitor from where he/she gets the links.

It can also be used to analyze your site too.

6: Covers SEO Difficulty & SERP Analysis

Assessment of your competition is a part and parcel when it comes to dealing with the keywords you are trying to rank for. Therefore, this keyword tool analyzes your competition as well.

You will come across the SEO difficulty of those keywords whenever they are shown in the tool.

It is a metric they have developed in order to let you know whether it is a hard or easy keyword for you.

Other SEO tools also use this metric (keyword difficulty score) to identify the nature of the keyword, it can be used to determine the competition.

In most cases, the tool shows the accurate difficulty score.

Apart from the difficulty checker, it also has SERP analyzer to make it more productive.

This way you can get a bird’s eye view of your competitor.

All the metrics offered by Ubersuggest are helpful and that makes it one of the best SEO tools in the market. In many ways, it is an ideal tool and I personally recommend and use this tool due to this enormous data.

SEO Audit…

Site audit option is also added to do the SEO audit of your site.

Ubersuggest will give you a lot of helpful insights in audit:

  • Your ranked keywords
  • Backlinks profile
  • Errors you need to fix on your site

The issue is that it does not guide you how to fix that specific issue.

Ubersuggest As A Tool

In back days, it was free but now it is extremely cheap as compared with other alternatives in the market.

But still it works as a free tool but there is a limitation. Overall, it is a good tool and I personally use it.

The advanced SEO filters are also available for keywords, it will not charge much for it.

How schway is that?

It is a gift for newbies, bloggers and content marketers. For me, it is replete with pros. It is also an alternative to keywords everywhere.

Am I missing something? Tell me in the comments.

Do not forget to share this post and also share your experience of using it.

Arsalan Rauf
Arsalan Rauf

Arsalan Rauf is an entrepreneur, freelancer, creative writer, and also a fountainhead of Green Hat Expert. Additionally, he is also an eminent researcher of Blogging, SEO, Internet Marketing, Social Media, premium accounts, codes, links, tips and tricks, etc.
www.greenhatexpert.com

Filed Under: Blogging, SEO

How to Add Your WordPress Site in Yandex Webmaster Tools

Last Updated on July 27, 2022 By Arsalan Rauf

How to Add Your WordPress Site in Yandex Webmaster Tools

Do you want to add your website to Yandex webmaster tools?

Do you want to connect your site to Yandex webmaster tools?

If yes, this post is for you.

Webmaster tools including Google search console and Bing webmaster help you to optimize your website, manage robots.txt, check site errors, monitor the traffic and so on. In this post, I shall show you how to add your WordPress site in Yandex webmaster tools to monitor your search engine traffic.

What is Yandex?

Yandex is another popular search engine like Google and Bing. It is based in Russia.

You can optimize your website for SEO in Yandex to get more visitors from Russia.

what is yandex

Yandex has a variety of tools like image search, generalized search engine, email, maps, videos and so on. It also has webmaster tools that help you to monitor traffic stats, rank your website, search queries, keywords etc.

You can connect your WordPress website with Yandex by using Yoast SEO plugin. It is similar to Bing webmaster tools and Google search console.

Adding WordPress Site in Yandex Webmaster Tools

Before I start, you will need a Yandex webmaster tools account to get started or connect your website. After creating your account, login to your WordPress site to configure Yandex webmaster tools using Yoast SEO plugin.

Now let’s have a look at how can you add your website in Yandex webmaster tools and start optimizing it.

Step 1: Create an Account at Yandex

First of all, you need to login to your Yandex webmaster tools account. If you do not have an existing Yandex account, then you can create one using this link.

Create an Account at Yandex

After creating the account, you will see the Yandex webmaster page.

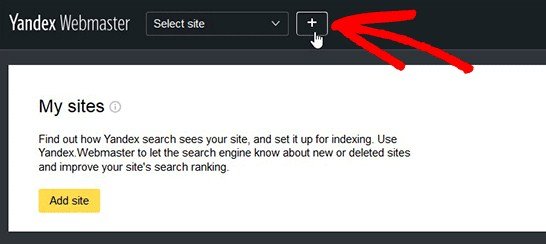
On this page, you will have to click on the (+) button in the top bar to add your site in Yandex.

add your site in Yandex

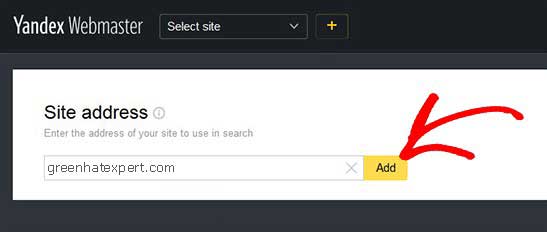
In the address field of website, you will add the full domain name of your website and click on the Add button.


add your domain name

Note: If you have ‘www’ in your domain URL, then you have to add it before the domain name like (www.greenhatexpert.com)

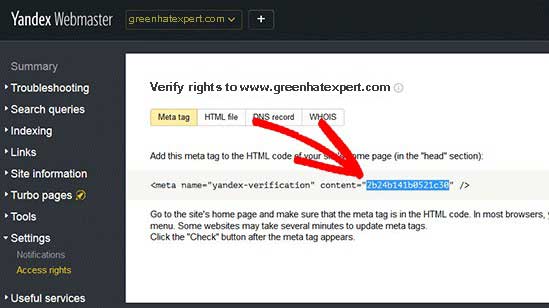
On the next page, you will be asked to verify website ownership by adding meta content in your WordPress website. Now copy the content code from this page because you will need it in the second step.

copy the content code

Step 2: Login to WordPress Admin Area and Add the Code

Now login to your WordPress admin area and put the verification code in the Yoast SEO webmaster settings.

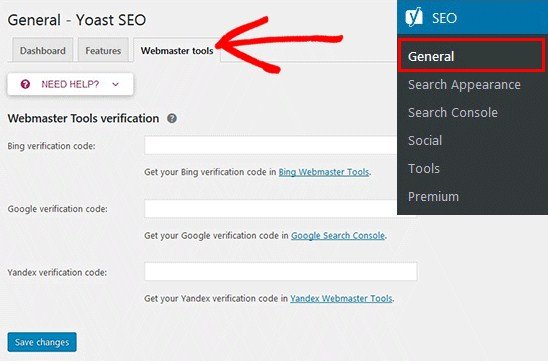
Simply go to SEO>General area and click on the Webmaster tools tab.

general seo webmaster

Now paste the code in the Yandex verification code field and click on the save changes button to save changes.

paste code save

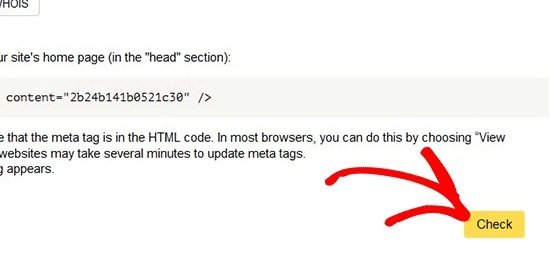
After adding the code in your website, you need to revisit the Yandex webmaster tools page where you copied the code and now click the Check button to verify the ownership.

check button rights

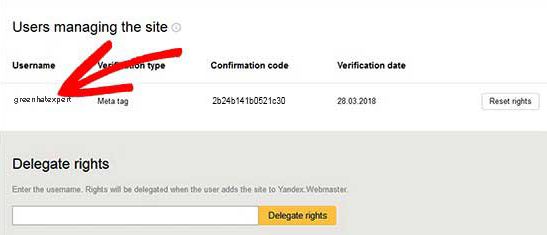
After successful verification, it will display your username which you can use to manage your website in Yandex webmaster tools. In addition, you can also delegate the rights to other users by adding their username and clicking on the Delegate rights button.

username rights

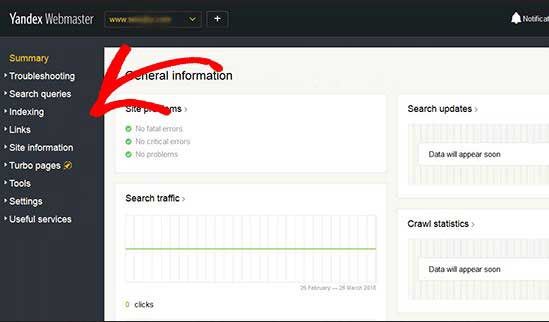
now you have verified and added your website in Yandex webmaster tools. You can see search errors, traffic stats, search queries, internal and external links, robots.txt analysis, site information, audit pages for mobile on the Yandex dashboard. Use the menu on the left side of the screen to get any information that you need.

yandex dashboard

Yandex webmaster tools also offer options for website optimization which are filtered from troubleshooting to important settings like .htaccess and robots.txt.

I hope that this post helped you to learn how to add your WordPress site in Yandex webmaster tools.

You may also want to read our post on Mobile SEO.

Do not forget to share this post.

Arsalan Rauf
Arsalan Rauf

Arsalan Rauf is an entrepreneur, freelancer, creative writer, and also a fountainhead of Green Hat Expert. Additionally, he is also an eminent researcher of Blogging, SEO, Internet Marketing, Social Media, premium accounts, codes, links, tips and tricks, etc.
www.greenhatexpert.com

Filed Under: Blogging, SEO, WordPress Tagged With: add site to yandex, baidu webmaster tools, google webmaster tools, yandex cy, yandex meta tag, yandex site check, yandex verification meta tag, yandex webmaster blog

How to Increase Pageviews and Reduce Bounce Rate in WordPress

Last Updated on July 27, 2022 By Arsalan Rauf

Do you want to increase pageviews and reduce bounce rate?

If yes, this post is for you.

How to Increase Pageviews and Reduce Bounce Rate in WordPress

Most bloggers think that it is a hard task to get people to their website or blog. Most expert bloggers or SEO experts believe that getting people to their blog is an easy task. To let the user stay on your site is a hard task. Most users visit your site and leave it without going through the second page. When the user does not visit the second page, it increases the bounce rate. In addition, it also decreases the pageviews per visit.

In general, it affects your ad revenue and decreases it. In this post, I shall tell you some tips and tricks to increase pageviews and reduce bounce rate in WordPress.

Before we start

Let’s start with basics to consider technology and terminology. Bounce rate stands for the percentage of visitors who enter your website and bounce (leave the site) rather than visiting other pages of the site. Page view represents the load of a single page on an internet site. I use Google Analytics to track my data. You can use other analytics services or you can also install Google Analytics on your WordPress website.

Now I have discussed the basic terminology and you are thinking that why do these numbers matter?

If you have a website which is primarily monetized by banner ads, then the number of pageviews do matter.

If you want to get a loyal users or audience, then the number of bounce rate also matter.  In addition, the lower your bounce rate, the better ads CPC(cost per click) or eCPM(cost per thousand) you will get. When the same user visits the next page, your ad provider will show a better ad to serve him and it will give you a higher CPC or eCPM. I have done a lot of experiments on my own websites so the methods I shall share with you are the ones that I used in the past and know that they will work.

P.S. These techniques will ONLY work if you have Good Content.

Interlink Your Posts

When you will interlink your other posts within the new post content, it will increase in pageviews. In WordPress 3.1 version, it has become an easy task to interlink. Simple you need to search for the post which you want to link while adding links. Interlinking techniques work great when your website is full of great articles. If you are a beginner, you will be a bit limited in this regard.

So how do you go back and interlink older posts when you will have something new?

You need to do it manually but it is time taking task.

There are plugins that let you automatically link keywords in WordPress.

Additionally, interlinking not only helps to increase pageviews but also reduces bounce rates. It is also helpful in SEO as well.

Show Related Posts After the Post

Why does user leave your blog?

The user leaves your blog after reading the post because you are not showing them what to do next. You should show the user a list of ‘related posts’ or ‘other popular posts’. It may lead them to see another post in your website. There are a number of ways to add or show related posts in your website. If you want to use a plugin to show related post. You may like our post on best related posts plugin for WordPress.

Show Excerpts on Front / Archive Pages

If you show excerpts on front/archive pages, it has two advantages. First of all, it will decrease the page load time. Secondly, it will increase the pageviews. You should not show full posts on your front page or archive page. Imagine if you have 25 images in one post, then have 5 of those on one page. It will give a terrible user experience because of super long page and slow load time.

It will make the user to leave your website. Most of good themes including Genesis, Headway and Thesis already have this as built-in option.

Splitting up Long Posts

Are you writing super long posts?

You can split it into multiple pages by using WordPress <nextpage> tag in your post. Just add it wherever you want to add it, then it will split your post into multiple pages. You may see some websites which split their posts into two pages or even into five pages.

But you need to be careful in this method as well. It is because if you do not have a sufficient amount of content on each page, then the user may get pissed of. There are several famous websites which are using this technique including Forbes, Wall Street Journal and NY Times etc.

Interactive Sidebar

Your sidebar plays an important role in reducing bounce rate and increasing pageviews. You can display your popular posts in the sidebar. You can also customize it to show popular posts by week, month and all time. The blogger can also show the most recent posts only on single post pages.

I have seen different websites that create custom images to navigate to their specific posts. You can integrate other sections of your website in your sidebar.

Encourage Random Browsing

You should encourage the user for random browsing. Make him curious to click on the buttons available on your website.

Results

An average user spends only one page per visit on your website and leaves it. When I started to see the basic data, my website bounce rate was in 70% range. After observing that, I have started implementing the above changes on my site.

Bounce rate decreased from the average of 70% to 45%. Pageviews per visit increased to 2.79/pages per visit. An average time spent on the page went to the average of 2 minutes and 40 seconds.

What is your strategy to increase pageviews and reduce bounce rate? Am I missing something?

Share with us in the comment section.

Do not forget to share this post.

Arsalan Rauf
Arsalan Rauf

Arsalan Rauf is an entrepreneur, freelancer, creative writer, and also a fountainhead of Green Hat Expert. Additionally, he is also an eminent researcher of Blogging, SEO, Internet Marketing, Social Media, premium accounts, codes, links, tips and tricks, etc.
www.greenhatexpert.com

Filed Under: Blogging, Guide, SEO, WordPress Tagged With: bounce plugin, how to check bounce rate in wordpress, how to increase page views in wordpress, how to increase page views per visit, increase page views bot, reduce bounce rate plugin, seyiny's bounce plugin, wordpress plugins to decrease bounce rate

How to Optimize for Google’s Featured Snippets to Build More Traffic

Last Updated on July 27, 2022 By Arsalan Rauf

Have you noticed that it has become a hard nut to crack to build referral traffic from Google?

It is because the competition has become tougher than before.

Google search results or Google search engine is not generating as much traffic as it used to generate in the past.

How do you adapt?

This post will teach you how to optimize your content to one of the most recent changes of Google that is, featured snippets.

What are featured snippets?

Featured snippets are selected results by the Google bot for the top of Google’s organic results below the ads in a box.

The objective of featured snippets is to answer the question of the user. They are also known as ‘answer boxes’. Being featured means getting additional brand exposure in Google search results.

There are two studies confirming the claim:

  • Ben Goodsell reports that CTR or click through rate on a featured page increased from 2 to 8 % once it is placed in an answer box, with revenue from organic traffic increasing by 677%.
  • Eric Enge highlights an increase of 20-30% in traffic for Confluentforms.com when they held the position of featured snipped for the query.

Types of featured snippets

There are three major types of featured snippets:

  • Paragraph (an answer is given in text). It can be a box contains text inside or a box with both image and text inside.
  • Table (an answer is given in a table)
  • List (an answer is available in a form of a list)

Here is an example of paragraph snippet with an image:

Image

According to Getstat, the most popular featured snippet is “paragraph” type:

Image

Featured snippets or answer boxes?

Since we are dealing with a pretty new thing, so the terminology is pretty loose for this one.

Many people refer featured snippets as answer boxes and it is because there is an answer available in a box.

So there is nothing wrong with the terminology. It creates a confusion in Google because it shows a quick answer, an estimate or a definition etc on the top without linking to the source:

Image

Let’s stick to the term ‘featured snippet’ in order to avoid the confusion. When there is a URL featured in a box because it gives an extra exposure to the linked site. It is an important thing for content publishers.

Image

Do I have a chance to get featured?

According to research by Ahrefs, 99.58% of featured pages already rank in top 10 of Google. So if you are already rank high for related search queries, you have good chance to get your featured snippet.

On the other hand, Getstat also claims that 70% of the snippets are from outside of the first position in Google. Therefore, it is necessary to be ranked in top 10. In order to get featured, you do not have to be at #1.

There is no doubt in saying that the most featured site is Wikipedia.org. If Wikipedia is already featured for the search query, it will be extremely hard for you to beat it. It does not mean that you lose heart and you should not try.

According to the analysis performed in a study, there are some types of search queries get featured snippet results most often:

  • DIY processes
  • Health
  • Financial
  • Mathematical
  • Requirements
  • Status
  • Transitional

Ahref’s study expands the list of popular topics using their most frequently words which appear in featured snippets:

Image

The following types of search queries usually do not have answer boxes:

  • Images and videos
  • Local
  • Shopping

To sum up the above discussion:

  • You need to be in the top 10 ranking to get featured. So the big part of being featured is to improve your overall rankings in Google. It includes long-tail informational queries and they are your lower-hanging fruit.
  • If your niche is health, DIY or finance, you have the highest chance of getting featured.

Identify all kinds of opportunities to be featured

Start with good old keyword research

According to the multiple studies, the majority of featured snippets are from long tail keywords. The more words you type in the Google search box, the higher the chances there will be a snippet.

It is a good idea to begin with researching your keywords.

When performing keyword research with featured snippets in mind, note that:

  • You need to start with question type search queries. It should contain words such as why, what, and how etc. It is because they are easiest to identify.
  • Target informational things not only focus on questions. The aim of featured snippets is to answer the question of the user immediately. Question type queries are not only the reason that builds featured results. According to Ahref’s study, most of the long tail queries with no questions trigger featured snippets in search engine.

It helps if you use a keyword research tool that shows you whether the query makes the featured results or not. Serpstat is one of the best keyword research tools and it combines the keyword research with featured snippet research let’s take an example of keywords that trigger answer boxes:

Image

Use Serpstat to filter the best performing keywords or queries of your competitors by the presence of answer boxes:

Image

This will help you in future for competition too, it will allow you to see the weaknesses and strengths of competitors.

Browse Google for more questions

If you want to further explore the topic, you need to go through Google’s ‘People also ask’ sections whenever you observe one in search results. It gives a huge insight into the questions that Google relates to the topic.

Image

Once you start expanding the questions in Google to see the answer, it will add more and more questions to the bottom of the box:

Image

Identify search queries where you already rank high

First of all, you need to identify the phrases for which you are already ranked highly. It will be the easiest way to get featured snippet after you optimize for answer boxes.

Google Search Console also shows that which search queries are sending you traffic. To get that report you need to click ‘search traffic’ and then ‘search analytics’.

Then check the boxes that will show the position of your pages in Google. You can also see the top performing queries too:

Image

Use the filters to find some question type queries among those:

Image

Go beyond traditional keyword research tools: Ask people

All the above methods are already used for discoveries. Your competitors are also ranking high for those opportunities. What if you go beyond that? Ask your audience, followers, customers how they search and what or which questions they ask.

MyBlogU: Ask people outside your immediate reach

Go away from your target users and select random people to ask what kind of questions they have on a specific topic and what will be their concerns. If you look out of the box, it will give you a fresh understanding.

MyBlogU is a great way to do that. You need to post a new project in the “Brainstorm” section and ask members to contribute their thoughts.

Image

Seed Keywords: Ask your friends and followers

Seed keywords is another tool that enables you to find related keywords with help from your followers and friends. Simply create a search plot, share it on social media and ask your audience and followers to type in the keywords they will use to solve it.

Do not lead your search scenario. It means that you need to avoid guiding people to search the phrase according to your thinking.

Here is an example of a scenario:

Image

And here are the suggestions from real people:

Image

Additionally, you can also create similar surveys using Google Forms or SurveyMonkey.

Monitor questions people ask on Twitter

To monitor questions people ask on Twitter is another way to discover more opportunities. Twitter search supports question mark (?), search operator will filter the results containing a question. You need to put a space between your search term and question mark (?).

Image

I suggest using Cyfe to archive and monitor Twitter results because it gives a minimal dashboard which I can use to get unlimited searches on Twitter.

Image

Once you lack article ideas, you need to log in to Cyfe to see the archive and you can proceed with the above keyword research tools to get exposure to any idea.

Use spreadsheets to organize keyword phrases and questions you discover (see more on this below). Some of these questions may become the whole piece of content and some of them will be subsections of broader articles:

  • I personally do not analyze the search volume to conclude whether any of these questions need to be covered in a separate article or a subsection. According to Ahrefs research, there is no direct correlation between the popularity of the term and whether it will give rise to a featured snippet.
  • Use your best judgement based on your research and niche knowledge. How much you will be able to tell or answer any particular question. If it has a lot to do, you need to separate the article and use the keyword research to identify subsections of the future piece.

Optimizing for featured snippets

Start with on-page SEO

There is no magic button available that can lead your site to get featured. Of course, you need to start with SEO best practices. It is simple because you will get featured if you are ranking high in Google search results for the query.

Randy Milanovic did a good overview of tactics to make your content findable with ease. Do not forget to go through our SEO guide.

How about structured markup?

There are a lot of people who suggest using Schema.org. According to the Ahrefs study, as discussed earlier, there is no correlation between the featured results and structured markup.

So the best way to optimize for featured snippets is to give a better answer. Here are a few actionable tips:

1. Aim at answering each question concisely

In my opinion and observation, Google gives preference to feature an answer that was given within one paragraph.

According to the study of AJ Ghergich cites, the average length of a paragraph snippet is 45 words and the maximum of 97 words. So you need to keep it in mind that how long each answer should be in order to get featured:

Image

It does not mean that your articles should be one paragraph long. Google also gives more preference to long form content that is also known as cornerstone content. It is also a better way to describe it, it is not only about content but it also includes attention grabbing images. Even if you do not believe that cornerstone content gets special treatment in SERPs, paying attention to long articles will help you to encompass more related questions in one piece.

You need to adjust the blogging style of yours:

  • Ask the question in your article (that may be a subheading)
  • Immediately answer the question with a one-paragraph answer
  • Elaborate further in the article

These tactics are also result in higher user retention and it is the best way to make your post well structured. It will be much easier to read as well.

To quote AJ Ghergich,

“When you use data to fuel topic ideation, content creation becomes more about resources and less about brainstorming”.

2. Be factual and organize well

Google loves lists, numbers and steps. I have seen this again and again: for example, answer boxes will list the actual ingredients, time to cook, number of steps, year and city of birth etc.

In your paragraph where you are answering the question, make sure to list useful names and numbers. Get very factual.

In fact, according to the study of AJ Ghergich, the comparison charts and lists are easier way to get featured snippet in Google because Google loves well structured content.

In fact, even for branded queries when a user is searching a particular brand, Google will pick up the table from another website if it has a table, and not from the brand site itself:

Image

It only shows that Google loves well structured, number driven and factual content.

There is no standard markup to structure your content. Google seems to pick up <table>, <ul>, and <ol> and does not require any other pointers.

3. Make sure one article answers many similar questions

In the research of featured snippets by Ahrefs, it is found that once a page gets featured, there is a great chance that it will get featured in a lot of similar queries. So it should be structured and worded in such a way that it can address a number of related queries.

Google is very good at analyzing the synonymic and closely related terms and questions. There is no need to create a separate page that answers each specific question.

Image

Creating a single solid post addressing different related questions is a smart strategy. If you want to get featured in answer boxes. It leads us to the next tactic:

4. Organize your questions properly

In order to combine closely related questions in one post, you need to organize the queries in a proper way. It will also help you to structure your content.

I have a multi level keyword organization strategy which you can apply here as well:

  • A generic keyword makes a section or a category of the blog
  • A more specific search query becomes the title of the post
  • Even more specific queries determine the subheadings of the article and thus define its structure
  • There will be a number of queries which are so closely related and they will all go under a single subheading.

For example:

Image

Serpstat is a helpful tool in this regard, it is helpful in discovering an article idea and then breaking it into subtopics as well. it has questions section that can give hundreds of questions containing your core term and then generate a tag cloud of other popular terms that come up in those questions:

Image

When you click any tag cloud it will filter results to those questions that only have that word in them. These are subsections for your post or article:

Image

Here is a good example of how related questions can help you structure the article:

Image

5. Make sure to use eye-grabbing images

Paragraph featured snippets with images are eye-catching as compared to the regular featured snippets. You will be wondering how can you make an image to be featured in your content in snippets. You are helpless here, it is because Google seems to pick up a random image from your post.

So in order to take care of this section, you need to make sure that all of your images in-article are eye-catching, annotated and branded well. So it does not matter which image Google will feature. You need to visualize your content, put together charts, tables and graphs while working on your post.

Use Bannersnack to create eye-catching images for your brand. I love the functionality of their image editing. It allows you to create graphics quickly and resize them to reuse as banners and social media images and organize them in folders:

Image

6. Update and re-upload the images (WordPress)

WordPress adds dates to image URLs, so if you will update an article using new information, the images will be considered as old. I managed to get a couple of paragraph featured snippets using images once I started updating my images too:

Image

7. Monitor how you are doing

Ahrefs enables you to monitor the queries for which your domain is featured for, so you need to keep an eye on those. When they grow then new ones appear:

Image

Conclusion

It will take a lot of planning and research and you cannot be sure when you will see the results. Especially if you do not possess too many top 10 ranking in Google. So being featured in Google search results is your incentive to work harder on your content, consider it this way. You will also achieve more important goals your way there:

  • You will discover hundreds of new content ideas (and thus will rank for a wider variety of various long-tail keywords)
  • You will learn to research each topic more thoroughly (and thus will build more incoming links because people tend to link to indepth articles)
  • You will learn to structure your articles better (and thus achieve a lower bounce rate because it will be easier to read your articles)

Have you been featured in Google search results yet? Please share your tips and tricks in the comments below.

Do not forget to share this post

Arsalan Rauf
Arsalan Rauf

Arsalan Rauf is an entrepreneur, freelancer, creative writer, and also a fountainhead of Green Hat Expert. Additionally, he is also an eminent researcher of Blogging, SEO, Internet Marketing, Social Media, premium accounts, codes, links, tips and tricks, etc.
www.greenhatexpert.com

Filed Under: Blogging, SEO, WordPress Tagged With: benefits of featured snippets, featured snippet definition, featured snippet example, featured snippets examples, google featured snippets api, google snippets, how to create featured snippets, how to get a featured snippet, how to track featured snippets, types of featured snippets, what is a featured snippet

Best Adsense Invalid Click Protector Plugins for Bloggers

Last Updated on June 25, 2022 By Arsalan Rauf

Every blogger knows about Google Adsense. It is a program powered by Google and it enables you to show ads on your website or blog. When someone clicks on your ads then you earn money. It seems to be an easy task but Adsense is very strict for invalid click activities on Adsense account. In this post, I am going to share best WordPress plugins to protect Adsense or Adsense invalid click protector plugins.

If you want to know about Google Adsense

Read our posts about:

  • How to create an Adsense account
  • Google Adsense Account approval process

Invalid clicks are common all over the world. According to the report, invalid clicks are targeting Asian bloggers most of the time. If you are also facing invalid clicks on your WordPress site, you can protect Adsense account from invalid clicks using plugins. It will also prevent it. Go through this post to know the best WordPress plugins to protect invalid clicks, how to use them etc.

What is Click bombing or Invalid Clicks?

Click bombing or invalid clicks stand for getting more clicks on your ads than previous days. For example, usually, you get 15 clicks on your ads on daily basis. The very next day you observe that you are getting 40 to 50 clicks. It is known as click bombing. If your Adsense account shows CTR of 5, 10 or 15 that is more than normal CTR. It means that click bombing is going on.

In other words, if you are getting clicks from a single IP address can lead to click bombing and invalid clicks. This activity can disable or ban your Google Adsense account.

How to Protect Your Adsense Account from Invalid Clicks?

There are a number of plugins available on WordPress that can help you to protect your Adsense account from invalid clicks or activity. I give preference to two of them that are super easy to use. So let’s see them. If you do not know how to install a plugin, see our guide on how to install a plugin on WordPress.

Plugins to Protect Your AdSense from Invalid Clicks

1. AdSense Invalid Click Protector (AICP)

I personally use this plugin on my websites. Adsense Invalid Click Protector for blogger is super easy to use and it can protect your Adsense account from invalid click activities.

Adsense Invalid Click Protector plugin which is also known as AICP. It will protect your Google Adsense account from invalid clicks and click bombing. According to Google Adsense terms, Google does not claim any liability towards this invalid click activity or click bombing and call Adsense publisher into question. It considers him/her responsible for this activity. So you need to put an end to this issue for good.

How to Use AdSense Invalid Click Protector?

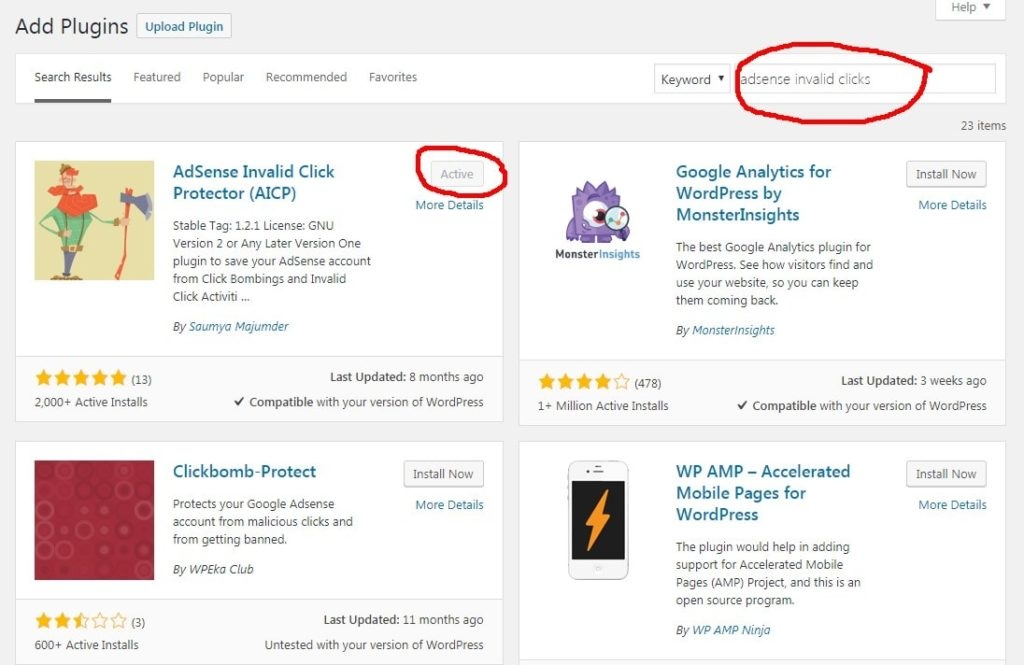
First of all, you need to install the plugin on your WordPress website by searching it on WordPress plugins like this:

Add AICP

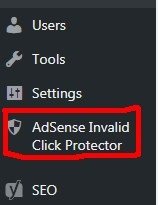
Now click on activate, you will be able to see the plugin in your WordPress menu area:

AICP icon

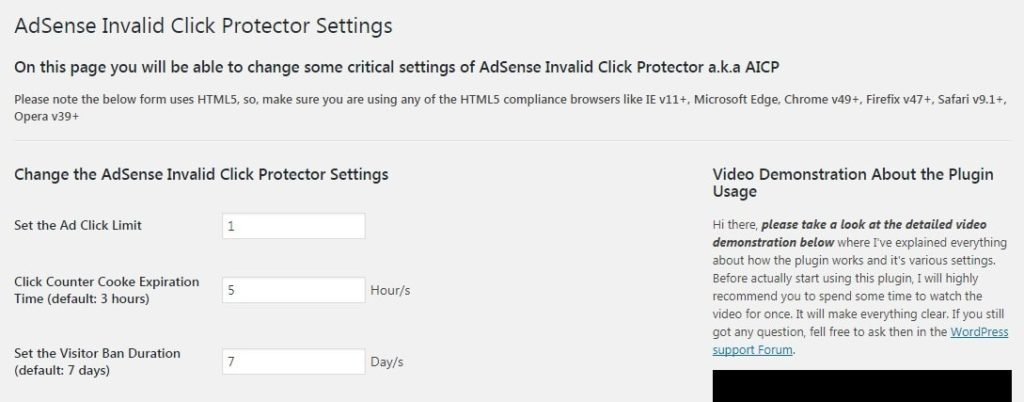
Now click on the plugin to see an interface that will show settings. You need to set the Ad click limit, set the visitor ban duration and click counter cookie expiration time. Simply fill the settings according to your own wish or you can use these settings.

AICP interface

2. ClickBomb Protect

Clickbomb protect is another Adsense click bombing protection plugin. It is also known as Google Adsense click bomb barrier and protection plugin. It is easy to use. This plugin responds to any suspicious activity on your ads and prevents it. As a result, it stops the click capacity of advertisements on your post or page. You can set the number of clicks from the same IP, time of banning the user and so on.

Clickbomb protect also has the ability to work with any topic as well as format. This plugin will not let your Adsense account ban. In addition, it can block IPS that are doing any suspicious activity on your page or post and makes that user handicap.

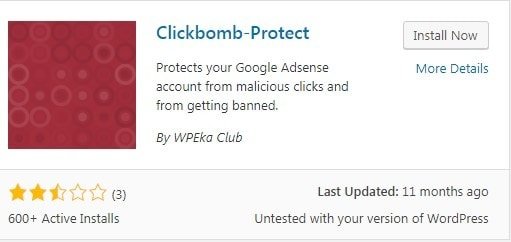
Clickbomb Protect

How to Use Clickbomb-Protect?

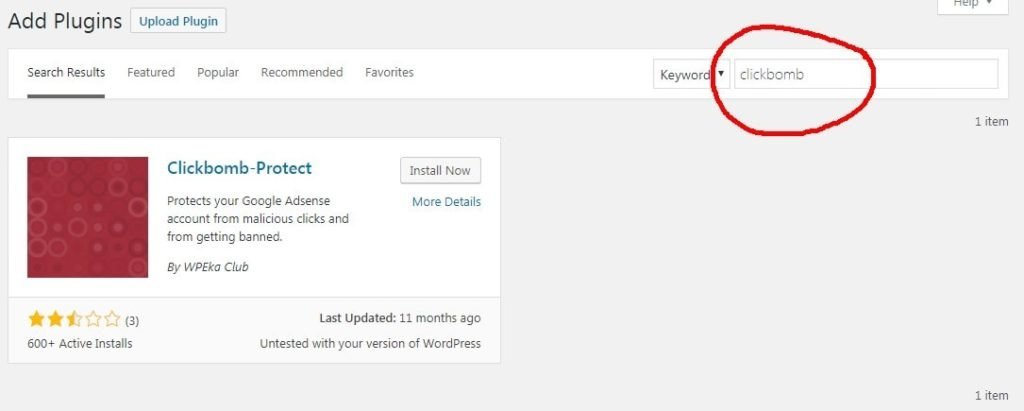
Follow the same instructions for this plugin too. Just search it from WordPress directory and install it.

Click bomb Protect plugin search

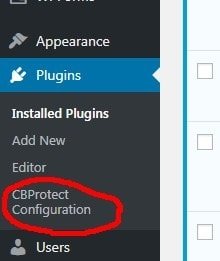
Upon activation of this plugin, you will be able to see the plugin in the plugins section like this:

Clickbomb plugin in dashboard

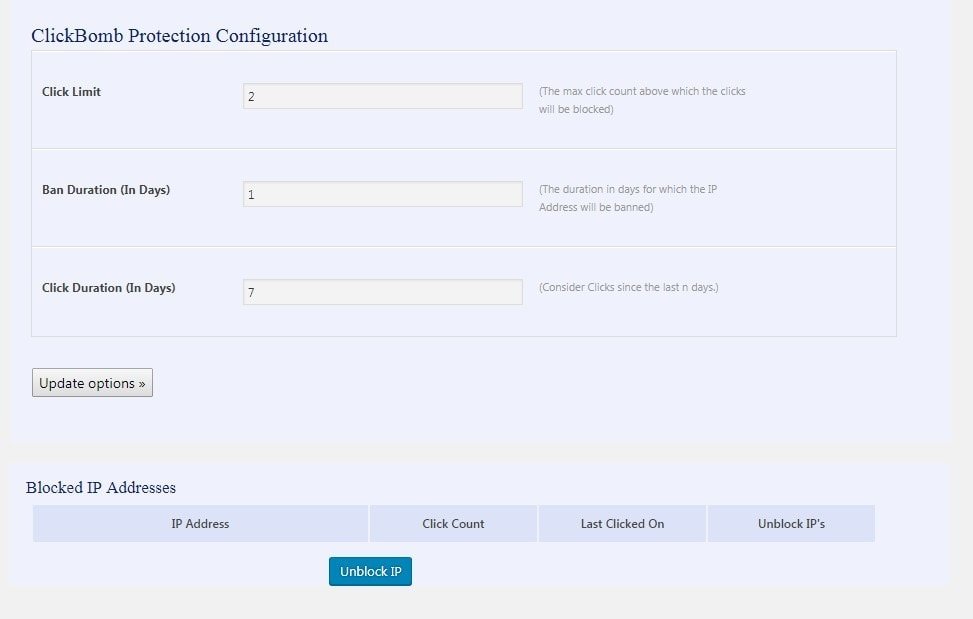
You need to click the plugin and it will show you an easy interface where you can do configuration. It includes click duration, click limit and ban duration etc.

Complete the settings according to your wish and relax from the headache of invalid clicks.

Clickbomb interface

Google is always strict about invalid click or click fraud and will not allow that user to show ads if they caught him.

In addition, you need to pay attention to your Adsense report and details on daily basis. You may see variation in your CTR and it seems to be invalid activity for you.

So these were the best WordPress plugins to protect Adsense from invalid clicks and click bombing.

Am I missing something?

Do not hesitate to share your ideas.

Do you know any other best plugin to protect your Adsense?

I hope that you liked this post. Do not forget to share this post.

Arsalan Rauf
Arsalan Rauf

Arsalan Rauf is an entrepreneur, freelancer, creative writer, and also a fountainhead of Green Hat Expert. Additionally, he is also an eminent researcher of Blogging, SEO, Internet Marketing, Social Media, premium accounts, codes, links, tips and tricks, etc.
www.greenhatexpert.com

Filed Under: Blogging, WordPress

How to Properly Change Your WordPress Username (Step by Step)

Last Updated on August 21, 2022 By Arsalan Rauf

Do you want to change your WordPress username for security reasons?

Have you ever tried to change it?

Do you want to change it?

If you want to change it, you are at the right place. This post is for you. In this post, I shall show you three different methods to change your WordPress username.

Method 1: Create a New User and Delete The Old One

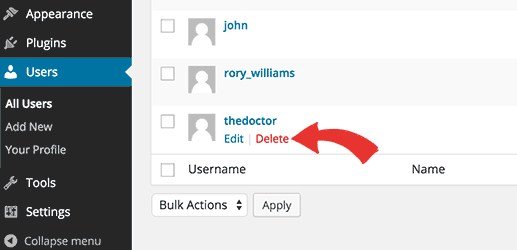
Creating a new user with your desired username with the administrator is the easiest way to change your WordPress username. You have to use a different email address than the one used by the old account. Now logout from the existing username and login with the new user account which you created. Go to Users section and click on Delete link under the old username.

delete user wp

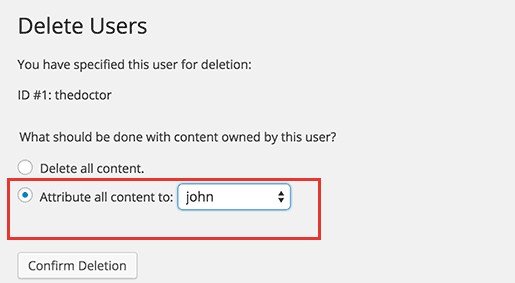
When you will do it, WordPress will ask what you want to do with their data or content. You need to make sure that you click on “Attribute all content to:” option and select the new user/username that you just created. Now click on “Confirm deletion” button to delete the old user account.

That’s it. You have changed your WordPress username with ease. Now if you want to change the email address of your new user, you can now use the old email address which was associated with the old account.

Method 2: Change Username by Using a Plugin

Using a plugin to change your WordPress username is another simple way to do this task. If you do not want to keep the plugins or want to install it. Then you can safely delete this plugin after changing your WordPress username.

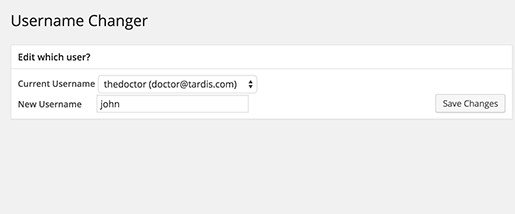
First of all, you need to install and activate the Username Changer plugin.

After activation, go to Users>Username Changer page.

wp username changer

Now select the username which you want to change and enter the new username. When you are done then click on the save changes button.

Method 3: Change Your WordPress Username Using phpMyAdmin

The third method is a little bit complicated because it needs to make direct changes to your WordPress database. I usually do not suggest users to make changes directly to their database of WordPress. However, at times, you may not have another option. For example, if you have forgotten your WordPress username and email address, you will not get access to the admin dashboard to change the existing username.

By using this method, you will be able to find the username and will also be able to change it.

I have forgotten my WordPress username and password what should I do or how to recover it?

So this method will help you if you have forgotten your WordPress username.

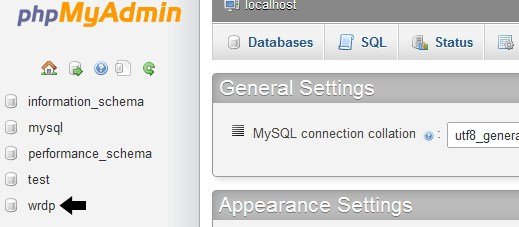
First of all, you need to login to your cPanel. Scroll down to the databases section and click on phpMyAdmin.

php my admin

Now you have to select the database that your blog is hosted in.

php my admin select db

You will see your database tables of WordPress. WordPress database tables use wp_as prefix before each table’s name by default. It is also possible that you may have been using any other prefix.

Now click on the table wp_users on the left hand side. Now click on edit the username which you want to edit.

edit user name

Change the user_login value according to your wish. For example, you can replace “admin” to “user” or “bob”

change user login

Press the Go button and you have completed it.

I hope that you have liked this article and it will be beneficial for you.

Do not forget to share this post.

Arsalan Rauf
Arsalan Rauf

Arsalan Rauf is an entrepreneur, freelancer, creative writer, and also a fountainhead of Green Hat Expert. Additionally, he is also an eminent researcher of Blogging, SEO, Internet Marketing, Social Media, premium accounts, codes, links, tips and tricks, etc.
www.greenhatexpert.com

Filed Under: Blogging, How to, WordPress Tagged With: change wordpress username and password phpmyadmin, how to find wordpress username, what is my wordpress username, wordpress change username plugin, wordpress username ideas, wordpress username requirements, wordpress usernames cannot be changed change wordpress admin username

How to Fix WordPress Posts Returning 404 Error

Last Updated on August 21, 2022 By Arsalan Rauf

WordPress is a powerful CMS. At times, a slight problem can make your site inaccessible. However, to find a solution for every WordPress problem is an easy task. I am trying to cover most of the problems of WordPress for our users.

Like internal server error or error establishing database connection.

WordPress posts returning a 404 error is another common problem that most of the WordPress users are facing these days. In this post, I shall show you how to fix WordPress posts returning 404 error.

In this occasion, a user can access his WordPress admin area and the main page of site. When the user goes to a single post, he gets a 404 not found error. Firstly, you do not need to panic because most of the time your posts are still there and entirely safe. It happens when something went wrong with rewrite rules or your .htaccess file got deleted. You need to fix your permalinks settings.

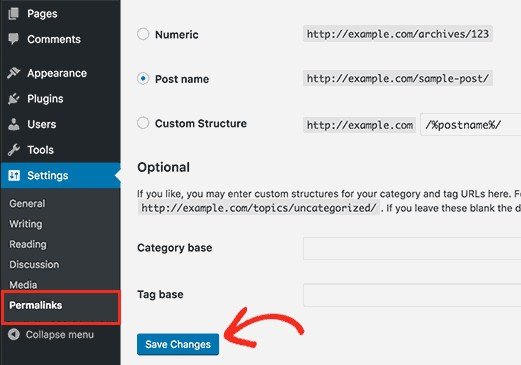
Go to Settings > Permalinks, and simply click on Save Changes button.

update perma links

This process will flush rewrite rules and update your permalinks settings. In most of the cases, this solution fixes the WordPress posts 404 error. However, if it does not work for you, then you have to update your .htaccess file manually.

Login to your server by using FTP and modify the .htaccess file which is available in the same location where folders like /wp-content/ and /wp-includes/ are present. You need to make the file writeable temporarily by changing the permissions to 666 that is the easiest way. Now repeat the original solution. Do not forget to change the permissions back to 660. You can also add this code in your .htaccess file manually:

1
2
3
4
5
6
7
8
9
10
# BEGIN WordPress
<IfModule mod_rewrite.c>
RewriteEngine On
RewriteBase /
RewriteRule ^index\.php$ - [L]
RewriteCond %{REQUEST_FILENAME} !-f
RewriteCond %{REQUEST_FILENAME} !-d
RewriteRule . /index.php [L]
</IfModule>
# END WordPress

Fix for Local Servers

Developers and designers often install WordPress on their PC/computer using a local server due to testing purposes. If you want to use permalinks, then you have to enable the rewrite_module in the Apache configuration of your WAMP, MAMP or XXAMP.

I hope that this post will help you to resolve posts returning 404 error in WordPress.

Did this solution work for you?

Do you have any other solution for 404 error or issue?

Kindly share it in the comment section.

Do not forget to share this post.


Arsalan Rauf
Arsalan Rauf

Arsalan Rauf is an entrepreneur, freelancer, creative writer, and also a fountainhead of Green Hat Expert. Additionally, he is also an eminent researcher of Blogging, SEO, Internet Marketing, Social Media, premium accounts, codes, links, tips and tricks, etc.
www.greenhatexpert.com

Filed Under: Blogging, How to, WordPress Tagged With: 404 error wordpress login, 404 error wordpress permalinks, wordpress 404 after migration, wordpress 404 error after changing permalinks, wordpress 404 error on all pages, wordpress 404 error on all pages except home, wordpress page not found but it exists, wordpress page not found error

How to Ask Readers to Add Your WordPress Blog Icon on iPhone

Last Updated on August 21, 2022 By Arsalan Rauf

People also search for how to add the little notification which asks their iPhone users to add a blog icon to their home screen. Most popular sites use this feature including TechCrunch and others. If your site has a great responsive design on your WordPress site or blog, and you have enough mobile users, then it is a sensible move to implement this technique. In this post, I shall show you how to ask your reader to add your WordPress blog icon on their iPhone or iPad home screen.

It encourages your users to visit your site more often because they will get one-click access to your site like an app.

Note: Please implement it if your mobile site is functional and look very good. Otherwise, it can irritate the users.

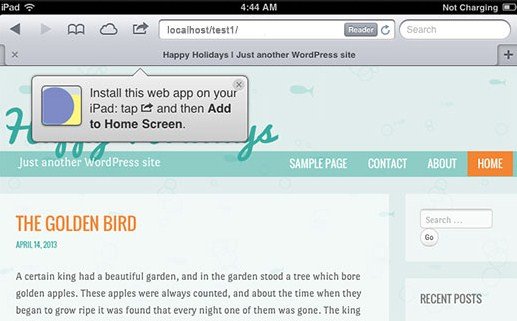
adding home screen icon to iphone

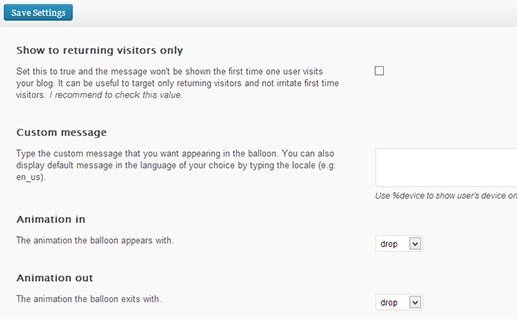
First of all, you need to install and activate the Add to home screen WP Plugin. After activation, you will see a new settings page under Settings>ATHS options. This setting page enables you to control the functionality and behavior of the plugin. In the settings tab, you can add the icon of your website. You need the icon to be recognizable easily because your user will see the icon on their home screen.

To add an icon go to Media>Add New in your admin area. Upload the image file with exact (144×144 pixels) dimensions. Copy the URL of this image file and paste it into the plugin settings page.

add to iphone settings

After doing that, you are good to go. This plugin will work on iPad, iPhone, iPod and touch devices. However, it will be functional only on the safari browser. When a user will visit your site, he will get a notification asking them to add your site’s link as a web app on their device. He needs to tap on the notification to install the website as a web app. If you have given the icon on the plugin settings page, it will be used as the home screen icon.

Otherwise, the plugin will use a snapshot of your web page as an icon.

ballon notification

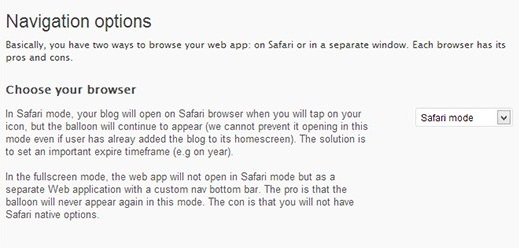
Add to home screen WordPress plugin gives you an option to open your site in the fullscreen web app mode rather than of Safari web browser.

It is suggested that you select the fullscreen mode so that the users who have already added your site will not see the balloon notification every time he visits your site.

To do that go to Settings > ATHS Options page.

Scroll down to Navigation options, and choose fullscreen mode from choose your browser app drop down menu.

fullscreen mode

I hope that you will like this post about how to add a notification that ask your readers to add your WordPress blog icon on their iPhone.

Do you ever add them to your iPhone?

Will you add this to your website?

What are your feelings about these balloon notifications?

Share your opinion with us.

Do not forget to share this post.

Arsalan Rauf
Arsalan Rauf

Arsalan Rauf is an entrepreneur, freelancer, creative writer, and also a fountainhead of Green Hat Expert. Additionally, he is also an eminent researcher of Blogging, SEO, Internet Marketing, Social Media, premium accounts, codes, links, tips and tricks, etc.

www.greenhatexpert.com

Filed Under: Blogging, How to, WordPress Tagged With: add to home screen programmatically, add to home screen wordpress plugin android, add to home wordpress plugin, ios add to home screen, official add to homescreen, wordpress add to homepage, WordPress Blog Icon on iPhone, wordpress homescreen icon, wordpress web app plugin

  • « Previous Page
  • 1
  • 2
  • 3
  • 4
  • Next Page »


Recent Posts

  • Free DeepSeek Accounts 2025
  • Free Zoho Mail Accounts 2025
  • Acudepot Discount Codes 2025
  • Free Blackshot Accounts 2025
  • Free GMX Email Accounts 2025
  • Songtrust Discount Codes 2025
  • Uzicases Discount Codes 2025
  • Cardillo Promo Codes 2025
  • Free DriverFix License Keys 2025
  • Avast Secureline VPN Activation Codes 2025

Recommended Posts

Create a Gmail Account Without Phone Number

Free Course Hero Account

Crunchyroll Accounts

Cracked Apps

Free Pokemon Go Accounts
Onlyfans Free Accounts
Free Chegg Accounts
Free Paypal Accounts
Free Gmail Accounts
Funny Steam Names

Categories

  • Apps
  • Apps for PC
  • Blogging
  • Discord
  • Facebook
  • Gaming
  • Grammar
  • Guide
  • How to
  • Instagram
  • Messaging
  • OnlyFans
  • Pinterest
  • Reddit
  • SEO
  • Snapchat
  • Social Media
  • Spotify
  • Steam
  • Telegram
  • TikTok
  • Twitch
  • Twitter
  • Whatsapp
  • WordPress
  • YouTube
  • Home
  • Social Media
  • Messaging
  • About
  • Submit Guest post