Green Hat Expert

  • Home
  • Social Media
    • Instagram
    • TikTok
    • Snapchat
    • Facebook
    • YouTube
    • Twitter
  • Messaging
    • Discord
    • Telegram
    • Whatsapp
  • About
  • Submit Guest post
You are here: Home / Archives for Social Media

How to Add Multiple Accounts on TikTok

Last Updated on February 20, 2023 By Arsalan Rauf

In this age, a single TikTok account is not good enough for everyone.

TikTok has introduced different features like Shadowban and manual reviews, TikTok accounts are currently at risk of huge drop in view due to this.

If your account is shadowbanned, the system won’t show up your videos on other users’ “For You” pages.

Additionally, if any of your video is under review, it will be hidden from everyone too.

If you are facing any of these, it will decrease the reach of your account drastically.

To fight it, you need to create another TikTok account.

If you have a good amount of followers on TikTok account, it will be wise to create a secondary account just in case something bad happens to your first one.

In this article, I will tell you how to add multiple accounts on TikTok in 4 steps.

How to add multiple accounts on TikTok

To add multiple accounts on TikTok, go to your profile and tap on the dropdown arrow.

After that, tap on “Add account” to add an existing account or create a new one.

If you do not have a new account, it can be created by tapping on one of the multiple sign-up options.

However, you must not use the same sign up option that you used when you were creating the main account.

Alternatively, if you already have an existing account, you can use it to log in.

At the bottom of sign-up page, you will need to tap on “Log in” to do it.

After adding a new account, you can easily switch between accounts by using the dropdown arrow on your profile again.

After that, switch to that account that you want to use by tapping on it.

Here are the steps you need to follow on how you can add multiple accounts on TikTok:

Step 1. Visit your TikTok profile & tap on the dropdown arrow

Go to TikTok > tap on the “Me” icon on the bottom bar.

The first thing you need to do is to tap on the dropdown arrow on your profile.

First of all, go to TikTok on your mobile device.

Just remember that you shouldn’t use TikTok on a desktop as the desktop version does not allow you to add multiple accounts there.

After opening TikTok, tap on the “Me” icon at the bottom bar.

After tapping on the “Me” icon, it will take you to your profile.

Your TikTok username will be visible on your profile with a dropdown arrow at the top bar.

At the top bar, you need to tap on the dropdown arrow.

Move on to the next step to find out how to add an additional account on TikTok.

Step 2. Tap on “Add account”

To add a new TikTok account, tap on “Add account”.

After tapping on the dropdown arrow, it will open a navigation menu.

You will see all the account of TikTok that you have added in the navigation menu.

For instance, if you’ve added two accounts, both accounts will be available on the menu.

By tapping on one of them, you can switch between accounts.

Your currently logged in account will show a tick with it.

It means that the account without a tick will be the account you are not currently logged into.

If your additional account is not added, you have to add it first.

To add a new account on TikTok, you need to tap on “Add account” available at the bottom of the menu.

You can use it to log in to an existing account or create a new one on TikTok.

Step 3. Sign up for a new account

Register a new TikTok account or log in to an existing account.

After tapping on “Add account”, it will take you to the sign-up page.

There are multiple sign-up options on the page such as “Continue with phone or email”, “Continue with Facebook”, “Continue with Apple”, and “Continue with Google”.

To expand the list of sign up options, you need to tap on the dropdown arrow.

There is a “Log in” option at the bottom of the page.

If you have not created a second account on TikTok yet, you have to create one from one of the sign-up options.

However, avoid using the same sign-up option that you have used for the main account.

For instance, if you’ve created an account using Facebook, for the second account, use another sign-up option (e.g. Gmail) to create a new account.

If you already own another account, just sign in to it by tapping on the “Log in” option available at the bottom of the page.

If you want to go through the account creation, move on to the last step to find out how.

Step 4. Follow the instructions on the screen

To create a new account, follow the on-screen instructions.

After tapping on a sign-up option from the previous step, the next thing is to enter your birthday.

To sign up for an account on TikTok, your age should not be less than 13 years.

If you are less than 13 years old, the app will not let you sign up.

So, when choosing your birthday, you need to select an age over 13 years.

After that, you have to provide your phone number or email.

After that, choose a password for the account and tap on the tick icon to finalize the sign up process.

After signing up, the next thing is to verify your email or phone number.

If you have used your email, you will get a verification link on your email and tap on it to verify your account.

You have to verify your account so TikTok algorithm does not mark you as a bot or spam account.

I hope that you have learned how to add multiple accounts on TikTok!

The steps can be used again to add more TikTok accounts on the application.

Final Words

Now, it is necessary to have multiple TikTok accounts.

This process will work as a hedge against temporary blocks and bans including the shadowban.

In reality, some popular TikTokers got their accounts banned because of the content they generated.

However, they were able to continue making videos because of their second, or even third account.

In short, if you are using a single account on TikTok, it would be wise to create a new one.

What’s Next

What Does “Clear Cache” Mean on TikTok?

How to Watch Live Videos on TikTok

How to See Follow Requests on TikTok

Arsalan Rauf
Arsalan Rauf

Arsalan Rauf is an entrepreneur, freelancer, creative writer, and also a fountainhead of Green Hat Expert. Additionally, he is also an eminent researcher of Blogging, SEO, Internet Marketing, Social Media, premium accounts, codes, links, tips and tricks, etc.
www.greenhatexpert.com

Filed Under: Social Media, TikTok

What Does “Clear Cache” Mean on TikTok?

Last Updated on April 22, 2023 By Arsalan Rauf

Did you come across a “Clear Cache” feature on TikTok?

If yes, you might be curious to know what does clear cache on TikTok means.

If you already have knowledge of clearing cache, you might be wondering about other questions.

Does clearing cache delete your liked videos?

Does clearing cache delete your drafts on Tiktok app?

Before you start using it, it is best that you are aware of its function.

This will prevent you from any regrets after using the function.

In this guide, I am going to teach you what “Clear Cache” means on TikTok, what it does and other frequently asked questions about it.

What Does “Clear Cache” Mean on TikTok?

“Clear Cache” stands for getting rid of insignificant data available in the application which will free up storage space on your android device.

The cache data stores the details about your profile and the videos you have watched on TikTok so when you clear it the app will load faster as compared to the current state.

If your android device is running out of storage space, you can also clear cache on TikTok to clear some storage.

The number shown beside the “Clear Cache” tab indicates the size of the cache.

For instance, if the number shows “500 M”, it means that the size of the cache is 500 MB (megabytes) of your device.

So if you want to clear the cache that says “500 M”, it will free up 500 MB of your device.

The size of the cache depends on videos you watch on TikTok, the more you watch, the larger the cache.

When you tap on the clear cache on Tiktok, it will clear the data of the videos that you have watched earlier.

Further, you may be logged out of TikTok and you need to log in again.

Cached data is not useful for you, so clearing it will not be a trouble for you.

The only disadvantage of clearing its cache is the application will run slower than the previous time for the first time when you open it.

It is hard to notice because it is hardly noticeable.

Tiktok will cache every video you watch on the app.

So, when you start using the app, the cache size will start growing again.

If your device’s storage space is already full or near to its limit, you need to clear your cache on the app to free some of the space.

However, if you have enough storage on your device and the size of cache is also small, you do not need to clear it.

How to clear cache on TikTok

The function itself is available within the application of TikTok or you can do it using the device settings.

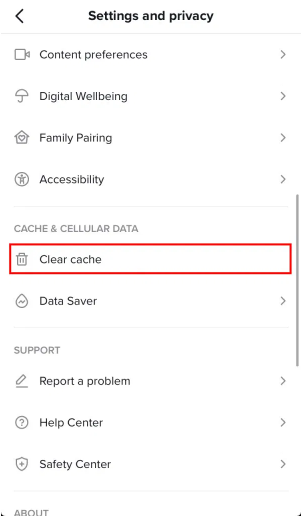
The steps to clear cache on TikTok are: Open TikTok app > Profile > … Icon > Clear Cache.

Here is the step by step guide on how can you clear cache in the TikTok app:

  1. Firstly, open TikTok app and visit your profile.
  2. Tap on the “triple-dots” icon available on the right corner of your screen.
  3. Scroll down to “Cache and Cellular Data”.
  4. Under “Cache and Cellular Data”, tap on “Clear Cache” to clear the cached data.

When you tap on the option of “Clear Cache”, there will be no pop-up message for confirmation to verify the decision.

Instead, it will clear the cache automatically.

So, you need to keep in mind that if you tap the button, the cache will be cleared on TikTok and many users do that.

You do not have to worry about losing anything because the process will not delete anything important.

Clearing cache will just free up some space on your android phone.

Furthermore, you can also clear cache from the settings section if you are doing it on Android device.

The process includes settings> apps> TikTok> clear cache.

If you are an iPhone user, you need to delete the application and reinstall it to clear the cache.

Will clearing cache on TikTok delete drafts?

No, it does not delete your draft on TikTok app.

The process will delete insignificant data including the details of videos you have watched on TikTok.

Clearing cache on TikTok does not mean deleting significant data but the focus is to delete insignificant data such as details of videos you have watched.

After going through the previous statement, you have come to know that nothing important will be deleted, so do not worry about it.

I did an experiment to find out whether the process will delete drafts or not.

Here are the details of steps I took:

  1. To get started, I made a recording of a 15-second video.
  2. Next, I save that video in the drafts.
  3. Now, it is available in my profile.
  4. After that, I cleared the cache of the application from the settings.
  5. Lastly, I visited my profile to see the draft, it was there.

The previous experiment shows that clearing cache on TikTok will not delete the drafts.

To conclude, your drafts are safe after the process.

Does clearing cache on TikTok delete liked videos?

No, when you delete the cache on TikTok, it does not delete your liked videos.

Your liked videos, videos, and drafts will not be deleted when you clear the cache on TikTok.

Your liked videos will not be removed from the app if you clear the cache.

I did an experiment to find out whether the process will delete liked videos or not.

Here are the details of steps I took:

  1. First of all, I liked a few videos on the “For You” page (FYP) on the app.
  2. The next thing I did to check the previous liked videos and the videos that I have just liked were there.
  3. After doing so, I cleared the cache of the app from the settings page.
  4. Finally, I checked my liked videos again after clearing cache, they were still there.

The previous experiment shows that deleting the cache on TikTok will not delete liked videos.

So, you should not be worried about deleting the cache as it will not clear anything important.

If I clear cache on TikTok will it delete my videos?

No, when you delete the cache on TikTok, your videos will remain safe.

Your videos will remain in your profile unless you delete them manually or any of your videos violates the guidelines of TikTok.

Apart from these reasons, your videos will not be deleted.

Again, deleting cache will not clear your videos on the TikTok app, it only deletes unimportant data to save your storage.

I did an experiment to find out whether the process will delete videos.

Here is the step by step process detail:

  1. Firstly, I made a couple of videos and posted them on application.
  2. The video are now available in my profile.
  3. After doing so, I visited the settings and deleted the cache of the app.
  4. Finally, I went back to check my videos they were still there.

This experiment also proves that your videos will not be deleted if you clear cache on TikTok.

Final Words

Clearing cache is an important feature because it gets rid of the unimportant data and provides storage space on your device and also fixes some minor issues too.

In a nutshell, clearing cache is available to free up storage space on your operating system. Further, it solves some minor issues that you face while using the app.

If you want to change your FYP, the first step you need to take is to clear the cache on TikTok.

Furthermore, you can also delete the cache on TikTok via app’s settings if your storage space is about to exceed its limit.

In addition, the same feature is also available on other applications including Facebook and Instagram.

You can use the free storage on your device to download another application.

Lastly, clearing the cache on the app is one of the ways to get rid of insignificant data on your device.

What’s Next

3 Ways to Contact Tiktok

What Does #xyzbca Mean on TikTok

Arsalan Rauf
Arsalan Rauf

Arsalan Rauf is an entrepreneur, freelancer, creative writer, and also a fountainhead of Green Hat Expert. Additionally, he is also an eminent researcher of Blogging, SEO, Internet Marketing, Social Media, premium accounts, codes, links, tips and tricks, etc.
www.greenhatexpert.com

Filed Under: TikTok

How to Send a Direct Message to a Private Account on Instagram

Last Updated on October 28, 2023 By Arsalan Rauf

This simple article will guide you on how to send a direct message to a private account on Instagram.

You can send a direct message on IG to public accounts or anyone whom you follow on Instagram.

However, it is a complicated task to send a direct message to a private account. The reason behind it is that the ‘message’ button is hidden from plain sight.

Nevertheless, let’s find out in this article.

How to Send a Direct Message to a Private Account on Instagram

How to message a private account on Instagram: First, you need to search for a private account > In their profile, visit the triple dots available at the top-right corner of the screen > at the bottom of the menu, choose ‘send message’.

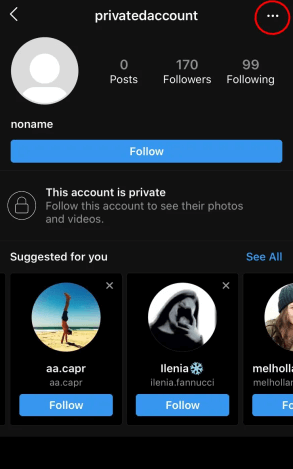
You need to visit the private profile and just tap on the ‘triple dots’ icon in order to send a direct message to them.

That is all, you have successfully learned how to send a direct message to a private account on Instagram.

If you want to learn it on a visual level, we have shared images in this guide too.

Here is a Step-by-step guide

You need to follow these steps (with images) on how you can send a direct message to a private account on Instagram.

After going through this article, you should be able to know how to send a DM to private account.

Step 1. Search for a private account that you want to message.

First of all, you need to find a private account that you want to message on Instagram.

Step 2. Now, tap on the triple-dots icon on the top right-hand corner.

private account dm 1

The next step is to tap on the triple-dots icon available in the top right-hand corner of your screen.

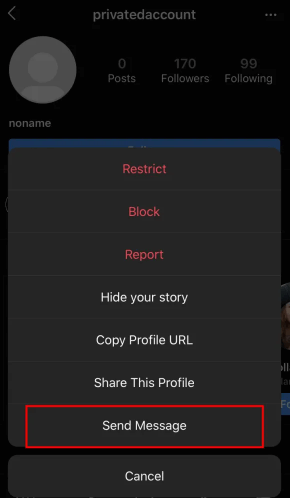
Step 3. Lastly, select ‘send message’.

private account dm 2

After tapping on the triple-dots icon, it will open a navigation drawer.

To send a message to a private IG account, you need to tap on, ‘Send Message’.

Direct message restrictions

You need to know some DM restrictions before you try to send them.

  • Beware of Instagram restrictions!
  • If you try to send too many messages at once, you will be actively blocked from Instagram.
  • To save yourself from action blocked, you need to ensure that you send DMs in intervals (10-15min).

Can you message a private account on Instagram?

Yes, you can send messages to private accounts on Instagram. All you have to do is send a message request and wait for the user to accept it before you can start messaging each other.

You need to be aware of these tips to avoid being action blocked.

If you liked this guide, you can share it with your friends and also go through my other guides as well.

What’s Next

Free Instagram Accounts

Arsalan Rauf
Arsalan Rauf

Arsalan Rauf is an entrepreneur, freelancer, creative writer, and also a fountainhead of Green Hat Expert. Additionally, he is also an eminent researcher of Blogging, SEO, Internet Marketing, Social Media, premium accounts, codes, links, tips and tricks, etc.

www.greenhatexpert.com

Filed Under: Instagram, Social Media

How to Fix Snapchat Account Compromised

Last Updated on February 15, 2023 By Arsalan Rauf

Are you facing an “It looks like your account is compromised” error on Snapchat?

The full error message is, “Oh no! It looks like your account is compromised, and has been locked for your safety”.

Accompanied by, “Please reach out to our support team for help!”.

If you’re getting this error message, you will be restricted from logging into your Snapchat account.

To get access to your account again, you have to contact Snapchat support to get assistance.

Otherwise, you won’t be able to log in or access your Snapchat account.

In this article, I will tell you how to fix the Snapchat account compromised error so that you can regain access to your account.

How to fix Snapchat account compromised

To fix the Snapchat account compromised error, the best bet is to contact Snapchat.

You can contact Snapchat by visiting the “Contact us” page and after that, choose the category of your issue.

After that, you need to tell the error that you are facing and submit the form.

After submitting the form, you have to wait to get Snapchat’s response.

You will get a response from Snapchat in 1-3 business days.

To check the response, you need to open your email periodically.

If you are able to get the response, Snapchat will send you instructions on your next steps.

To recover your Snapchat account, you need to follow the instructions in the email.

Here’s a step-by-step guide on how to fix the Snapchat account compromised error:

Step 1. Contact Snapchat

The first thing you need to do is to access the “Contact us” form on Snapchat.

Your account is not accessible even if you have reset your password, you have to contact Snapchat support to get help.

Otherwise, your account will not be opened.

First of all, visit Google and search for “Snapchat Support”.

After that, click on the first search result that has the title of, “Snapchat Support”.

On the other hand, you can click on this URL to go there directly: https://support.snapchat.com/en-US.

After reaching the Snapchat Support website, there will be multiple categories.

The categories are “Using Snapchat”, “Snapstreaks”, “My Account is Hacked”, and so on.

You need to use the category of your problem.

On the other hand, you can contact Snapchat for help.

At the bottom of the categories, a “Contact Us” button will be available.

To contact them, you need to tap on the “Contact Us” button.

On the other hand, you can use this direct link to use the contact form: https://support.snapchat.com/en-US/i-need-help.

Step 2. Select the category of your issue

After tapping on the “Contact Us” button, it will take you to the “Contact Us” page.

There are a couple of headers on the page.

The headers are “What can we help you with?” and “Oh no! Tell us more…”.

First of all, you have to choose the category of your issue.

It can be done by choosing the appropriate category under the “What can we help you with?” header.

Since you are not able to access your Snapchat account, choose the “I can’t access my account” option.

Secondly, you have to choose the sub-category of your problem.

You can choose the right category under the “Oh no! Tell us more…” header.

Choose the “I think my account was hacked” option as you will be able to get in touch with Snapchat.

After selecting the “I think my account was hacked” option, it will expand the form.

To submit the form, you need to complete 4 additional fields.

The fields you need to complete are “Username”, “Email”, “Mobile Number”, and “What information should we know?”.

First of all, in the “Username” field, you need to put your Snapchat username.

Ensure that you do not use spaces.

After that, in the “Email” field, add your email address.

You need to ensure that you use the same email address that is linked to your Snapchat account.

The next step is to provide your mobile number in the “Mobile Number” field.

In the “Mobile Number” field, you have to use your country code too (e.g. +1-202-555-1234).

After that, you have to describe the issue that you’re experiencing in the “What information should we know?” field.

Use this as an inspiration for a description, “Hi Snapchat, I’m facing an “It looks like your account may have been compromised” error when I try logging in to my account”.

Accompanied by, “I’ve been unable to log in to my account since then. I need help in fixing this”.

Step 3. Submit the form & wait for Snapchat’s response

After completing the form, you have to send it.

To submit the form to Snapchat, you need to scroll down to the bottom and tap on “Send” to submit it.

You might have to complete a reCAPTCHA to send the form.

After submitting the form, you need to wait to get a response from Snapchat.

Snapchat can send you a reply in 1 to 3 business days.

To check the response from them, you have to go through your email inbox frequently.

If successful, you will get instructions from Snapchat on your next steps.

To regain access to your Snapchat account, you have to follow the instructions in the email.

That’s it. I hope that you know how to fix the “Oh no! It looks like your account is compromised” error on Snapchat!

Final Words

You should try to solve the issue yourself first before you start contacting Snapchat.

It can be done on the Snapchat Support website.

After reaching their website, it will show you multiple categories that you can select from.

You need to choose the relevant category of the issue you are getting and try to get the solution.

To find the issue, you can also use the search bar on the website.

If the solution is not available on their website, you can use the “Contact Us” form to get help from them.

What’s Next

Good, Funny, and Cute Snapchat Names

How to Contact Snapchat Support

How to Send All Streaks at Once on Snapchat

Arsalan Rauf
Arsalan Rauf

Arsalan Rauf is an entrepreneur, freelancer, creative writer, and also a fountainhead of Green Hat Expert. Additionally, he is also an eminent researcher of Blogging, SEO, Internet Marketing, Social Media, premium accounts, codes, links, tips and tricks, etc.

www.greenhatexpert.com

Filed Under: Snapchat, Social Media

How to Fix Snapchat Support Code SS06

Last Updated on April 23, 2023 By Arsalan Rauf

Are you getting a Support Code SS06 error when you try to log in to Snapchat and want to fix it?

Snapchat helps you to upload videos and photos in order to live the moments and share it with your dear ones.

The snaps can be sent to people, which can be photos and videos that can be available for 24 hours.

The photo or video will be removed after 24 hours.

The app contains different filters called as Lenses that are made by the Snapchat community.

On Snapchat, you can also chat, video chat, and express yourself with Bitmojis and Friendmojis.

The “Snap Map” feature is also available on the app which helps you to share your location with your friends.

Since Snapchat’s launch, the app had faced different bugs and glitches like log-in errors.

In this post, I will tell you how to fix Snapchat Support Code SS06 when you can’t log in.

What is Support Code SS06 on Snapchat?

Support Code SS06 on Snapchat means that there is suspicious activity on the app and it has detected it.

It can also be a result of too many login attempts.

Consequently, your Snapchat account has been temporarily disabled.

In some cases, the error message can be a result of a mistake or if Snapchat is down.

Before you try to fix it, you have to check the status of Snapchat and it can be done on downdetector.com/status/snapchat.

You can also go to Twitter.com and use the search for “Snapchat Down” and check if there are a lot of tweets about it.

How to fix Snapchat Support Code SS06

To fix Snapchat Support Code SS06, an effort can be made to unlock your Snapchat account on a browser.

If your Android device is rooted, your task is to unroot it and uninstall any third-party apps or plugins on it.

If you’re connected to a VPN, you have to change your network and switch off the virtual private network (VPN).

Other than that, you can also contact Snapchat support if you think this is happening because of a mistake.

Solution 1: Unlock your Snapchat account

  1. Visit this link https://accounts.snapchat.com/accounts/unlock.
  2. Sign in to your Snapchat account.
  3. To unlock your account, select “Unlock”.

Source link: https://support.snapchat.com/en-US/article/locked.

Solution 2: Switch your network and switch off your VPN

  • If you’re connected to a Wi-Fi network, move to mobile data and turn off your Wi-Fi.
  • If you’re using mobile data, switch to a Wi-Fi network instead.
  • Turn off your VPN if you are using one.

Source link: https://support.snapchat.com/en-US/a/account-questions.

Note: After moving to another network or turning off your VPN, the next step is to force close Snapchat and reopen it.

Solution 3: Unroot your Android device

  • If your Android device is rooted, please unroot it.
  • Uninstall any third-party apps and plugins available on your device.
  • Uninstall and reinstall the Snapchat app (the process will remove Snapchat’s cache and it will be automatically moved to the latest version).

Source link: https://support.snapchat.com/en-US/a/account-questions.

Solution 4: Contact Snapchat support

  1. Visit this link https://support.snapchat.com/en-US/i-need-help.
  2. Choose “I think my account was compromised”.
  3. Fill up the form entirely and submit it.
  4. Wait for a few days to get a response from Snapchat via email.

Note: Just put the email address that is linked to your Snapchat account. In addition, another way to contact them is, to use Snapchat Support on Twitter (@snapchatsupport) by tagging them or sending them a direct message.

What’s Next

What is the Snapchat Plus Solar System?

How to Fix “Oops! We could not find matching credentials” on Snapchat

How to Fix Snapchat Account Compromised

Arsalan Rauf
Arsalan Rauf

Arsalan Rauf is an entrepreneur, freelancer, creative writer, and also a fountainhead of Green Hat Expert. Additionally, he is also an eminent researcher of Blogging, SEO, Internet Marketing, Social Media, premium accounts, codes, links, tips and tricks, etc.

www.greenhatexpert.com

Filed Under: Snapchat, Social Media

How to Fix “Oops! We could not find matching credentials” on Snapchat

Last Updated on February 17, 2023 By Arsalan Rauf

To fix “Oops! We could not find matching credentials” on Snapchat, your task is to reset your password.

After resetting your Snapchat password, it will fix the error.

To reset your password on Snapchat, follow the 9 steps below.

However, the only access you need to have is your phone number or email address.

The reason is, you will receive a password reset link either on your phone number or email.

If you do not have access to them, you have to contact Snapchat Support to get help.

Otherwise, you will not be able to reset your Snapchat password.

Here’s a step by step guide on how to fix “Oops! We could not find matching credentials” on Snapchat.

1. Open Snapchat and tap on “Use Other Account”

The first thing is to go to the Snapchat app and go to the login/sign-up page.

On the sign-up or login page, all of your Snapchat accounts will be shown.

There are several options available there such as “Log In”, “Sign Up”, and “Use Other Account”.

To use another account, you need to tap on “Use Other Account”.

2. Tap on “Forgot your password?”

After tapping on “User Other Account”, it will take you to the login page.

The login page shows a “Username or Email” field and a “Password” field.

Firstly, you have to enter your Snapchat username.

The next thing is to provide email address that is associated with your Snapchat account.

After that, tap on “Forgot your password?” in order to change your Snapchat password.

3. Reset your password via email

After tapping on “Forgot your password?”, you will see a pop-up.

The pop-up has two options.

The options are “via Phone” and “via Email”.

You can use your email or phone to reset your password on Snapchat.

In this article, I am using the “via Email” option to reset your password.

To start resetting the password from your email, you need to tap on “via Email”.

4. Enter your email address

After tapping on “via Email”, it will take you to the “Reset Password” page.

After landing on that page, it will show you an “Email” field.

In the Email field, put the email address that is associated with your Snapchat account.

After that, tap on “Submit” to submit your email.

If you are not able to access your email address, the only way is to contact Snapchat support to get help.

5. Check your email for the password reset link

After tapping on “Submit”, you will get a password reset link to your email.

To ensure that, you need to check your email.

If the mail is not in your inbox, make sure to check your junk and spam folder.

The email will have the “Team Snapchat” and the subject line will be “Snapchat Password Reset” on it.

Tap on the password reset link by opening it and it will reset your Snapchat password.

6. Change your Snapchat password

After tapping on the password reset link, it will take you to the “Change My Password” page.

The page contains two fields such as “New Password” and “Confirm Password”.

First of all, you have to enter a new password in the “New Password” field.

After that reuse that password by entering it in the “Confirm Password” field to confirm it.

In the end, you need to tap on “Save” to reset your Snapchat password.

It’s highly suggested that you should get a password with at least 8 characters long, that has uppercase and lowercase letters, and numbers/symbols.

7. Go back to the Snapchat app

After tapping on “Save”, it will take you to the “Password Changed!” page.

It indicates that you’ve successfully changed/updated your Snapchat password.

You will be taken to the login page of Snapchat by tapping on “Continue”.

However, you have to go back to the Snapchat app rather than tapping the “Continue” option.

8. Log in to your Snapchat account

After reaching the Snapchat app, you need to sign in to your Snapchat account with your new password.

First of all, in the “Username or Email” field, you have to enter your Snapchat username.

After that, in the “Password” field, type your new password.

In the end, to log in to your Snapchat account, tap on “Log In”.

9. The error is fixed!

After updating your Snapchat password and signing in to your account with the new password, the “Oops! We could not find matching credentials” error should be fixed!

Now, you can use Snapchat normally.

If you are still experiencing the problem, the next step is to try deleting and re-installing Snapchat.

This process will remove the cache of the app.

The next time, you install it, it will begin as a new slate.

Final Words

The “Oops! We could not find matching credentials” error on Snapchat can also occur due to a glitch.

In short, you can deal with it easily by just resetting your Snapchat password.

If you’re still getting the error even if you have reset your Snapchat password, here are two bonus fixes that you can use:

  1. Visit this link which is “Unlock Your Snapchat Account” page and log in to your Snapchat account to unlock it.
  2. The next method is to Contact Snapchat support for help.

If you are not able to login to your Snapchat account, it is highly suggested that you follow the first solution to access it.

The last resort is to contact customer support of Snapchat.

What’s Next

How to Fix Snapchat Account Compromised

How to Get Your Snapchat Streak Back

Good, Funny, and Cute Snapchat Names

Arsalan Rauf
Arsalan Rauf

Arsalan Rauf is an entrepreneur, freelancer, creative writer, and also a fountainhead of Green Hat Expert. Additionally, he is also an eminent researcher of Blogging, SEO, Internet Marketing, Social Media, premium accounts, codes, links, tips and tricks, etc.

www.greenhatexpert.com

Filed Under: Snapchat, Social Media

What Does Post Unavailable Mean on Instagram?

Last Updated on April 23, 2023 By Arsalan Rauf

Are you facing a “Post Unavailable” error in your direct messages on Instagram?

If yes, you won’t be able to see the shared post.

You can get the error message when you share an Instagram post with someone or someone shares it with you.

You can do it by tapping on the paper plane icon available at the bottom of a post.

After tapping on the paper plane icon, choose the user, and tap on “Send”.

In this article, I will tell you why Instagram says “This post is unavailable” in your DM and how to fix it.

Why does Instagram say this post is unavailable?

Instagram says that this post is unavailable because the post is removed.

Otherwise, it is archived by the person who posted it.

If the post is posted by a private account and you’re not following them, the post will also be unavailable to you.

You can also face the error when it is taken down by Instagram because of a community guideline violation.

What does Post Unavailable mean on Instagram?

Post Unavailable on Instagram means that the post is no longer available or archived.

It can also happen when the original poster has a private account or the post is deleted by Instagram.

Otherwise, the person who posted it deactivated the account, blocked you on IG, or added an age restriction.

Reason 1. The post has been removed

If the post is deleted or removed, both of you the sharer and you won’t be able to view it.

You will not be able to see it unless you have taken a screenshot of the post.

The deleted post will be moved to “Recently deleted”.

After 30 days, the posts available in “Recently deleted” will be permanently deleted.

Reason 2. The post was archived

Instagram users can archive their posts.

When the user archives a post, the post will be hidden from the user’s profile.

Consequently, the post will be unavailable if it is shared with others.

You will be able to see it only if the person unarchives it.

Reason 3. It’s a private account

If the post is from a private account and you are not its follower, you won’t be able to see it.

The cause that why the sharer can share the post is that they are your follower.

In this case, you have to ask the sharer to take a screenshot of the post and share or send it to you.

It will avoid the requirement to follow the account to view the post.

Reason 4. The post was taken down

Everyone has to follow the community guidelines of Instagram.

The guidelines focus on no illegal content, hate speech, violence, and so on.

If a post violated a community guideline, Instagram will delete it.

Hence, if a post is unavailable on Instagram, it might be removed by Instagram.

Reason 5. Deactivated, blocked, or age-restricted

If the user has deactivated or deleted the account, the posts will also be removed.

If the user has blocked you, you won’t be able to view the user’s posts.

You will be restricted from viewing an age-restricted post unless you’re 18 and above.

Visit your account settings to verify your age, select “Personal information”, and add your date of birth.

How to fix Post Unavailable on Instagram

To fix Post Unavailable on Instagram, you have to ask the sharer to take a screenshot of the post and give it to you.

You can do it if it belongs to a private account and you cannot view it.

If the sharer and you are not able to view the post, it shows that the post is either removed, archived, or taken down.

In this case, the post will not be viewable to you unless the sharer took a screenshot of it before it is taken down.

What’s Next

How to Fix “You can’t message this account unless they follow you” on Instagram

How to Fix “You’ve reached the message request limit” on Instagram

How to Fix Instagram DMs Stuck on Loading Screen

Arsalan Rauf
Arsalan Rauf

Arsalan Rauf is an entrepreneur, freelancer, creative writer, and also a fountainhead of Green Hat Expert. Additionally, he is also an eminent researcher of Blogging, SEO, Internet Marketing, Social Media, premium accounts, codes, links, tips and tricks, etc.

www.greenhatexpert.com

Filed Under: Instagram, Social Media

How to Fix “You can’t message this account unless they follow you” on Instagram

Last Updated on February 13, 2023 By Arsalan Rauf

Are you facing a “You can’t message this account unless they follow you” error on Instagram and do you want to fix it?

You can get the error when you try to message someone who does not accept message requests.

You can get message requests from anyone on Instagram by default.

However, you can also stop others from sending you messages.

The feature is known as “Don’t receive message requests”, which is available in your privacy settings.

In this article, I will tell you how to fix “You can’t message this account unless they follow you” on Instagram.

Why can’t I message people who don’t follow me?

You can’t message people who don’t follow you on Instagram because the person has used the option on Instagram to prevent message requests.

Anyone can receive message requests on Instagram by default.

However, there is a feature that stops others from sending you messages.

The option is known as “Don’t receive message requests”.

If the user has enabled it, he/she won’t get message requests from people who don’t follow them.

When you try to do that, it will show you “You can’t message this account unless they follow you” error message.

You can only send them message if they disabled the “Don’t receive message requests” option or if they are your followers.

How to fix “You can’t message this account unless they follow you” on Instagram

To fix “You can’t message this account unless they follow you” on Instagram, the only way is to enable the “Message requests” option for “Your followers on Instagram”.

You also have to allow “Message requests” feature for “Others on Instagram”.

With this option, you will enable your followers and those who are not your followers to send you DM on Instagram.

Method 1. Allow your followers to message you

  1. Visit your Instagram profile by tapping on your profile picture which is available on the bottom bar.
  2. Then, tap on the menu icon and select “Settings”.
  3. Follow these steps: Privacy > Messages > Potential connections > Your followers on Instagram.
  4. Enable the “Message requests” option/feature.

By enabling the “Message requests” feature for “Your followers on Instagram”, your followers can DM you.

If you have not enabled it, you won’t get messages from your followers.

Method 2. Allow others on Instagram to message you

  1. Visit your Instagram profile by tapping on your profile picture which is available on the bottom bar.
  2. Then, tap on the menu icon and select “Settings”.
  3. Follow these steps: Privacy > Messages > Other people > Others on Instagram.
  4. Enable the “Message requests” feature/option.

By enabling the “Message requests” option on Instagram, you will allow users who are not your followers on Instagram to direct message you.

You will receive message requests from others in your message requests folder.

How do I message people who don’t follow me on Instagram?

To message people who don’t follow you on Instagram, the best bet is to wait until the user enables the “Message requests” feature from their end.

On the other hand, you can also wait until the user follows you on IG to message them.

In the meantime, you can attract them by posting comments on their posts.

If you’re trying to DM a private account, visit their profile, tap on the three dots, and choose “Send Message”.

What’s Next

How to Fix “You’ve reached the message request limit” on Instagram

How to Fix Instagram DMs Stuck on Loading Screen

How to Fix Instagram Direct Messages (DMs) Not Working

Arsalan Rauf
Arsalan Rauf

Arsalan Rauf is an entrepreneur, freelancer, creative writer, and also a fountainhead of Green Hat Expert. Additionally, he is also an eminent researcher of Blogging, SEO, Internet Marketing, Social Media, premium accounts, codes, links, tips and tricks, etc.

www.greenhatexpert.com

Filed Under: Instagram, Social Media

How to Fix “You’ve reached the message request limit” on Instagram

Last Updated on January 1, 2024 By Arsalan Rauf

Are you facing a “You’ve reached the message request limit” on Instagram and do you want to fix it?

The next part of the error is, “There is a limit to the number of conversations that you can start each day with people who don’t follow you”.

You can send direction messages on Instagram to users who are not your followers.

You can use the three dots icon to send a direct message to private accounts.

However, if you send too many requests, it may block you from this function.

In this article, I will tell you how to fix the “You’ve reached the message request limit” error on Instagram.

Why is there a message request limit on Instagram?

There is a message request limit on Instagram to restrict direct messages that people want to avoid, like spam.

According to Instagram’s community guidelines, they give preference to a positive and diverse community.

Consequently, they have a guideline that says to remove unwanted messages.

This guideline will be available under “Respect other members of the Instagram community”.

If you have sent too many message requests in one day, you will be blocked from Instagram temporarily from doing it.

The action is taken against spam, bots, or automation on the platform.

How to fix “You’ve reached the message request limit” on Instagram

To fix “You’ve reached the message request limit” on Instagram, you can go to the desktop app or try sending requests on the website that is, Instagram.com.

You can also use a VPN or another way is to wait for 24 to 48 hours.

It is a temporary message that will be lifted after a day.

If everything is failed, you can use another Instagram account to send messages.

Method 1. Use instagram.com

  1. Use your web browser like Chrome.
  2. Visit this link: https://www.instagram.com/.
  3. Sign in to your Instagram account.
  4. After that, try to send a message request to anyone who is not your follower.

Method 2. Use the desktop app of Instagram

  1. Use the Microsoft Store to download the desktop app of IG.
  2. Open the IG desktop app.
  3. Sign in to your Instagram account.
  4. After that, try to send a message request to anyone who is not your follower.

Method 3. Connect to a VPN

  1. Download a free VPN from app store including “VPN – Super Unlimited Proxy”.
  2. Open it and connect to a country inside the VPN.
  3. Force close the Instagram app and relaunch it.
  4. After that, try sending a message request.

Method 4. Wait for 24-48 hours

  • The best way to fix this error is the wait ranging from 24-48 hours.
  • The “You’ve reached the message request limit” error is not permanent and it will be lifted eventually.
  • In some cases, the error may be fixed within a few hours.

Editor’s note: It happened to me when I try to send message requests too many times, I got blocked and the error goes on its own after a few hours.

Method 5. Use another Instagram account

  • Another reliable method to bypass the error is to try using another Instagram account in order to send message requests.
  • Temporary blocks will not be imposed on your other Instagram accounts.
  • If you don’t have another Instagram account, you can get a free Instagram account here.

What’s Next

How to Fix Instagram DMs Stuck on Loading Screen

How to Fix Instagram Direct Messages (DMs) Not Working

How to Make a Website Like Instagram

Arsalan Rauf
Arsalan Rauf

Arsalan Rauf is an entrepreneur, freelancer, creative writer, and also a fountainhead of Green Hat Expert. Additionally, he is also an eminent researcher of Blogging, SEO, Internet Marketing, Social Media, premium accounts, codes, links, tips and tricks, etc.

www.greenhatexpert.com

Filed Under: Instagram, Social Media

How to Fix “Couldn’t load requests” on Instagram

Last Updated on February 13, 2023 By Arsalan Rauf

Are you getting a “Couldn’t load requests” error on Instagram and do you want to fix it?

The next part of the error is, “There was a network issue. You can try again now or check back later”.

When you select “Try again”, it will refresh your message requests.

You can send and receive direct messages from Instagram.

When someone sends you a direct message, you will get it in your message requests.

You won’t be able to view the message if the message requests are not loading.

In this article, I will tell you how to fix “Couldn’t load requests” on Instagram and why you’re getting the network issue.

Why can’t Instagram load requests?

Instagram can’t load requests because of the outage of servers.

Otherwise, your internet speed is very weak or there’s an issue with your internet connection.

To get started, the first thing is to check if Instagram is down.

To begin with, visit downdetector.com/status/instagram and examine if there’s a spike in the graph.

If you see a spike, it means that the servers are down.

You can also go to Twitter, search for “Instagram down”, and read the top/new tweets to find out if anyone else is complaining about it.

How to fix “Couldn’t load requests” on Instagram

To fix “Couldn’t load requests” on Instagram, you can use an external website like uptodown to download an older version of Instagram.

On the other hand, try to use the desktop version of Instagram by visiting instagram.com.

If you are facing a network error, try to move from Wi-Fi to mobile data and vice-versa.

If Instagram is having outage, wait for at least 24 hours for your message requests to load.

Solution 1: Download an older version of Instagram

  1. Remove the Instagram app.
  2. Copy and paste this link: https://instagram.en.uptodown.com/android/versions.
  3. Download an older version of Instagram from this link.
  4. Open the Instagram APK and sign in to your account.
  5. Now, open your message requests.

Note: This solution is only suitable for Android devices.

Solution 2: Use Instagram on your desktop

  • Instagram’s website: Visit instagram.com, sign in to your account, choose “Messages” on the left sidebar, and select “Requests”.
  • Instagram desktop application: Download the desktop version of IG from the Microsoft Store, go to it, log in to your account, on the left sidebar, select “Messages”, and select “Requests”.

Solution 3: Switch your network

  • If you’re using Wi-Fi, move to mobile data.
  • If you’re using mobile data, move to Wi-Fi.
  • You can also try using another Wi-Fi network.

Solution 4: Other troubleshooting ways

  • To refresh your message, select “Try again” to refresh.
  • Force close the Instagram app (swipe up from the bottom of your screen and swipe up on Instagram) and try to open it again.
  • For Android users, remove the cache of Instagram by navigating to Settings > Apps > See All Apps > Instagram > Storage & cache > Clear cache > Force stop).
  • Find out if Instagram is down from downdetector.com/status/instagram (if there is an outage, wait for up to 24-48 hours).

What’s Next

How to Fix Instagram DMs Stuck on Loading Screen

How to Fix Instagram Direct Messages (DMs) Not Working

How to Make a Website Like Instagram

Arsalan Rauf
Arsalan Rauf

Arsalan Rauf is an entrepreneur, freelancer, creative writer, and also a fountainhead of Green Hat Expert. Additionally, he is also an eminent researcher of Blogging, SEO, Internet Marketing, Social Media, premium accounts, codes, links, tips and tricks, etc.

www.greenhatexpert.com

Filed Under: Instagram, Social Media

  • « Previous Page
  • 1
  • …
  • 11
  • 12
  • 13
  • 14
  • 15
  • …
  • 37
  • Next Page »


Recent Posts

  • Free DeepSeek Accounts 2025
  • Free Zoho Mail Accounts 2025
  • Acudepot Discount Codes 2025
  • Free Blackshot Accounts 2025
  • Free GMX Email Accounts 2025
  • Songtrust Discount Codes 2025
  • Uzicases Discount Codes 2025
  • Cardillo Promo Codes 2025
  • Free DriverFix License Keys 2025
  • Avast Secureline VPN Activation Codes 2025

Recommended Posts

Create a Gmail Account Without Phone Number

Free Course Hero Account

Crunchyroll Accounts

Cracked Apps

Free Pokemon Go Accounts
Onlyfans Free Accounts
Free Chegg Accounts
Free Paypal Accounts
Free Gmail Accounts
Funny Steam Names

Categories

  • Apps
  • Apps for PC
  • Blogging
  • Discord
  • Facebook
  • Gaming
  • Grammar
  • Guide
  • How to
  • Instagram
  • Messaging
  • OnlyFans
  • Pinterest
  • Reddit
  • SEO
  • Snapchat
  • Social Media
  • Spotify
  • Steam
  • Telegram
  • TikTok
  • Twitch
  • Twitter
  • Whatsapp
  • WordPress
  • YouTube
  • Home
  • Social Media
  • Messaging
  • About
  • Submit Guest post