Green Hat Expert

  • Home
  • Social Media
    • Instagram
    • TikTok
    • Snapchat
    • Facebook
    • YouTube
    • Twitter
  • Messaging
    • Discord
    • Telegram
    • Whatsapp
  • About
  • Submit Guest post
You are here: Home / Archives for How to

How to Fix “Not seeing what you expected here? Don’t worry, your conversation data is preserved! Check back soon” in ChatGPT

Last Updated on April 18, 2023 By Arsalan Rauf

ChatGPT saves your conversation history so you can restart them where you left it.

The whole conversation remains safe there which includes the prompts used by the user and the responses generated by the AI.

Sometimes, you might face “Not seeing what you expected here?” error in ChatGPT.

The next part of the error is, “Don’t worry, your conversation data is preserved! Check back soon”.

If you are getting it, you will be restricted from viewing your past conversations with ChatGPT.

In this article, I will tell you how to fix “Not seeing what you expected here? Don’t worry, your conversation data is preserved! Check back soon” in ChatGPT.

Why is my conversation data in ChatGPT gone?

Your conversation data in ChatGPT is gone because there is a problem with the conversation history feature.

The error can occur due to the technical issues with the service or network problems.

The feature can help the model to understand the context by using the previous conversations.

Additionally, you can see your previous conversations and reuse your past prompts.

How to fix “Not seeing what you expected here? Don’t worry, your conversation data is preserved! Check back soon” in ChatGPT

To fix “Not seeing what you expected here? Don’t worry, your conversation data is preserved! Check back soon” in ChatGPT, the first thing you can do is to try logging out and logging in.

You can also remove the cache from your browser, try to use the history of the browser to obtain ChatGPT conversation, or contact OpenAI support to get assistance.

If ChatGPT’s servers are not functioning properly, you have to wait for a few hours so they can work properly.

To find out the status of the website copy and paste this link to your browser: https://status.openai.com/.

Solution 1: Log out and log in to ChatGPT

  1. Visit this URL: https://chat.openai.com/.
  2. On the left sidebar, select “Log out” to sign out.
  3. Select “Log in” to log in again.
  4. Your conversation history will be there.

Solution 2: Clear your browser’s cache

  • Google Chrome: Follow these steps: Chrome > Three Dots > More Tools > Clear browsing data > Cookies and other site data / Cached images and files > Clear data.
  • Microsoft Edge browser: Follow these steps: Edge > Three Dots > Settings > Privacy & services > Choose what to clear > Cached images and files / Cookies and other site data > Clear.
  • Firefox: Follow these steps: Firebox > Menu > Settings > Privacy & Security > Cookies and Site Data > Clear.

Solution 3: Restore ChatGPT from your browsing history

  1. Click on the three dots on the right of the URL field on Google chrome browser.
  2. Select “History” next to “History” again.
  3. Use the search bar to search for “chat.openai.com”.
  4. Try opening any of your previous chats (for instance, https://chat.openai.com/chat_xx_xxx_xx).

Solution 4: Wait until your conversation data is restored

  • You can use this link to check ChatGPT status: https://status.openai.com/.
  • If the service is undergoing maintenance, you have to wait for a few hours and try to use chat.openai.com again.
  • Repeat the same process if ChatGPT is down, the only way is to wait for a few hours for your conversation history to be reopened.

Solution 5: Contact OpenAI support

  1. Go to this link: https://help.openai.com/.
  2. Use the chat icon.
  3. Select “Search for help” and after that, select “Send us a message”.
  4. Select the main topic of the issue.
  5. Tell them your problem in detail and send a message.
  6. Wait to get a response from the support team of OpenAI.

What’s Next

How to Fix “History is temporarily unavailable” in ChatGPT

How to Fix “You’ve made too many phone verification requests” on ChatGPT

How to Fix “This phone number is already linked” on ChatGPT

Arsalan Rauf
Arsalan Rauf

Arsalan Rauf is an entrepreneur, freelancer, creative writer, and also a fountainhead of Green Hat Expert. Additionally, he is also an eminent researcher of Blogging, SEO, Internet Marketing, Social Media, premium accounts, codes, links, tips and tricks, etc.
www.greenhatexpert.com

Filed Under: How to

Free Flashbit Premium Accounts 2025

Last Updated on December 31, 2024 By Arsalan Rauf

FlashBit is another file hosting provider on the internet that contains online storage and backup services.

The platform offers tools for uploading and downloading the files, images, audio, videos and flash.

You can store and access your personal data in a secure way from different devices without using a USB.

FlashBit ensures that other users are not able to search files uploaded by other users to prevent any content leak.

The files can be shared with the people if you want to share it or you can also use it for personal backup so you can download from there whenever you want.

This post has a list of free Flashbit premium accounts (flashbit.cc) with email addresses and passwords (no generator).

Is Flashbit free?

Yes, Flashbit is free, but it does have a premium version.

Flashbit paid version allows users to use the full features of the service.

It will allow the user to handle the daily traffic of 50GB in terms of downloading files including movies, pictures, and music.

The download speed that a premium user gets is up to 1GB/s.

In the end, you can view the videos online and you do not have to download them and they are safe because they are checked for viruses.

How to get a free Flashbit premium subscription

To get a free Flashbit premium subscription, use different survey sites including Survey Junkie or YouGov to earn rewards such as PayPal cash and buy them.

How to create a Flashbit account

To create a Flashbit account, visit their website https://flashbit.cc/.

Once you reach the website, hit the “Sign up” link.

Select a username, provide your email address, select a password, and confirm your password.

In the end, solve the Captcha, click on the “Submit” button, and visit your email to verify it.

Free Flashbit Premium accounts 2025

Free Flashbit accounts

UsernamePassword
kldjf38x=2ml*Obu
jkliop432ze8p9-lC
mnbvcx7890aTruk-#
qweasd123N17$*ZUc
poiuyt4564@AD4CrI
uhfytu9863&E6lnew
pwoeir901SPljl*-1
zxasqw345wriS43@h
edcrfv789s_-0lw9N
yhnjmk254t*Ochi46
zxcvbnm4821ned7T&ka
fghjkl87658iC+PIt_
asdfgh2145st-1eDri
lkjhgf6543*rAY2p_1
poiuyt0987n=&ebrI8
qwe4ty4567yl&RI_r0
ytrewq12344I?eSe$r
mnbvcx3678!0#s3oQU
jfsrtz6589w-TRiw3s
poiuytrewq325f_P07wl*
rfvgm5678cec0*6rE
asdfghl4301H@ke1a6A
zxcvbnm7890$eG$R18o
qjftop3452tr*50pRu
qaedc0987T6-tObr3
lkjhgfdsa6264zOGE?-s4

This table contains a limited number of Flash Bit accounts and you have to use them before anyone tries to access them.

Majority of the accounts are made from temporary email addresses and you cannot use them if they are deleted from the system after usage.

Please do not update the password, it will help others to log into to an account.

If the account is not accessible, it means that the password might be updated by anyone.

Another reason is that the account is banned or deleted or you are using the wrong password to log in.

To avoid the incorrect passwords, my recommendation is that instead of typing the password, just copy and paste the password.

If the flashbit.cc account from the list is devoid of an active subscription, there is a great chance that it is expired or needs to be renewed.

In this case, you need to use other Free FlashBit logins from the list.

I will add new Flashbit accounts to the table in the future, you can bookmark the page to obtain free accounts later.

What’s Next

Free PixelDrain Premium Accounts

Free Nelion Premium Accounts

Free Ufile Premium Accounts

Arsalan Rauf
Arsalan Rauf

Arsalan Rauf is an entrepreneur, freelancer, creative writer, and also a fountainhead of Green Hat Expert. Additionally, he is also an eminent researcher of Blogging, SEO, Internet Marketing, Social Media, premium accounts, codes, links, tips and tricks, etc.
www.greenhatexpert.com

Filed Under: How to

How to Change Servers in Genshin Impact

Last Updated on April 15, 2023 By Arsalan Rauf

To play Genshin Impact with your friends, you have to go to the same server as them.

Otherwise, you cannot play with them or find them.

Let’s suppose, you are on the America server while your friend is on another server for instance, Asia server.

In this case, you will not be able to play the game with them.

To fix this, you or your friend have to change servers.

If you are playing on America server, you have to switch to the server that your friend is on.

However, you might have a question in mind that if your progress will be lost.

In this article, I will tell you how to change servers in Genshin Impact and whether you’ll lose progress if you change servers.

I will also tell you if servers matter in Genshin Impact.

This guide is universal regardless of the platform you are using to play Genshin Impact including PC, Xbox, PlayStation, iOS, Android, or Nintendo Switch, you can follow this article to change servers.

How to change servers in Genshin Impact

To change servers in Genshin Impact, the first step is to launch the game.

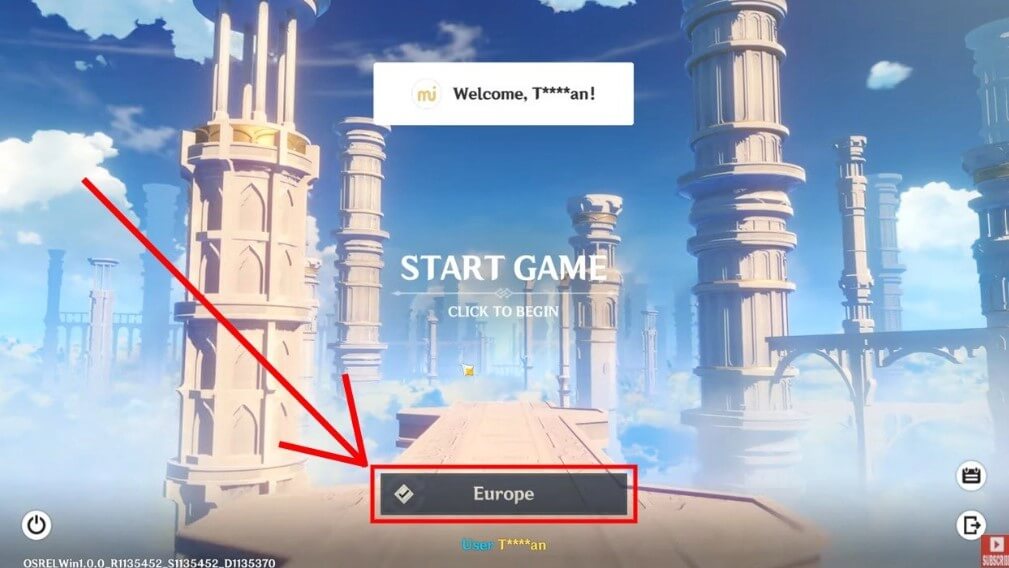
After launching Genshin Impact, click on the current server that you’re playing on and choose the server that you want to switch to.

For instance, if your current server is “Europe”, you need to click on “Europe”.

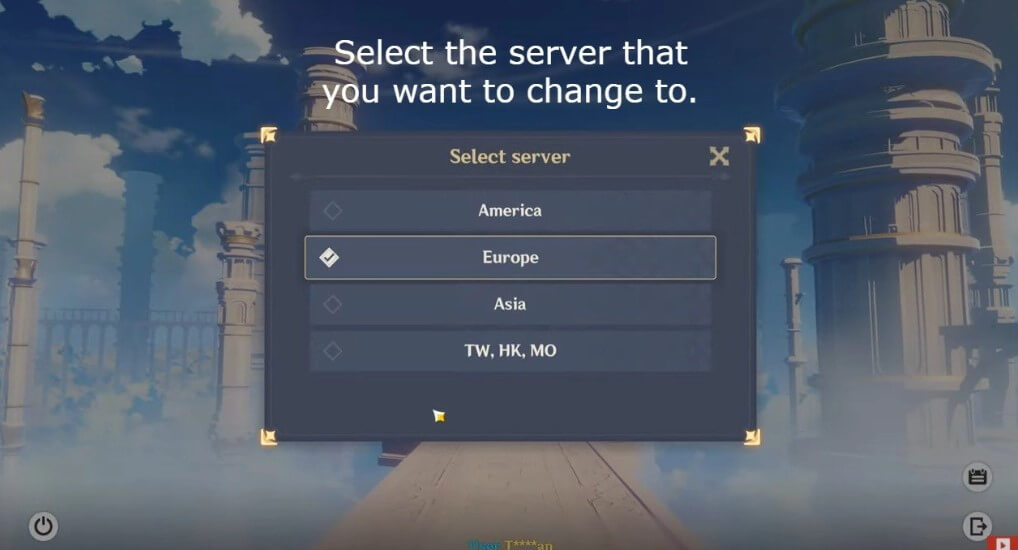
After that, you can select from four different servers.

Those 4 servers include America, Europe, Asia, and TW/HK/MO.

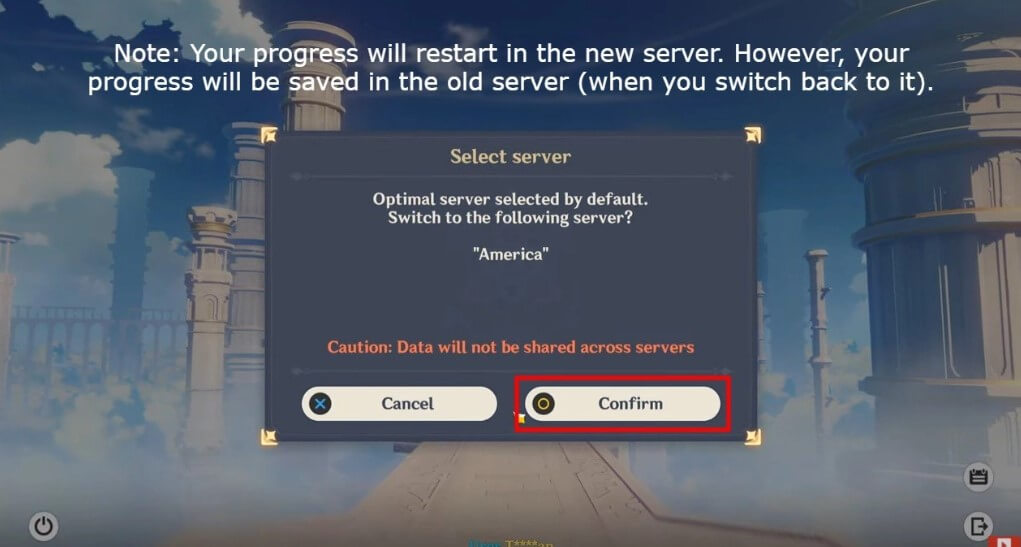
After selecting the server that you want to change to, it will show you a pop-up message.

The message on a pop-up will be that data will not be shared across servers.

It means that you have to relaunch or restart the game when you switch to a new server.

However, it will save your progress in the old server.

Therefore, you do not have to be worried about switching or changing of servers because your progress will remain there.

Here is a step by step guide on how to change servers in Genshin Impact:

Step 1. Launch Genshin Impact

The first thing you need to do when it comes to changing servers in Genshin Impact is to launch the game.

First of all, you need to open Genshin impact application on your platform.

The platforms can be PC, Xbox, PlayStation, iOS, Android, or Nintendo Switch version of the game.

After opening the Genshin Impact application, you need to launch the game by clicking on “Launch”.

Step 2. Click on your current server

change servers genshin impact 1

After launching Genshin Impact, it will show you the server that you’re currently on.

For instance, if you’re using the “Europe” server now, a “Europe” button will be available.

Similarly, if the “America” server is being used by you, it will display an “America” button.

To move on to change your server on Genshin Impact, you need to click on the server button.

Step 3. Select the server that you want to change to

change servers genshin impact 2

After clicking on the server button, it will open a pop-up.

The pop-up will give you a list of servers that you can move to.

The servers are America, Europe, Asia, and TW/HK/MO.

It is time to select the server that you desire to switch to.

If you want to play co-op with your friend, it is wise to be on the similar server as your friend.

For instance, if your friend is playing on the Asia server, select “Asia” to change to the Asia server.

Step 4. Confirm the change

change servers genshin impact 3

After choosing the server that you want to be on, it will show you a confirmation pop-up.

The pop-up will tell that data will not be shared across servers.

It indicates that your progress will restart if you switch to a new server.

However, your progress will remain saved in the old server (if you go back to it).

Therefore, you don’t have to be anxious about losing your progress because you can go back to your old server whenever you want.

When you switch it, you get your progress back.

You have to click on “Confirm” to change servers.

Well done! I have successfully taught you how to change servers on Genshin Impact!

Do you lose progress if you change servers in Genshin Impact?

Your old server will keep your progress but the new server will lose your progress.

The reason behind it is that data cannot be transferred across servers.

For instance, if you switched to a new server in Genshin Impact, your progress will restart.

However, in the old server, you will begin with your progress where you left it (when you go back to it).

If you have been playing Blizzard games such as Hearthstone, you will be familiar with the rule that it does not transfer progress between servers.

Does the server matter in Genshin Impact?

Yes, servers matter in Genshin Impact if you want to enjoy co-op mode with your friend.

You have to be on the same server as them in order to play with them.

Let’s suppose that you’re on the Asia server and playing on it but your friend is on the America server.

If your friend wants to play co-op with you, he needs to change the server to Asia.

On the other hand, your friend can change their server to Asia.

Final Words

Another recommendation is that you choose a server that is close to where you reside in.

For instance, if you are in Singapore, you should select the “Asia” server.

Alternatively, if you reside in America, you should select the “America” server.

It will cause a lower ping.

Just remember that switching servers will not delete your progress on the old server.

However, on the new server, your progress will be reset.

It means that when you go back to the old server, your progress will be restored.

You have to choose the same server as your friend in order to play co-op with them.

If your friend is not very progressive in Genshin Impact, you can ask them to switch to your server.

What’s Next

Genshin Impact Usernames Ideas

How to Recover Your Genshin Impact Account

How to Change or Reset Your Genshin Impact Password

Arsalan Rauf
Arsalan Rauf

Arsalan Rauf is an entrepreneur, freelancer, creative writer, and also a fountainhead of Green Hat Expert. Additionally, he is also an eminent researcher of Blogging, SEO, Internet Marketing, Social Media, premium accounts, codes, links, tips and tricks, etc.
www.greenhatexpert.com

Filed Under: Gaming, How to

How to Join Someone in Roblox Without Being Their Friend

Last Updated on April 14, 2023 By Arsalan Rauf

Roblox is a sandbox game that can be used to share experiences and be anything you can think of.

You can select from thousands of experiences and play with your friends.

If you are friend with someone, you can join them in a Roblox experience and this setting is by default.

You can use your privacy settings to change it.

There are five options and this setting is known as “Who can join me in experiences?”.

In this article, I will tell you how to join someone in Roblox without being their friend in an experience.

Can you join someone in Roblox without being friends?

Yes, you can join someone in Roblox without being friends with the user.

It can be possible if the user has set their “Who can join me in experiences?” privacy setting to “Friends, users I follow, and my followers” or “Everyone”.

If the setting of the user is set to “Friends, users I follow, and my followers”, you can join them in an experience and it can be done by going to their profile and click on the three dots and follow them.

If you are following the person and their privacy setting is also set to “Friends, users I follow, and my followers”, you can join them when they play a game.

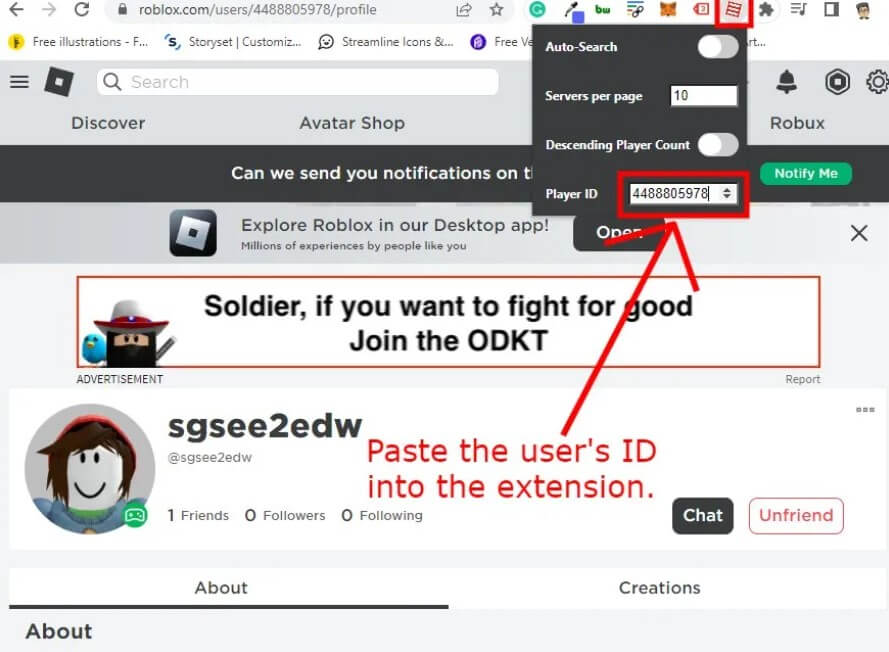
You can also use the “Restore Old Roblox Server List” Chrome extension and use the player’s ID into the extension.

How to join someone in Roblox without being their friend

To join someone in Roblox without being their friend, the first thing you need to do is to install the “Restore Old Roblox Server List” Chrome extension and put the player’s ID into the extension.

After entering the player’s ID, inspect the badges of the user, guess the game they are playing, choose it, find the user, and join the server they are in.

If you see no results, you have to check their badges again and select another game.

The method is based on trial and error, so multiple tries are needed to join the user in an experience.

#1: Install the “Restore Old Roblox Server List” Chrome extension

  1. Go to the Google chrome browser.
  2. Visit the “Restore Old Roblox Server List” extension to install it.
  3. Select “Add to Chrome”.
  4. To pin the extension, click on the puzzle icon.

#2: Copy and paste the player’s ID into the extension

join someone joins off roblox 1
join someone joins off roblox 2
  1. Visit the Roblox website.
  2. Search for the user that you want to join in an experience.
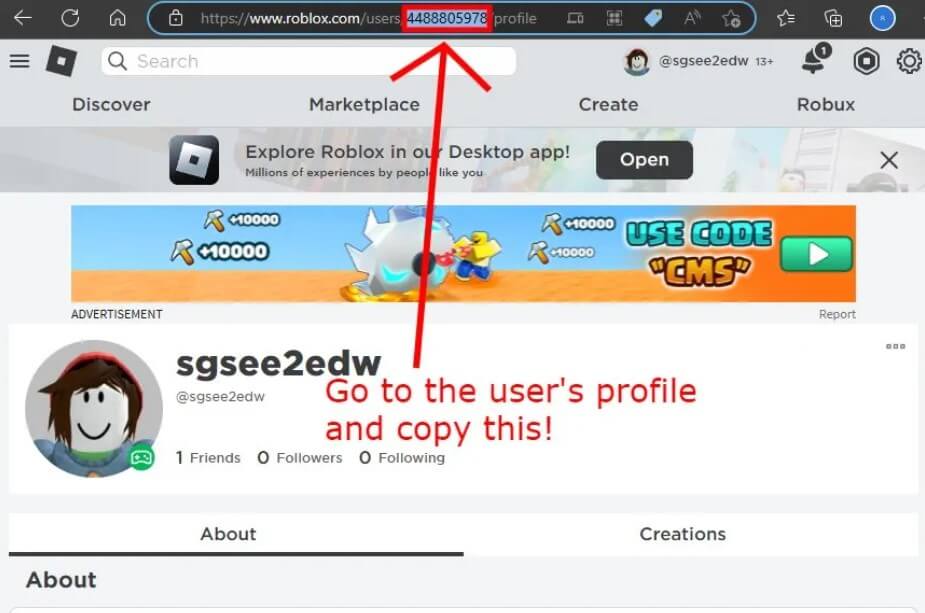
  3. Use the Chrome search box to copy their player ID (for instance, 4488805978).
  4. After that, you need to click on the “Restore Old Roblox Server List” extension.
  5. Paste the ID of the player into the “Player ID” field.

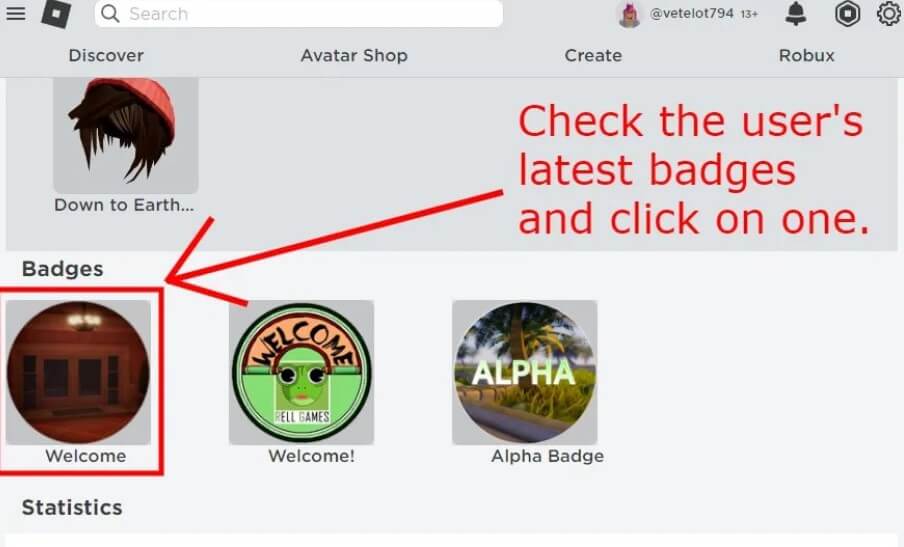
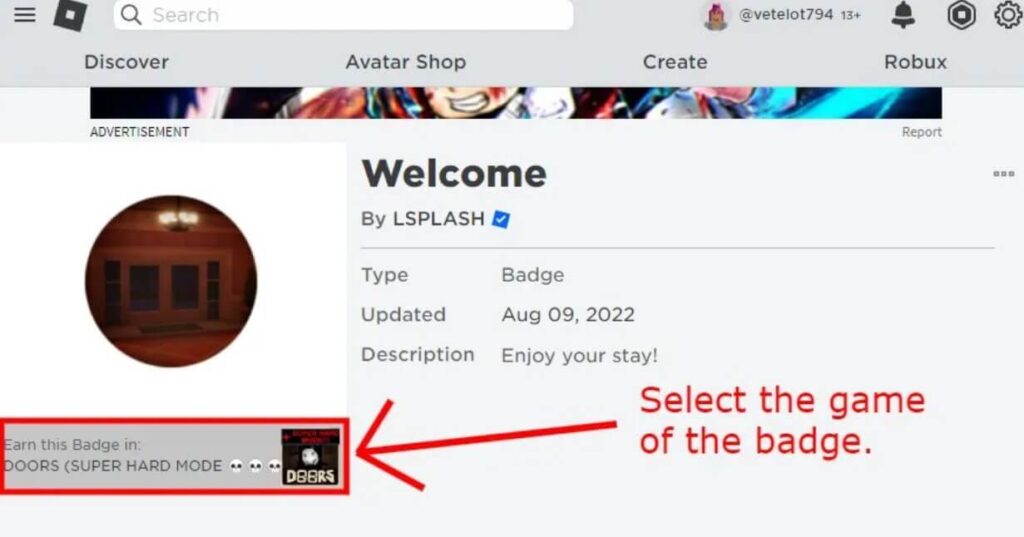
#3: Check the user’s badges and guess the game they are playing

join someone joins off roblox 3
join someone joins off roblox 4
  1. On the Roblox website, visit “My Friends”.
  2. Go to the profile of the user that you want to join.
  3. Scroll down to reach the “Badges” section.
  4. Choose the most recent badge that they obtained.
  5. Select the game/experience of the Badge.

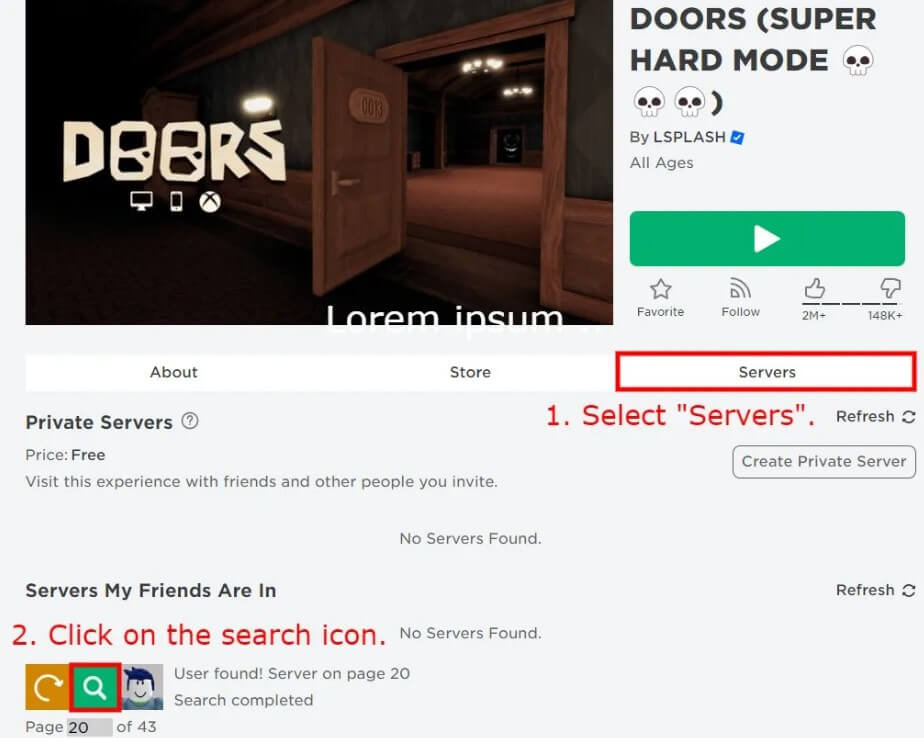
#4: Search for the user and join the server they are in

join someone joins off roblox 5
join someone joins off roblox 6
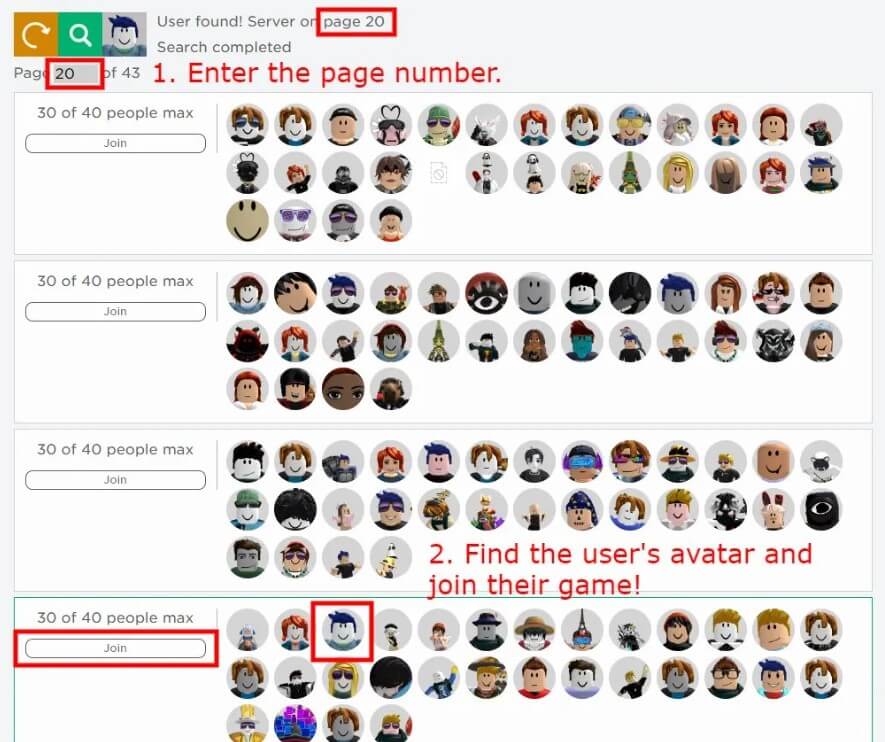
  1. Select “Servers” on the page.
  2. Now, click on the search icon and wait for up to 60 seconds (1-minute).
  3. Edit the page number to the page where the user is found.
  4. Find the avatar of the user and join their game!

Note: If the search results in “User not found”, you have to visit the #3 step in this guide and try selecting another badge from another game/experience.

What’s Next

How to Join Someone with their Joins Off in Roblox

How to Fix “Advapi32.dll” Error in Roblox

Free Roblox Gift Card Codes

Arsalan Rauf
Arsalan Rauf

Arsalan Rauf is an entrepreneur, freelancer, creative writer, and also a fountainhead of Green Hat Expert. Additionally, he is also an eminent researcher of Blogging, SEO, Internet Marketing, Social Media, premium accounts, codes, links, tips and tricks, etc.
www.greenhatexpert.com

Filed Under: Gaming, How to

How to Fix Game Already Running in Minecraft

Last Updated on April 13, 2023 By Arsalan Rauf

Are you facing a “The game is already running” error on Minecraft?

The next part of the error is, “If you just quit the game, it should be ready to launch in a moment”.

Minecraft is a game in which you will have to prove yourself resourceful with the help of surrounding environment to obtain building material.

You can come up with something unique by breaking down trees.

You have to get rid of dangerous situations by keeping yourself at arm’s length from mobs to survive the night.

Players can know about the Redstone ore to build amazing creations to give rise to the creations.

In this article, I will tell you how to fix game already running in Minecraft for Java or Bedrock.

What is “This game is already running” in Minecraft?

This game is already running on Minecraft means that you have already opened an instance of Minecraft.

In short, the Minecraft launcher is already running in the background.

You can also face it when the launcher is stuck in the task manager.

A firewall or antivirus program can also stop Minecraft from launching too, so you have to disable them to run it.

How to fix game already running in Minecraft

To fix game already running in Minecraft, the first thing you need to do is to end the task for the Minecraft launcher.

You can also use the app’s settings to verify or repair the game.

If everything fails, you can remove and reinstall the game from the Microsoft store.

Solution 1: End the task for the Minecraft launcher

  1. Press these keys together “CTRL” + “ALT” + “DEL” from your keyboard.
  2. To open the task manager, select “Task Manager”.
  3. Look for the “Minecraft Launcher” process.
  4. Right-click on “Minecraft Launcher” and select “End task” to end the task.
  5. Now, open the Minecraft Launcher.

Solution 2: Verify and repair the game

  • Use the window search bar to find “Apps and features”
  • Click on the three dots beside “Minecraft Launcher” by Mojang/Microsoft Studios.
  • After that, select “Advanced options”.
  • Choose “Terminate”, “Repair”, and “Reset” in the same order.
  • Now, open the Minecraft Launcher.

Solution 3: Uninstall and reinstall the launcher

  1. Use the windows search to find “Apps and features”.
  2. Click on the three dots beside “Minecraft Launcher” by Mojang/Microsoft Studios.
  3. After that, select “Advanced options”.
  4. Scroll down to choose “Uninstall”.
  5. Go to the Microsoft Store > search for “Minecraft Launcher” > install it again.
  6. Now, open the Minecraft Launcher.

What’s Next

How to Fix Error Code 0x87e50038 on Minecraft

Top 3 Best Mob Arena Minecraft Servers

Free Minecraft Redeem Codes

Arsalan Rauf
Arsalan Rauf

Arsalan Rauf is an entrepreneur, freelancer, creative writer, and also a fountainhead of Green Hat Expert. Additionally, he is also an eminent researcher of Blogging, SEO, Internet Marketing, Social Media, premium accounts, codes, links, tips and tricks, etc.
www.greenhatexpert.com

Filed Under: Gaming, How to

How to Fix Error Code 0x87e50038 on Minecraft

Last Updated on April 13, 2023 By Arsalan Rauf

Are you facing a 0x87e50038 error code in Minecraft?

The error message will show that the game is already running.

It also shows that it will be able to launch soon if you have just quit it.

If you will keep trying to run the game, the error message will be shown again and again.

In this article, I will tell you how to fix “Error Code: 0x87e50038” on Minecraft if you can’t start the launcher.

What does error code 0x87e50038 mean on Minecraft?

Error code 0x87e50038 on Minecraft means that you have already opened an instance of Minecraft.

In short, the Minecraft launcher is already running in the background.

You can also face it when the launcher is stuck in the task manager.

A firewall or antivirus program can also stop Minecraft from launching too, so you have to disable them to run it.

How to fix error code 0x87e50038 on Minecraft

To fix error code 0x87e50038 on Minecraft, the first thing you need to do is to end the task for the Minecraft launcher.

You can also use the app’s settings to verify or repair the game.

If everything fails, you can remove and reinstall the game from the Microsoft store.

Solution 1: End the task for the Minecraft launcher

  • Press these keys together “CTRL” + “ALT” + “DEL” from your keyboard
  • To open the task manager, select “Task Manager”.
  • Find the “Minecraft Launcher” process.
  • Right-click on “Minecraft Launcher” and select “End task” to end the task.
  • Now, open the Minecraft Launcher.

Solution 2: Verify and repair the game

  1. Use the window search bar to find “Apps and features”.
  2. Click on the three dots beside “Minecraft Launcher” by Mojang/Microsoft Studios.
  3. After that, select “Advanced options”.
  4. Choose “Terminate”, “Repair”, and “Reset” in the same order.
  5. Now, open the Minecraft Launcher.

Solution 3: Uninstall and reinstall the launcher

  1. Use the windows search to find “Apps and features”.
  2. Click on the three dots beside “Minecraft Launcher” by Mojang/Microsoft Studios.
  3. After that, select “Advanced options”.
  4. Scroll down to choose “Uninstall”.
  5. Go to the Microsoft Store, search for “Minecraft Launcher” to install it again.
  6. Now, open the Minecraft Launcher.

What’s Next

Top 3 Best Mob Arena Minecraft Servers

Top 7 Minecraft Servers With Guns

Free Minecraft Accounts

Arsalan Rauf
Arsalan Rauf

Arsalan Rauf is an entrepreneur, freelancer, creative writer, and also a fountainhead of Green Hat Expert. Additionally, he is also an eminent researcher of Blogging, SEO, Internet Marketing, Social Media, premium accounts, codes, links, tips and tricks, etc.
www.greenhatexpert.com

Filed Under: Gaming, How to

Free PixelDrain Premium Accounts 2025

Last Updated on December 24, 2024 By Arsalan Rauf

PixelDrain is another reliable file sharing website that helps users to upload as well as share the files on the web.

The stored files remain on the website for at least 2 months, in this period, anyone can download the file if the user has the link.

It is not necessary to have an account, it contains different features including accessing files and albums from different devices, renaming and deleting files, and creating and reordering albums.

Additionally, you can also support the service by purchasing a subscription and boost their aim to make the content sharing safe and easy.

This post has a list of free PixelDrain premium/pro accounts (pixeldrain.com) with email addresses and passwords (no generator).

Is PixelDrain free?

PixelDrain is free, but the free version offers limited features.

You have to subscribe to the pro/premium plan in order to use all the features.

A free account is restricted to 20 GB per file and files will expire after 2 months after the last time it’s viewed.

A premium version has a limitation of 50 GB and files will be removed 240 days after the last time it’s viewed.

How to get a free PixelDrain premium subscription

To get a free PixelDrain premium subscription, use different survey sites including Survey Junkie or YouGov to earn rewards such as PayPal cash and buy them.

How to create a PixelDrain account

To create a PixelDrain account, visit their website https://pixeldrain.com/.

Once you reach the website, hit the “Register” link.

Select a username, provide your email address, select a password, and confirm your password.

In the end, solve the Captcha, click on the “Submit” button, and visit your email to verify it.

Free PixelDrain Premium accounts 2025

Free PixelDrain accounts

UsernamePassword
kldjf38x=2ml*Obu
qrehtn613si9*6r$C
wdymvb877-3iC&Ube
ksoixf246dr@T0ESO
nzjlqr128SWa3$b6b
lxpzkj392fr_wRu42
pwoeir901SPljl*-1
zxasqw345wriS43@h
edcrfv789s_-0lw9N
yhnjmk254t*Ochi46
zxcvbnm4821ned7T&ka
fghjkl87658iC+PIt_
asdfgh2145st-1eDri
lkjhgf6543*rAY2p_1
poiuyt0987n=&ebrI8
qwe4ty4567yl&RI_r0
ytrewq12344I?eSe$r
mnbvcx3678!0#s3oQU
jfsrtz6589w-TRiw3s
poiuytrewq325f_P07wl*
rfvgm5678cec0*6rE
asdfghl4301H@ke1a6A
zxcvbnm7890$eG$R18o
qjftop3452tr*50pRu
qaedc0987T6-tObr3
lkjhgfdsa6264zOGE?-s4

This table contains a limited number of Pixel Drain accounts and you have to use them before anyone tries to access them.

Majority of the accounts are made from temporary email addresses and you cannot use them if they are deleted from the system after usage.

Please do not update the password, it will help others to log into to an account.

If the account is not accessible, it means that the password might be updated by anyone.

Another reason is that the account is banned or deleted or you are using the wrong password to log in.

To avoid the incorrect passwords, my recommendation is that instead of typing the password, just copy and paste the password.

If the pixeldrain.com account from the list is devoid of an active subscription, there is a great chance that it is expired or needs to be renewed.

In this case, you need to use other Free PixelDrain logins from the list.

I will add new PixelDrain accounts to the table in the future, you can bookmark the page to obtain free accounts later.

What’s Next

Free Nelion Premium Accounts

Free Ufile Premium Accounts

Free IcerBox Premium Accounts

Arsalan Rauf
Arsalan Rauf

Arsalan Rauf is an entrepreneur, freelancer, creative writer, and also a fountainhead of Green Hat Expert. Additionally, he is also an eminent researcher of Blogging, SEO, Internet Marketing, Social Media, premium accounts, codes, links, tips and tricks, etc.
www.greenhatexpert.com

Filed Under: How to

Free Movavi Video Converter Activation Keys 2025

Last Updated on December 31, 2024 By Arsalan Rauf

With Movavi Video Converter 2025, you can change your multimedia content without worrying about file formats.

The aim of the converter is to do the conversion rapidly without losing any quality, allowing you to compress the large videos with ease.

Additionally, the software contains AI-powered upscaling to boost the quality of the videos which are in low-resolution.

You can use the editing tools such as cropping, trimming, adjust colors and add effects with the help of editing tools.

You can add subtitles to your videos easily with this software.

This post has free Movavi video converter activation keys (1-year subscription, lifetime, business license, and more).

Is Movavi video converter free?

The Movavi video converter comes with a 7-day trial period for you so you can test it before buying it.

The trial version will give you access to all the features that are available in the full version but there will be restrictions in functionality and duration.

You can use the trial version of Movavi for specific days after the installation.

Each product contains specific limitations in the trial version and you can find the modules on Movavi’s website.

How to get Movavi video converter for free

To get Movavi video converter for free, use different survey sites including Survey Junkie or YouGov to earn rewards such as PayPal cash and buy them.

Movavi video converter giveaway

How to take part in the Movavi video converter giveaway:

  1. Follow Green Hat Expert on Facebook.
  2. Share this post on social media sites like FB, Twitter, Instagram etc.
  3. Send a screenshot after sharing the post on any social media site to prove that you have shared the post.
  4. We will select one winner every week (you will receive the key on your social media if you won).

Free Movavi video converter activation keys 2025

Movavi video converter activation keys (Lifetime/1-year subscription)

  • 178943-34512-76543-98765-32109-54321-65780
  • 345672-65432-98765-10987-54321-23456-89701
  • 862345-23456-87654-65432-54321-98765-40692
  • 726439-54332-89773-76451-76593-87653-43560
  • 823456-12345-67890-43210-98765-45678-31205
  • 946123-45987-21540-86543-27564-65324-10985
  • 987654-98765-98765-98765-98765-98765-98765
  • 123456-12345-12345-12345-12345-12345-12345
  • 543210-54321-54321-54321-54321-54321-54321
  • 312567-76543-23456-87654-54321-10987-56701
  • 901234-56789-01234-56789-01234-56789-01235
  • 678901-23456-78901-23456-78901-23456-78901
  • 789012-34567-89012-34567-89012-34567-89012
  • 890123-45678-90123-45678-90123-45678-90123
  • 543210-98765-43210-98765-43210-98765-43210
  • 456789-01234-56789-01234-56789-01234-56789
  • 567890-12345-67890-12345-67890-12345-67890
  • 123456-65432-21098-09876-54321-23456-78901
  • 543210-12345-09876-87654-32109-65432-78901
  • 234567-87654-32109-09876-54321-09876-54320
  • 678901-23456-78901-23456-78901-23456-78902
  • 987654-43210-10987-54321-09876-54321-87650
  • 987321-67890-43210-12345-67890-43210-12358
  • 456789-09876-54321-21098-76543-21098-76540
  • 765432-10987-65432-21098-76543-21098-76540
  • 987654-32109-87654-21098-76543-21098-76540

In this list, we have added limited number of free Movavi video converter activation keys.

The keys are based on first come first serve, so if the key is no longer working, it means that it is expired now.

In this case, you can use the next Movavi Video activation key from the list.

I will add more free Movavi converter activation keys with lifetime subscriptions to the list in the future.

To get Movavi Video converter keys free in the future, you can bookmark the page to revisit it later

What’s Next

Free Movavi Video Editor Activation Keys

Free Windows XP Product Keys

Free IDM Serial Numbers and Keys

Arsalan Rauf
Arsalan Rauf

Arsalan Rauf is an entrepreneur, freelancer, creative writer, and also a fountainhead of Green Hat Expert. Additionally, he is also an eminent researcher of Blogging, SEO, Internet Marketing, Social Media, premium accounts, codes, links, tips and tricks, etc.
www.greenhatexpert.com

Filed Under: How to

How to Fix Error Code 134 in Rockstar Games Launcher

Last Updated on April 10, 2023 By Arsalan Rauf

The Rockstar Games Launcher is a digital launcher that is designed for PC games and the developer and publisher of this storefront is Rockstar Games.

The users are allowed to buy and download games from the library of Rockstar Games such as Red Dead Redemption, GTA and Max Payne.

In some cases, the users can face connection issues with the launcher.

There are several players who complained that the Rockstar Games Launcher is not working, freezing, or not responding.

A common error that is experienced by the players is the error code 134 in Social Club.

In this article, I will tell you how to fix the Social Club error code 134 in the Rockstar Games Launcher for GTA 5.

What is error code 134 in GTA 5?

Error code 134 in GTA 5 means that the game version is not up to the date.

The version of the game becomes outdated if you do not update it.

Otherwise, there is a problem with the Rockstar Games services or your internet connection.

You can go to the Rockstar Service Status website in order to find the status.

How to fix error code 134 in Rockstar Games Launcher

To fix error code 134 in Rockstar Games Launcher (GTA 5), you can do these two things including use Proton VPN or 1.1.1.1 by Cloudflare.

Additionally, you can also remove the social club folder by deleting it or flush the DNS cache.

Rockstar suggests verifying the integrity of your game files using the Rockstar Games Launcher or GTA 5.

For Steam, visit your library, right-click on “GTA V”, choose “Properties”, select “Local Files”, and select “Verify integrity of game files”.

Solution 1: Use ProtonVPN

  1. End the task for the Rockstar Games Launcher.
  2. Go to their official website: ProtonVPN.com
  3. Scroll down until you find the “Get Free VPN”.
  4. Click on “Get Free VPN”.
  5. After that, Install Proton VPN, open it, and create an account.
  6. After opening the free VPN, connect to it and open the Rockstar Games Launcher.

Solution 2: Use 1.1.1.1 by Cloudflare

  1. End task for the Rockstar Games Launcher.
  2. Visit https://1.1.1.1/ by Cloudflare.
  3. After that, install 1.1.1.1 for Windows/macOS/Linux.
  4. Now, access WARP and turn it on.
  5. Lastly, open the Rockstar Games Launcher.

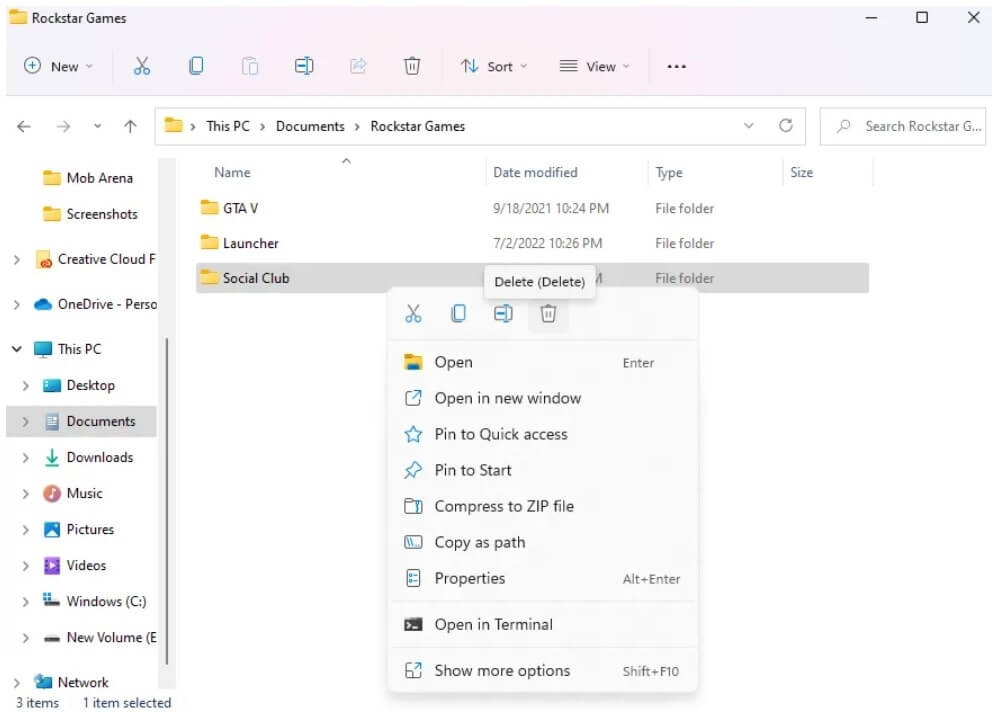
Solution 3: Delete the social club folder

fix offline mode rockstar games launcher 1
  1. Visit the File Explorer.
  2. Go to the “Documents” folder.
  3. Open the “Rockstar Games” folder to access it.
  4. After that, delete the “Social Club” folder.
  5. Lastly, go to the Rockstar Games Launcher to open it and log in to your account.

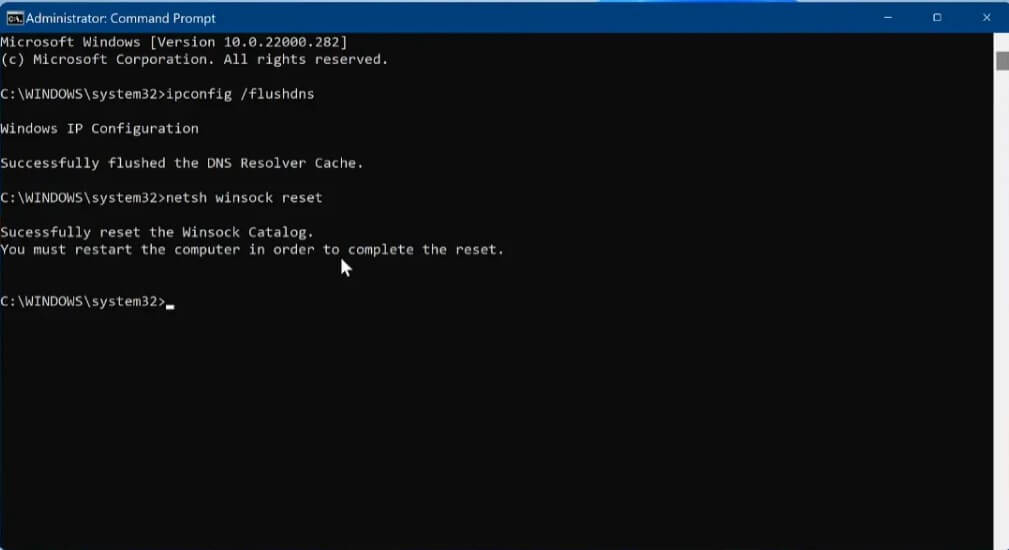
Solution 4: Flush your DNS cache

fix offline mode rockstar games launcher 2
  1. To find “Command Prompt”, use the Windows search.
  2. Now, run the Command Prompt as an administrator.
  3. Type this command “ipconfig /flushdns” and press enter.
  4. After that, type this command “netsh winsock reset” and press enter.
  5. Restart your PC or computer and reopen the Rockstar Games Launcher.

What’s Next

How to Fix Social Club Error Code 1002

How to Fix “Social Club has failed to start because of an incomplete installation code 1″

How to Fix Error Code 6000.87 in Rockstar Games Launcher

Arsalan Rauf
Arsalan Rauf

Arsalan Rauf is an entrepreneur, freelancer, creative writer, and also a fountainhead of Green Hat Expert. Additionally, he is also an eminent researcher of Blogging, SEO, Internet Marketing, Social Media, premium accounts, codes, links, tips and tricks, etc.
www.greenhatexpert.com

Filed Under: Gaming, How to

How to Fix Social Club Error Code 1002

Last Updated on April 10, 2023 By Arsalan Rauf

The Rockstar Games Launcher is launched by Rockstar Games that works as a software platform to sell their computer games.

The users can browse, buy and download games from its library including GTA and Red Dead Redemption.

Multiple users have complained that there is a problem while connecting to the launcher, some users reported that they get the problem including freezing or unresponsiveness.

The users have posted these issues on forums and social media sites.

A common error that is experienced by the players is error code 1002 in Social Club.

In this article, I will tell you how to fix error code 1002 in Social Club in the Rockstar Games Launcher.

What is error code 1002 in Social Club?

Error code 1002 in Social Club occurs due to an incorrectly installed Social Club folder.

Otherwise, another app is stopping Social Club from communicating with the Rockstar Games servers.

The error can also occur when the launcher cannot find the Social Club folder.

It happens when there is a missing Documents folder in the C or D drive.

How to fix Social Club error code 1002

To fix Social Club error code 1002, the first thing is to update the location of your documents folder to the default location.

To begin with, follow these steps: go to the File Explorer > This PC > right-click “Documents” > Properties > Location > Restore Default > Apply > Ok.

Here’s a step by step guide on how to do this:

  1. Go to the File Explorer and select “This PC”.
  2. After that, right-click on “Documents”.
  3. Choose “Properties”.
  4. Location > Restore Default > Apply > Ok.
  5. Access the Rockstar Games Launcher by opening it and launch a game like Grand Theft Auto 5.

If you still experience the issue, follow these steps: go to This PC > Windows (C:) > Users > Your user.

In the user folder, follow these steps: right-click > New > Folder > name it “Documents”.

After that, copy the file directory of the new folder, return to the documents folder in “This PC”, right-click on it, and select “Location”.

In the end, you need to change the location to the location of the new documents folder in the C Drive.

What’s Next

How to Fix “Social Club has failed to start because of an incomplete installation code 1″

How to Fix Error Code 6000.87 in Rockstar Games Launcher

How to Fix “Failed to connect to the Rockstar Games Library Service”

Arsalan Rauf
Arsalan Rauf

Arsalan Rauf is an entrepreneur, freelancer, creative writer, and also a fountainhead of Green Hat Expert. Additionally, he is also an eminent researcher of Blogging, SEO, Internet Marketing, Social Media, premium accounts, codes, links, tips and tricks, etc.
www.greenhatexpert.com

Filed Under: Gaming, How to

  • « Previous Page
  • 1
  • …
  • 25
  • 26
  • 27
  • 28
  • 29
  • …
  • 81
  • Next Page »


Recent Posts

  • Free DeepSeek Accounts 2025
  • Free Zoho Mail Accounts 2025
  • Acudepot Discount Codes 2025
  • Free Blackshot Accounts 2025
  • Free GMX Email Accounts 2025
  • Songtrust Discount Codes 2025
  • Uzicases Discount Codes 2025
  • Cardillo Promo Codes 2025
  • Free DriverFix License Keys 2025
  • Avast Secureline VPN Activation Codes 2025

Recommended Posts

Create a Gmail Account Without Phone Number

Free Course Hero Account

Crunchyroll Accounts

Cracked Apps

Free Pokemon Go Accounts
Onlyfans Free Accounts
Free Chegg Accounts
Free Paypal Accounts
Free Gmail Accounts
Funny Steam Names

Categories

  • Apps
  • Apps for PC
  • Blogging
  • Discord
  • Facebook
  • Gaming
  • Grammar
  • Guide
  • How to
  • Instagram
  • Messaging
  • OnlyFans
  • Pinterest
  • Reddit
  • SEO
  • Snapchat
  • Social Media
  • Spotify
  • Steam
  • Telegram
  • TikTok
  • Twitch
  • Twitter
  • Whatsapp
  • WordPress
  • YouTube
  • Home
  • Social Media
  • Messaging
  • About
  • Submit Guest post