Green Hat Expert

  • Home
  • Social Media
    • Instagram
    • TikTok
    • Snapchat
    • Facebook
    • YouTube
    • Twitter
  • Messaging
    • Discord
    • Telegram
    • Whatsapp
  • About
  • Submit Guest post
You are here: Home / Archives for Guide

8 Ways To Fix Asphalt 8 Unfortunately Stopped On Android

Last Updated on August 21, 2022 By Arsalan Rauf

8 Ways To Fix Asphalt 8 Unfortunately Stopped On Android

Asphalt 8 is one of the best Racing games and the developer of this game is Gameloft. This racing game is replete with ideal graphics quality that attracts the attention of the users on the screen. The selection of the car is perfect and cool which has an additional engine option that makes it sophisticated. In addition, it also makes the user experience more challenging. There are many challenges that enable users to try, try again. In this post, I shall discuss how to fix Asphalt 8 unfortunately stopped on Android phone or Asphalt 8 not working.

Also read:

  • Best Apps to find Job in India
  • Best Sites to Download PC games for Free
  • How to Disable UC browser notifications

Fix Asphalt 8 Unfortunately Stopped On Android

Some of the smartphone or Android users including those who have installed Asphalt 8: Airborne cannot run it in a smooth way. Some of them experience lag, can not open, or receive an error to ‘Fix Asphalt 8 Unfortunately Stopped or Unfortunately, Asphalt 8 Has stopped’. This error can occur due to the junk of cache files, no support or corrupt installation files and so on. So you can see in this post, Unfortunately Asphalt 8 has stopped working fix.

1. Make sure File Download is Completed

As all of us are aware that Asphalt 8 Airborne is a game which has ideal graphic quality. Therefore, the size of the file of Asphalt 8 is very large, it is about more than 2GB. Before you start playing it, you need to make sure that you have downloaded all the files.

2. Make sure Network is Maximum

In addition, while playing games you need to ensure that the quality of network around you is up. If it is not, you will experience lagging while playing it. Asphalt 8 showing unfortunately stopped error or you will stop in the middle of the road. This game does not need a plenty of data packets because we have download the file the size of more than 2GB. It only takes a while to connect with a number of users.

3. Ensure Sufficient Memory

In addition to your internal memory, you should have sufficient amount of Ram memory as well. The minimum requirement of Asphalt 8 is 3GB. A piece of advice, do not open other apps in the background while playing it. Most Android phones lag and get an error message when the memory of the ram is full.

4. Restart Smartphone

The simple step you can take when you see the error message on Game Asphalt 8 Airbone to restart your Android phone. It may make your game normal again but the chances are very few.

5. Remove Asphalt Cache 8

The next step is to clean garbage files on Game Asphalt 8 Airbone. There may be a stack of cache files or junk files which can block your game. If you have never erased your cache files for weeks or even for months. You should use a Cleaner app on your Android to clear the junk or cache files. Now see the method to clean the cache files:

  • Go to Settingsmenu >Installed Apps> Select “Asphalt 8” » Next tap ” Clear Data “» then Select “Clear Cache” .

NOTE: The above method I performed on the Xiaomi Redmi Note 4X Smartphone with the Android operating system Nougat v7.0. If you have a different Smartphone system, you can customize its own method.

6. Remove Asphalt Data 8

The next step is to clean and fix the data to fix Asphalt 8 Airborne unfortunately stopped. When you will clear the data then the game will come into the default position. It usually happened due to bugs. Cleaning game data will erase data including login data, account, history, cache, database and others. To do it, you need to follow these steps:

  • Go to Settings menu »Installed Apps» Select “Asphalt 8” » Next tap ” Clear Data “» then Select “Clear All Data” .

NOTE: The above method I did on the Xiaomi Redmi Note 4X Smartphone which has Android operating system Nougat v7.0. If you have a different Smartphone system, you can customize its own method.

7. Reinstall Asphalt 8

The seventh step is to reinstall Asphalt 8 Airbone game. When you will re-install it, Asphalt 8 Airbone game may start working again. You need to erase the game and temporary cache files which are attached then restart it. after doing so, you need to install game Asphalt 8 Airbone again. Follow the deletion steps:

  • Go to Settingsmenu »Installed Apps» Choose “Asphalt 8” » Next tap ” Uninstall “» then Select “OKE” .

NOTE: The above method I did on the Xiaomi Redmi Note 4X Smartphone which has Android operating system Nougat v7.0. If you have a different Smartphone system, you can customize its own method.

8. Asphalt 8 Not Support

If you are using these methods and still Asphalt 8 keeps crashing on Android. Then the issue may present on your Android system or your smartphone is not compatible or less compatible with the game. You need to update your system to fix Asphalt 8 keeps stopping error. By doing that, it is possible that it starts working again. It is due to the fact that bugs not only happens on games or apps, but also occurs in the system.

These were some simple methods to fix Asphalt 8 Airbone game from unfortunately stopped error that occurs while playing. You can try all these methods on your smartphone including Samsung, VIVO, ASUS Zenfone, Lenovo, Xiaomi, LG, HTC, SONY, Huawei, NOKIA, Acer and so on.

If Your Installing Modded App Try Out This Method:

To get rid of interrupted internet connectivity, we cannot download asphalt data directly from Google play store. So you may download data and modded app from other websites. In such cases, this method is to run the app without any problem.

  1. Search and Download Asphalt from Google Playstore.
  2. When display downloading, cancel it.
  3. Then After this install your own Modded Asphalt APK.
  4. Move OBB to sdcard/Phone Storage Android.
  5. Open the file.
  6. As early as the gauge verifying file full instantly switch off your internet connection
  • Free Grammarly Premium Accounts
  • Free Spotify Premium Accounts

I hope that you liked the post on how to fix Unfortunately, Asphalt 8 has stopped on HP android.

Am I missing something? Do you want to add something?

Feel free to share it in the comment section.

Do not forget to share this post.

Arsalan Rauf
Arsalan Rauf

Arsalan Rauf is an entrepreneur, freelancer, creative writer, and also a fountainhead of Green Hat Expert. Additionally, he is also an eminent researcher of Blogging, SEO, Internet Marketing, Social Media, premium accounts, codes, links, tips and tricks, etc.

www.greenhatexpert.com

Filed Under: Guide Tagged With: asphalt 8 closing automatically, asphalt 8 crashes after gameloft logo, asphalt 8 keeps crashing android, asphalt 8 keeps stopping, asphalt 8 not working, asphalt 8 showing unfortunately stopped, asphalt 8 stuck on gameloft logo, unfortunately asphalt 8 has stopped working fix

Download Brute Force SEO Evo2 Free

Last Updated on August 21, 2022 By Arsalan Rauf

In this post of Green Hat Expert, you will be able to Download Brute Force SEO Evo2 Free.

How to Download Brute Force SEO Evo2 Free:

You can use Brute Force SEO Evo2 to take your website on the search results on auto pilot without doing any manual work. It is a complete SEO package for every tom, dick and harry. SEO Evo2 has the ability to create automatic emails and it will help you in marketing. Additionally, it also gives backlink for our website and also provides us the facility of social sharing. The tool also enables us to submit our new website to RSS feed.

Download Brute Force SEO Evo2


File Size: 4.48 MB

[sociallocker id=31][/sociallocker]

Arsalan Rauf
Arsalan Rauf

Arsalan Rauf is an entrepreneur, freelancer, creative writer, and also a fountainhead of Green Hat Expert. Additionally, he is also an eminent researcher of Blogging, SEO, Internet Marketing, Social Media, premium accounts, codes, links, tips and tricks, etc.
www.greenhatexpert.com

Filed Under: Guide

How to Fix the WordPress Failed to Open Stream Error

Last Updated on August 21, 2022 By Arsalan Rauf

How to Fix the WordPress Failed to Open Stream Error

Are you facing failed to open stream error in WordPress?

If yes, then you are at the right place.

This error generally points out the location of the scripts where the error occurs. However, it is a hard task for newbie users to understand it. in this post, I shall show you how to fix the WordPress failed to open stream error.

Why Failed to Open Stream Error Occurs?

Before I try to fix this error, it is necessary for you to know that what causes failed to open stream error in WordPress.

This error arises when WordPress is not able to load the file mentioned in the code of site. When this error occurs, at times WordPress will show a warning message will continue to load the website. sometimes, it will display a fatal error and will not load anything else.

The phrase of the message can be different because it depends on the location of error and the reason for failure. In addition, it also gives you clues about what do you need to fix.

Typically, this message will appear something like this:

1
2
3
Warning: require(/home/website/wp-includes/load.php): failed to open stream: No such file or directory in /home/website/wp-settings.php on line 19
Fatal error: require(): Failed opening required ‘/home/website/wp-includes/load.php’ (include_path=’.:/usr/share/php/:/usr/share/php5/’) in /home/website/wp-settings.php on line 19

Here is another example:

1
Last Error: 2018-04-04 14:52:13: (2) HTTP Error: Unable to connect: ‘fopen(compress.zlib://https://www.googleapis.com/analytics/v3/management/accounts/~all/webproperties/~all/profiles?start-index=1): failed to open stream: operation failed’

After the previous discussion, let us take a look how to troubleshoot and fix failed open stream error in WordPress.

Fixing Failed to Open Stream Error in WordPress

As I described earlier, the error can be a result of a number of reasons and the error message will also be different. It depends on the location and cause of the file which is causing the error.

In every example, failed to open stream phrase will be a result of a certain reason. For instance, no such file or directory, permission denied, operation failed and so on.

Now if your error message consists of ‘no such file or directory’, then you need to go through the code to find out which file is mentioned at the specific line.

If it is a theme file or plugin, then it means that the theme files or the plugin were either not installed properly or deleted. Simply deactivate and reinstall the plugin/ theme to fix the error.

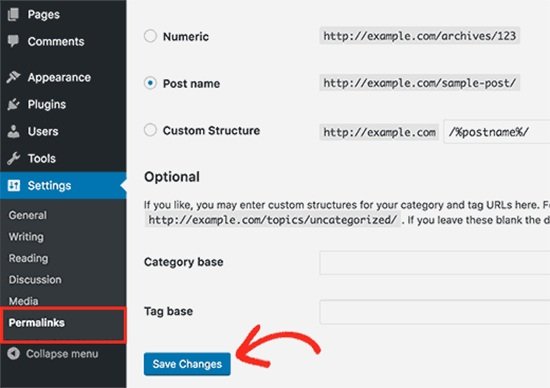
However, there is also a chance that WordPress is unable to find the files because of a missing .htaccess file available in the root folder. In this situation, you need to visit Settings>Permalinks page in admin of your WordPress and click on save settings button to regenerate .htaccess file.

fix ht access

If the error message is something like ‘Permission denied’, then it means that WordPress does not have the right permission to access the directory referenced in the code or file.

To resolve this, you need to go through our post on Fix File and Folder permissions in WordPress and correct them if required.

In the end, there are some WordPress plugins that load scripts from third party sources including Facebook APIs, Google Analytics, Google Maps and other APIs.

Some of these APIs may need authentication or may have changed the way of accessing them by developers. A failure or authenticate or incorrect access method will result in WordPress failing to open the needed files.

To resolve this issue, you need to contact the author of the plugin to get support. They will be able to help you and fix the error.

I hope that you liked the post, and you learn how to fix WordPress ‘failed to open stream’ error. You may want to see our post on How to change the WordPress Database prefix to improve security.

Do not forget to share this post.

Arsalan Rauf
Arsalan Rauf

Arsalan Rauf is an entrepreneur, freelancer, creative writer, and also a fountainhead of Green Hat Expert. Additionally, he is also an eminent researcher of Blogging, SEO, Internet Marketing, Social Media, premium accounts, codes, links, tips and tricks, etc.
www.greenhatexpert.com

Filed Under: Guide, How to, WordPress Tagged With: failed to open stream no such file or directory in wordpress, failed to open stream: no such file or directory laravel, failed to open stream: permission denied

Fix WordPress Memory Exhausted Error – Increase PHP Memory

Last Updated on August 21, 2022 By Arsalan Rauf

Fix: WordPress Memory Exhausted Error – Increase PHP Memory

Are you getting an allowed memory size exhausted error in WordPress?

If yes, then you are at the right place.

It is one of the most common WordPress errors, you can get rid of it with ease. You need to increase php memory limit in WordPress to solve the issue.

In this post, I shall show you how to fix WordPress memory exhausted error by increasing PHP memory.

What is WordPress Memory Exhausted Error?

WordPress is composed in PHP that is a server side programming language. Every site requires a WordPress hosting server for it to make it functional.

Web servers are similar to other computers. They require memory to run multiple apps at the same time in a smooth way. Server administrators allot specific memory size to different apps including PHP.

When your WordPress code needs more memory than the default alloted memory, you will see an error.

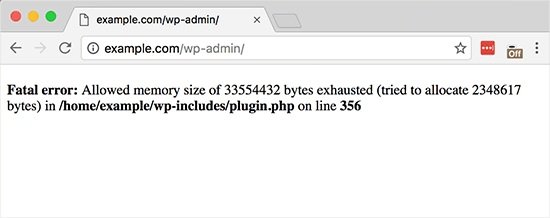
1
Fatal error: Allowed memory size of 33554432 bytes exhausted (tried to allocate 2348617 bytes) in /home4/xxx/public_html/wp-includes/plugin.php on line xxx

memory exhuasted error

WordPress automatically tries to increase PHP memory limit if is less than 64 MB by default. However, it is not sufficient enough.

After above discussion, let’s see how to increase PHP memory limit in WordPress to fix memory exhausted error.

Increase PHP Memory Limit in WordPress

First of all, you need to edit your wp-config.php file on your WordPress website. The location of this file is in the root folder of WordPress website and you need to use FTP client or file manager in the control panel of your web hosting.

Next, you need to paste the coding in wp-config.php file before the line that states

1
define( 'WP_MEMORY_LIMIT', '256M' );

This code will enable WordPress to increase the memory limit of PHP to 256MB. After completing it, you need to save the changes and upload your wp-config.php file back to your server.

Visit the WordPress site now and memory exhausted error should be resolved or disappear now.

Note: If this solution is not working for you, it means your web hosting provider does not enable WordPress to increase the memory limit of PHP. You need to ask the web hosting provider to increase the limit of your PHP memory manually.

That is it. I hope that you liked this post on how to fix WordPress memory exhausted error – increase PHP memory. And it will enable you to increase the PHP memory limit. You may want to see our guide on how to fix 404 error in WordPress.

Arsalan Rauf
Arsalan Rauf

Arsalan Rauf is an entrepreneur, freelancer, creative writer, and also a fountainhead of Green Hat Expert. Additionally, he is also an eminent researcher of Blogging, SEO, Internet Marketing, Social Media, premium accounts, codes, links, tips and tricks, etc.

www.greenhatexpert.com

Filed Under: Guide, WordPress Tagged With: allowed memory size of 41943040 bytes exhausted, fatal error: allowed memory size of 67108864 bytes exhausted godaddy, fatal error: allowed memory size of 67108864 bytes exhausted opencart, fatal error: allowed memory size of 67108864 bytes exhausted wordpress, fatal error: allowed memory size of bytes exhausted wordpress, fatal error: out of memory wordpress, increase wordpress memory limit godaddy, wordpress memory limit

How to Change the WordPress Database Prefix to Improve Security

Last Updated on August 21, 2022 By Arsalan Rauf

How to Change the WordPress Database Prefix to Improve Security

WordPress database seems to be the brain fo your full website. It is because every amount of information is available there and it can become the target of those people who want to get over your system. Spammers run automated codes for SQL injections. Unluckily, there are several website owners who do not change the database prefix while installing WordPress.  It enables the bots to mass attack by targeting the defaul prefix that is, wp-admin. It is a smart move to protect the database of WordPress by changing its prefix which is an easy task while setting up your website. You need to follow few steps to change the WordPress database prefix in a proper way. In this way, you will not mess with your established website.

Preparation

I suggest that you create a backup of your WordPress database before you act on anything I am going to suggest in this post. It is necessary to create a backup of your website on daily basis. BackupBuddy is a highly recommended plugin for this purpose. Next thing I suggest is that you redirect your visitors to a temporary maintenance page.

Change Table Prefix in wp-config.php

Open your wp-config.php file that is available in your WordPress root directory. Change the table prefix line from wp- to something else like wp-greenhat

So the line will look like this:

1
$table_prefix  = 'wp_a123456_';

Note: You can only change it to letters, numbers, and underscores.

Change all Database Tables Name

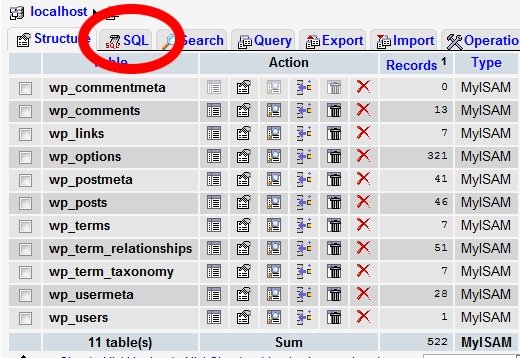
You have to access your database using phpMyAdmin, then change the table names to one I specified in wp-config.php file. If you have cPanel WordPress hosting, you can find the phpMyAdmin link available in your cPanel. See the image:

phpmyadmin

There are 11 default WordPress tables available in total, therefore, to change them manually is a hard task.

sql

Therefore, in order to make things fast, I have a SQL query that you can use.

1
2
3
4
5
6
7
8
9
10
11
12
RENAME table `wp_commentmeta` TO `wp_a123456_commentmeta`;
RENAME table `wp_comments` TO `wp_a123456_comments`;
RENAME table `wp_links` TO `wp_a123456_links`;
RENAME table `wp_options` TO `wp_a123456_options`;
RENAME table `wp_postmeta` TO `wp_a123456_postmeta`;
RENAME table `wp_posts` TO `wp_a123456_posts`;
RENAME table `wp_terms` TO `wp_a123456_terms`;
RENAME table `wp_termmeta` TO `wp_a123456_termmeta`;
RENAME table `wp_term_relationships` TO `wp_a123456_term_relationships`;
RENAME table `wp_term_taxonomy` TO `wp_a123456_term_taxonomy`;
RENAME table `wp_usermeta` TO `wp_a123456_usermeta`;
RENAME table `wp_users` TO `wp_a123456_users`;

You may have to add lines for other plugins because they may use their own tables in the database of WordPress. The idea is that you change all tables prefix to your desired one.

The Options Table

I have to search the options table for any other fields that is using wp- as a prefix, so we can change them. To make the process easy use this query:

1
SELECT * FROM `wp_a123456_options` WHERE `option_name` LIKE '%wp_%'

It will return a plenty of results, you need to go one by one to change these lines.

UserMeta Table

Next, the need is to search the user meta for all fields that are using wp- as a prefix, so you can change it. Use this SQL query to perform this:

1
SELECT * FROM `wp_a123456_usermeta` WHERE `meta_key` LIKE '%wp_%'

The number of entries may differ depends on how many plugins you are using. Simply change everything that has wp- to the new prefix.

Backup and Done

So you are up to test the website. If you have followed the above steps explained by me, it should be working fine. After doing so, you need to create a new backup of your website to stay on safe side.

Do not forget to share this post.

Arsalan Rauf
Arsalan Rauf

Arsalan Rauf is an entrepreneur, freelancer, creative writer, and also a fountainhead of Green Hat Expert. Additionally, he is also an eminent researcher of Blogging, SEO, Internet Marketing, Social Media, premium accounts, codes, links, tips and tricks, etc.
www.greenhatexpert.com

Filed Under: Guide, How to, WordPress Tagged With: change db prefix plugin, change wordpress table prefix after install, database prefix mysql, get wordpress table prefix, how to change table prefix in phpmyadmin, wordpress change table prefix plugin, wordpress plugin to change database table prefix, wordpress table prefix generator

How to Fix File and Folder Permissions Error in WordPress

Last Updated on August 21, 2022 By Arsalan Rauf

How to Fix File and Folder Permissions Error in WordPress

Do you want to fix the file and folder permissions error in WordPress? or

Are you trying to fix the file and folder permissions error in WordPress?

If yes, then you are at the right place.

Incorrect file and folder permissions can generate errors on your site while uploading. In this post, I shall show you how to easily fix file and folder permissions error in WordPress.

How File and Folder Permissions Work in WordPress?

Your self-hosted WordPress website works on a PC run by your WordPress hosting company. This PC works as a server and uses a software that is, Apache. It uses this software to manage your files and serve them to browsers.

File and folder permissions inform the server who can run, read and modify files hosted on your account. WordPress requires permissions to manage files and make folders on the server.

Incorrect file permissions will block WordPress from uploading images, creating folders or run scripts. In addition, it can also compromise security of WordPress website.

In some cases, WordPress will try to warn you that it cannot create a folder, edit a file or cannot write to disk etc. However, at times, you may not see any error messages.

Correct File and Folder Permissions in WordPress

The correct set of file and folder permissions enable WordPress to make files and folders. The following settings are suggested for most of the users.

755 for all folders and sub-folders.
644 for all files.

Let’s take a bird’s eye view of how to fix file and folder permissions in WordPress.

Fix File and Folder Permissions in WordPress Using FTP

First of all, you need to connect to your WordPress website with FTP client.

After connecting, visit the root folder of your site.

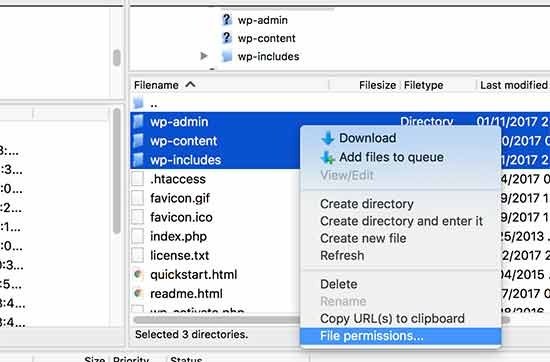
After doing so, select all folders in root directory and then press right click to select ‘File Permissions’.

file permissions

It will bring up the file permissions dialog box.

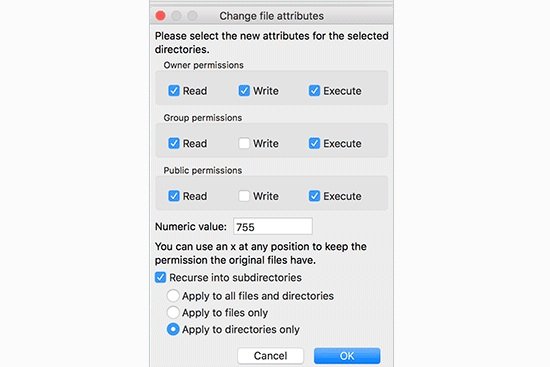
Now you have to put 755 in the numeric value field. After doing it, you will have to click on ‘Recurse into subdirectories’ checkbox and then select ‘Apply to directories only’ option.

folder permissions

Click the OK button to keep going. Your FTP client will begin setting file permissions to folders as well as sub-folders. You need to wait for it to complete.

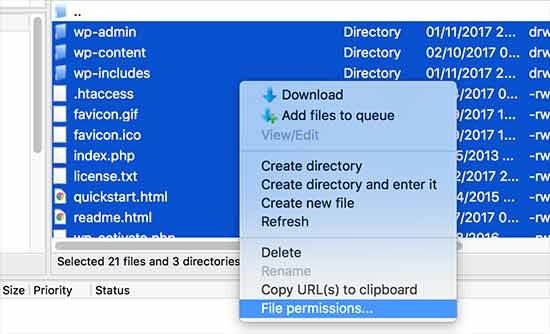
Now, you have to select all files and folders in the root folder of your WordPress website and then right-click to select the file permissions.

file permissions 2

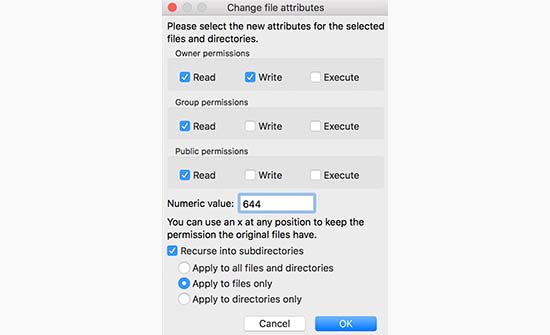
The file permissions dialog box will become visible.

Now you need to put 644 in numeric value. After doing so, you will click on ‘Recurse into subdirectories’ checkbox and then select ‘Apply to files only’ option.

set files permission

Click on OK to continue.

Your FTP client will now begin setting file permission to all files on your WordPress website.

I hope that you liked the post and you learn how to fix file and folder permissions error in WordPress.


Arsalan Rauf
Arsalan Rauf

Arsalan Rauf is an entrepreneur, freelancer, creative writer, and also a fountainhead of Green Hat Expert. Additionally, he is also an eminent researcher of Blogging, SEO, Internet Marketing, Social Media, premium accounts, codes, links, tips and tricks, etc.
www.greenhatexpert.com

Filed Under: Guide, How to, WordPress Tagged With: correct file permissions for wordpress, fix file ownership wordpress, fix wordpress permissions ssh, ubuntu wordpress permissions, wordpress localhost file permissions, wordpress permissions nginx, wordpress permissions plugin, wordpress permissions script

How to Completely Remove Comments From Your WordPress Site

Last Updated on August 21, 2022 By Arsalan Rauf

Do you want to remove comments from your WordPress website completely?

If yes, this post is for you.

If you only use static pages on your site or do not want people to comment on your posts then you can disable all the comments in WordPress with ease. In this post, I shall show you how to entirely remove comments from your WordPress site.

Why Remove Comments in WordPress?

Most of the WordPress users are small business owners who do not usually add a blog section on their site. Their site contains static pages only that makes the comment useless.

While you can disable comments on your WordPress pages with ease but it does not mean that it will remove the comments completely from your WordPress site.

There are some bloggers who do not want to use comments at all. According to their opinion, comments are a distraction and their blogs can do without getting comments.

Now the issue is that most WordPress themes give built-in support for comments. It means that even if you have turned off the comments manually, they still pop up to and fro.

Want to get rid of comments with a single click?

Let’s go for how to completely remove WordPress comments from your site without leaving any traces.

Disabling Comments in WordPress

First of all, you need to install and activate the Disable Comments plugin. For more details, go through our step by step guide on how to install a WordPress plugin.

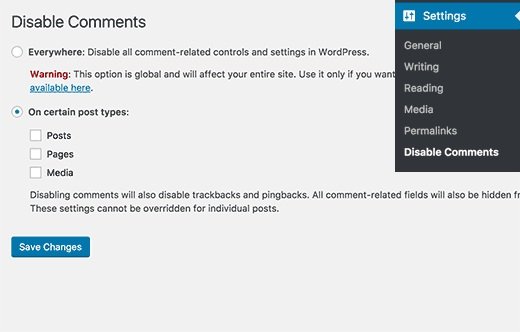
After activation, you need to visit Settings>Disable Comments page to configure the settings of plugin.

disablecomments

The settings page has two sections.

You can get rid of comments everywhere on your WordPress site or you can selectively disable them on pages, posts or any custom post types.

Choose the first option to disable WordPress comments on your website completely.

Do not forget to click on the save changes button to save your settings.

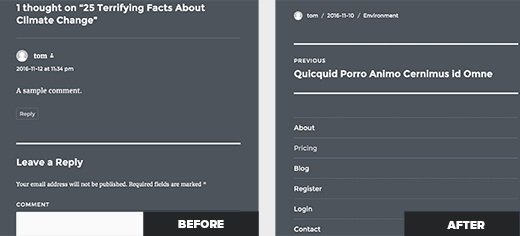
Diable comments plugin will now disable comments on your site completely. Now go to any post or page of your site to see this plugin in action.

commentsremoved

Since comments will not be shown, there is no need to delete the existing comments.

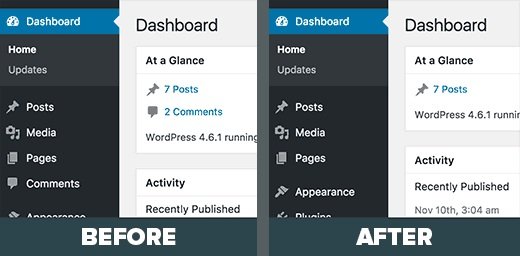
This plugin will also remove the comments menu item and all mentions of comments from the admin area of your WordPress site.

commentdisabled

Removing ‘Comments Are Closed’ and Existing Comments in WordPress

Disable comments plugin will stop showing existing comments, remove comment form and remove messages like ‘comments are closed’ from old posts.

However, if your WordPress theme is not checking the status of comment, then it may show existing comments, the comment form or comments are closed message.

You can ask the developer of your theme to fix this because it is not a standard compliant approach.

Alternatively, you can also try to fix it yourself by following the instructions below:

First of all, you need to connect to your site using FTP client or File manager in cPanel. Now navigate to your current theme folder which will be available in /wp-content/themes/folder.

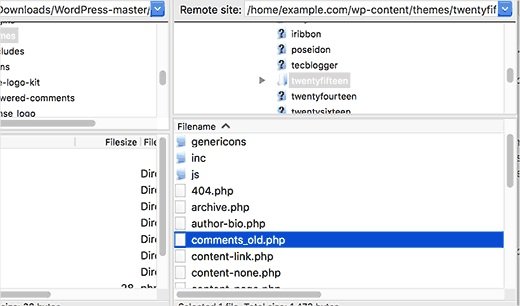
In the theme folder, you have to find the file comments.php and rename it to comments_old.php.

renamecommentstemplate

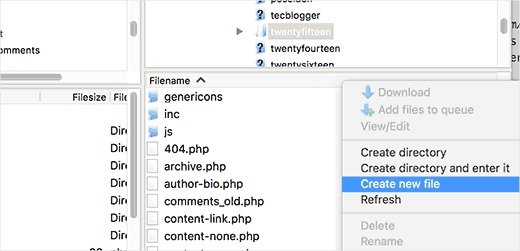
Next, you will have to right click and choose ‘create new file’ option in your FTP client.

newcommentstemplate

Name your new file comments.php and click the OK button.

This trick will serve an empty comments template for your WordPress theme so no comment related messages or comments will be displayed.

If your WordPress theme does not support comments.php file or does not have it. Then you need to ask the developer of your theme which file you need to edit.

That is it. I hope that post will help you to learn how to completely remove comments from your WordPress site.

You may also want to see our post on Best Backup plugins for WordPress.

Arsalan Rauf
Arsalan Rauf

Arsalan Rauf is an entrepreneur, freelancer, creative writer, and also a fountainhead of Green Hat Expert. Additionally, he is also an eminent researcher of Blogging, SEO, Internet Marketing, Social Media, premium accounts, codes, links, tips and tricks, etc.
www.greenhatexpert.com

Filed Under: Guide, How to, WordPress Tagged With: disable comments wordpress plugin, disable comments wordpress without plugin, how do i remove the comment box in wordpress?, wordpress delete all comments, wordpress disable comments completely, wordpress disable comments on media, wordpress disable comments sitewide, wordpress remove comments section, wordpress remove leave a reply

What is Gravatar and Why You Should Start Using it Right Away

Last Updated on August 21, 2022 By Arsalan Rauf

Often people search how the grey icon that shows up next to their name. sometimes people also ask how can they turn this grey thing off. This grey icon stands for gravatar. In this post, I shall discuss what is gravatar and why you should start using it and how to change the default Gravatar on WordPress.

What is Gravatar and Why You Should Start Using it Right Away

History: Avatar

Before I discuss what is Gravatar, I should first discuss what is an avatar. An avatar gives a graphical representation of the user. It can be a random icon they want to associate with or the picture of the person. In past, when web was sort of anonymous, people used icons for the sake of identification.

Still it is the case in the gamer community. It is also one of the coolest parts about discussion forums, boards. It enables you to recognize the users who are active due to their avatar. While it is a hard task to remember names, but it is an easy thing to identify the specific image.

If you were part of numerous discussion forums or boards, you will start to recognize same group of people everywhere. As the web evolved and blogging has become more common, it was a hard task to get an identity as a commenter.

With forums and other services, users were asked to register. Every user had his own profile, so they could easily add an avatar to their profile. However, blog commenting does not ask registration in most of the cases.

So how do we identify users?

That is where Gravitar gets in.

What is a Gravatar?

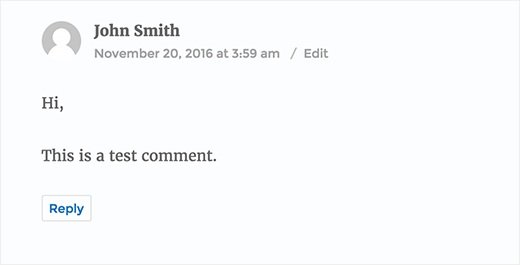
Gravatar is known as Globally Recognized Avatar. It is globally recognized because millions of sites and people use them. Most popular applications like WordPress has built in support for Gravatar. When a user leaves a comment using email on the website that supports Gravatar, it pulls their globally recognized avatar from Gravatar servers. Then the picture is also available next to the comment. It allows each commenter to get their identity throughout the world wide web.

gravatar

Why Should I add Gravatar?

If you want to be identified on the internet, you should use gravatar. If you are a blogger, small business, non-profit, or anyone who wants to build a brand, you should start using gravatar. In the beginning, your gravatar may not get much attention. But if the same person sees your comment at various websites they read, they will definitely visit your site.

In my opinion, gravatar makes your comment stand out.

How can I get a Gravatar?

It is free and simple. Simply go to Gravatar’s website. Signup using that email which you use often to comment on any site. Add an avatar of yourself. It could be the logo of your company, or a picture of yourself or something unique. You need to do it one time. Chances are you will not change your avatar a lot. So it is like you set it and forget it.

Most of WordPress themes support gravatar integration with comments. If your theme does not support it, you should consider it to add it. For further branding purposes, you can change the default mystery man gravatar on your website and come up with something else.

If you have a gravatar, make a comment below so I will be able to recognize you.

How to Change the Default Gravatar on WordPress

Do you want to change the default gravatar on your WordPress site?

If you will add your own default gravatar image, it can make your comments section branded. In this post, I shall show you how to change the default gravatar in WordPress and replace it with your own custom default gravatar image.

What is Default Gravatar and Why Change it?

Gravatar is a web service and the creator of gravatar is WordPress co-founder Matt Mullenweg’s company known as Automattic. It enables anyone to create a profile and associate avatar images to their email addresses.

This avatar image will be shown on all WordPress blogs where users leave comments or write a blog post.

WordPress websites have built-in support for Gravatars and it shows the users avatars automatically when they leave a comment or write a post.

However, if a user does not have a gravatar image then WordPress will show the default image of gravatar. The default option is to show an image aka the mystery man. It looks like this:

default mystery man

If you do not like the mystery man and do not want to use it as default image. Then you can replace it with your brand image.

Now let’s see that how can you change the default gravatar image on WordPress website, so you can use a custom default gravatar image.

Changing Default Gravatar Image in WordPress

First of all, you need to go to Settings>Discussion page and scroll down to avatars section. This is where you can change and configure gravatar setting on your website.

gravatar settings

You will be able to observe a few choices under the default avatar option. These avatars are used when you do not have a gravatar associated with your email address. WordPress itself uses the icon of mystery person by default. You can change it to gravatar logo or blank.

There are some other options present too. These are the images which are autogenerated and available in different designs. These images use email address and the name of author to generate a new or unique gravatar image.

Do not forget to click on save changes button after changing your default gravatar.

Using Custom Default Gravatar Image in WordPress

WordPress also lets you use your own default gravatar images. Here is how you can add your own custom default gravatar image with ease in WordPress.

First of all, you need to create an image that you want to use as a default gravatar. This image should be of 250×250 pixels and in a square.

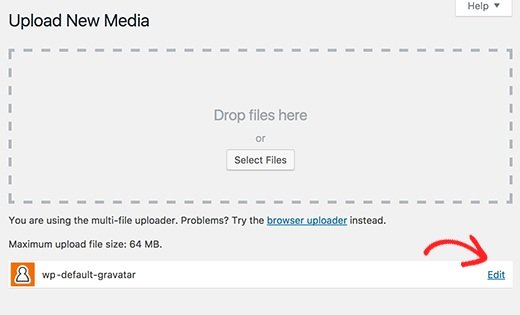
Next, you have to upload this image to your WordPress website. Go to Media>Add New and upload your custom default gravatar image.

upload edit

After uploading the image, you need to click on edit link text to the image.

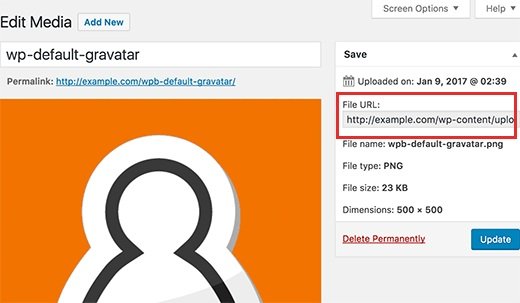
WordPress will open new image for editing. You need to copy the URL of image file and paste it in a plain text editor like notepad.

copy file url

Now you have to add some coding to your WordPress website.

Add the following code to your functions.php file of your theme or a site specific plugin.

1
2
3
4
5
6
add_filter( 'avatar_defaults', 'wpb_new_gravatar' );
function wpb_new_gravatar ($avatar_defaults) {
$myavatar = 'http://example.com/wp-content/uploads/2017/01/wpb-default-gravatar.png';
$avatar_defaults[$myavatar] = "Default Gravatar";
return $avatar_defaults;
}

Do not forget to replace myavatar value to the URL of the custom gravatar image that you uploaded earlier.

Now visit Settings>Discussion page and you will see your custom default avatar added to default avatar choices.

custom default gravatar

Choose your custom default avatar image, then click on save changes button to save it.

WordPress will now use your image for users who do not have their gravatar associated with their email address.

custom avatar

I hope that you liked the post. It will help you to learn what is gravatar and how to change the default gravatar on WordPress.

You may also want to see my post on How to set custom avatars for users in WordPress.

Do not forget to share this post.

Arsalan Rauf
Arsalan Rauf

Arsalan Rauf is an entrepreneur, freelancer, creative writer, and also a fountainhead of Green Hat Expert. Additionally, he is also an eminent researcher of Blogging, SEO, Internet Marketing, Social Media, premium accounts, codes, links, tips and tricks, etc.
www.greenhatexpert.com

Filed Under: Guide, WordPress Tagged With: 3 patti game free download for laptop, 3 patti game free download for windows 10, 3 patti game online play, 3 patti gold free download for android, 3 patti gold game free download for laptop, 3 patti gold game free download for pc facebook, 3 patti gold mod apk download, 3 patti gold old version

Download External Domain Extractor Desktop Tool

Last Updated on August 21, 2022 By Arsalan Rauf

In this post of Green Hat Expert, you will be able to Download External Domain Extractor Desktop Tool Free.

How to Download External Domain Extractor Desktop Tool Free and its introduction:

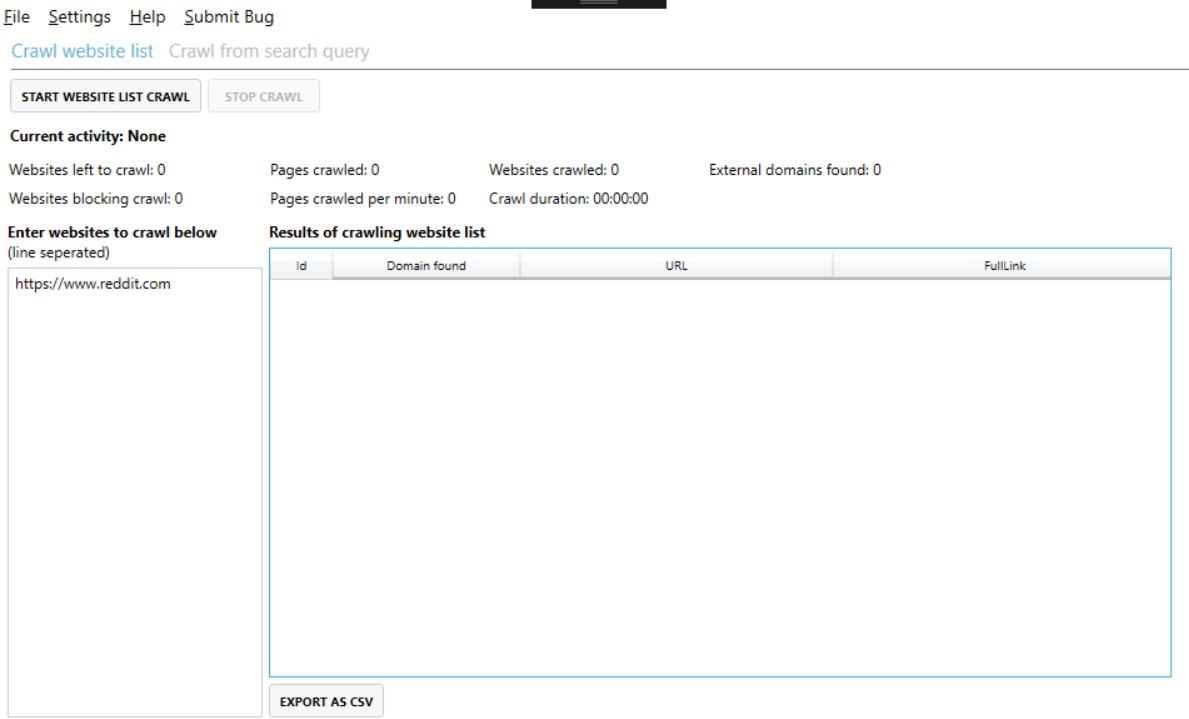
It is another SEO tool which allows the users to crawl websites and they can also extract outbound domains and links from websites.

How does External Domain Extractor work?

There are three methods of finding external domains and links from the targeted websites.

Crawl a list of websites for external domains (outbound domains)

There is a chance that you want to analyze any website and separate them from outside connections. You can enter each page to extract outbound domains easily from this domain extractor SEO tool.

Download External Domain Extractor Desktop Tool

Crawl search results by niche related keywords for external domains

You can enter the analysis of watchwords and external domain extractor will help you to google all the special catchphrases and it will return you the catchphrases and every outbound connection and areas.

Why should I use this software?

There are several people who use google to find different sites and individuals for marketing. It is a fine tool for bigger companies or organizations because there are different private companies that do not show up in Google. If you want to find the website admins who are at home in web advertising, you will love to find them by creeping digital point. Instead of googling it by entering the catchphrase.

How does this tool work?

Once the crawler will get the domain then it will snatch or take away all the connections on the page. It will add the outdoor connections and spaces and interior connections too. This point will remain rehash until it creeps the whole site.

https://www.youtube.com/watch?v=swnTXCbrQOs


File Size: 7 MB

[sociallocker id=31][/sociallocker]

Arsalan Rauf
Arsalan Rauf

Arsalan Rauf is an entrepreneur, freelancer, creative writer, and also a fountainhead of Green Hat Expert. Additionally, he is also an eminent researcher of Blogging, SEO, Internet Marketing, Social Media, premium accounts, codes, links, tips and tricks, etc.
www.greenhatexpert.com

Filed Under: Guide

Download Bulk Mailer 8.4.0 Software Free

Last Updated on August 21, 2022 By Arsalan Rauf

In this post of Green Hat Expert, you will be able to Download Bulk Mailer 8.4.0 Software Free.

How to Download Bulk Mailer 8.4.0 Software Free:

Do not consider it a normal email sender because it enables us to send and receive a large number of emails. This tool has a large size of storage which facilitate us. So you can manage meetings, contacts, alerts and schedule easily by using this tool. It is easy and simple to use and you can use it office as well as for personal purpose. Bulk Mailer 8.4.0 Software is here to make you able to do email marketing for your products and promotions. Download it free and enjoy the software.

Download Bulk Mailer 8.4.0 Software Free

File Size: 17.10 MB

[sociallocker id=31][/sociallocker]

Arsalan Rauf
Arsalan Rauf

Arsalan Rauf is an entrepreneur, freelancer, creative writer, and also a fountainhead of Green Hat Expert. Additionally, he is also an eminent researcher of Blogging, SEO, Internet Marketing, Social Media, premium accounts, codes, links, tips and tricks, etc.
www.greenhatexpert.com

Filed Under: Guide Tagged With: best bulk email software, bigg mass mailer, bulk email gmail, bulk email software free download full version, download mailer php, free bulk email sender online, thunder mailer, unlimited email sending software free download

  • « Previous Page
  • 1
  • …
  • 11
  • 12
  • 13
  • 14
  • 15
  • 16
  • Next Page »


Recent Posts

  • Free DeepSeek Accounts 2025
  • Free Zoho Mail Accounts 2025
  • Acudepot Discount Codes 2025
  • Free Blackshot Accounts 2025
  • Free GMX Email Accounts 2025
  • Songtrust Discount Codes 2025
  • Uzicases Discount Codes 2025
  • Cardillo Promo Codes 2025
  • Free DriverFix License Keys 2025
  • Avast Secureline VPN Activation Codes 2025

Recommended Posts

Create a Gmail Account Without Phone Number

Free Course Hero Account

Crunchyroll Accounts

Cracked Apps

Free Pokemon Go Accounts
Onlyfans Free Accounts
Free Chegg Accounts
Free Paypal Accounts
Free Gmail Accounts
Funny Steam Names

Categories

  • Apps
  • Apps for PC
  • Blogging
  • Discord
  • Facebook
  • Gaming
  • Grammar
  • Guide
  • How to
  • Instagram
  • Messaging
  • OnlyFans
  • Pinterest
  • Reddit
  • SEO
  • Snapchat
  • Social Media
  • Spotify
  • Steam
  • Telegram
  • TikTok
  • Twitch
  • Twitter
  • Whatsapp
  • WordPress
  • YouTube
  • Home
  • Social Media
  • Messaging
  • About
  • Submit Guest post