Green Hat Expert

  • Home
  • Social Media
    • Instagram
    • TikTok
    • Snapchat
    • Facebook
    • YouTube
    • Twitter
  • Messaging
    • Discord
    • Telegram
    • Whatsapp
  • About
  • Submit Guest post
You are here: Home / Archives for Gaming

How to Fix “Unable to find TaskScheduler” on Roblox FPS Unlocker

Last Updated on June 1, 2023 By Arsalan Rauf

With the Roblox FPS Unlocker, the players can unlock the Roblox frame rate.

The FPS limit in Roblox is 60, and with the help of this tool, players can change it to unlimited.

Are you getting an “Unable to find TaskScheduler!” error? When you try to run Roblox FPS

The next part of the error message is, “This is probably due to a Roblox update”.

Accompanied by, “Watch the Github for any patches or a fix”.

In this article, I will tell you how to fix “Unable to find TaskScheduler! This is probably due to a Roblox update” on Roblox FPS Unlocker.

What is the “Unable to find TaskScheduler” error on Roblox FPS Unlocker?

The “Unable to find TaskScheduler” error on Roblox FPS Unlocker means the software is not able to locate the Windows Task Scheduler service from the computer or PC.

The error occurred after a Roblox Byfron update that helps to mitigate cheating and hacking in Roblox.

If you are using a third-party program or app after downloading it for Roblox, it might not load.

To fix the issue, the developer of the Roblox FPS Unlocker needs to update it.

How to fix “Unable to find TaskScheduler” on Roblox FPS Unlocker

To fix “Unable to find TaskScheduler” on Roblox FPS Unlocker, the first thing you need to do is to download the latest version of Roblox FPS Unlocker.

On the other hand, you can try uninstalling Roblox and installing it from the MS instead of getting it from the Roblox website.

Solution 1: Download the latest version of Roblox FPS Unlocker

  1. Use the windows search and search for “Windows Security”.
  2. Follow these steps: Virus & threat protection > Virus & threat protection settings > Manage settings > Real-time protection > Off.
  3. Visit this link: https://github.com/axstin/rbxfpsunlocker/releases and download the .zip file of the latest release.
  4. Open or extract the zip file named “rbxfpsunlocker-x64.zip”.
  5. You need to run “rbxfpsunlocker.exe” before launching Roblox.

After downloading the Roblox FPS Unlocker, turn on the real-time protection from Windows Security again.

Solution 2: Uninstall Roblox and install it from the Microsoft Store

  1. Use the windows search to search for “Control Panel”.
  2. Select “Uninstall a program”.
  3. Right-click on “Roblox” and select “Uninstall”.
  4. After that, reinstall Roblox from this link: https://apps.microsoft.com/store/detail/roblox/9NBLGGGZM6WM.

What’s Next

How to Fix “Failed to find Roblox process” on Krnl

How to Fix “Advapi32.dll” Error in Roblox

Free Roblox Gift Card Codes

Arsalan Rauf
Arsalan Rauf

Arsalan Rauf is an entrepreneur, freelancer, creative writer, and also a fountainhead of Green Hat Expert. Additionally, he is also an eminent researcher of Blogging, SEO, Internet Marketing, Social Media, premium accounts, codes, links, tips and tricks, etc.
www.greenhatexpert.com

Filed Under: Gaming, How to

Free Fortnite Merry Mint Axe Codes 2025

Last Updated on December 25, 2024 By Arsalan Rauf

The Minty Pickaxe is a cosmetic item introduced in Fortnite during a promotion.

In 2019, the promotion was given as the part of the holiday season.

The description of the pickaxe is, “Refreshingly festive. Part of the Frosty Fights set”.

You can get the code by buying any Fortnite item like V-Bucks.

Players who obtained the code can redeem/use it in the game for free.

This post has 25+ free Fortnite Merry Mint Axe codes (Minty Pickaxe) to redeem from the limited promotion (no generator).

How to get free Fortnite V-Bucks

To get free Fortnite V-Bucks, use different survey sites including Survey Junkie or YouGov to earn rewards such as PayPal cash and buy them.

How to get a Fortnite Minty Pickaxe code

To get a Fortnite Minty Pickaxe code, the only step you need to take is to purchase anything like V-Bucks or merchandise.

If you have bought Fortnite products, you will be given a code.

It was the part of 2019 holiday season, and the offer is limited time and it is a cosmetic giveaway.

The pickaxe’s description is, “Refreshingly festive. Part of the Frosty Fights set”.

How to redeem Fortnite Minty Pickaxe codes

  1. Visit this website: https://www.fortnite.com/redeem.
  2. Sign in to your Fortnite account.
  3. Copy and paste the code and select “Redeem”.
  4. Lastly, launch Fortnite to equip or claim the pickaxe.

Free Fortnite Merry Mint Axe codes 2025

Fortnite Minty Pickaxe codes

  • VPBXJ-ABRYS-3AJYL-4XDTL
  • CPMQB-6EAVB-P4TEM-NHFS3
  • TSFVW-MCDRY-2NHKP-7YJZL
  • 9FTJG-T56R4-W3K5B-ZB9GJ
  • KJCAZ-FUVVK-EXBC2-BGJJQ
  • QXGKD-LTBNM-9RPHE-6WMFC
  • JBYLX-APKDH-8RQNM-5FSTZ
  • KJTVN-AXLRU-5MSFD-4ZQYG
  • GQWYP-MEBCS-2JNHL-6DFAT
  • FKBXD-LNSPH-9RTVJ-7YQZC
  • ZHGVF-ECMJB-6UQNP-1YKDL
  • WUJLM-APXKR-4STZH-9QGEC
  • DZCHF-MNYTS-7LWXP-8BQRA
  • WZKDX-LQBPH-8TNJL-4YADE
  • SGHYC-AXNRU-6VSFC-3BQYG
  • EQWNL-MTDPH-2YSJL-9GQRA
  • MTFJN-ABLRU-1KSFD-7ZQYG
  • JUVXP-ACLRU-7KTFD-5ZQYG
  • UYJNV-ATKZH-8SQWB-3MPFC
  • RVQXM-MBKPH-4SNJL-6YADE
  • NHPZK-ATXRU-9MSFC-5BQYG
  • LYUVC-EPDTS-5RWXP-2GQRA
  • PZELT-ACQMH-6RWJN-2BKYF
  • HXGSR-EFBNL-3KQDP-9YVZM
  • CJFYW-LRANM-7XTKP-1DZTH
  • RYCZT-EMBNM-4NHKP-1WDFC

The free Fortnite Merry Mint Axe codes in the list are based on a first-come-first-serve.

If you are not able to redeem one or more codes by Fortnite Merry Mint Axe, it can happen because of different reasons.

Firstly, the code might have already been used by another visitor.

In this case, you need to use one of the free Fortnite Merry Mint Axe code in the above list.

Secondly, you might be using the incorrect code.

You should turn off Caps Lock while writing it and do not be confused between “5” and “S” or “0” and “O”.

I will add new Fortnite Minty Pickaxe codes to the list in the future.

You can bookmark the page on Chrome by clicking on the star icon to get Fortnite Minty Pickaxe codes free.

What’s Next

Pet Simulator X Merch Codes

Free Fortnite Wildcat Skin Codes

Free Nintendo Switch eShop Codes

Arsalan Rauf
Arsalan Rauf

Arsalan Rauf is an entrepreneur, freelancer, creative writer, and also a fountainhead of Green Hat Expert. Additionally, he is also an eminent researcher of Blogging, SEO, Internet Marketing, Social Media, premium accounts, codes, links, tips and tricks, etc.
www.greenhatexpert.com

Filed Under: Gaming

Free Pet Simulator X Merch Codes 2025

Last Updated on December 25, 2024 By Arsalan Rauf

PSX is a short form of Pet Simulator X, is the 3rd version of the Pet Simulator franchise.

The aim of the player in the game is to collect coins and gems to access the powerful pets.

You can use the coins to hatch pets from eggs and also buy new biomes from them.

When the player moves forward in the game, they can unlock new worlds to reach novel gameplay mechanics as well as features.

In the collection, there are more than 1,000 pets currently available.

To redeem unique pets, you can purchase PSX merch.

This article has free Pet Simulator X merch codes on Roblox that are not expired and working to get a huge dog, a huge cat, and so on.

How to get free Pet Simulator X merch

To get free Pet Simulator X merch, use different survey sites including Survey Junkie or YouGov to earn rewards such as PayPal cash and buy them.

How to get a Pet Simulator X merch code

  1. Visit their official Big Games online shop.
  2. Now, filter the shop to “Redeemable Code”.
  3. Purchase a plushie using a redeemable code that is in stock.
  4. Lastly, redeem the code in Pet Simulator X!

How to redeem Pet Simulator X merch codes

  1. Firstly, launch Pet Simulator X.
  2. After that, choose the “Pet” icon.
  3. Now, select the “Exclusive Shop” icon.
  4. Click on “Redeem for Exclusive Pets!”.
  5. Enter the merch code and choose “Redeem!”.

Free Pet Simulator X merch codes 2025

Pet Simulator X merch codes

  • 5LHJ2R8EFT9S
  • 3PYN6G7VX4UQ
  • 2MBC5F8RJH3S
  • 2UUC6X3PYP4W
  • 4HPZ5N8LJW2V
  • 9JDK7M4QCB6X
  • 7BTR9K6DYL5V
  • 8XHN4J2QWS6Z
  • 3VXB9K6RFL8M
  • 4CJH7N2QYP5F
  • 5LZS6G8XV3B
  • 6DFL2K7NHT9Y
  • 9PQS6L8VX5FZ
  • 2TBN6G8YJ7H
  • 2TBN6G8UJ9H
  • 3XDR9K6FLA8Z
  • 7HDF4J2RKL9P
  • 8JWN5K6QYT4V
  • 4MCH7N2QZP5G
  • 5LXS6G8FV3R
  • 7JDN4J2YKL6H
  • 9FPH2L7VX6C
  • 2YBN6G8UJ7K
  • 3WXR9K6FLB8Z
  • 8KBN5R6QYP4V
  • 9DHF2L7VX8T

The free Pet Simulator X merch codes in the list are based on a first-come-first-serve.

If you are not able to redeem one or more codes by Pet Simulator X, it can happen because of different reasons.

Firstly, the code might have already been used by another visitor.

In this case, you need to use one of the free Pet Simulator X Merch code in the above list.

Secondly, you might be using the incorrect code.

You should turn off Caps Lock while writing it and do not be confused between “5” and “S” or “0” and “O”.

I will add new Pet Simulator X merch codes to the list in the future.

You can bookmark the page on Chrome by clicking on the star icon to get Pet Simulator X Merch codes free.

What’s Next

Free Fortnite Wildcat Skin Codes

Free Nintendo Switch eShop Codes

Free Call of Duty Modern Warfare 2 Codes

Arsalan Rauf
Arsalan Rauf

Arsalan Rauf is an entrepreneur, freelancer, creative writer, and also a fountainhead of Green Hat Expert. Additionally, he is also an eminent researcher of Blogging, SEO, Internet Marketing, Social Media, premium accounts, codes, links, tips and tricks, etc.
www.greenhatexpert.com

Filed Under: Gaming

How to Fix “Failed to connect to the server” in Minecraft

Last Updated on May 13, 2023 By Arsalan Rauf

Are you facing a “Failed to connect to the server” error in Minecraft?

The next part of the error is, “Failed to log in: Invalid session”.

Next to, “Try restarting your game and the launcher”.

Generally, the error is shown in the Java Edition of Minecraft when you try to connect to a server.

The problem can occur on multiple servers—Hypixel, Mineplex, Brawl, and so on.

In this article, I will tell you how to fix the “Failed to connect to the server” error in Minecraft (Java or Bedrock edition).

Why did I fail to connect to a Minecraft server?

You failed to connect to a Minecraft server because you might be using two instances of Minecraft and the old session ID is invalidated.

The error can also occur when you’re using a cracked version of the game such as TLauncher.

Most Minecraft servers restrict the cracked players to join the server.

If you’re the owner of server and you’ve set “online-mode” to “true” in the properties of your server, it can also result in connection issues.

Otherwise, Mojang’s/Microsoft are having issues on their end that needs to be fixed.

In May, the “Failed to connect to the server” error is a prominent bug in the Mojang Studios Official Issue Tracker website.

The bug is kept in the category of a “Networking” issue: https://bugs.mojang.com/browse/MC-262264.

If the bug is the official one in the tracker, it indicates that the Mojang team is working on the issue and finding a fix.

To find out the status of Minecraft, you can check it if someone is facing the same error from this link: https://downdetector.com/status/minecraft/.

How to fix “Failed to connect to the server” in Minecraft

To fix “Failed to connect to the server” in Minecraft, there are few steps to follow including quitting the game, closing the launcher and reopening it.

If you have an additional Minecraft account, you can also use it to log in.

If you’re playing a cracked version of Minecraft, you have to join a server that does not have problem with the cracked versions or does not check for licenses.

If you have a server, you have to set “online-mode” to “false” in your server’s properties.

In some cases, there may be a problem from Minecraft’s end or a bug that needs to be fixed from their end.

Solution 1: Quit and reopen Minecraft (for regular gamers)

  1. Quit the server/game.
  2. You need to close the Minecraft launcher (use task manager).
  3. Open the launcher again.
  4. Join the game/server.

Solution 2: Log in from an alternate Minecraft account (for regular gamers)

  1. Go to the Minecraft launcher and open it.
  2. After that, click on the dropdown box of your account.
  3. Choose “Log out” from the dropdown menu.
  4. Click on “Add account” to add additional account.
  5. Log in to another Minecraft account via Microsoft/Mojang.

Solution 3: Log in with the Minecraft/Mojang license (for cracked players)

  1. Use the Minecraft/Mojang license to log in from the “Accounts” menu item.
  2. After that, select a server that allows cracked versions to join and does not check for licenses.

Solution 4: Set “Online-Mode” to “False” (for server owners)

  1. Go to the main folder of your Minecraft server.
  2. Access the server.properties file > Online-Mode > set to “False”.
  3. Save the file to save the settings and reboot your server.

What’s Next

How to Fix “Failed to login: Invalid session (try restarting your game)” in Minecraft

How to Fix “internal exception java.net.socketexception connection reset” in Minecraft

Free Minecraft Redeem Codes

Arsalan Rauf
Arsalan Rauf

Arsalan Rauf is an entrepreneur, freelancer, creative writer, and also a fountainhead of Green Hat Expert. Additionally, he is also an eminent researcher of Blogging, SEO, Internet Marketing, Social Media, premium accounts, codes, links, tips and tricks, etc.
www.greenhatexpert.com

Filed Under: Gaming, How to

How to Change Servers in Genshin Impact

Last Updated on April 15, 2023 By Arsalan Rauf

To play Genshin Impact with your friends, you have to go to the same server as them.

Otherwise, you cannot play with them or find them.

Let’s suppose, you are on the America server while your friend is on another server for instance, Asia server.

In this case, you will not be able to play the game with them.

To fix this, you or your friend have to change servers.

If you are playing on America server, you have to switch to the server that your friend is on.

However, you might have a question in mind that if your progress will be lost.

In this article, I will tell you how to change servers in Genshin Impact and whether you’ll lose progress if you change servers.

I will also tell you if servers matter in Genshin Impact.

This guide is universal regardless of the platform you are using to play Genshin Impact including PC, Xbox, PlayStation, iOS, Android, or Nintendo Switch, you can follow this article to change servers.

How to change servers in Genshin Impact

To change servers in Genshin Impact, the first step is to launch the game.

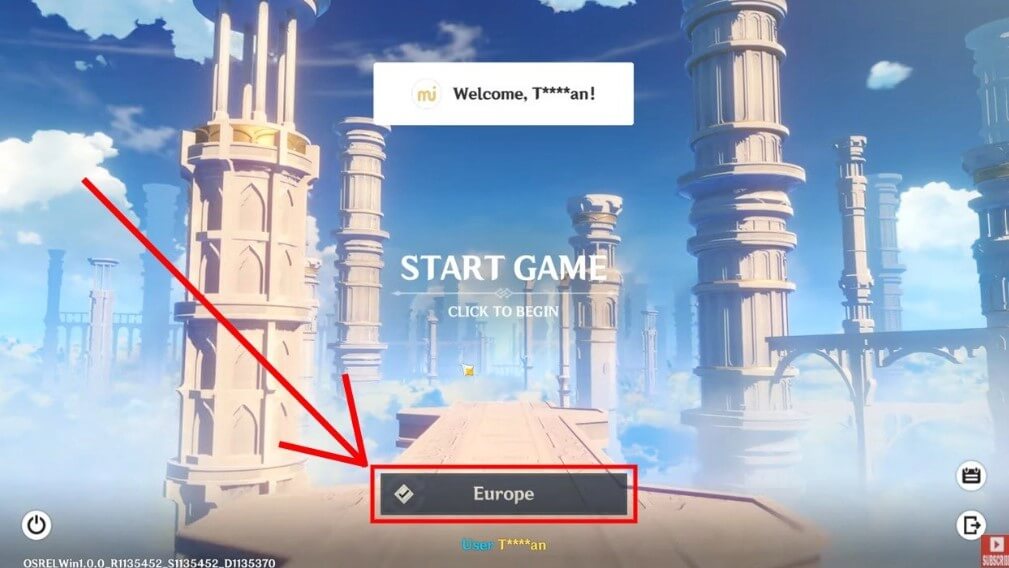
After launching Genshin Impact, click on the current server that you’re playing on and choose the server that you want to switch to.

For instance, if your current server is “Europe”, you need to click on “Europe”.

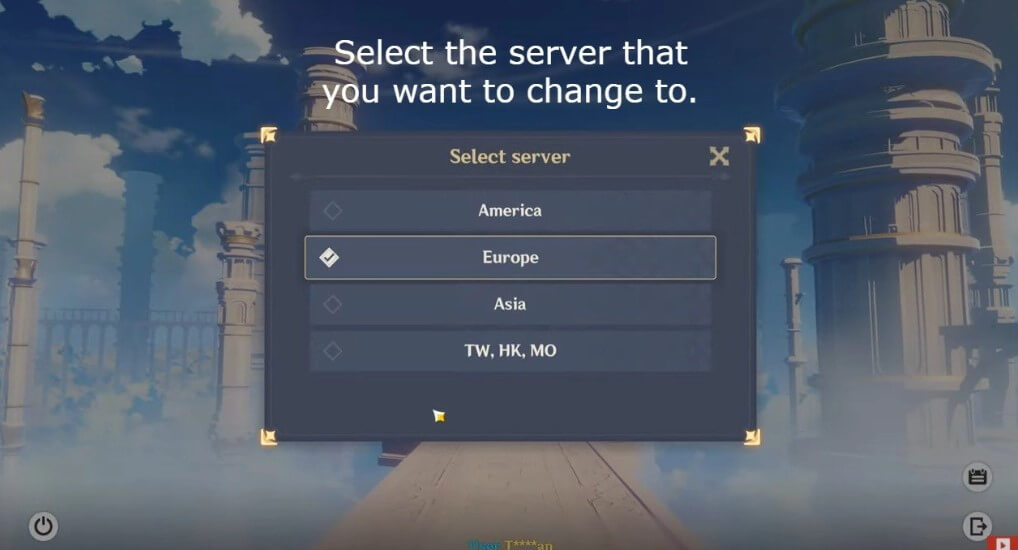
After that, you can select from four different servers.

Those 4 servers include America, Europe, Asia, and TW/HK/MO.

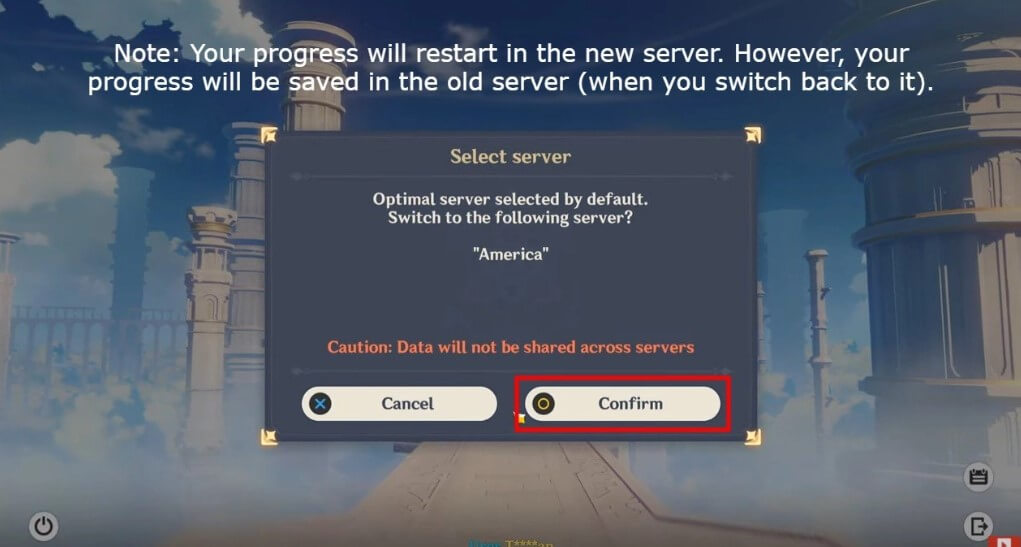
After selecting the server that you want to change to, it will show you a pop-up message.

The message on a pop-up will be that data will not be shared across servers.

It means that you have to relaunch or restart the game when you switch to a new server.

However, it will save your progress in the old server.

Therefore, you do not have to be worried about switching or changing of servers because your progress will remain there.

Here is a step by step guide on how to change servers in Genshin Impact:

Step 1. Launch Genshin Impact

The first thing you need to do when it comes to changing servers in Genshin Impact is to launch the game.

First of all, you need to open Genshin impact application on your platform.

The platforms can be PC, Xbox, PlayStation, iOS, Android, or Nintendo Switch version of the game.

After opening the Genshin Impact application, you need to launch the game by clicking on “Launch”.

Step 2. Click on your current server

change servers genshin impact 1

After launching Genshin Impact, it will show you the server that you’re currently on.

For instance, if you’re using the “Europe” server now, a “Europe” button will be available.

Similarly, if the “America” server is being used by you, it will display an “America” button.

To move on to change your server on Genshin Impact, you need to click on the server button.

Step 3. Select the server that you want to change to

change servers genshin impact 2

After clicking on the server button, it will open a pop-up.

The pop-up will give you a list of servers that you can move to.

The servers are America, Europe, Asia, and TW/HK/MO.

It is time to select the server that you desire to switch to.

If you want to play co-op with your friend, it is wise to be on the similar server as your friend.

For instance, if your friend is playing on the Asia server, select “Asia” to change to the Asia server.

Step 4. Confirm the change

change servers genshin impact 3

After choosing the server that you want to be on, it will show you a confirmation pop-up.

The pop-up will tell that data will not be shared across servers.

It indicates that your progress will restart if you switch to a new server.

However, your progress will remain saved in the old server (if you go back to it).

Therefore, you don’t have to be anxious about losing your progress because you can go back to your old server whenever you want.

When you switch it, you get your progress back.

You have to click on “Confirm” to change servers.

Well done! I have successfully taught you how to change servers on Genshin Impact!

Do you lose progress if you change servers in Genshin Impact?

Your old server will keep your progress but the new server will lose your progress.

The reason behind it is that data cannot be transferred across servers.

For instance, if you switched to a new server in Genshin Impact, your progress will restart.

However, in the old server, you will begin with your progress where you left it (when you go back to it).

If you have been playing Blizzard games such as Hearthstone, you will be familiar with the rule that it does not transfer progress between servers.

Does the server matter in Genshin Impact?

Yes, servers matter in Genshin Impact if you want to enjoy co-op mode with your friend.

You have to be on the same server as them in order to play with them.

Let’s suppose that you’re on the Asia server and playing on it but your friend is on the America server.

If your friend wants to play co-op with you, he needs to change the server to Asia.

On the other hand, your friend can change their server to Asia.

Final Words

Another recommendation is that you choose a server that is close to where you reside in.

For instance, if you are in Singapore, you should select the “Asia” server.

Alternatively, if you reside in America, you should select the “America” server.

It will cause a lower ping.

Just remember that switching servers will not delete your progress on the old server.

However, on the new server, your progress will be reset.

It means that when you go back to the old server, your progress will be restored.

You have to choose the same server as your friend in order to play co-op with them.

If your friend is not very progressive in Genshin Impact, you can ask them to switch to your server.

What’s Next

Genshin Impact Usernames Ideas

How to Recover Your Genshin Impact Account

How to Change or Reset Your Genshin Impact Password

Arsalan Rauf
Arsalan Rauf

Arsalan Rauf is an entrepreneur, freelancer, creative writer, and also a fountainhead of Green Hat Expert. Additionally, he is also an eminent researcher of Blogging, SEO, Internet Marketing, Social Media, premium accounts, codes, links, tips and tricks, etc.
www.greenhatexpert.com

Filed Under: Gaming, How to

How to Join Someone in Roblox Without Being Their Friend

Last Updated on April 14, 2023 By Arsalan Rauf

Roblox is a sandbox game that can be used to share experiences and be anything you can think of.

You can select from thousands of experiences and play with your friends.

If you are friend with someone, you can join them in a Roblox experience and this setting is by default.

You can use your privacy settings to change it.

There are five options and this setting is known as “Who can join me in experiences?”.

In this article, I will tell you how to join someone in Roblox without being their friend in an experience.

Can you join someone in Roblox without being friends?

Yes, you can join someone in Roblox without being friends with the user.

It can be possible if the user has set their “Who can join me in experiences?” privacy setting to “Friends, users I follow, and my followers” or “Everyone”.

If the setting of the user is set to “Friends, users I follow, and my followers”, you can join them in an experience and it can be done by going to their profile and click on the three dots and follow them.

If you are following the person and their privacy setting is also set to “Friends, users I follow, and my followers”, you can join them when they play a game.

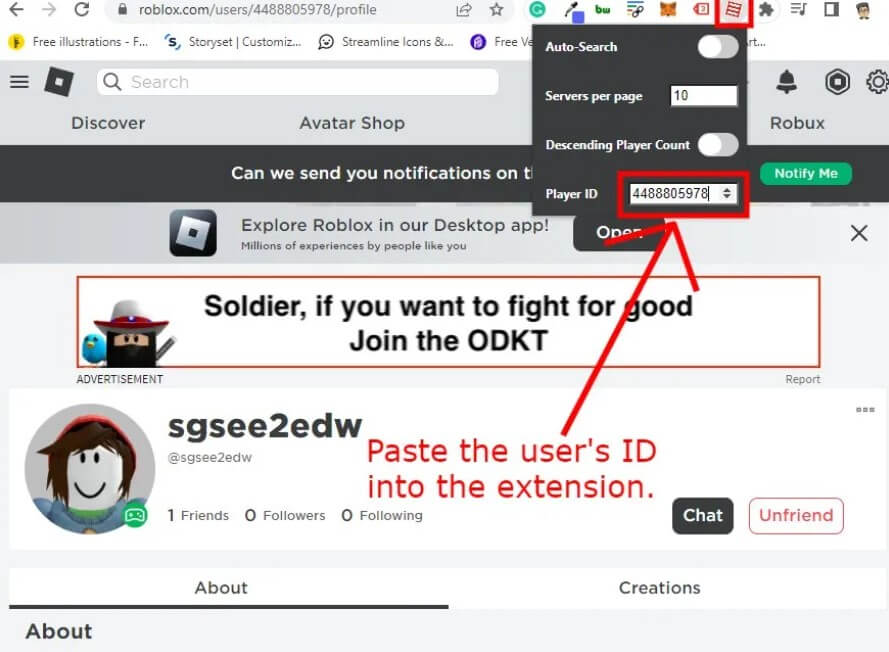
You can also use the “Restore Old Roblox Server List” Chrome extension and use the player’s ID into the extension.

How to join someone in Roblox without being their friend

To join someone in Roblox without being their friend, the first thing you need to do is to install the “Restore Old Roblox Server List” Chrome extension and put the player’s ID into the extension.

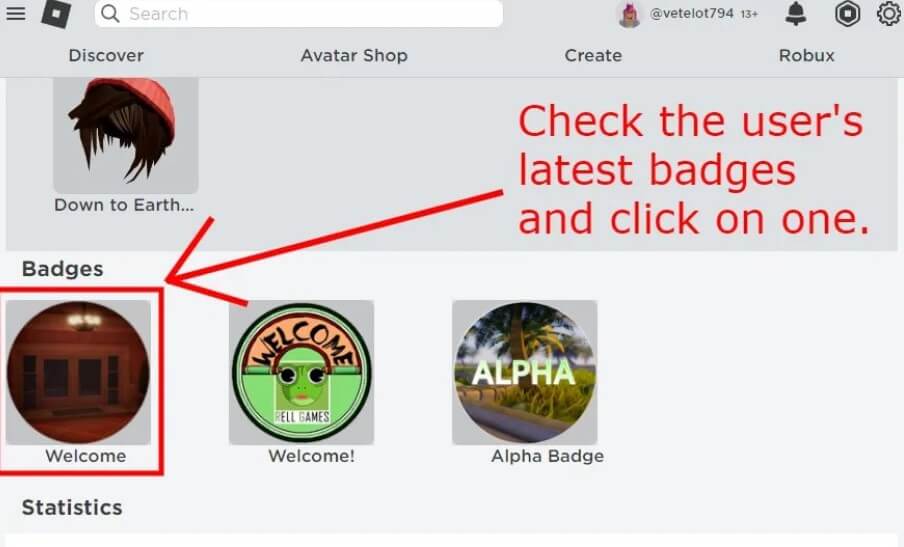
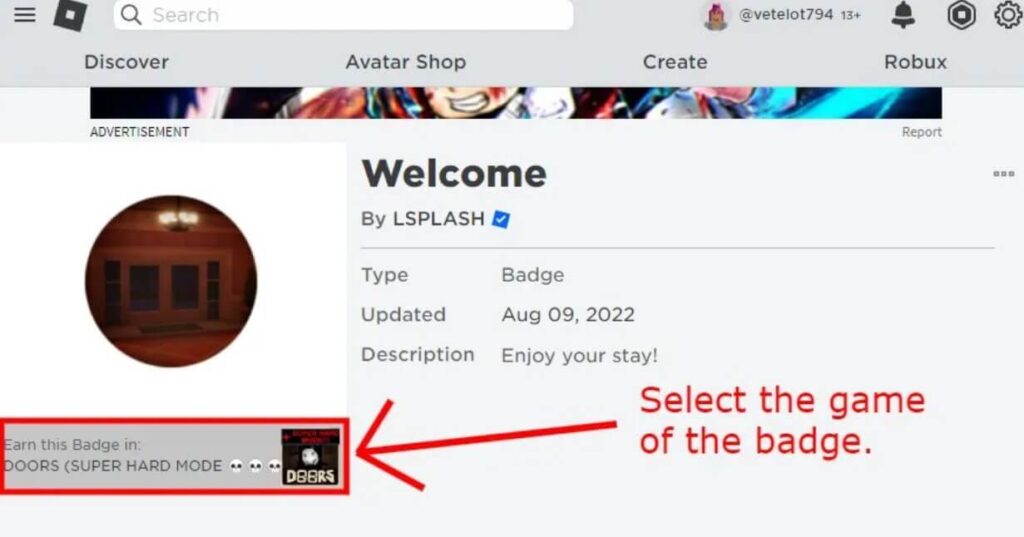
After entering the player’s ID, inspect the badges of the user, guess the game they are playing, choose it, find the user, and join the server they are in.

If you see no results, you have to check their badges again and select another game.

The method is based on trial and error, so multiple tries are needed to join the user in an experience.

#1: Install the “Restore Old Roblox Server List” Chrome extension

  1. Go to the Google chrome browser.
  2. Visit the “Restore Old Roblox Server List” extension to install it.
  3. Select “Add to Chrome”.
  4. To pin the extension, click on the puzzle icon.

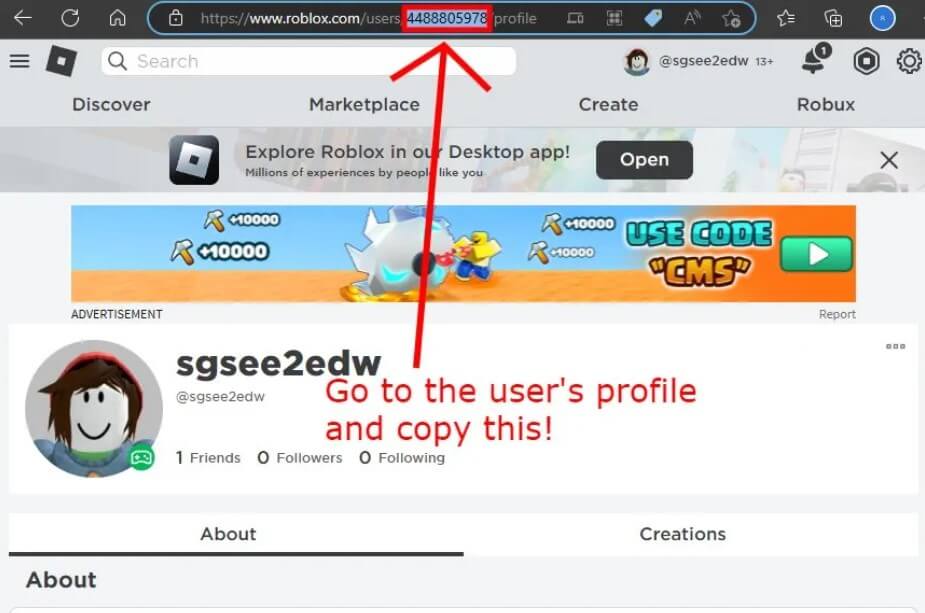
#2: Copy and paste the player’s ID into the extension

join someone joins off roblox 1
join someone joins off roblox 2
  1. Visit the Roblox website.
  2. Search for the user that you want to join in an experience.
  3. Use the Chrome search box to copy their player ID (for instance, 4488805978).
  4. After that, you need to click on the “Restore Old Roblox Server List” extension.
  5. Paste the ID of the player into the “Player ID” field.

#3: Check the user’s badges and guess the game they are playing

join someone joins off roblox 3
join someone joins off roblox 4
  1. On the Roblox website, visit “My Friends”.
  2. Go to the profile of the user that you want to join.
  3. Scroll down to reach the “Badges” section.
  4. Choose the most recent badge that they obtained.
  5. Select the game/experience of the Badge.

#4: Search for the user and join the server they are in

join someone joins off roblox 5
join someone joins off roblox 6
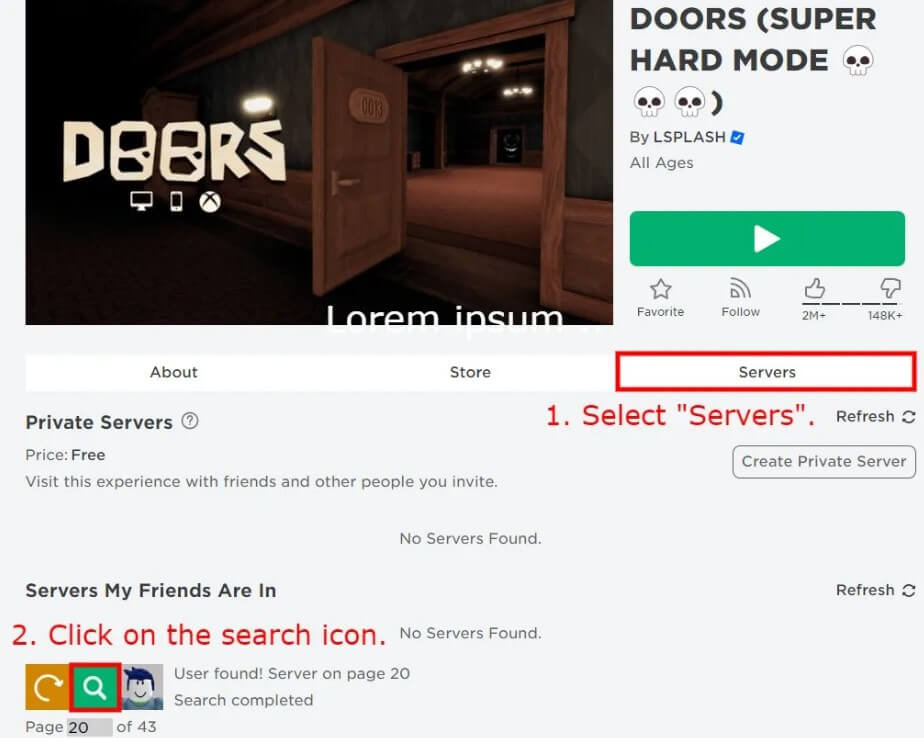
  1. Select “Servers” on the page.
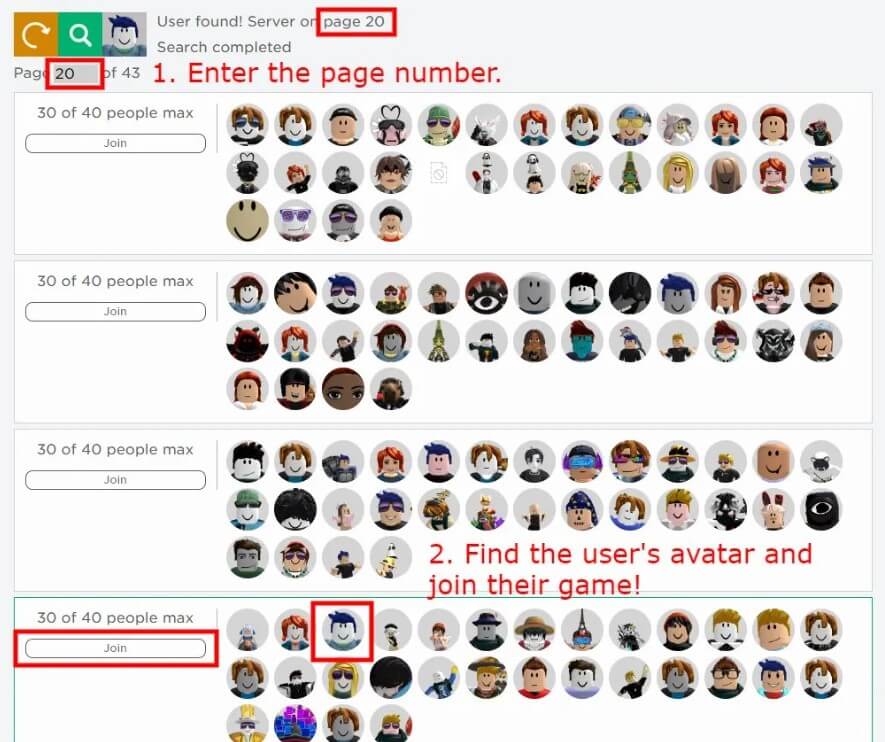
  2. Now, click on the search icon and wait for up to 60 seconds (1-minute).
  3. Edit the page number to the page where the user is found.
  4. Find the avatar of the user and join their game!

Note: If the search results in “User not found”, you have to visit the #3 step in this guide and try selecting another badge from another game/experience.

What’s Next

How to Join Someone with their Joins Off in Roblox

How to Fix “Advapi32.dll” Error in Roblox

Free Roblox Gift Card Codes

Arsalan Rauf
Arsalan Rauf

Arsalan Rauf is an entrepreneur, freelancer, creative writer, and also a fountainhead of Green Hat Expert. Additionally, he is also an eminent researcher of Blogging, SEO, Internet Marketing, Social Media, premium accounts, codes, links, tips and tricks, etc.
www.greenhatexpert.com

Filed Under: Gaming, How to

How to Fix Game Already Running in Minecraft

Last Updated on April 13, 2023 By Arsalan Rauf

Are you facing a “The game is already running” error on Minecraft?

The next part of the error is, “If you just quit the game, it should be ready to launch in a moment”.

Minecraft is a game in which you will have to prove yourself resourceful with the help of surrounding environment to obtain building material.

You can come up with something unique by breaking down trees.

You have to get rid of dangerous situations by keeping yourself at arm’s length from mobs to survive the night.

Players can know about the Redstone ore to build amazing creations to give rise to the creations.

In this article, I will tell you how to fix game already running in Minecraft for Java or Bedrock.

What is “This game is already running” in Minecraft?

This game is already running on Minecraft means that you have already opened an instance of Minecraft.

In short, the Minecraft launcher is already running in the background.

You can also face it when the launcher is stuck in the task manager.

A firewall or antivirus program can also stop Minecraft from launching too, so you have to disable them to run it.

How to fix game already running in Minecraft

To fix game already running in Minecraft, the first thing you need to do is to end the task for the Minecraft launcher.

You can also use the app’s settings to verify or repair the game.

If everything fails, you can remove and reinstall the game from the Microsoft store.

Solution 1: End the task for the Minecraft launcher

  1. Press these keys together “CTRL” + “ALT” + “DEL” from your keyboard.
  2. To open the task manager, select “Task Manager”.
  3. Look for the “Minecraft Launcher” process.
  4. Right-click on “Minecraft Launcher” and select “End task” to end the task.
  5. Now, open the Minecraft Launcher.

Solution 2: Verify and repair the game

  • Use the window search bar to find “Apps and features”
  • Click on the three dots beside “Minecraft Launcher” by Mojang/Microsoft Studios.
  • After that, select “Advanced options”.
  • Choose “Terminate”, “Repair”, and “Reset” in the same order.
  • Now, open the Minecraft Launcher.

Solution 3: Uninstall and reinstall the launcher

  1. Use the windows search to find “Apps and features”.
  2. Click on the three dots beside “Minecraft Launcher” by Mojang/Microsoft Studios.
  3. After that, select “Advanced options”.
  4. Scroll down to choose “Uninstall”.
  5. Go to the Microsoft Store > search for “Minecraft Launcher” > install it again.
  6. Now, open the Minecraft Launcher.

What’s Next

How to Fix Error Code 0x87e50038 on Minecraft

Top 3 Best Mob Arena Minecraft Servers

Free Minecraft Redeem Codes

Arsalan Rauf
Arsalan Rauf

Arsalan Rauf is an entrepreneur, freelancer, creative writer, and also a fountainhead of Green Hat Expert. Additionally, he is also an eminent researcher of Blogging, SEO, Internet Marketing, Social Media, premium accounts, codes, links, tips and tricks, etc.
www.greenhatexpert.com

Filed Under: Gaming, How to

How to Fix Error Code 0x87e50038 on Minecraft

Last Updated on April 13, 2023 By Arsalan Rauf

Are you facing a 0x87e50038 error code in Minecraft?

The error message will show that the game is already running.

It also shows that it will be able to launch soon if you have just quit it.

If you will keep trying to run the game, the error message will be shown again and again.

In this article, I will tell you how to fix “Error Code: 0x87e50038” on Minecraft if you can’t start the launcher.

What does error code 0x87e50038 mean on Minecraft?

Error code 0x87e50038 on Minecraft means that you have already opened an instance of Minecraft.

In short, the Minecraft launcher is already running in the background.

You can also face it when the launcher is stuck in the task manager.

A firewall or antivirus program can also stop Minecraft from launching too, so you have to disable them to run it.

How to fix error code 0x87e50038 on Minecraft

To fix error code 0x87e50038 on Minecraft, the first thing you need to do is to end the task for the Minecraft launcher.

You can also use the app’s settings to verify or repair the game.

If everything fails, you can remove and reinstall the game from the Microsoft store.

Solution 1: End the task for the Minecraft launcher

  • Press these keys together “CTRL” + “ALT” + “DEL” from your keyboard
  • To open the task manager, select “Task Manager”.
  • Find the “Minecraft Launcher” process.
  • Right-click on “Minecraft Launcher” and select “End task” to end the task.
  • Now, open the Minecraft Launcher.

Solution 2: Verify and repair the game

  1. Use the window search bar to find “Apps and features”.
  2. Click on the three dots beside “Minecraft Launcher” by Mojang/Microsoft Studios.
  3. After that, select “Advanced options”.
  4. Choose “Terminate”, “Repair”, and “Reset” in the same order.
  5. Now, open the Minecraft Launcher.

Solution 3: Uninstall and reinstall the launcher

  1. Use the windows search to find “Apps and features”.
  2. Click on the three dots beside “Minecraft Launcher” by Mojang/Microsoft Studios.
  3. After that, select “Advanced options”.
  4. Scroll down to choose “Uninstall”.
  5. Go to the Microsoft Store, search for “Minecraft Launcher” to install it again.
  6. Now, open the Minecraft Launcher.

What’s Next

Top 3 Best Mob Arena Minecraft Servers

Top 7 Minecraft Servers With Guns

Free Minecraft Accounts

Arsalan Rauf
Arsalan Rauf

Arsalan Rauf is an entrepreneur, freelancer, creative writer, and also a fountainhead of Green Hat Expert. Additionally, he is also an eminent researcher of Blogging, SEO, Internet Marketing, Social Media, premium accounts, codes, links, tips and tricks, etc.
www.greenhatexpert.com

Filed Under: Gaming, How to

How to Fix Error Code 134 in Rockstar Games Launcher

Last Updated on April 10, 2023 By Arsalan Rauf

The Rockstar Games Launcher is a digital launcher that is designed for PC games and the developer and publisher of this storefront is Rockstar Games.

The users are allowed to buy and download games from the library of Rockstar Games such as Red Dead Redemption, GTA and Max Payne.

In some cases, the users can face connection issues with the launcher.

There are several players who complained that the Rockstar Games Launcher is not working, freezing, or not responding.

A common error that is experienced by the players is the error code 134 in Social Club.

In this article, I will tell you how to fix the Social Club error code 134 in the Rockstar Games Launcher for GTA 5.

What is error code 134 in GTA 5?

Error code 134 in GTA 5 means that the game version is not up to the date.

The version of the game becomes outdated if you do not update it.

Otherwise, there is a problem with the Rockstar Games services or your internet connection.

You can go to the Rockstar Service Status website in order to find the status.

How to fix error code 134 in Rockstar Games Launcher

To fix error code 134 in Rockstar Games Launcher (GTA 5), you can do these two things including use Proton VPN or 1.1.1.1 by Cloudflare.

Additionally, you can also remove the social club folder by deleting it or flush the DNS cache.

Rockstar suggests verifying the integrity of your game files using the Rockstar Games Launcher or GTA 5.

For Steam, visit your library, right-click on “GTA V”, choose “Properties”, select “Local Files”, and select “Verify integrity of game files”.

Solution 1: Use ProtonVPN

  1. End the task for the Rockstar Games Launcher.
  2. Go to their official website: ProtonVPN.com
  3. Scroll down until you find the “Get Free VPN”.
  4. Click on “Get Free VPN”.
  5. After that, Install Proton VPN, open it, and create an account.
  6. After opening the free VPN, connect to it and open the Rockstar Games Launcher.

Solution 2: Use 1.1.1.1 by Cloudflare

  1. End task for the Rockstar Games Launcher.
  2. Visit https://1.1.1.1/ by Cloudflare.
  3. After that, install 1.1.1.1 for Windows/macOS/Linux.
  4. Now, access WARP and turn it on.
  5. Lastly, open the Rockstar Games Launcher.

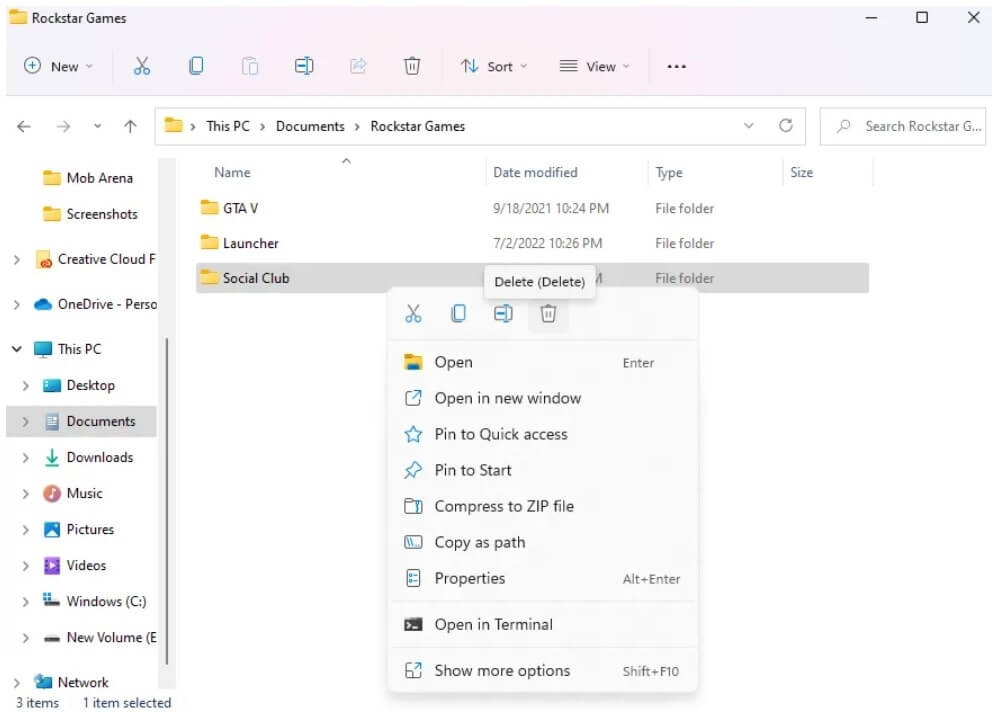
Solution 3: Delete the social club folder

fix offline mode rockstar games launcher 1
  1. Visit the File Explorer.
  2. Go to the “Documents” folder.
  3. Open the “Rockstar Games” folder to access it.
  4. After that, delete the “Social Club” folder.
  5. Lastly, go to the Rockstar Games Launcher to open it and log in to your account.

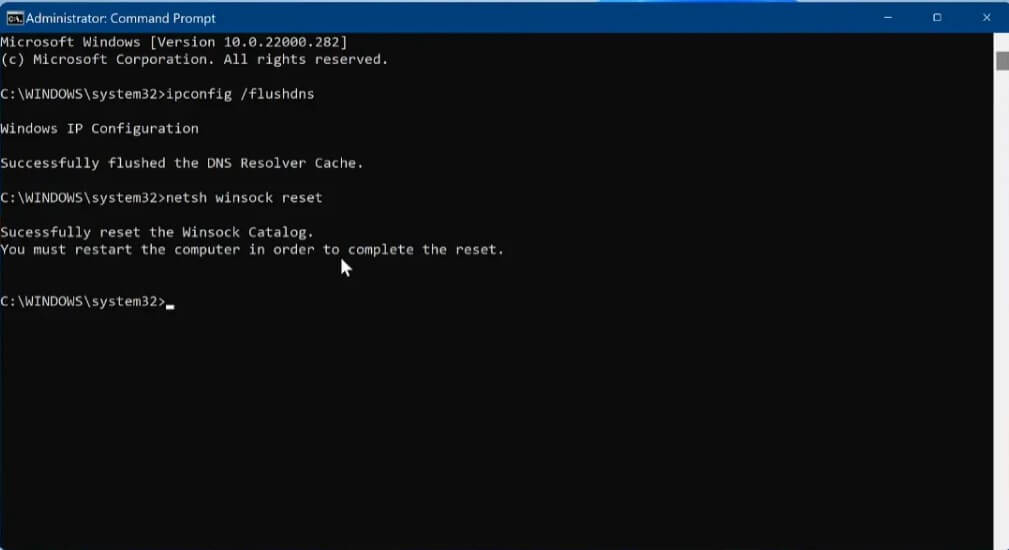
Solution 4: Flush your DNS cache

fix offline mode rockstar games launcher 2
  1. To find “Command Prompt”, use the Windows search.
  2. Now, run the Command Prompt as an administrator.
  3. Type this command “ipconfig /flushdns” and press enter.
  4. After that, type this command “netsh winsock reset” and press enter.
  5. Restart your PC or computer and reopen the Rockstar Games Launcher.

What’s Next

How to Fix Social Club Error Code 1002

How to Fix “Social Club has failed to start because of an incomplete installation code 1″

How to Fix Error Code 6000.87 in Rockstar Games Launcher

Arsalan Rauf
Arsalan Rauf

Arsalan Rauf is an entrepreneur, freelancer, creative writer, and also a fountainhead of Green Hat Expert. Additionally, he is also an eminent researcher of Blogging, SEO, Internet Marketing, Social Media, premium accounts, codes, links, tips and tricks, etc.
www.greenhatexpert.com

Filed Under: Gaming, How to

How to Fix Social Club Error Code 1002

Last Updated on April 10, 2023 By Arsalan Rauf

The Rockstar Games Launcher is launched by Rockstar Games that works as a software platform to sell their computer games.

The users can browse, buy and download games from its library including GTA and Red Dead Redemption.

Multiple users have complained that there is a problem while connecting to the launcher, some users reported that they get the problem including freezing or unresponsiveness.

The users have posted these issues on forums and social media sites.

A common error that is experienced by the players is error code 1002 in Social Club.

In this article, I will tell you how to fix error code 1002 in Social Club in the Rockstar Games Launcher.

What is error code 1002 in Social Club?

Error code 1002 in Social Club occurs due to an incorrectly installed Social Club folder.

Otherwise, another app is stopping Social Club from communicating with the Rockstar Games servers.

The error can also occur when the launcher cannot find the Social Club folder.

It happens when there is a missing Documents folder in the C or D drive.

How to fix Social Club error code 1002

To fix Social Club error code 1002, the first thing is to update the location of your documents folder to the default location.

To begin with, follow these steps: go to the File Explorer > This PC > right-click “Documents” > Properties > Location > Restore Default > Apply > Ok.

Here’s a step by step guide on how to do this:

  1. Go to the File Explorer and select “This PC”.
  2. After that, right-click on “Documents”.
  3. Choose “Properties”.
  4. Location > Restore Default > Apply > Ok.
  5. Access the Rockstar Games Launcher by opening it and launch a game like Grand Theft Auto 5.

If you still experience the issue, follow these steps: go to This PC > Windows (C:) > Users > Your user.

In the user folder, follow these steps: right-click > New > Folder > name it “Documents”.

After that, copy the file directory of the new folder, return to the documents folder in “This PC”, right-click on it, and select “Location”.

In the end, you need to change the location to the location of the new documents folder in the C Drive.

What’s Next

How to Fix “Social Club has failed to start because of an incomplete installation code 1″

How to Fix Error Code 6000.87 in Rockstar Games Launcher

How to Fix “Failed to connect to the Rockstar Games Library Service”

Arsalan Rauf
Arsalan Rauf

Arsalan Rauf is an entrepreneur, freelancer, creative writer, and also a fountainhead of Green Hat Expert. Additionally, he is also an eminent researcher of Blogging, SEO, Internet Marketing, Social Media, premium accounts, codes, links, tips and tricks, etc.
www.greenhatexpert.com

Filed Under: Gaming, How to

  • « Previous Page
  • 1
  • 2
  • 3
  • 4
  • 5
  • 6
  • …
  • 46
  • Next Page »


Recent Posts

  • Free DeepSeek Accounts 2025
  • Free Zoho Mail Accounts 2025
  • Acudepot Discount Codes 2025
  • Free Blackshot Accounts 2025
  • Free GMX Email Accounts 2025
  • Songtrust Discount Codes 2025
  • Uzicases Discount Codes 2025
  • Cardillo Promo Codes 2025
  • Free DriverFix License Keys 2025
  • Avast Secureline VPN Activation Codes 2025

Recommended Posts

Create a Gmail Account Without Phone Number

Free Course Hero Account

Crunchyroll Accounts

Cracked Apps

Free Pokemon Go Accounts
Onlyfans Free Accounts
Free Chegg Accounts
Free Paypal Accounts
Free Gmail Accounts
Funny Steam Names

Categories

  • Apps
  • Apps for PC
  • Blogging
  • Discord
  • Facebook
  • Gaming
  • Grammar
  • Guide
  • How to
  • Instagram
  • Messaging
  • OnlyFans
  • Pinterest
  • Reddit
  • SEO
  • Snapchat
  • Social Media
  • Spotify
  • Steam
  • Telegram
  • TikTok
  • Twitch
  • Twitter
  • Whatsapp
  • WordPress
  • YouTube
  • Home
  • Social Media
  • Messaging
  • About
  • Submit Guest post