Green Hat Expert

  • Home
  • Social Media
    • Instagram
    • TikTok
    • Snapchat
    • Facebook
    • YouTube
    • Twitter
  • Messaging
    • Discord
    • Telegram
    • Whatsapp
  • About
  • Submit Guest post
You are here: Home / Archives for Social Media

How to Get the Teenage Filter on TikTok

Last Updated on February 23, 2023 By Arsalan Rauf

The teenage filter on TikTok will allow you to become a teenager as it makes your face into a teenager version.

Your scars, wrinkles and other flaws will be removed from it.

It will make a comparison of now and how you used to look as a teenager.

The filter has been used on more than 2 million videos until now and it’s one of the most trending filters on TikTok right now.

In this article, I will tell you how to get the teenage filter on TikTok and use it on yourself.

How to get the teenage filter on TikTok

To get the teenage filter on TikTok, you have to tap on the plus icon, after that, select “Effects”, and find the filter by searching for the “Teenage Look” effect.

You can also use the filter from a video that already contains it.

#1 Method: Select the “Teenage Look” effect

  1. Go to TikTok and tap on the + icon.
  2. Select “Effects”.
  3. Now, tap on the search icon.
  4. Search for the terms “Teenage Look”.
  5. Select “Teenage Look”.

#2 Method: Watch a video of the filter

  1. Go to TikTok and use on the search icon by tapping on it.
  2. Find “Teenage filter”.
  3. Watch a video that has the filter.
  4. Lastly, tap on the “Teenage Look” filter on the video to use it.

Note: If the filter is not available on the app, try updating TikTok or your Android/iOS device.

On the other hand, you can go to this link to get the filter: https://vt.tiktok.com/ZS8uxYWd4/.

How to use the teenage look filter on TikTok

To use the teenage look filter on TikTok, the first step is to locate it and select it.

After selecting it, you need to tap on the screen to disable the filter, and record yourself, after that, you need to enable the filter by tapping on the screen again.

Here’s a step-by-step guide on how to do this:

  1. Go to TikTok and tap on the plus icon.
  2. Effects > Search > Teenage Look.
  3. To disable the filter, tap on the screen.
  4. Start recording yourself.
  5. To enable the filter, tap on the screen again.

Your face will look like a teenager and the filter will remove scars, wrinkles, and other flaws from your face.

As a result, you will be able to enjoy the teenage version of yourself.

What’s Next

How to Get the AI Portrait Filter on TikTok

What is the AI Trend on TikTok?

How to Get the AI Manga Filter on TikTok

Arsalan Rauf
Arsalan Rauf

Arsalan Rauf is an entrepreneur, freelancer, creative writer, and also a fountainhead of Green Hat Expert. Additionally, he is also an eminent researcher of Blogging, SEO, Internet Marketing, Social Media, premium accounts, codes, links, tips and tricks, etc.
www.greenhatexpert.com

Filed Under: Social Media, TikTok

150+ Funny Instagram Comments

Last Updated on April 30, 2023 By Arsalan Rauf

Does your friend post a photo on Instagram on a regular basis?

If yes, you might want to leave a comment on that photo.

However, it is a difficult task to create a unique comment instantly.

You can your comment funny in order to make it unique.

A funny comment on Instagram is an ideal way to get more like and attention from others.

The reason behind it is that most of the comments are filled with repetitive compliments.

This post has more than 150 funny Instagram comments for friends, girls, and boys that you can copy and paste.

Funny Instagram comments

  • I would say God bless you, but it looks like he already did!
  • hotter than hot chilly sauce
  • where’s the tw? I almost had a heart attack 😩
  • Imagine calling this yours
  • Sending your pictures to NASA because you are a star!
  • How do I explain to my eggs that you are not going to fertilize them?
  • yess normalize not looking your best!
  • I don’t see harry but I see style
  • icarly but without the car
  • 2021 was rough on me too
  • You’re Hotel without el
  • I didn’t even have to run to catch these butterflies!
  • I am showing this to my plastic surgeon 😩
  • Why is it spicy🥵🔥🌶
  • Sorry for breathing the same air with u
  • Guess what I’m wearing? The smile you gave me!
  • You’re the main cause of global warming
  • Instagram delivers
  • Just burned myself on the screen
  • Are you at McDonald’s? Cause I’m loving it
  • will be added directly to my favorites 📌
  • Rattenscharf 🐀
  • Fine as wine
  • N🧊
  • Ignore me, I’m just screenshotting here
  • Doesn’t look that bad, maybe a bit of tinsel will help
  • I honestly expected more
  • a rose for the pose
  • if you were a potato, you would be a sweet potato
  • 🚶🏽‍♀️-shocked
  • love the body positivity
  • ⚠️: hot person
  • please don’t post again
  • Those fancy shoes? You WANT to be noticed. Your clothes are telling
  • I would literally cut off my finger to look like you
  • you can run me over disrespectfully
  • you didn’t have to go this hard
  • “The food is not that hot” the food:😩😩
  • I don’t approve of this picture
  • hm your hoodie is pink which is the color of romance and femininity.. are you wearing that to send me a sign? are you… flirting with me?
  • me that you take care of yourself, but now, I will take care of YOU
  • million dollar prize
  • My dream is for you to say hi to me
  • bow chica wow wow
  • wish I had your confidence!
  • yess show off your flaws 😩
  • average photoshopped pic

Funny Instagram comments for friends

  • Two beauties 🥰 (on a pic with 3)
  • go vegan🥦🥕🌽
  • Wait, you actually kinda look good in this one
  • I had the same shirt, I sold it cause I hated it lol
  • fresh like airwaves 💨
  • Is this a museum? Or why am I looking at a masterpiece? 😏
  • hey bestie this is on ur main not ur priv
  • Are you buying likes?
  • yuh get it I guess
  • You better not delete this
  • I like the background better
  • Much needed, thank you
  • Blocked and reported
  • straight to the Pinterest🔥
  • I can’t describe in words how beautiful you are but numbers can, 3/10
  • You must have lost weight
  • 2.5/10 ⭐️
  • look @you!
  • Really nice background
  • good for you for not caring what people think 😌
  • Wow, you look different
  • ur so brave for posting this
  • So beautiful, enjoy your time at college!
  • What a wonderful post!
  • Give me your PIN
  • Hans get the FLAMMENWERFER
  • So fine for what
  • @nasa I think you missed a star
  • Let em’ know
  • Oh! is the sun falling down, nah that’s just my boy with da heat 🔥
  • u r cute bro
  • they ain’t ready yet

Funny Instagram comments for girls

  • oh, I didn’t catch your name, is it stunning? 😀
  • someone as beautiful as you belongs in an art museum
  • the confidence to post this queeeen
  • guys write songs about girls like you
  • Shoe without s
  • Thank you for my new lock screen picture
  • Can we take a minute of silence to appreciate this masterpiece? Thank u
  • My eyes got blessed!
  • How does it feel to be god’s favorite
  • Ladies and gentlemen… her 😩
  • You are a very beautiful girl. Looking for a sugar daddy? Check DMs ❤️
  • How do I explain to my eggs that you are not going to fertilize them?
  • I didn’t even have to run to catch these butterflies!
  • I am showing this to my plastic surgeon 😩
  • Why is it spicy🥵🔥🌶
  • Sorry for breathing the same air with u
  • Guess what I’m wearing? The smile you gave me!
  • step on me queen 👑
  • Called god, had to know if he was missing one of his angels
  • Look, no offense, but you should be more careful with what you post because I’m blown away by your beauty 😼
  • Imagine calling this yours
  • Sending your pictures to NASA because you are a star!
  • Ignore me, I’m just screenshotting here 🙋🏼‍♀️
  • Doesn’t look that bad, maybe a bit of tinsel will help
  • I honestly expected more
  • a rose for the pose
  • Do you happen to be looking for another lonely to the lonely?
  • Don’t make me act up bae
  • ladies and gentlemen, her
  • imagine being this pretty
  • Hand in marriage now
  • are you from Tennessee? Because you are the only one ten I see
  • another day another slay
  • I wasn’t gonna eat anyways
  • wanna date?
  • can you give me money for plan B now?
  • baddie alert🚨

Final Words

Did you find a funny Instagram comment in the list that you want to use in a comment?

If yes, feel free to copy and paste it into the comment section of a photo or post of your friend.

Otherwise, you can create your own funny comment for Instagram posts by using the ones above for inspiration.

You need to think before you use any of these comments from the list because some of them can be offensive to some people.

Therefore, you shouldn’t use these comments who are not frank with you or who can’t take a joke.

People who are frank with you, you can use one of these funniest Instagram comments on their posts.

What’s Next

Best Instagram Story Viewers

How to Delete Your Instagram Call History

Funny Instagram Captions (For Friends & Selfies)

Arsalan Rauf
Arsalan Rauf

Arsalan Rauf is an entrepreneur, freelancer, creative writer, and also a fountainhead of Green Hat Expert. Additionally, he is also an eminent researcher of Blogging, SEO, Internet Marketing, Social Media, premium accounts, codes, links, tips and tricks, etc.

www.greenhatexpert.com

Filed Under: Instagram

140+ Good Instagram Comments For Your Friends

Last Updated on April 30, 2023 By Arsalan Rauf

If you leave a good Instagram comment on anyone’s post, it will make the day of that person.

However, composing such a comment can be a hard task because you do not know what to say.

There are a lot of users who like Instagram post without commenting on it.

You should try commenting if you are not commenting yet.

It will be a nice gesture on someone’s post to comment there, it will also leave a good impression of you on the user.

This post has more than 135 cute, nice and good Instagram comments that can be used for boy, girls and also for friends.

It will also teach you which comment you should use to post on the picture of your friend.

If you do not have any idea what to comment you can read this post to get the ideas of short Instagram comment below.

What should I comment on my best friend’s picture?

The best idea you can use for commenting is complimenting someone.

For instance, if your friend has uploaded a picture of himself you can post a comment like “nice photo”.

Further, if you cannot think of anything you can use emojis to post an expression.

There are several emojis that can be used or common ones including 100 points emoji, smiling face with heart emojis, fire emoji etc.

What should I comment on a guy’s post?

You can post fire emoji when you are commenting on the post of a guy.

This is the ideal way to show that you like their post.

This fire emoji can be used to show love admiration or adoration.

This emoji also shows that the person is attractive.

Good Instagram comments

  • Keep on hustling
  • Sheeeeeeesh!
  • Out of this world
  • So pretty!
  • Those lips tho
  • Pretty girl
  • My jaw dropped 
  • You look amazing
  • You’re killing it
  • This outfit is absolutely insane 
  • So beautiful 
  • Oh my lawd 
  • I love this
  • I love these 
  • Love the fit!
  • What a babe 
  • Drip fit
  • Love your vibe!
  • Beyond amazing 
  • You are stunning
  • You’re the cutest thing
  • So perfect
  • You’re so gorgeous!
  • You are amazing omg
  • Disco baby
  • Oh good lord! 
  • Stop this is the comment I’m looking for
  • This outfit and you in it 
  • Cool style 
  • Oh hello 
  • Look at you
  • The beast in action
  • Sheeesh!
  • Better than good!
  • You’re so stunning 
  • This is fire 
  • What a great picture
  • Keep grinding 
  • This is the cutest outfit!
  • You look so cute!
  • Have a great weekend 
  • My heart 
  • Fire fit
  • A whole bloody vibe 
  • Love this picture!
  • You’re the goat
  • That smile 
  • Such an angel
  • Insane bro 
  • You’re the man
  • So dreamy
  • The shocker!
  • Such a beauty
  • So cool 
  • Badass photo
  • Big guy eh
  • Keep doing what you doing 
  • Dream physique
  • Full on goofy
  • Freaking gorgeous 
  • Always killing it with the looks! 
  • Looking sick my guy 
  • Hell yeah 
  • Classy dude
  • Love this picture
  • Straight like that! 
  • You are rocking the look 
  • Always surprising 
  • The outfit is perfect
  • Love it so much
  • You’re a total cutie
  • Rock on bro
  • Now that’s a lovely picture
  • Hard look 
  • You make my heart blow
  • You’re fabulous 
  • Keep going
  • This picture made my day
  • Absolute beauty right here
  • So gorgeous you are
  • Loving the fit 
  • You’re literally unreal
  • I’m so obsessed
  • Always popping off
  • Always dripping
  • You’re a machine 
  • So sick 
  • Amazing brother 
  • My everything 
  • Looking up to you
  • To look like this 
  • You’re one handsome young fella/fellow
  • Amazing look 
  • Sick outfit bro 
  • Big guy with big dreams 
  • There we go
  • Just like that
  • This is mood 
  • Looking good!
  • Great shoots 
  • Nice picture
  • The vibes are immaculate
  • Hardwork pays off 
  • Lord have mercy
  • Good vibes only 
  • Nice look 
  • Fresh look!
  • Nice shoot man 
  • My role model 
  • I adore you 
  • Yea, you’re unreal
  • Marry me rn!
  • What’s going up with you today? 
  • Hot stuff 
  • Blessing my feed rn
  • Slaying as always 
  • This is incredible 
  • You are amazing 
  • Damn body goals
  • You never fail to impress me
  • These are hard 
  • You look so good!

Nice Instagram comments

  • This is amazing!
  • Vibes on point
  • My spirit animal 
  • Dope shot!
  • I’m in love with your fit
  • This is straight 
  • Stunning picture 
  • You got it 

Cute Instagram comments

  • So cute 
  • The cutest omg 
  • You’re an angel
  • What a cutie!
  • You are so adorbs!
  • This is magical!
  • Loving the look!
  • What a babe 

Final Words

It is a hard nut to crack to post a good Instagram comment.

You can always post typical comments but it is very difficult for you to write something creative.

However, you do not have to leave a creative comment this is not necessary.

You can use a simple emoji of fire to show them that their post is great.

If you do not like to use emojis you can leave a comment such as “I love this!” or “nice pic”.

Even the simplest comments can make someone happy.

The above mentioned comments for Instagram are not in order.

If you love the post and comments in it do not forget to share it with other Instagram users.

What’s Next

Good Facebook Comments

How to Find Someone on Instagram Without their Username

Cool, Aesthetic, And Cute Instagram Usernames

Funny Instagram Captions (For Friends & Selfies)

Arsalan Rauf
Arsalan Rauf

Arsalan Rauf is an entrepreneur, freelancer, creative writer, and also a fountainhead of Green Hat Expert. Additionally, he is also an eminent researcher of Blogging, SEO, Internet Marketing, Social Media, premium accounts, codes, links, tips and tricks, etc.

www.greenhatexpert.com

Filed Under: Instagram

How to Recover Deleted Messages on Messenger

Last Updated on February 22, 2023 By Arsalan Rauf

To recover deleted messages on Messenger, the first step you need to take is to download your information on Facebook.

After downloading your information, go to the message that you want to recover and read it.

You can download a copy of your information from Facebook.

While downloading it, you can also select the categories of data that you want to include.

Since you want to recover deleted messages on Messenger, your need can be fulfilled by selecting the “Messages” category.

The category enables you to retrieve messages that you’ve sent to other users via Messenger.

In addition, the date range of data can also be selected that you want to receive.

You can select them by choice when you request your information.

Here’s a step by step guide on how to recover deleted messages on Messenger.

Step 1. Open the Facebook app and go to your settings

The first thing you need to do is to open the Facebook app.

The desktop version of Facebook can be used for this purpose.

For the purpose of this post, I am using the Facebook app.

After opening the Facebook app, you need to log in to your FB account if you are not log in yet.

To log in on Facebook, you have to use the same account you use on FB messenger.

After opening the app of Facebook, on the bottom bar, tap on the “Menu” icon.

After that, scroll down the menu, tap on “Settings & Privacy” to expand it, and to access the settings, you need to tap on “Settings”.

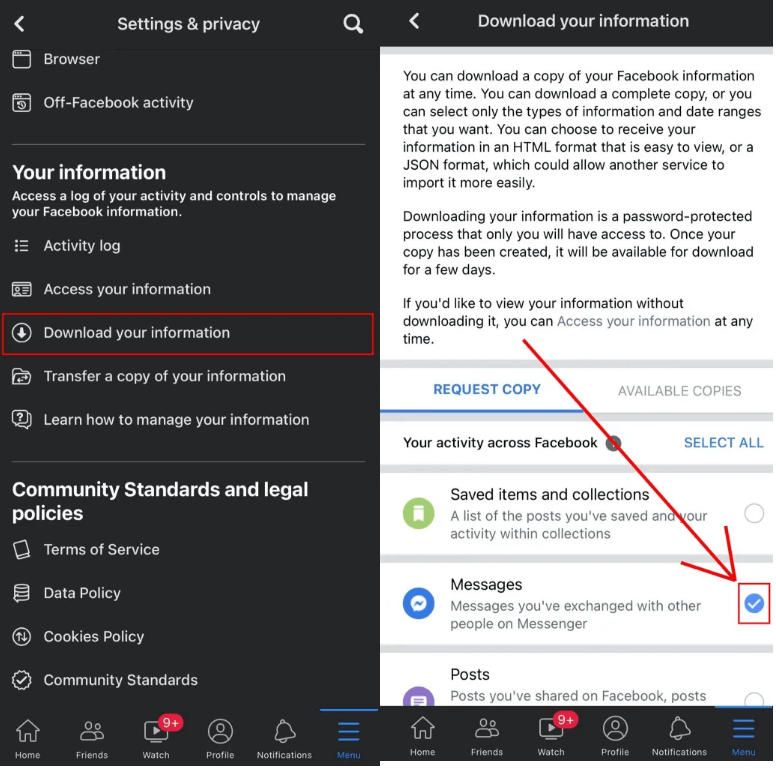
Step 2. Tap on “Download your information”

recover deleted messages messenger 1

After tapping on “Settings”, it will take you to the “Settings & privacy” page.

Now, there will be several options that you can select from.

The multiple headers are “Account”, “Preferences”, “Audience and visibility”, and so on.

You need to scroll down until you reach the header of “Your information”.

This section will help you to access a log of your activity and controls in order to manage the information of FB.

There will be an option to download your information under the “Your information” header.

To visit the “Download your information” page, tap on “Download your information”.

Step 3. Deselect all and select “Messages”

After tapping on “Download your information”, it will take you to the “Download your information” page.

On that page, Facebook will allow you to download a copy of your Facebook information.

The download can be limited to types of information that you need or you can also download a full copy.

You can also decide the information format whether you need it in JSON or HTML.

Just remember that the process of downloading your information is password protected that can only be accessible by you.

To get started, to deselect all of your information, you need to tap on “DESELECT ALL”.

Since you want to recover removed messages on messenger, you will only choose “Messages”.

To request the copy of messages you have sent to other users on messenger, Select “Messages”.

Step 4. Tap on “Create File”

recover deleted messages messenger 2

After selecting the “Messages” category, the next thing is to request that information.

Scroll to the bottom of the page to do that.

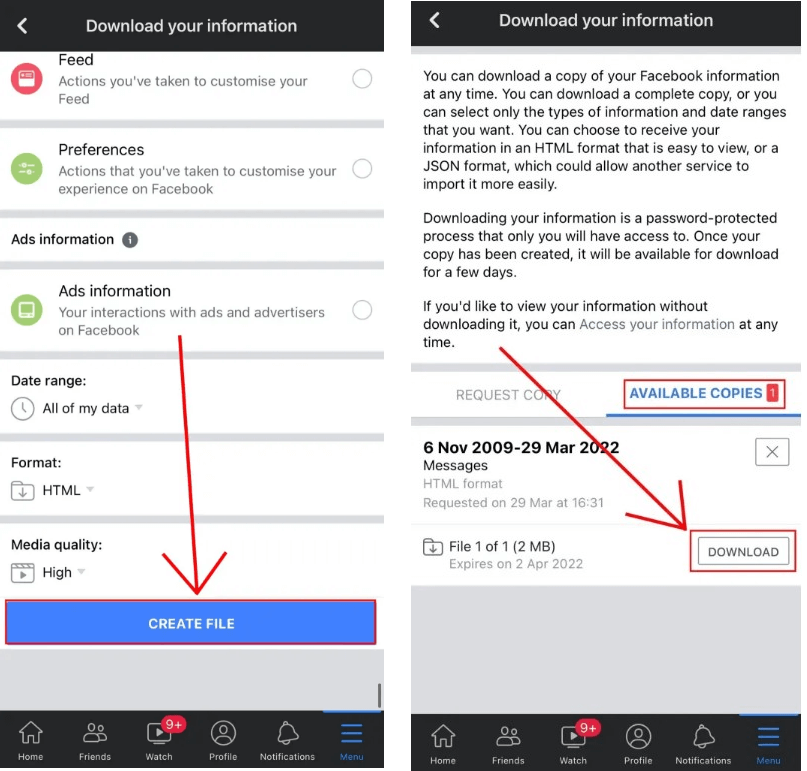
There are 3 dropdown boxes at the bottom of the page.

They are “Date range”, “Format”, and “Media quality”.

If you want to restore deleted messages of the last day, you can change “Date range” to the previous day.

However, it’s my suggestion that you select “All of my data”.

My recommendation is to use “HTML” as the format and use “High” as the media quality.

To request your messenger information, you need to tap on “CREATE FILE”.

Step 5. Tap on “Download”

After tapping on “CREATE FILE”, it will request a copy of your Messenger information.

The next thing you need to do is to wait for the file to be ready.

If the messages are not in bulk, the task will not take more than a few minutes and the file will be ready.

Alternatively, if your messages are available in bulk, it can take a few hours or more for the file to be ready.

You will get an email from them once the file is ready.

The subject line of the email will say, “Your Facebook information file is ready”.

The email will contain this, “The file you’ve requested containing your information is now ready for you to download”.

Accompanied by, “You can find your file in the Available Files tab on the Download Your Information page”.

After that, you have to revisit the “Download Your Information” page.

To begin with, go to Facebook app > Menu > Settings & Privacy > Settings > Your information > Download your information > AVAILABLE COPIES.

To begin downloading your messenger information, you need to tap on “Download.

Step 6. Log in to your Facebook account and tap on “Download”

After tapping on “Download”, it will take you to the login page of Facebook.

After that, you have to log in to your Facebook account.

The reason behind it is that downloading your information is a password-protected procedure.

After using your login details, tap on “Log In”, and it will open a pop-up.

To download your messenger information, you need to tap on “Download”.

Step 7. Go to the message that you want to recover

After downloading the zip file, you need to reach it and open it.

If you’re an iPhone user, it will download the file in the “Files” app.

After finding the file, tap on it to unzip it.

After unzipping it, you will see a “facebook-username” folder.

Open the folder and an HTML file and a “messages” folder will be visible to you.

To open the “messages” folder, you need to tap on “messages”.

You will see various HTML files and other folders in the “messages” folder.

To get started, tap on “inbox” to visit your Messenger inbox.

In your Messenger inbox, you have to reach the person that you’ve chatted with.

The files name will show the name of the person.

For instance, if the person’s Facebook name is “Arsalan”, the file name will be something like, “arsalan_tjx3t7w”.

To see the conversation between you and the person, open the file and tap on “message_1”.

Step 8. Read the messages

After tapping on “message_1”, it will open an HTML file.

The file will have a full list of messages that you and the person sent to each other using Messenger.

The data contains messages from different years ago, (it can happen when you’ve set the date range to “All of my data”).

Now, you need to go through the file to locate the deleted message.

I hope that you have learned how to recover deleted messages on Messenger!

Final Words

Just remember that your downloaded information can remain available for 5 days.

After 5 days, the download will expire and to download it, you will have to request again.

If the removed messages are not there, there is another method to help you.

If you want to view recently deleted Messenger messages on an Android device, you need to visit the notification history.

You have to turn on the Messenger notifications for this method.

If someone unsent a message, it will be shown in your notification history.

If this article is failed to help you, you can check this updated guide to see unsent messages on Messenger.

What’s Next

How to Know Who Viewed Your Facebook Profile

How to See Unsent Messages on Messenger

Best, Nice, and Good Facebook Comments

Arsalan Rauf
Arsalan Rauf

Arsalan Rauf is an entrepreneur, freelancer, creative writer, and also a fountainhead of Green Hat Expert. Additionally, he is also an eminent researcher of Blogging, SEO, Internet Marketing, Social Media, premium accounts, codes, links, tips and tricks, etc.

www.greenhatexpert.com

Filed Under: Facebook, Social Media

How to Fix Messenger Select an Account Problem

Last Updated on February 22, 2023 By Arsalan Rauf

Are you not able to select an account on Facebook Messenger?

Does Messenger keep asking you to select an account?

A lot of Android users are facing this problem after updating the app.

A username named Ranjit commented, “Every time I open the app, it asks me to select an account”.

In this post, I will tell you why you can’t switch accounts in Messenger and how to fix the select an account problem.

Why can’t I switch accounts in Messenger?

You can’t switch accounts in Messenger probably because the servers of Facebook are down.

It can also be happening because of a bug in the app that is caused by the latest update.

It seems like Android users are getting the switching accounts problem more than iOS users.

Therefore, the bug might be Android-specific.

Some Messenger updates cause bugs to the app.

If so, FB will usually release a new update to fix the bug.

How to fix Messenger select an account problem 

To fix the Messenger select an account problem, the first step is to check if Messenger is down.

If Messenger is down, the ideal way is to wait for the servers to be back up.

If Messenger is working, you need to update the FB app or uninstall and reinstall it.

Some updates come with bug fixes that can fix the select an account problem.

Method 1. Check if Messenger is down

Before you try to fix the problem, the first step is to check if Facebook Messenger is down.

If it’s down, ideal you have to wait for a few hours for the servers to start working again properly.

There are two methods that can be used to do this.

The first way is to go to downdetector.com and search for the term “Messenger”.

Check if you come across a spike in the graph.

A spike in the graph indicates that many users are encountering issues with the app.

Therefore, the app is most likely down for every tom, dick and harry.

The second way that is suitable for you is to go to Twitter and search for “Messenger down”.

After searching for “Messenger down”, check the latest tweets on Twitter.

If there are a lot of recent tweets complaining the issue, it means that Messenger is most likely down.

You can also search for the error or problem that you’re experiencing (for instance, select an account problem on Messenger).

Method 2. Update Messenger

  1. Firstly, visit the App Store/Google Play Store.
  2. Search for “Messenger”.
  3. Tap on “Update”.

According to Facebook Messenger, if the option to switch accounts is not available, you need to update the app.

Similarly, if you’re facing the “Select an account” problem, the best way is to upgrade the version of your app.

If you already using the latest version of Messenger, wait for a new update by Facebook.

Some updates have bugs that need to be fixed in a follow-up update.

If the bug is available in the newest update, Facebook will send a new update to fix it.

Method 3. Uninstall and reinstall Messenger

Uninstalling and reinstalling Messenger is an ideal way to troubleshoot it.

To begin the process, tap and hold the Messenger app and tap on “Remove App”.

After deleting the app, visit the App Store/Google Play Store and reinstall it.

Uninstalling and reinstalling Messenger will result in a couple of things.

Firstly, the app will be automatically updated to its newest version.

Secondly, the cache of the app will be cleared.

Clearing the app’s cache can get rid of issues with logging in or switching accounts.

Final Words

The “Select an account” problem on Messenger is not a regular issue.

It usually occurs when the Facebook servers are down or after an update.

In most cases, the error is from Facebook’s end rather than yours.

Therefore, the best way is to wait until they fix the issue on their end.

What’s Next

How to Recover Deleted Messages on Messenger

How to See Unsent Messages on Messenger

Good Instagram Comments For Your Friends

Arsalan Rauf
Arsalan Rauf

Arsalan Rauf is an entrepreneur, freelancer, creative writer, and also a fountainhead of Green Hat Expert. Additionally, he is also an eminent researcher of Blogging, SEO, Internet Marketing, Social Media, premium accounts, codes, links, tips and tricks, etc.

www.greenhatexpert.com

Filed Under: Facebook, Social Media

How to Delete All of Your TikTok Posts

Last Updated on February 22, 2023 By Arsalan Rauf

Have you uploaded a lot of unwanted TikTok videos on your profile?

If yes, you might want to delete all of your TikTok posts/videos at once.

This way, your TikTok profile will become new due to its cleaning.

However, if you have a lot of videos, it will be difficult for you to delete them.

You can try hiding your videos instead of deleting them.

That way, the videos can be recovered at any time.

In this post, I will tell you how to delete all of your TikTok posts/videos and if you can delete all of them at once.

How to delete all of your TikTok posts

To delete all of your TikTok posts, you have to delete the videos one by one or delete your account.

Another way to deal with it is by hiding your videos instead of deleting them, the video can be hidden by changing their privacy setting to “Only me”.

You will be the one who can view them by changing your videos’ privacy settings to “Only me”.

The public on TikTok will be unable to see your videos if they visit your TikTok profile.

Deleting your TikTok account will also remove your entire profile including your videos.

If you want to delete all of your videos at once, you need to delete your account and this is an ideal way.

#1: Delete your TikTok account

  1. Firstly, go to TikTok and go to your profile.
  2. Tap on the menu icon.
  3. Then, tap on “Settings and privacy”.
  4. Select “Manage account”.
  5. Tap on “Delete account”.
  6. Now, tap on “Skip”.
  7. Check the checkbox and tap on “Continue”.
  8. Now, tap on “Continue”.
  9. Enter the 4-digit code.
  10. Tap on “Delete” twice to delete your account.

Deleting your TikTok account will delete all of your posts/videos.

This is the only method to remove all of your posts at once.

Your account on TikTok will be deactivated for 30 days before its permanently deleted.

It means that you can reactivate your TikTok’s account within 30 days by logging in to the app.

#2: Delete your videos one be one

  1. Firstly, go to TikTok and go to your profile.
  2. Tap on the video that you want to delete.
  3. Now, tap on the three dots.
  4. Then, scroll to the right of the carousel and tap on “Delete”.
  5. Repeat the process and delete all of your other videos individually.

Deleting your videos one by one is highly recommended if you don’t have a lot of videos on your TikTok account.

The more videos you have, the harder it is to remove all of them.

If you have hundreds of videos and you want to remove all of them at once, it’s suggested that you delete your TikTok account instead of deleting them individually.

In addition, you can also switch to a private account to stop the public from watching your videos.

To move to private account, go to your profile > Menu > Settings and privacy > Privacy > Private account > Enable.

#3: Private all of your videos

  1. Firstly, go to TikTok and go to your profile.
  2. Tap on the video which you want to delete.
  3. Tap on the three dots.
  4. Now, scroll to the right of the carousel and tap on “Privacy settings”.
  5. Select “Only me”.
  6. Repeat the process to remove the rest of your videos.

Instead of deleting all of your TikTok posts/videos, the ideal way is to private all of them.

When you make your videos private, it will prevent the public and your followers from watching them.

If you set the privacy of your videos to “Only me”, it will also prevent them from viewing them.

It is a better option than deleting videos because you can recover them whenever you want.

If you want to show them to the public, you can change the privacy of your videos back to “Everyone” whenever you want.

Can I delete all of my TikTok videos at once?

The only method you can use to delete all of your TikTok videos at once is to delete your account.

When you delete your TikTok account, as a result, all of your videos will be removed too.

Before you get rid of your TikTok account, you need to ensure that you download a copy of your data.

It can be done by going to your profile > Menu > Settings and privacy > Privacy > Download your data.

Also, you need to save all of your videos too.

Can I mass delete TikToks?

Currently, TikTok does not have an option to mass delete videos, there is no information about it whether they will add it in the future or not.

However, you can delete your TikTok account to remove all of your videos at once from your TikTok account.

If want to hide your videos from the public, you can change your account to a private account.

On the other hand, you can change the privacy settings for all of your videos to “Only me”.

Final Words

After deleting a TikTok video, you cannot recover it.

Before you delete any of your videos on TikTok, you should save them first.

You can do it by going to the video > three dots > Save video.

As a result, your video will be saved to your phone.

For more information, you can go to the TikTok Help Center or contact TikTok.

What’s Next

How to Fix “You’re tapping too fast. Take a break!” on TikTok

How to Recover Deleted Messages on Messenger

How to See Unsent Messages on Messenger

Arsalan Rauf
Arsalan Rauf

Arsalan Rauf is an entrepreneur, freelancer, creative writer, and also a fountainhead of Green Hat Expert. Additionally, he is also an eminent researcher of Blogging, SEO, Internet Marketing, Social Media, premium accounts, codes, links, tips and tricks, etc.

www.greenhatexpert.com

Filed Under: Social Media, TikTok

How to Fix Messenger Notifications Not Working

Last Updated on February 22, 2023 By Arsalan Rauf

Are your Facebook Messenger Notifications not working and do you want to fix them?

If yes, you are in the right place.

In this case, you won’t be able to receive notifications when someone sends you messages on the app.

One user stated that all of their notifications are on, but they are not working most of the time.

Another user told that they couldn’t receive any messages.

The report also says that there is a notification bug.

In this post, I will tell you why your Facebook Messenger notifications are not working and how to fix it.

Why are my Messenger notifications not working?

Your Messenger notifications are not working because the notifications are turned off by you.

If your notifications are on but you’re still not receiving them, it indicates that Facebook Messenger is down or there is a glitch.

If Facebook Messenger is down, you can do nothing to fix it from your end.

You can only wait for the Facebook engineering team to fix it, whether it is downtime or the bug.

This process may not take more than 24 hours.

You can come across bugs and glitches all the time on Messenger.

Luckily, the team of the Messenger app frequently sends updates to fix them.

How to fix Messenger notifications not working

To fix Messenger notifications not working, the first step is to ensure that your notifications are enabled.

If you didn’t allow notifications for Facebook Messenger, as a result, you will not get message notifications.

However, if you enabled notifications but are still not getting them, it shows that FB is probably down or there’s a glitch on the app.

In this case, you need to wait for Facebook to fix the issue from their side.

This process will not exceed more than 24 hours.

When the issue is resolved by them, an update will typically be released for the app.

Therefore, you need to go to the App Store or Google Play Store to check if Messenger has an update.

Method 1. Ensure that your notifications are enabled

  1. Firstly, go to your Settings.
  2. Scroll down and tap on “Messenger”.
  3. Now, select “Notifications”.
  4. Enable “Allow Notifications” to allow them.

After enabling the “Allow Notifications”, the next thing is to force close Messenger.

Messenger will send you notifications whenever someone sends you a message.

If you’ve already enabled notifications for the app but you are unable to get them, it indicates that there is a bug on the application.

In this case, you need to go for the other two methods in this guide below.

Method 2. Check if Messenger is down

If the notifications on Messenger are already enabled but you still can’t receive them, it indicates that the app is down.

There are two ways of checking it if the app is not up.

First of all, you can visit DownDetector and search for the term “Facebook Messenger”.

After opening the “Facebook Messenger” page, you need to see the graph for it.

If the graph contains a spike, it shows that the Messenger app is down for everyone and not just you.

In this case, the best way is to wait for 24 hours for Facebook to fix the issue from their side.

Another method you can use to check if Messenger is down is to search for “Facebook Messenger Down” on Twitter.

After searching for it, check the top and latest tweets to see if there is a tweet about it.

You can also search for the specific issue that you’re encountering on it (for example, Facebook Messenger not sending notifications).

If you come across a lot of tweets about it, it indicates that there’s a global outage.

Method 3. Update Messenger

The last way is to check if you are on the latest version of Messenger.

However, some Messenger updates come with bugs and glitches.

If so, you will get a follow-up update from FB to fix them.

You want the updates that are the ones that are released with bug fixes and improvements.

After updating the app, open it and check if you can receive notifications or not,

If the update is not released, you have to wait for 24 to 48 hours for one.

You can also uninstall and reinstall messenger app instead of updating it.

This way, the app’s cache will be removed and it’ll be updated to the newest version.

Final Words

Facebook Messenger still contains glitches, bugs and crashing errors.

These bugs and glitches usually occur due to a new update.

In rare cases, it is caused by a server issue.

If there are a lot of users complaining or reporting about them, there will be a fix implemented from FB.

To eradicate the error from the app, you need to update it to the latest version.

What’s Next

Fake Email for Facebook

How to Recover Deleted Messages on Messenger

How to See Unsent Messages on Messenger

Arsalan Rauf
Arsalan Rauf

Arsalan Rauf is an entrepreneur, freelancer, creative writer, and also a fountainhead of Green Hat Expert. Additionally, he is also an eminent researcher of Blogging, SEO, Internet Marketing, Social Media, premium accounts, codes, links, tips and tricks, etc.

www.greenhatexpert.com

Filed Under: Facebook, Social Media

How to Fix No Edit Option on Facebook Post

Last Updated on February 22, 2023 By Arsalan Rauf

Do you have no edit option on your Facebook post?

Or the edit option not showing or missing on Facebook?

The option is not available after the new Facebook update.

A lot of users are complaining that they are not able to edit their old posts.

Here are some examples:

“I can edit on my laptop but not on my phone after the latest update”.

“So when did this change happen? I can’t edit it even after this?”.

To fix the no edit option on your Facebook post, the best bet is to download an older version of Facebook or reinstall the app after uninstalling it.

Solution 1: Check if Facebook is down

If there’s no edit option on your Facebook post, you may face it because Facebook is down.

To check the status of FB app, you can visit DownDetector.com/status/Facebook.

After opening the website, check if you see a spike in the graph.

If there is a spike, it indicates that Facebook is probably down and you need to wait for a few hours so it comes back up.

You can also search for the same issue on Twitter from their search engine such as “can’t edit Facebook posts”.

If there are a lot of people tweeting about it, it means the error is on global level and it will be fixed.

Solution 2: Download an older version of Facebook

To fix the no edit option on Facebook, you can also download an older version of the FB app.

The reason behind it is that the latest version of the app might have removed the feature.

You can download the older version of Facebook from this URL: https://facebook.en.uptodown.com/android.

After opening the website, scroll down to “Older Versions” and choose an older version to download.

After that, click on “Download” to download the older version of FB.

Just remember that this solution only works for Android devices.

Solution 3: Use another device

The third way is to use another device.

If you’re using Facebook on a mobile device, switch to PC.

Alternatively, if you’re using Facebook on a laptop, use a mobile phone instead.

Some users claimed that they managed to edit their posts when they use Facebook on their PC.

Solution 4: Update Facebook

The fourth way is to update Facebook app to its latest version.

You can do it by visiting the App Store/Google Play Store, search for the term “Facebook”, and tap on “Update”.

If there is no update available, it is better you wait for one.

Some Facebook updates come with bugs like the missing edit option.

In this case, Facebook will publish a follow-up update to fix it.

Solution 5: Uninstall and reinstall Facebook

Uninstalling and reinstalling Facebook also helps you to troubleshoot the errors.

When you uninstall and reinstall Facebook, the cache of the app will be removed.

Removal of the cache from the app can fix common issues on it including logging in, searching, and posting.

Uninstalling and reinstalling Facebook also refreshes the app and take it to a smooth level.

What’s Next

How to See Unsent Messages on Messenger

How to Recover Deleted Messages on Messenger

Good Instagram Comments For Your Friends

Arsalan Rauf
Arsalan Rauf

Arsalan Rauf is an entrepreneur, freelancer, creative writer, and also a fountainhead of Green Hat Expert. Additionally, he is also an eminent researcher of Blogging, SEO, Internet Marketing, Social Media, premium accounts, codes, links, tips and tricks, etc.

www.greenhatexpert.com

Filed Under: Facebook, Social Media

How to Fix “You’re using an unsupported version of Facebook Lite”

Last Updated on February 22, 2023 By Arsalan Rauf

Are you facing an “Update Your App” error on Facebook Lite?

The error message is, “You’re using an unsupported version of Facebook Lite“.

Accompanied by, “Update to the latest version”.

The difference between Facebook and Facebook Lite is the requirement of storage space.

Facebook Lite uses lesser storage space, RAM, and CPU power.

However, you might have some problems while using the app.

In this post, I will tell you how to fix “You’re Using an Unsupported Version of Facebook Lite. Update to the latest version”.

Why does Facebook say “You’re using an unsupported version of Facebook Lite”?

Facebook says “You’re using an unsupported version of Facebook Lite” because you are on the old version of the app.

You can also face the error message due to a bug or a glitch.

As of August, a lot of users are facing the “Unsupported version” error.

Apparently, the Facebook Lite app is down and a lot of users are unable to use it.

A lot of users are also complaining about the error on other social media platforms such as YouTube.

“Apparently, this is a new issue…I’m narrowing the possible solutions for this problem”.

“I thought I was the only one lol!”.

“We don’t deserve this. Why Facebook, why?”.

How to fix “You’re using an unsupported version of Facebook Lite”

You have to download an older version of Facebook Lite to avoid it:

  1. Remove Facebook Lite from your device.
  2. Download an older version of Facebook Lite from this link https://drive.google.com/file/d/16Es0s3KM6MUsCkaOu75N9Gp4-NZaNvtV/view.
  3. You can also use older versions of the app from this link: https://androidapksfree.com/facebook-lite/com-facebook-lite/old/.
  4. Go to Facebook Lite and log in to your account.

Upgrading Facebook Lite to the newest version does not fix the “Unsupported version” error even though it should fix it.

However, installing an older version of the app will fix the error.

“I installed the new version but it’s still the same. I had to install the older 291 version and somehow it works!”.

A lot of users are getting the issue because it’s a global outage.

The only method you can use to bypass the error message is to download an older version of Facebook Lite.

Otherwise, you are left with no choice but to wait for Facebook to fix the issue and update the app when they release a new update with a fix.

What’s Next

Best, Nice, and Good Facebook Comments

How to Recover Deleted Messages on Messenger

How to Fix “App Not Set Up: This app is still in development mode”

Arsalan Rauf
Arsalan Rauf

Arsalan Rauf is an entrepreneur, freelancer, creative writer, and also a fountainhead of Green Hat Expert. Additionally, he is also an eminent researcher of Blogging, SEO, Internet Marketing, Social Media, premium accounts, codes, links, tips and tricks, etc.

www.greenhatexpert.com

Filed Under: Facebook, Social Media

How to Fix “Could Not Load Results” on Facebook

Last Updated on April 29, 2023 By Arsalan Rauf

Are you facing a “Could Not Load Results” error on Facebook?

The error message occurs when you use the search function on the FB app.

It can also occur due to a search function bug.

The bug can happen because of the latest Facebook update.

To fix it, you need to download an older version of Facebook or update it or uninstall and reinstall it, or move to another network.

#1: Check if FB is down

Before you try to fix the “Could Not Load Results” error, the first thing is to check if Facebook is down.

There are a couple of methods to ensure if Facebook is down.

The first method is to visit downdetector.com and search for “Facebook”.

After searching for “Facebook”, the next thing is to see the graph.

If there is a spike in it, it shows that Facebook is probably down for everyone.

The second method is to use Twitter and search for “Facebook down”.

Check the top and new tweets to see if the people are also tweeting the error.

On the other hand, you can search for the problem that you’re getting, for instance, could not load results.

If Facebook is down, it is pertinent to wait for a few hours for the servers to be back up.

#2: Download an older version of Facebook

To fix “Could Not Load Results” on Facebook, you can also download an older version of the FB app.

The reason behind it is that the latest version of the app might come with the search function issue.

To download an older version of Facebook, you can use this URL: https://facebook.en.uptodown.com/android.

After opening the website, scroll down to “Older Versions” and select an older version of Facebook there.

After doing so, click on “Download” to download the older version of the app.

Just remember that you can use it only for Android devices.

#3: Update Facebook

The third way is to update Facebook to the newest version.

To begin with, visit the App Store/Google Play Store, search for “Facebook”, and tap on “Update”.

If there is no update available, you should wait for one.

In some cases, the new Facebook update might come with bugs.

In this case, Facebook will send a follow-up update to fix them.

#4: Uninstall and reinstall Facebook

Uninstalling and reinstalling Facebook is an ideal way to troubleshoot this.

When you uninstall and reinstall app, the cache of FB app will be cleared.

Clearing the app’s cache can fix common error on it including logging in, searching, and posting etc.

Uninstalling and reinstalling Facebook also upgrades the app to the latest version.

#5: Switch your network

The final way is to try moving to another network.

If you’re using a Wi-Fi network, try connecting to mobile data.

Alternatively, if you’re on mobile data, try switching to a Wi-Fi network.

You can also try using a faster Wi-Fi network.

If your IP address is temporarily blocked by Facebook, the change of network will lift it.

What’s Next

How to See Unsent Messages on Messenger

How to Recover Deleted Messages on Messenger

Good Instagram Comments For Your Friends

Arsalan Rauf
Arsalan Rauf

Arsalan Rauf is an entrepreneur, freelancer, creative writer, and also a fountainhead of Green Hat Expert. Additionally, he is also an eminent researcher of Blogging, SEO, Internet Marketing, Social Media, premium accounts, codes, links, tips and tricks, etc.

www.greenhatexpert.com

Filed Under: Facebook, Social Media

  • « Previous Page
  • 1
  • …
  • 10
  • 11
  • 12
  • 13
  • 14
  • …
  • 37
  • Next Page »


Recent Posts

  • Free DeepSeek Accounts 2025
  • Free Zoho Mail Accounts 2025
  • Acudepot Discount Codes 2025
  • Free Blackshot Accounts 2025
  • Free GMX Email Accounts 2025
  • Songtrust Discount Codes 2025
  • Uzicases Discount Codes 2025
  • Cardillo Promo Codes 2025
  • Free DriverFix License Keys 2025
  • Avast Secureline VPN Activation Codes 2025

Recommended Posts

Create a Gmail Account Without Phone Number

Free Course Hero Account

Crunchyroll Accounts

Cracked Apps

Free Pokemon Go Accounts
Onlyfans Free Accounts
Free Chegg Accounts
Free Paypal Accounts
Free Gmail Accounts
Funny Steam Names

Categories

  • Apps
  • Apps for PC
  • Blogging
  • Discord
  • Facebook
  • Gaming
  • Grammar
  • Guide
  • How to
  • Instagram
  • Messaging
  • OnlyFans
  • Pinterest
  • Reddit
  • SEO
  • Snapchat
  • Social Media
  • Spotify
  • Steam
  • Telegram
  • TikTok
  • Twitch
  • Twitter
  • Whatsapp
  • WordPress
  • YouTube
  • Home
  • Social Media
  • Messaging
  • About
  • Submit Guest post