Green Hat Expert

  • Home
  • Social Media
    • Instagram
    • TikTok
    • Snapchat
    • Facebook
    • YouTube
    • Twitter
  • Messaging
    • Discord
    • Telegram
    • Whatsapp
  • About
  • Submit Guest post
You are here: Home / Archives for How to

How to Add Your Etsy Store in WordPress

Last Updated on August 21, 2022 By Arsalan Rauf

How to Add Your Etsy Store in WordPress

Recently one of my readers asked:

Is it possible to connect an Etsy store to WordPress website?

If you have integrated your WordPress site with your Etsy shop then it will help you to sell more products online. In this post, I shall show you how to add your Etsy store in WordPress.

Why Add Your Etsy Store in WordPress?

Etsy shops consist of limited features if we compare them with other popular eCommerce platforms such as Shopify or WooCommerce. It is because Etsy is an online marketplace for creative goods whereas WooCommerce and Shopify are complete eCommerce platforms.

Etsy shops have harsh product guidelines with limited payment choices, which may not be available in several countries. You also don’t have the ability to add advanced features to your Etsy Shop which you can use in a WooCommerce online store.

However, Etsy gives you more exposure to a niche customers looking for handcrafted, artistic, and different products. It is very easy to use, and you don’t have to spend enough time on finding consumers because they are already there.

If you want to increase your business, then you may want to use WordPress to make a website to better showcase your Etsy shop items.

After this discussion, let’s have a look at how to add your Etsy store in WordPress easily.

Adding Your Etsy Store in WordPress

First of all, you need to install and activate the Etsy Shop plugin. For more details, see my post on how to install a WordPress plugin.

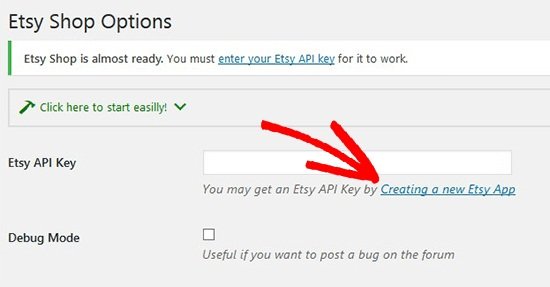
After activation, you need to visit the Settings > Etsy Shop page and enter your Etsy API key to connect your store with the plugin.

Note: If you currently do not have an Etsy API key, then simply click the link to get one from your Etsy store.

add etsy api key

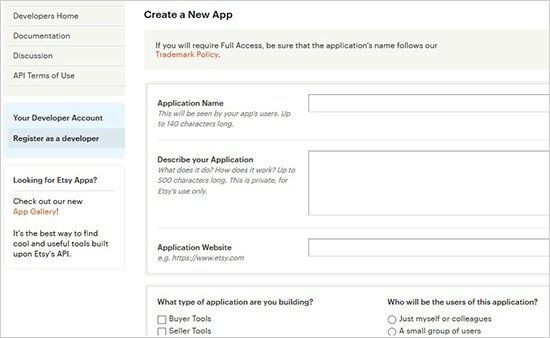
When you will click on the link, it will ask you to create a new app. You need to put the name for your app, describe your app, and add the URL of your WordPress website. After that, you need to choose the best choices for your app and click on the Create App button below.

create new etsy app

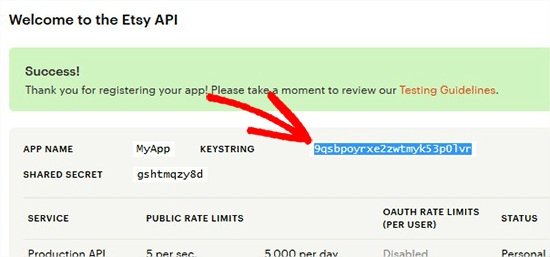
You will now get a success message of registering your app with your Etsy API key. Go ahead and copy the key from here.

copy etsy api key

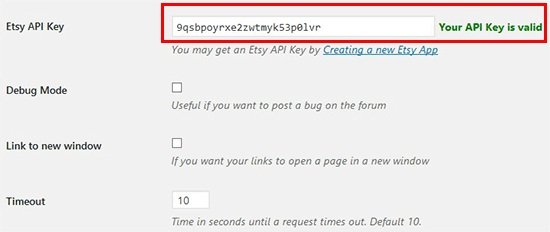
Now, you need to return to your WordPress admin area and paste the Etsy API key which you copied. After doing so, click on the Save Changes button, and the plugin will validate your API key and connect to your Etsy store.

add valid etsy api key

After attaching your Etsy store successfully, you can show and sell products from your Etsy shop right on your WordPress site.

To add the Etsy shop products in WordPress, you need to make a new page in WordPress or edit an existing page. On this page, you have to add the following shortcode to the edit area of your page.

[etsy-shop shop_name="MyShopUSDesign"

section_id="55895579"]

Do not forget to change the shop name and section ID in this shortcode with your Etsy store name and ID.

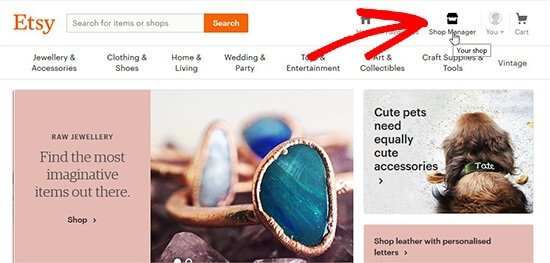
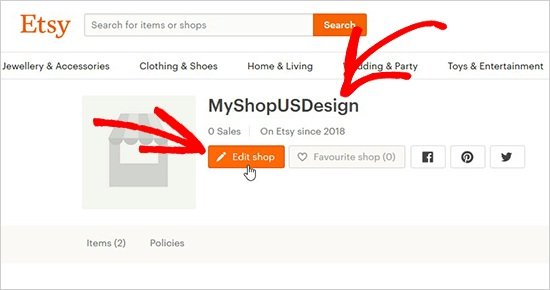
To get these two details, you need to visit your Etsy store and click on the Shop Manager tab from top right corner of the screen.

Note: You need to ensure that you are already logged in to your Etsy account.

open shop manager

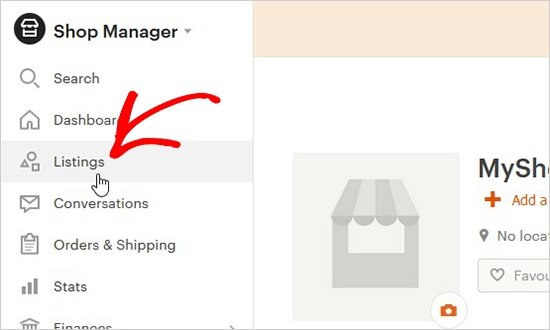
On this page, you have to click the link in the left menu to get access to your shop.

go to shop name etsy

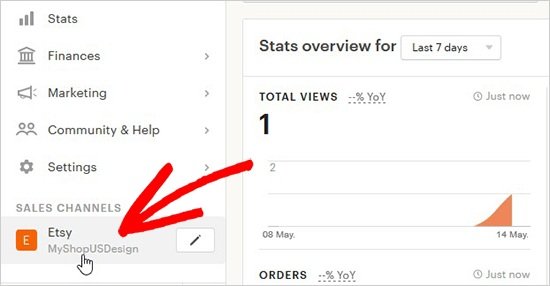
First of all, you have to copy the name of your store and then click on the Edit Shop button to locate the section ID.

edit shop for section id etsy

From here, you will have to click on Listings tab available in the left menu.

edit listings for section id

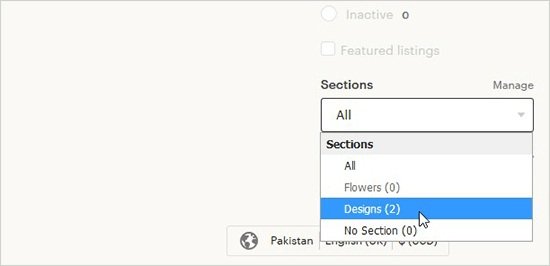
On this page, you will be asked to choose the section in which you have added your items or products. You can select the Sections from the dropdown menu as shown in the screenshot below.

select section

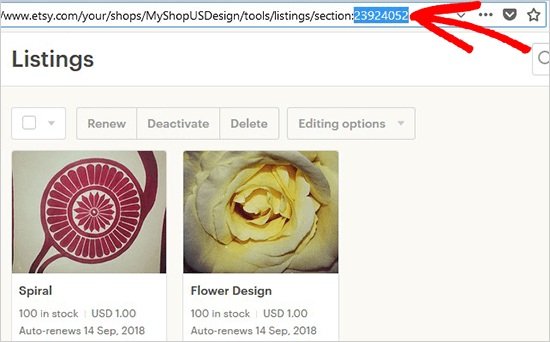
The section ID of your store will be shown in the page URL when your selected section is loaded. Now copy this section ID to replace in the shortcode.

section id etsy

After adding the shortcode with your store name and section ID, you can go to the post/page to see your Etsy store in your WordPress website.

my etsy store

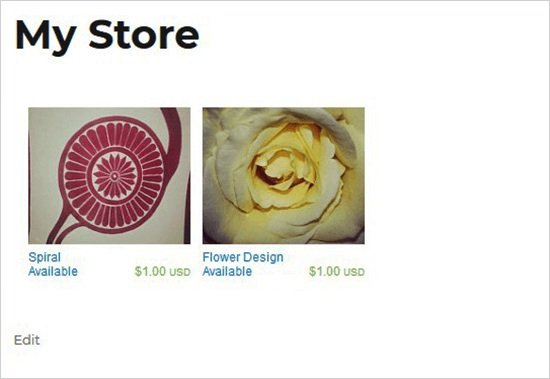
You can add the same shortcode to multiple posts or pages in WordPress to show your Etsy store. To display different listings, you need to change the section ID available in the shortcode. However, the shop name can remain same.

I hope that you liked the post on how to add your Etsy store in WordPress. You may want to see my post on:

  • How to add a Paypal Donate Button in WordPress

Do not forget to share this post.

Arsalan Rauf
Arsalan Rauf

Arsalan Rauf is an entrepreneur, freelancer, creative writer, and also a fountainhead of Green Hat Expert. Additionally, he is also an eminent researcher of Blogging, SEO, Internet Marketing, Social Media, premium accounts, codes, links, tips and tricks, etc.

www.greenhatexpert.com

Filed Under: Guide, How to, WordPress Tagged With: etsy 360, etsy api key wordpress, etsy mini wordpress, etsy shop plugin, export woocommerce to etsy, import etsy to wordpress, woocommerce etsy, wordpress etsy reviews

How to Add a Search Bar to WordPress Menu (Step by Step)

Last Updated on August 21, 2022 By Arsalan Rauf

How to Add a Search Bar to WordPress Menu (Step by Step)

Do you want to add a search bar to your navigation menu in WordPress?

If yes, then you are in the right place.

Search form can be really beneficial for your users to find what they are looking for on your website. In this post, I shall show you how to add a search bar to your WordPress menu.

Why You Should Add a Search Bar in Menu?

A search bar allows your users to find what they’re looking for with ease. They do not have to scroll to all the pages.

If you add a search bar to your top navigation menu, then it will be visible on all pages that show the menu, and your users can search and find all the content on your site with ease.

There are a number of search plugins that you can use to add a search bar to your website. Let’s have a look at how to add a search bar to your WordPress menu.

Adding a Search Bar to WordPress Menu

First of all, you need to install and activate the Add Search to Menuplugin. For more details, read our step by step guide on how to install a WordPress plugin.

After activation, you need to visit the Settings > Add Search To Menu page in your WordPress admin area to add search bar to your menu.

add search to menu plugin

In this area, you need to choose the menu where you want to add the search bar. This list of menus (Primary Menu and Social Links Menu) is a property of your WordPress template. If you change the template of your website, then the list will be automatically upgraded with the available menus within your template.

After selecting, the search bar will be added to your navigation menu. You can define the search post types, search menu title, search form style, manage mobile display for search, and so on. These settings will also help you to control the search results for your users.

After doing so, you can go to your site to see the search bar in the WordPress navigation menu.

add search to menu

You can also add the search bar to all other available menus of your website. Simply choose the menu from plugin settings where you want to show your search form.

I hope that you liked the post on how to add a search bar to WordPress menu.

You may also want to see our guides on

  • How to add a favicon to your WordPress blog
  • How to change the font size in WordPress
  • Tips to fix add media button not working in WordPress
  • How to Change your WordPress username
  • How to Add a PayPal donate button in WordPress

Do not forget to share this post.

Arsalan Rauf
Arsalan Rauf

Arsalan Rauf is an entrepreneur, freelancer, creative writer, and also a fountainhead of Green Hat Expert. Additionally, he is also an eminent researcher of Blogging, SEO, Internet Marketing, Social Media, premium accounts, codes, links, tips and tricks, etc.

www.greenhatexpert.com

Filed Under: How to, WordPress Tagged With: add search to menu plugin, add search to menu wordpress plugin, how to add search box in wordpress header, how to add search box in wordpress page, search bar wordpress plugin, search icon in menu wordpress plugin, toggle search box wordpress plugin, wordpress add search icon to menu

How to Change Genshin Impact Language

Last Updated on August 7, 2022 By Arsalan Rauf

Genshin Impact supports a number of text and voice-over language.

Currently, the game has 13 text languages and 4 voice-over languages.

Both of them can be changed individually and you can use any combination.

The supported text languages of Genshin impact are English, Simplified Chinese, Traditional Chinese, Portuguese, Spanish, Japanese, Korean, Indonesian, Thai, Vietnamese, German, French, and Russian.

Genshin impact’s supported voice-over languages are English, Korean, Chinese, and Japanese.

In this post, I will tell you how to change the language in Genshin Impact including the game language and the voice-over language.

I will also teach you how to change to a Japanese voice-over and what language is Genshin Impact.

How to change Genshin Impact language

To change the Genshin Impact language, the first step is to open the Paimon menu and click on “Settings”.

Now, click on “Language” and you’ll be able to change the game’s language as well as voice-over language.

There is a difference between the voice over language and game’s language.

All the text in the game will be changed with the game language.

Alternatively, the voice-over language only replaces the voices of the characters in the game.

Both of them can be changed individually or use different combinations.

In short, you cannot use the same language for both the voice-over as well as the game language.

Here’s a step by step guide on how to change the Genshin Impact language:

Step 1. Open the Paimon menu and click on “Settings”

The first thing you need to do is to open the Paimon menu.

Every device offers different controls to open the Paimon menu.

If you’re playing Genshin Impact on a PC, to open the Paimon menus, you need to press “Esc” on your keyboard.

Alternatively, if you’re playing Genshin Impact on a PlayStation, press “Options” on your controller to open it.

Lastly, if you’re using a mobile device to play, tap on the Paimon icon near to the minimap.

As a result, it will open the Paimon menu that has a lot of options.

The options include camera, gear and an exit icon on the left sidebar of the Paimon menu.

To open your settings, you need to click on the gear icon.

Step 2. Click on “Language”

After clicking on the gear icon, it will open the settings page.

There are several options available to select on the left sidebar.

The options are “Controls”, “Graphics”, “Audio”, and more.

To access the language settings, click on “Language”.

There are two language options available such as “Game language” and “Voice-Over language”.

Move on to the next step to find out what “Game language” is.

Step 3. Change the game language

In the language settings, you can change the language of the game and the voice-over language.

First of all, the language of the game enables you to change all the text in Genshin Impact.

Technically, game language = in-game text.

To begin with, click on the “Game Language” dropdown box and select the language that you want to shift to.

13 text languages are available and you can choose from them, the languages are Chinese, Japanese, and Korean.

You need to select the text language that you understand.

Otherwise, you will unable to read the text in the game.

Step 4. Change the voice-over language

Voice over language is the second language you can change.

The voice-over language enables you to change the voices of the characters in the game.

Technically, voice-over language = character’s voices.

To begin with, click on the “Voice-Over Language” dropdown box and choose the voice-over language that you want to use.

4 voice-over languages are available to choose from, the languages are English, Chinese, Japanese, and Korean.

After selecting the language, click on the “X” icon to close the settings.

I hope that you have learned how to change the language in Genshin Impact!

How do I change to a Japanese voice in Genshin Impact?

  1. For PC version, press “Esc” from your keyboard or press “Options” on your controller (for PlayStation).
  2. On the left sidebar, click on the gear icon.
  3. To open the language settings, select “Language” on the left sidebar.
  4. Click on the “Voice-Over Language” dropdown box.
  5. 4 voice-over languages are available to select from including English, Chinese, Japanese, and Korean.
  6. You need to select “Japanese” to change the voice-over language to Japanese.

What language is Genshin Impact?

The developer of Genshin Impact is miHoYo, a Shanghai-based studio.

Therefore, the suggested language for the game is Chinese.

The reason behind it is that the quality is consistent for all voice actors.

Japanese is also a great choice as a language because Genshin Impact is anime-based.

However, if you want to know what the characters are saying, it is a wise decision to choose your native language.

Final Words

The language in Genshin Impact is a part and parcel of the game.

Since the developer of the game is a Chinese game studio, it’s highly recommended that you choose the Chinese voice-over language.

As a result, you will get an authentic experience in the game.

The two voice-over languages for recommendations are Chinese and Japanese.

However, if you want to understand what the characters are saying, you can choose English.

Having said that, the English dubbed is less original than the Chinese and Japanese voice-over languages.

What’s Next

Genshin Impact Usernames Ideas

How to Exit Genshin Impact on PC/PlayStation/Mobile

How to Add Friends in Genshin Impact

Arsalan Rauf
Arsalan Rauf

Arsalan Rauf is an entrepreneur, freelancer, creative writer, and also a fountainhead of Green Hat Expert. Additionally, he is also an eminent researcher of Blogging, SEO, Internet Marketing, Social Media, premium accounts, codes, links, tips and tricks, etc.

www.greenhatexpert.com

Filed Under: Gaming, How to

How to Add Friends in Genshin Impact

Last Updated on April 15, 2023 By Arsalan Rauf

You can also add friends in Genshin impact to your Friends List.

Adding friends help you to check the profile of the player and join them for a co-op session.

You can also assign a nickname for your friends to recognize them.

Additionally, an in-game private message can also be sent to your friends.

However, the co-op mode is only unlocked at adventure rank 16.

In co-op mode, you can also have a party of up to 4 players.

The cross-play is also available for you for the co-op mode between PC, mobile, and PSN as long as you and your friends are using the same server.

In this post, I will tell you how to add friends in Genshin Impact so that you can play co-op mode with them.

I will also tell you if you can add friends from different servers in Genshin Impact and why can’t you join your friends in Genshin Impact.

How to add friends in Genshin Impact

To add friends in Genshin Impact, the first step is to ask your friend to send you their UID.

Then, it will allow you to add them by opening the Paimon menu, go to “Friends”, and pasting their UID.

In the “Add Friend” menu, you can search for players and send them friend requests from the UID of the player.

A UID stands for a unique identifier, and you can find it in the bottom right of the screen.

To receive a friend request from you, your friend does not have to be online.

Your friend needs to accept your friend request once your friend is online.

After adding a friend on Genshin Impact, you can play co-op with them at rank 16.

However, you must be on the same server as them.

For instance, if you’re playing in the “Asia” server, your friend have to be in the “Asia” server too.

Here is a step by step guide to add friends in Genshin Impact:

Step 1. Ask your friend to send you their UID

The first thing you need to do is to ask your friend to send your their UID (unique identifier).

To add someone on Genshin Impact, the first thing you need is their UID.

Their username cannot be used to add them.

The UID is available on a couple of places.

Firstly, it is found at the bottom right corner of the screen.

Secondly, you can locate it on the Paimon menu.

To find it, press “Esc” from your keyboard if you’re playing Genshin Impact on a PC.

After pressing “Esc” from your keyboard, it will open the Paimon menu.

On the menu, your UID will be available under your profile picture.

To copy your UID, you need to click on “Copy”.

Then, your friend needs to follow the above steps too in order to send you their UID.

Step 2. Go to “Friends”

After receiving your friend’s UID, you can now add them in Genshin Impact.

First of all, go to the Paimon menu by pressing “Esc” from your keyboard if you’re on a PC and playing Genshin Impact.

After pressing “Esc” button on keyboard, the Paimon menu will open.

On the menu, you’ll see a lot of options.

The options will be “Party Setup”, “Friends”, “Achievements”, and more.

Since you want to add friends on Genshin Impact, click on “Friends”.

Step 3. Add your friend using their UID

After clicking on “Friends”, it will open the “Friends Menu”.

On the top bar, 3 icons will be shown.

The icons stand for a name card icon, an add friends icon, and a timer icon.

Click on the add friends icon on the top bar to visit the “Add Friends” menu.

On the “Add Friends” menu, a “Search and add friends by UID” search bar will be available.

You need to paste UID of your friend via the search bar by clicking on “Paste”.

Now, click on “Search” to find your friend.

After searching for your friend using their UID, you can add them as a friend on Genshin Impact!

Just remember that you can add 45 friends in total in Genshin Impact.

Your friends list will be sorted keeping in view the online status, adventure rank, and last online time.

Can you add friends from different servers in Genshin impact?

No, you cannot add friends from different servers in Genshin Impact.

You need to be on the same server as them in order to add someone on Genshin Impact.

Similarly, to play co-op with your friends, you have to be on the same server as your friend.

After getting on the same server with your friend, you’ll be able to play co-op with them even if your platform is different.

Why can’t I join my friends in Genshin Impact?

You can’t join your friends in Genshin Impact because your friend or you have not reached the adventure rank 16 yet.

You and your friend need to be ranked 16 in order to play co-op with them.

If you are on a different server than your friend that is why you cannot join your friends and it is another reason for this issue.

The requirement to play co-op mode with your friend, both of you should be on the same server.

Final Words

Once you and your friend have accomplished rank 16, you’ll be able to play co-op mode in the game.

However, the first step is to add them as a friend in Genshin Impact so that they’ll appear in your friends list.

If you’ve activated the cross-save feature on Playstation, it will split the list into two.

The lists will be “Genshin Impact Friends” and “Genshin Impact Friends on PlayStation Network”.

In co-op mode, cross-play is available between mobile, PC, and PSN platforms.

However, you have to remain on the same server as your friend.

For instance, if your friend is on the “Asia” server, you have to be in the “Asia” server too.

If you haven’t played in the “Asia” server before, it will restart your progress on the server.

However, your progress will be saved on the old server when you move back to the old server.

What’s Next

Genshin Impact Usernames Ideas

How to Change Your Genshin Impact Username or Name

How to Change Servers in Genshin Impact

Arsalan Rauf
Arsalan Rauf

Arsalan Rauf is an entrepreneur, freelancer, creative writer, and also a fountainhead of Green Hat Expert. Additionally, he is also an eminent researcher of Blogging, SEO, Internet Marketing, Social Media, premium accounts, codes, links, tips and tricks, etc.

www.greenhatexpert.com

Filed Under: Gaming, How to

How to Recover Permanently Deleted Files from Google Drive

Last Updated on August 5, 2022 By Arsalan Rauf

Do you want to recover a permanently deleted file from Google Drive?

When you remove a file in Google Drive, it will be available in your trash.

After 30 days, items in your trash will be deleted automatically.

So, you can recover the file within 30 days.

However, if the file has been sent in the trash for over 30 days, you won’t be able to recover it yourself.

In this post, I will tell you how to recover deleted or permanently deleted files from Google Drive.

How to recover permanently deleted files from Google Drive

  1. Firstly, visit https://support.google.com/drive/contact/file_recovery.
  2. Click on the “Contact us” button at the bottom of the page.
  3. Now, sign in to your Google account.
  4. Enter your first and last name.
  5. Agree to the terms.
  6. Lastly, click on the “Submit” button.

After submitting the form, wait for a few days to get Google’s response.

Google can only try to restore the file(s) if you are the owner of them.

You will be considered as the owner of the files if you created, uploaded, and accepted ownership of them.

If you don’t own the files that are permanently removed, Google will not be able to recover/restore them for you.

Google can only restore files that you have deleted recently.

Your files cannot be recovered from Gmail or Google Photos.

How to recover deleted files from Google Drive

  1. Firstly, visit https://drive.google.com/drive/my-drive.
  2. Sign in to your Google account.
  3. Now, select “Trash”.
  4. Right-click the file that you want to recover.
  5. Lastly, select “Restore”.

After selecting “Restore”, the file will be restored and will be sent to its original location.

You can select “Show File Location” to visit the location of the file.

Otherwise, you can scroll your drive to locate it.

Just remember that you can only recover files that are removed within 30 days.

If the file has been deleted for over 30 days, it will be permanently removed from your trash.

In this case, you need to contact Google in order to restore it.

What’s Next

How to Center Text in The Middle in Google Docs

How to Make Text Vertical in Google Docs

How to Remove Table Borders in Google Docs

Arsalan Rauf
Arsalan Rauf

Arsalan Rauf is an entrepreneur, freelancer, creative writer, and also a fountainhead of Green Hat Expert. Additionally, he is also an eminent researcher of Blogging, SEO, Internet Marketing, Social Media, premium accounts, codes, links, tips and tricks, etc.

www.greenhatexpert.com

Filed Under: How to

How to Change Column Width in Google Sheets

Last Updated on August 5, 2022 By Arsalan Rauf

Is your text not fitting in the cells in Google Sheets and do you want to fix it?

If yes, you need to change the width of each column.

Your text will fit in its cells by increasing the width of a column.

This way, your text will not overflow to the next columns.

Google Sheets contains a feature that allows you to resize columns.

You can access the feature by right-clicking the column that you want to resize.

In this post, I will tell you how to adjust, resize, or change the column width in Google Sheets.

How to change column width in Google Sheets

Here is a step by step guide on how to change column width in Google Sheets

  • Firstly, select the column that you want to resize.
  • Right-click the column(s).
  • Select “Resize column(s)”.
  • Now, select “Enter a new column width in pixels”.
  • Enter the column width (in pixels) that you want to change (e.g. 200).
  • Lastly, select “OK”.

After selecting “OK”, the width of the column will be resized to the pixels that you’ve entered.

By default, the column width in pixels is 100.

You can increase or decrease it by putting the pixels into the text field.

You can press the “Shift” button from the keyboard to select more than one column.

If you’ve selected more than one column such as columns A to C, you’ll see the “Resize columns A – C” option.

All of the columns that you’ve selected will be resized after entering the pixels into the text field and after that, you click on “OK”.

If you are looking for a way to fit the text into the cells, you can double click the border beside the alphabet of the column.

In short, to fit the text, the width of the column will be resized.

What’s Next

How to Remove Table Borders in Google Docs

How to Make Text Vertical in Google Docs

How to Center Text in The Middle in Google Docs

Arsalan Rauf
Arsalan Rauf

Arsalan Rauf is an entrepreneur, freelancer, creative writer, and also a fountainhead of Green Hat Expert. Additionally, he is also an eminent researcher of Blogging, SEO, Internet Marketing, Social Media, premium accounts, codes, links, tips and tricks, etc.

www.greenhatexpert.com

Filed Under: How to

How to Find the Game Folder for GTA 5

Last Updated on August 3, 2022 By Arsalan Rauf

It is necessary to find the file location for GTA 5/V on your PC for multiple things.

You can backup, mod, or add essential files to GTA 5 if the game contains issues.

By backing up the game, you can reinstate it to the previous state if something goes wrong.

GTA V contains a lot of mods that can also be installed.

Before you install a mod to the game, it is necessary to back up your game file before you add it.

In this post, I will tell you how to find the game folder, root directory, or file location for GTA 5/GTA V on Steam.

How to find the file location for GTA 5

Here is a step by step guide on how to find the file location for GTA 5

  • First of all, visit File Explorer.
  • Select the “C” or “E” Drive (depending on where your Steam games are available).
  • Open “SteamLibrary”.
  • Open “steamapps”.
  • Open “common”.
  • Lastly, select “Grand Theft Auto V”.

After selecting “Grand Theft Auto V”, it will take you to the directory of the game.

The directory will have multiple files and folders including “Installers”, “update”, and more.

You can add mods or change the corrupted files.

How to find the GTA 5 game folder on Steam

Here is a step by step guide on how to find the GTA 5 game folder

  1. Firstly, go to your Steam Library.
  2. Right-click “Grand Theft Auto V”.
  3. Now, select “Properties…”.
  4. Select “Local Files”.
  5. Lastly, select “Browse…”.

After selecting “Browse”, the root directory of GTA 5 will open.

Now, you’ll be able to drag and drop mods such as Script Hook inside it.

If the files are corrupted, you can also change or replace certain files.

What’s Next

How to Fix Stray UE4-HK Project Game Has Crashed

Funny, Cool, And Best Gaming Names

How to Fix Stray Crashing on PC

Arsalan Rauf
Arsalan Rauf

Arsalan Rauf is an entrepreneur, freelancer, creative writer, and also a fountainhead of Green Hat Expert. Additionally, he is also an eminent researcher of Blogging, SEO, Internet Marketing, Social Media, premium accounts, codes, links, tips and tricks, etc.

www.greenhatexpert.com

Filed Under: Gaming, How to

How to Find the Save File Location for Stardew Valley

Last Updated on August 3, 2022 By Arsalan Rauf

It is necessary to find the file location for Stardew Valley on your PC for multiple things.

You can backup, mod, or add essential files to Stardew Valley if the game contains issues.

To backup the game, you need to download the folder of “Saves”.

The folder has your progress and other data in Stardew Valley.

By backing up the game, you can reinstate it to the previous state if something goes wrong.

Some Steam games contain a myriad of mods that can also be installed.

Before you install a mod to the game, it is necessary to back up your game file before you add it.

In this post, I will tell you how to find the save file, directory, or file location for Stardew Valley on Steam.

How to find the file location for Stardew Valley

Here is a step by step guide on how to find the file location for Stardew Valley

  1. Search for “%appdata%” from Windows Search.
  2. Go to “Roaming”.
  3. Lastly, open “StardewValley”.

The “StardewValley” folder has a “Saves” folder.

After clicking on “Saves”, a list of your saved games will be shown in Stardew Valley.

As a backup for Stardew Valley, you can save the whole “Saves” folder or individual folders inside it.

The names of the individual folders are based on the name of your character in the game.

The number shows the number of minutes that have passed since the game began.

If there are two folders containing the same character, the lower number is the one that you’ve made first.

If you are looking to restore your old saved games in the future, copy them, open the current “Saves” folder, and change the folders in it with them.

How to find the Stardew Valley save file

Here is a step by step on how to find the Stardew Valley save file

  1. Search for “%appdata%” from Windows Search.
  2. Go to “Roaming”.
  3. Open “StardewValley”.
  4. Lastly, open “Saves”.

Finding the Stardew Valley save file is the same as finding the file location for it.

The save files are available in the “Stardew Valley” folder named as “Saves”.

“Saves” has a list of your saved games by character name.

You need to copy and paste the farm that you are looking to save/backup into a new folder.

What’s Next

How to Find the File Location for MultiVersus

How to Find the File Location for Digimon Survive

Funny, Cool, And Best Gaming Names

Arsalan Rauf
Arsalan Rauf

Arsalan Rauf is an entrepreneur, freelancer, creative writer, and also a fountainhead of Green Hat Expert. Additionally, he is also an eminent researcher of Blogging, SEO, Internet Marketing, Social Media, premium accounts, codes, links, tips and tricks, etc.

www.greenhatexpert.com

Filed Under: Gaming, How to

How to Find the File Location for MultiVersus

Last Updated on August 3, 2022 By Arsalan Rauf

It is necessary to find the file location for Multiversus on your PC for multiple things.

You can backup, mod, or add essential files to Multiversus if the game contains issues.

To backup the game, you need to download the folder of “SaveGames”.

The folder has your progress and other data in Multiversus.

By backing up the game, you can reinstate it to the previous state if something goes wrong.

Some Steam games contain a myriad of mods that can also be installed.

Before you install a mod to the game, it is necessary to back up your game file before you add it.

In this post, I will tell you how to find the save games folder, directory, or file location for MultiVersus on Steam.

How to find the MultiVersus SaveGames folder

Here is a step by step guide on how to find the MultiVersus SaveGames folder

  1. Firstly, search for “%appdata%” from Windows Search.
  2. Click on “AppData” in the URL field.
  3. Open “Local”.
  4. Now, open “MultiVersus”.
  5. Open “Saved”.
  6. Lastly, open “SaveGames” to view your game data.

As a backup for MultiVersus, you can save the “SaveGames” folder.

If you want to restore it in the future, remove the current “SaveGames” folder and change it with the old one.

As a result, your progress will start from the old “SavedGames” folder when you start the game.

When you delete the folder and open the game, it will ask you to provide your age again.

It’s highly suggested that you set your age to at least 18 years old or above.

How to find the file location for MultiVersus

Here is a step by step guide on how to find the file location for MultiVersus

  • Firstly, go to your Steam Library.
  • Right-click “MultiVersus”.
  • Select “Properties…”.
  • Select “Local Files”.
  • Lastly, click “Browse…”.

After clicking on “Browse”, it will open the MultiVersus file location.

It has “EasyAntiCheat”, “Engine”, and “MultiVersus”.

If you have a problem with the Easy Anti Cheat program, the only way to deal with it is to set it to run as an administrator.

Just remember that the Easy Anti Cheat program is the “start_protected_game” application and not “EasyAntiCheat”.

What’s Next

How to Find the File Location for Stray

How to Find the File Location for Digimon Survive

Funny, Cool, And Best Gaming Names

Arsalan Rauf
Arsalan Rauf

Arsalan Rauf is an entrepreneur, freelancer, creative writer, and also a fountainhead of Green Hat Expert. Additionally, he is also an eminent researcher of Blogging, SEO, Internet Marketing, Social Media, premium accounts, codes, links, tips and tricks, etc.

www.greenhatexpert.com

Filed Under: Gaming, How to

How to Find the File Location for Digimon Survive

Last Updated on August 3, 2022 By Arsalan Rauf

It is necessary to find the file location for Digimon Survive on your PC for multiple things.

You can backup, mod, or add essential files to Digimon Survive if the game contains issues.

To backup the game, you need to download the folder of “SaveGames”.

The folder has your progress and other data in Digimon Survive.

By backing up the game, you can reinstate it to the previous state if something goes wrong.

Some Steam games contain a myriad of mods that can also be installed.

Before you install a mod to the game, it is necessary to back up your game file before you add it.

In this post, I will tell you how to find the game folder, directory, or file location for Digimon Survive on Steam.

How to find the file location for Digimon Survive

Here is a step by step guide on how to find the file location for Digimon Survive

  1. Search for “%appdata%” from Windows Search.
  2. Click on “AppData” in the URL field.
  3. Open “LocalLow”.
  4. Now, open “BANDAI NAMCO”.
  5. Open “DIGIMON SURVIVE”.
  6. Lastly, open “Savedata” to view your game data.

If you are unable to locate “BANDAI NAMCO” in the “Local” folder, open the “Local” folder instead.

As a backup for Digimon Survive, you can save the “Savedata” folder.

If you want to reinstate it in the future, delete the current “Savedata” folder and change it with the old one.

As a result, your progress will start from the old “SavedGames” folder when you start the game.

How to find the Digimon Survive folder

Here is a step by step guide on how to find the Digimon Survive folder

  1. Search for “%appdata%” from Windows Search.
  2. Click on “AppData” in the URL field.
  3. Open “LocalLow”.
  4. Lastly, open “BANDAI NAMCO”.

Finding the “BANDAI NAMCO” folder is the same as finding the file location for it.

However, you don’t need to perform steps 5 and 6.

The reason behind it is that the “BANDAI NAMCO” folder is where the Digimon Survive folder is available.

“BANDAI NAMCO” has a “DIGIMON SURVIVE” folder that you’ll have to open to view the rest of the folders.

What’s Next

How to Fix Stray Crashing on PC

How to Fix Stray UE4-HK Project Game Has Crashed

Funny, Cool, And Best Gaming Names

Arsalan Rauf
Arsalan Rauf

Arsalan Rauf is an entrepreneur, freelancer, creative writer, and also a fountainhead of Green Hat Expert. Additionally, he is also an eminent researcher of Blogging, SEO, Internet Marketing, Social Media, premium accounts, codes, links, tips and tricks, etc.

www.greenhatexpert.com

Filed Under: Gaming, How to

  • « Previous Page
  • 1
  • …
  • 69
  • 70
  • 71
  • 72
  • 73
  • …
  • 81
  • Next Page »


Recent Posts

  • Free DeepSeek Accounts 2025
  • Free Zoho Mail Accounts 2025
  • Acudepot Discount Codes 2025
  • Free Blackshot Accounts 2025
  • Free GMX Email Accounts 2025
  • Songtrust Discount Codes 2025
  • Uzicases Discount Codes 2025
  • Cardillo Promo Codes 2025
  • Free DriverFix License Keys 2025
  • Avast Secureline VPN Activation Codes 2025

Recommended Posts

Create a Gmail Account Without Phone Number

Free Course Hero Account

Crunchyroll Accounts

Cracked Apps

Free Pokemon Go Accounts
Onlyfans Free Accounts
Free Chegg Accounts
Free Paypal Accounts
Free Gmail Accounts
Funny Steam Names

Categories

  • Apps
  • Apps for PC
  • Blogging
  • Discord
  • Facebook
  • Gaming
  • Grammar
  • Guide
  • How to
  • Instagram
  • Messaging
  • OnlyFans
  • Pinterest
  • Reddit
  • SEO
  • Snapchat
  • Social Media
  • Spotify
  • Steam
  • Telegram
  • TikTok
  • Twitch
  • Twitter
  • Whatsapp
  • WordPress
  • YouTube
  • Home
  • Social Media
  • Messaging
  • About
  • Submit Guest post