Green Hat Expert

  • Home
  • Social Media
    • Instagram
    • TikTok
    • Snapchat
    • Facebook
    • YouTube
    • Twitter
  • Messaging
    • Discord
    • Telegram
    • Whatsapp
  • About
  • Submit Guest post
You are here: Home / Archives for WordPress

How to Properly Change Your WordPress Username (Step by Step)

Last Updated on August 21, 2022 By Arsalan Rauf

Do you want to change your WordPress username for security reasons?

Have you ever tried to change it?

Do you want to change it?

If you want to change it, you are at the right place. This post is for you. In this post, I shall show you three different methods to change your WordPress username.

Method 1: Create a New User and Delete The Old One

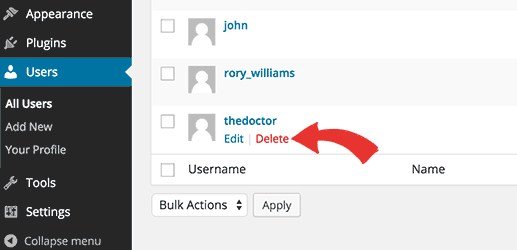
Creating a new user with your desired username with the administrator is the easiest way to change your WordPress username. You have to use a different email address than the one used by the old account. Now logout from the existing username and login with the new user account which you created. Go to Users section and click on Delete link under the old username.

delete user wp

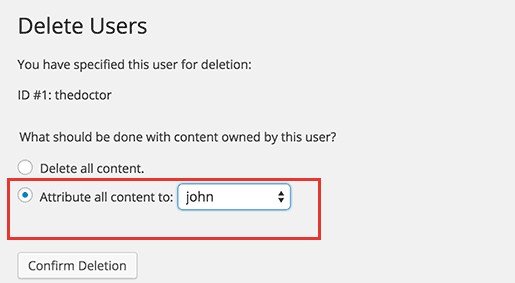
When you will do it, WordPress will ask what you want to do with their data or content. You need to make sure that you click on “Attribute all content to:” option and select the new user/username that you just created. Now click on “Confirm deletion” button to delete the old user account.

That’s it. You have changed your WordPress username with ease. Now if you want to change the email address of your new user, you can now use the old email address which was associated with the old account.

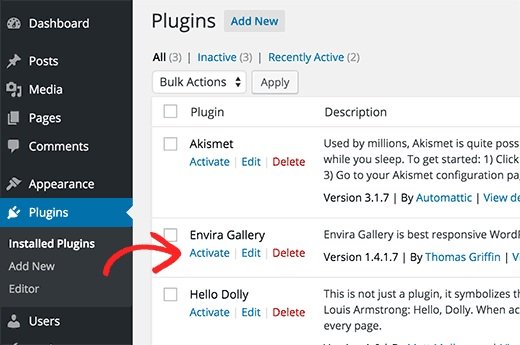
Method 2: Change Username by Using a Plugin

Using a plugin to change your WordPress username is another simple way to do this task. If you do not want to keep the plugins or want to install it. Then you can safely delete this plugin after changing your WordPress username.

First of all, you need to install and activate the Username Changer plugin.

After activation, go to Users>Username Changer page.

wp username changer

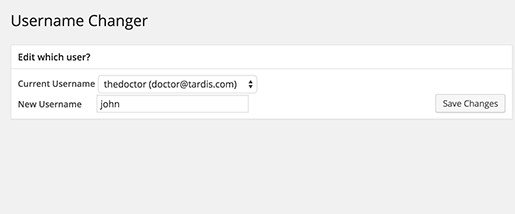
Now select the username which you want to change and enter the new username. When you are done then click on the save changes button.

Method 3: Change Your WordPress Username Using phpMyAdmin

The third method is a little bit complicated because it needs to make direct changes to your WordPress database. I usually do not suggest users to make changes directly to their database of WordPress. However, at times, you may not have another option. For example, if you have forgotten your WordPress username and email address, you will not get access to the admin dashboard to change the existing username.

By using this method, you will be able to find the username and will also be able to change it.

I have forgotten my WordPress username and password what should I do or how to recover it?

So this method will help you if you have forgotten your WordPress username.

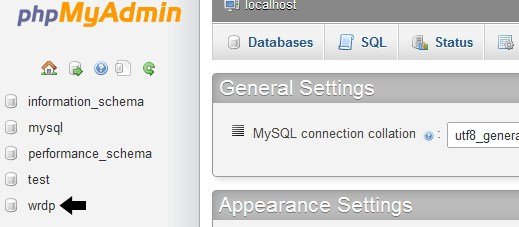
First of all, you need to login to your cPanel. Scroll down to the databases section and click on phpMyAdmin.

php my admin

Now you have to select the database that your blog is hosted in.

php my admin select db

You will see your database tables of WordPress. WordPress database tables use wp_as prefix before each table’s name by default. It is also possible that you may have been using any other prefix.

Now click on the table wp_users on the left hand side. Now click on edit the username which you want to edit.

edit user name

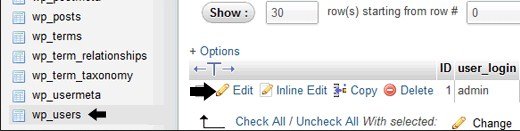
Change the user_login value according to your wish. For example, you can replace “admin” to “user” or “bob”

change user login

Press the Go button and you have completed it.

I hope that you have liked this article and it will be beneficial for you.

Do not forget to share this post.

Arsalan Rauf
Arsalan Rauf

Arsalan Rauf is an entrepreneur, freelancer, creative writer, and also a fountainhead of Green Hat Expert. Additionally, he is also an eminent researcher of Blogging, SEO, Internet Marketing, Social Media, premium accounts, codes, links, tips and tricks, etc.

www.greenhatexpert.com

Filed Under: Blogging, How to, WordPress Tagged With: change wordpress username and password phpmyadmin, how to find wordpress username, what is my wordpress username, wordpress change username plugin, wordpress username ideas, wordpress username requirements, wordpress usernames cannot be changed change wordpress admin username

How to Change the Font Size in WordPress

Last Updated on August 21, 2022 By Arsalan Rauf

Do you want to change the font size in WordPress posts and pages?

If yes, you are at the right place. There are a few ways to decrease or increase font size and text formatting in WordPress. In this post, I shall show you how to change the font size in WordPress with ease.

Method 1: Using the Paragraph Headings

Most of the people want to show bigger font size in WordPress to attract the readers, especially for heading elements. You need to use different font size when you write a post and you can use heading size.

Using visual editor mode, you can see all the available items under the tab known as Paragraph as displayed in the screenshot below:

paragraph visual editor

These sizes are controlled by the stylesheet file (style.css) of the theme to make sure that font size is logical with everything. In most of the cases, the heading sizes can do the job.

If you use heading in your posts, it gives a good user experience. In the meanwhile, it also makes the WordPress posts SEO friendly.

Method 2: TinyMCE Advanced Plugin

For this method, I shall use a WordPress plugin to get a better control on overall font sizes and text formatting while writing content.

First of all, you need to install and activate the TinyMCE advanced plugin. For more details, see my step by step guide on how to install a WordPress plugin.

After activation, go to Settings>TinyMCE Advanced to configure the editor settings.

You will see TinyMCE editor toolbar with buttons on this page.

In addition, you will also see unused buttons below.

Font Size Button Tinymce wp

Now you have to drag and drop the font size button from the unused buttons to any row in the toolbar. After doing so, click the save changes button.

If you want to see the button whether it is functional or not. You need to create a new post or edit an existing one and you will observe that default WordPress visual editor is changed by the TinyMCE advanced editor with font size button.

tinymce font size

As you can observe in the above screenshot that you can choose any font size you like from the drop down. It provides you more freedom over things because now you can choose the smaller font size than the normal body font like 8pt or 10pt.

There is a downside to this method that is, if you ever change your theme, you will have to account for all the font size changes that you made in any post.

Method 3: Change Overall Font Size of Paragraphs Using CSS

If you do not like the font size of your them and want to change it for paragraphs. You need to do it using CSS.

So you have to add the following custom CSS to your WordPress theme.

1
2
3
p {
font-size:16px;
}

Note: This change will be effective on all paragraphs in your WordPress theme and you will lose your change when you will switch your theme.

I hope that you have liked this post.

Still, having issues? Leave them in the comment section.

Do not forget to share this post.

Arsalan Rauf
Arsalan Rauf

Arsalan Rauf is an entrepreneur, freelancer, creative writer, and also a fountainhead of Green Hat Expert. Additionally, he is also an eminent researcher of Blogging, SEO, Internet Marketing, Social Media, premium accounts, codes, links, tips and tricks, etc.

www.greenhatexpert.com

Filed Under: How to, WordPress Tagged With: how to change font color in wordpress theme, how to change font size in wordpress pages, how to change font size in wordpress theme, how to change font style in wordpress, how to change site title font size in wordpress, wordpress change font size css, wordpress font size code, wordpress font size plugin

How to Fix WordPress Posts Returning 404 Error

Last Updated on August 21, 2022 By Arsalan Rauf

WordPress is a powerful CMS. At times, a slight problem can make your site inaccessible. However, to find a solution for every WordPress problem is an easy task. I am trying to cover most of the problems of WordPress for our users.

Like internal server error or error establishing database connection.

WordPress posts returning a 404 error is another common problem that most of the WordPress users are facing these days. In this post, I shall show you how to fix WordPress posts returning 404 error.

In this occasion, a user can access his WordPress admin area and the main page of site. When the user goes to a single post, he gets a 404 not found error. Firstly, you do not need to panic because most of the time your posts are still there and entirely safe. It happens when something went wrong with rewrite rules or your .htaccess file got deleted. You need to fix your permalinks settings.

Go to Settings > Permalinks, and simply click on Save Changes button.

update perma links

This process will flush rewrite rules and update your permalinks settings. In most of the cases, this solution fixes the WordPress posts 404 error. However, if it does not work for you, then you have to update your .htaccess file manually.

Login to your server by using FTP and modify the .htaccess file which is available in the same location where folders like /wp-content/ and /wp-includes/ are present. You need to make the file writeable temporarily by changing the permissions to 666 that is the easiest way. Now repeat the original solution. Do not forget to change the permissions back to 660. You can also add this code in your .htaccess file manually:

1
2
3
4
5
6
7
8
9
10
# BEGIN WordPress
<IfModule mod_rewrite.c>
RewriteEngine On
RewriteBase /
RewriteRule ^index\.php$ - [L]
RewriteCond %{REQUEST_FILENAME} !-f
RewriteCond %{REQUEST_FILENAME} !-d
RewriteRule . /index.php [L]
</IfModule>
# END WordPress

Fix for Local Servers

Developers and designers often install WordPress on their PC/computer using a local server due to testing purposes. If you want to use permalinks, then you have to enable the rewrite_module in the Apache configuration of your WAMP, MAMP or XXAMP.

I hope that this post will help you to resolve posts returning 404 error in WordPress.

Did this solution work for you?

Do you have any other solution for 404 error or issue?

Kindly share it in the comment section.

Do not forget to share this post.


Arsalan Rauf
Arsalan Rauf

Arsalan Rauf is an entrepreneur, freelancer, creative writer, and also a fountainhead of Green Hat Expert. Additionally, he is also an eminent researcher of Blogging, SEO, Internet Marketing, Social Media, premium accounts, codes, links, tips and tricks, etc.

www.greenhatexpert.com

Filed Under: Blogging, How to, WordPress Tagged With: 404 error wordpress login, 404 error wordpress permalinks, wordpress 404 after migration, wordpress 404 error after changing permalinks, wordpress 404 error on all pages, wordpress 404 error on all pages except home, wordpress page not found but it exists, wordpress page not found error

How to Ask Readers to Add Your WordPress Blog Icon on iPhone

Last Updated on August 21, 2022 By Arsalan Rauf

People also search for how to add the little notification which asks their iPhone users to add a blog icon to their home screen. Most popular sites use this feature including TechCrunch and others. If your site has a great responsive design on your WordPress site or blog, and you have enough mobile users, then it is a sensible move to implement this technique. In this post, I shall show you how to ask your reader to add your WordPress blog icon on their iPhone or iPad home screen.

It encourages your users to visit your site more often because they will get one-click access to your site like an app.

Note: Please implement it if your mobile site is functional and look very good. Otherwise, it can irritate the users.

adding home screen icon to iphone

First of all, you need to install and activate the Add to home screen WP Plugin. After activation, you will see a new settings page under Settings>ATHS options. This setting page enables you to control the functionality and behavior of the plugin. In the settings tab, you can add the icon of your website. You need the icon to be recognizable easily because your user will see the icon on their home screen.

To add an icon go to Media>Add New in your admin area. Upload the image file with exact (144×144 pixels) dimensions. Copy the URL of this image file and paste it into the plugin settings page.

add to iphone settings

After doing that, you are good to go. This plugin will work on iPad, iPhone, iPod and touch devices. However, it will be functional only on the safari browser. When a user will visit your site, he will get a notification asking them to add your site’s link as a web app on their device. He needs to tap on the notification to install the website as a web app. If you have given the icon on the plugin settings page, it will be used as the home screen icon.

Otherwise, the plugin will use a snapshot of your web page as an icon.

ballon notification

Add to home screen WordPress plugin gives you an option to open your site in the fullscreen web app mode rather than of Safari web browser.

It is suggested that you select the fullscreen mode so that the users who have already added your site will not see the balloon notification every time he visits your site.

To do that go to Settings > ATHS Options page.

Scroll down to Navigation options, and choose fullscreen mode from choose your browser app drop down menu.

fullscreen mode

I hope that you will like this post about how to add a notification that ask your readers to add your WordPress blog icon on their iPhone.

Do you ever add them to your iPhone?

Will you add this to your website?

What are your feelings about these balloon notifications?

Share your opinion with us.

Do not forget to share this post.

Arsalan Rauf
Arsalan Rauf

Arsalan Rauf is an entrepreneur, freelancer, creative writer, and also a fountainhead of Green Hat Expert. Additionally, he is also an eminent researcher of Blogging, SEO, Internet Marketing, Social Media, premium accounts, codes, links, tips and tricks, etc.

www.greenhatexpert.com

Filed Under: Blogging, How to, WordPress Tagged With: add to home screen programmatically, add to home screen wordpress plugin android, add to home wordpress plugin, ios add to home screen, official add to homescreen, wordpress add to homepage, WordPress Blog Icon on iPhone, wordpress homescreen icon, wordpress web app plugin

How to Add Your WordPress Site to Google Webmaster Tools

Last Updated on August 21, 2022 By Arsalan Rauf

To add your WordPress site to Google Webmaster tools is an important step to optimize your site for search engines. Many people search for SEO Tips and how to increase organic search traffic on their sites. I will provide other tips with usage of Google webmaster tools. In this post, I shall show you how to add your WordPress site to Google Webmaster tools.

What is Google Webmaster Tools

Google Webmaster tools is a set of tools powered by Google in order to give an overview of your site. How people see your site and how search engines observe it. It gives data and reports which can help you to find out the pages which are appearing in the search engine or search results. It provides you the search queries and you will be able to get the keywords and search results. How people click it.

This data allows you to improve your older posts, create new content, and formulate a content strategy for your site. You can also submit XML sitemap of your site using Google websmaster tools. You can also help Google to display the most important content of your site. Google will also notify you if there is a problem with your site that stops Google from indexing and crawling your web pages.

How to Add your WordPress Site to Google Webmaster Tools

Go to Google Webmaster tools website and sign in with a Google account.

After signing in, you need to add the URL of your website and click the add a Property button.

add the URL of your website

Now enter your website url

Add a Property to google webmaster tools

On the next screen, you will see the option to verify the ownership of the website that you are adding. You can upload an HTML file to the root directory of your site using FTP or click on alternate method to get a meta tag which you can paste to your WordPress website.

verify the ownership

In order to add meta tag with ease to your website, you need to install and activate Insert Headers and Footers plugin.

Copy the meta tag line given by webmaster tools which will look something like this:

<meta name=”google-site-verification” content=”VerificationKeyCode” />

Now go to Settings » Insert Headers and Footers and paste the meta tag line into the header field.

Now save the changes and go back to Google webmaster tools in order to Verify your site. Click on verify site button.

If you are using WordPress SEO plugin by Yoast, you can copy the verification key in content part of the meta tag and paste it in Yoast SEO plugin. Click on SEO option in your WordPress dashboard sidebar and scroll down to webmaster tools section to paste the unique key in the Google webmaster tools field.

Save the changes and go back to Google webmaster tools to verify your site.

Put verification key in yoast

After verifying your site, you will need to add your XML sitemap.

Don’t have a sitemap or don’t know what is sitemap?

Check our post about How to Create XML sitemaps in WordPress.

After adding the sitemap, it may take a while for Google to show your site data.

This is how you add your WordPress site to Google Webmaster tools.

Still have questions? Do not hesitate to ask them in the comment section.

Do not forget to share this post.

Arsalan Rauf
Arsalan Rauf

Arsalan Rauf is an entrepreneur, freelancer, creative writer, and also a fountainhead of Green Hat Expert. Additionally, he is also an eminent researcher of Blogging, SEO, Internet Marketing, Social Media, premium accounts, codes, links, tips and tricks, etc.

www.greenhatexpert.com

Filed Under: Blogging, How to, WordPress Tagged With: google disavow tool, google site verification, google site verification meta tag wordpress, google sitemap submit, how to upload google html verification file wordpress, how to upload html verification file to my website, submit url to google search engine, verify wordpress site with google, webmaster tools verification, website verification services wordpress

How to Add Google Maps in WordPress

Last Updated on August 21, 2022 By Arsalan Rauf

You can add all kind of content into your WordPress blog, site or website. At Green Hat Expert, I have shown you how to add audio files, videos, PDF and Spreadsheets in WordPress.

You can create highly useful and interactive content by adding content from external sources. In this post, I shall show you how to add Google Maps in WordPress.

Manually Adding a Google Map in WordPress

Go to Google Maps website, now search for a location that you want to add by typing its address. After finding the location, you need to click on the link button in the right hand panel. It will give you an embed code. Copy the iframe code or you can also click on ‘customize and preview the embedded map’ to customize the appearance of the map on your website.

google maps embed iframe

Now go to your WordPress site and paste the code in a page, post or a template. Now save the post/page in order to see the Google map live on your website.

Adding Google Maps in WordPress Using a Plugin

The first is method is good if you only want to show a single Google map to one location on your WordPress blog. If the map is a part and parcel of your site, and you need to add them frequently basis. Then you I will recommend use a plugin for this purpose.

First of all, you need to install and activate MapPress Easy Google Maps plugin. Edit a page/post where you want to add the map. Now scroll down to MapPress section on your page or post edit screen and press the New Map button.

mappress google maps plugin


It will open MapPress editor where you need to enter an address or click on MyLocation link to enable the plugin to detect your location automatically.

Choose the size of the map and give a title to your map. After doing all the work, click on the save button and click on insert into post button to add the map into your post. Publish or update your post and you can preview it.

By using MapPress, you can add many maps to a post or page. It will also add plugin settings menu in your WordPress admin sidebar and it also works out of the box. Change the plugin settings by clicking on it including map border, type, alignment and controls etc.

mappress settings

Adding Google Maps in a Widget and a Lightbox

Add Google maps to your WordPress with ease by installing Google Maps Widget plugin.

After activating the plugin, go to Appearance > Widgets and drag and drop Google Maps Widget to your sidebar.

google maps widget settings

Now enter the address that you want to display on the map in Widget settings. You can also select the size of the map, pin color and zoom level etc. configure the lightbox settings by clicking on the lightbox tab.

Lastly, click on the save button to save the widget settings.

Visit your website to see the widget in action.

google maps widget

I hope that you have learned how to add Google maps in your WordPress site.

Still have questions or problems?

Leave them in the comment section.

Do not forget to share this post.

Arsalan Rauf
Arsalan Rauf

Arsalan Rauf is an entrepreneur, freelancer, creative writer, and also a fountainhead of Green Hat Expert. Additionally, he is also an eminent researcher of Blogging, SEO, Internet Marketing, Social Media, premium accounts, codes, links, tips and tricks, etc.

www.greenhatexpert.com

Filed Under: Blogging, How to, WordPress Tagged With: Add Google Maps in WordPress, contact form with google map wordpress plugin, embed google map wordpress plugin, How to Add a Favicon to Your WordPress Blog, how to add google map api in wordpress, how to add google map in wordpress contact page, how to add google map in wordpress without plugin, how to use wp google maps, update google map wordpress, wordpress map plugin multiple locations

How to Add a Favicon to Your WordPress Blog

Last Updated on August 21, 2022 By Arsalan Rauf

Favicon is also known as site icon which is a tiny image which appears next to your site title in browser. It will help the users to identify your site. Most of the users will recognize your site with that tiny image. It will establish your brand among the users and you will be able to build trust among your users.

If you are not adding a favicon on your site, you are doing the most common WordPress mistake. In this post, I shall show you how to add a favicon to your WordPress site.

Why you should Add a Favicon to Your WordPress Site?

As I mentioned earlier that it builds your website’s identity.

In addition, it also improves the user experience and site’s usability. This image will help you to understand it in a better way:

favicons

Many users usually open multiple tabs in their browser. When the number of tabs increases, it hides the title of your website. If you will use a favicon, the user will easily identify your website and move quickly to the tab he wants.

Your site favicon or icon is also used when a visitor adds your website to his homescreen on a mobile device. You can also ask the users to add your site to their homescreen.

home screen site icon

How to Create a Favicon

You can use the logo of your brand as your favicon or site icon. The recommended size for your site icon image is at least 512 pixels in both height and width. The icon image of the site should be a square, you can also use a larger rectangular image and WordPress will enable you to crop the image when you will add it.

creating site icon wordpress

I suggest using an image editor or editing software like Gimp or Adobe Photoshop to create an icon of exact 512×512 pixels. That is the way to create maintain the proportions of your image. In addition, you can also fill the image with a background color or use transparent image of your choice. This image can be in JPEG, PNG or GIF format.

Adding Your Site Icon or Favicon in WordPress

After the launch of WordPress 4.3 version, you can add a favicon or site icon from WordPress dashboard.

You need to go to Appearance>Customize and click on the Site Identity tab.

site identity

In this site identity section, you can change the title, description and control whether you want to display it in the header or not.

It also enables you to upload the site icon of your site. Click on the select file button to upload the image that you want to use as favicon or icon.

adding site icon

If you are uploading an image that is exceeding recommended size, you can also crop it to use it. If your image is matching the suggested size, then save your changes.

After doing so, you can now preview your site to see your favicon.

Additionally, you can also visit your site on mobile phone and by using browser menu you can choose “add to homescreen”. You will see your site icon on the homescreen.

Adding Favicon to Older WordPress (4.2 or below)

If you are using older WordPress version 4.2 or below, you need to upload favicon to the root directory of your website using FTP. After that, you need to paste the code into the header of your theme in header.php file.

1
2
<link rel="icon" href="https://www.greenhatexpert.com/favicon.png" type="image/x-icon" />
<link rel="shortcut icon" href="https://www.greenhatexpert.com/favicon.png" type="image/x-icon" />

Replace Greenhatexpert.com with your site’s Url and you are done.

If your theme does not have a header.php file or you are unable to find it. Then do not worry, I have a plugin for you.

Install and activate Insert Headers and Footers plugin.

After activating the plugin go to Settings » Insert Headers and Footersand paste the code provided above in the header section and save your settings.

If you do not want to deal with FTP, then you have to use the plugin known as All in One Favicon.

I hope that you have learned that how to add favicon to your WordPress site.

Still having problems?

Leave your problems in the comment section.

Do not forget to share this post and like our Facebook page to get the latest updates.

Arsalan Rauf
Arsalan Rauf

Arsalan Rauf is an entrepreneur, freelancer, creative writer, and also a fountainhead of Green Hat Expert. Additionally, he is also an eminent researcher of Blogging, SEO, Internet Marketing, Social Media, premium accounts, codes, links, tips and tricks, etc.

www.greenhatexpert.com

Filed Under: Blogging, How to, WordPress Tagged With: create favicon, How to Add a Favicon to Your WordPress Blog, site icon wordpress, wordpress add favicon functions php, wordpress favicon change, wordpress favicon not showing, wordpress favicon plugin, wordpress favicon size, wordpress site icon not working

5 Best Related Posts Plugins for WordPress

Last Updated on August 21, 2022 By Arsalan Rauf

Are your readers or users leaving your website after reading one post?

This guide is for you. To reduce the bounce rate and increase the pageviews is a hard task for site owners.

If you show a user related content, it will be an effective way to get more pageviews. By using a plugin, you can show related posts on your WordPress site easily.

In this post, I am going to show you the best related posts plugins for WordPress.

5 Best Related Posts Plugins for WordPress

1. Yet Another Related Posts Plugin

yarpp

Yet Another Related Posts plugin is also known as YARPP is the most famous WordPress related posts plugin. It has more than 3.4 million downloads. It supports both text display of related posts and thumbnail.

Pros:

Yet Another Related Posts plugin has a built in algorithm to find related posts from the site. It consists of great template system, text display, allows for thumbnails, supports custom post types and RSS feed display.

Cons:

YARPP can be very resource intensive, if you are running a very large website. The pro or premium version of the plugin can solve the problem by doing heavy-lifting on YARPP’s own servers.

Yet Another Related Post Plugin is not compatible with WPML plugin. If you want to create a multi-lingual or multi language WordPress website, you should select Polylang.

Lastly, YARRP is blocked on Managed WordPress hosting providers such as WPEngine.

2. Contextual Related Posts

contextualrelatedposts

Contextual Related posts is another WordPress related post plugin that shows related posts. It drives contextually matching posts to the users. It shows related posts with text and thumbnails.

Pros:

It has a simpler settings page for text related posts and it works out of the box for this. This plugin uses images inside a post as thumbnail when there is not featured image and post thumbnail are present.

Cons:

This plugin does not consist of any template to show thumbnails. It shows thumbnail images in a bulleted list. The beginners cannot add a style to it, but expert users can add their own CSS to style it.

Like YARPP, Contextual related posts plugin cannot work well on larger sites. Managed WordPress Hosts like WPEngine has blocked this plugin for customers. It is because this plugin slow down the sites when they are larger.

3. Related Posts for WordPress

relatedpostsforwp

Related Posts for WordPress is another alternative plugin for related posts plugin which is lightweight. This plugin uses cache to show related posts and does all the resource intensive tasks in the admin area.

Pros:

Related Posts for WordPress pays attention to performance. It is fast and will not slow down your site. It also supports textual and thumbnail display of related posts list.

There are a shortcode and widget that you can use to show related posts anywhere on your site.

Cons:

If you had been using other related posts plugin, then you may miss a few extra features.

4. Yuzo Related Posts

yuzorp

Yuzo Related Posts is another related posts plugin which is free. It is full of comprehensive features which you are expecting from a related posts plugin. List views, thumbnail views, horizontal views with thumbnails, built-in-cache etc.

Pros:

It is very easy to setup and use. Users can choose the style by just clicking on it. Caching features makes the performance better from YARPP and Contextual related posts. The widget of this plugin is highly customizable with a number of options.

Cons:

You cannot compromise on speed and you need to know that it is not lightweight.

5. Inline Related Posts

inlinerelatedposts

Inline related posts is unique from other plugins in the list. This plugin does not show related posts below the content, it rather shows them inside the post. This type of inline display of related content is famous on blog and news websites.

Pros:

This plugin shows related posts when users are engaged in the content and more likely to click the related post. It is easy to setup and enables you to control the location where you want to show inline related post links in your content or post.

Cons:

If you want to show the related posts at the end of the post, then you need other plugins to do this. To install two related posts plugins on one website can be resource intensive.

Bonus Tips

You may have noticed that I have mentioned several times that related posts plugins can be resource intensive. It is also possible that any of these plugins may not functional on shared WordPress hosting.

In such situation, you need to use Manual Related Posts plugin. By using this plugin, you will be able to add related posts to a post manually. The link relationship will work both ways. If you add an old post as related post to a new post and vice versa.

There is another option to display related posts with thumbnails without using plugins manually.

I hope that this article will help you to find the best related posts plugin for your WordPress site.

Do not forget to share and like this post.

Arsalan Rauf
Arsalan Rauf

Arsalan Rauf is an entrepreneur, freelancer, creative writer, and also a fountainhead of Green Hat Expert. Additionally, he is also an eminent researcher of Blogging, SEO, Internet Marketing, Social Media, premium accounts, codes, links, tips and tricks, etc.

www.greenhatexpert.com

Filed Under: Blogging, WordPress Tagged With: best related posts plugin 2018, Best Related Posts Plugins, contextual related posts, manual related posts wordpress, related pages plugin wordpress, Related Posts Plugins for WordPress, wordpress related posts plugin custom post types, wordpress related posts without plugin, yet another related posts plugin (yarpp), yuzo related posts

How to Minify CSS & JavaScript Files in WordPress

Last Updated on August 21, 2022 By Arsalan Rauf

Do you want to minify files on your WordPress site?

You are at the right place.

Minifying your WordPress CSS and JavaScripts files can enable your site to load faster. It also speeds up your WordPress site. In this post, I shall show you how to minify CSS JavaScript files in WordPress to improve the performance and speed of your site.

What is Minify and When Do You Need it?

Minify is a term which is used to describe a method that makes your website file size smaller. It completes this task by removing lines, white spaces and unnecessary characters from the source code.

Usually, it is suggested to use only for files which are sent to user’s browsers. It includes JavaScript, CSS and HTML files. In addition, you can also minify PHP files too. PHP is a server side programming language and if you minify it, it will not improve the load speed for your users.

The main advantage of minifying files is to improve the performance and speed of WordPress.

Compact files load faster and improve the speed of your site.

Some experts are of the view that the performance improvement is very small for most websites.

The minification process only decreases few kilobytes (kb) of data on WordPress websites. You can also reduce the pageload time by optimizing images for web..

Here is an example of normal CSS code:

body {
margin:20px;
padding:20px;
color:#333333;
background:#f7f7f7;
}
h1 {
font-size:32px;
color#222222;
margin-bottom:10px;
}

After minifying the code it will look like this:

body{margin:20px;padding:20px;color:#333;background:#f7f7f7}h1{font-size:32px;margin-bottom:10px}

If you want to achieve 100/100 score on Google PageSpeed insights or GTMetrix tool. Then minifying JavaScript and CSS will improve your score.

Now take a look at how to minify CSS/JavaScript on your WordPress site easily.

Minify CSS/Javascript in WordPress

First of all, you need to install and activate the Better WordPress Minify plugin.

For more details, see our step by step guide on how to install a WordPress plugin.

After activation, this plugin will add a new menu item named “BWP Minify” to your WordPress admin bar. When you will click on it, it will take you to plugin’s settings.

bwpminify settings

On the settings page, you have to check the first two options to minify JavaScript and CSS files automatically on your WordPress site.

Now click on save changes button to save changes.

Advanced options are also available on this page. The default settings should work for most of websites, but you can change these options depending on a case basis.

Now go to your website. Right click anywhere then select ‘view page source’ from browser options.

view page source

You will be able to see HTML source code generated by your WordPress site. When you look closely, you will see that this plugin will load CSS/JavaScript files from plugin’s own folder in lieu of your WordPress plugins and themes.

These are the minified versions of your original CSS and JavaScript files. Better WordPress minify plugin will keep them cached and serve the minified versions to user’s browsers.

Still having problems? Type your problems in the comment section.

Do not forget to share this post and like our Facebook page for more updates.

Arsalan Rauf
Arsalan Rauf

Arsalan Rauf is an entrepreneur, freelancer, creative writer, and also a fountainhead of Green Hat Expert. Additionally, he is also an eminent researcher of Blogging, SEO, Internet Marketing, Social Media, premium accounts, codes, links, tips and tricks, etc.

www.greenhatexpert.com

Filed Under: Guide, How to, SEO, WordPress Tagged With: best wordpress minify plugin, better wordpress minify, how to minify javascript and css in wordpress without plugin, inline small javascript wordpress, js css compression wordpress, minify css wordpress without plugin, minify html wordpress, minify javascript and css wordpress htaccess

How to Install a WordPress Plugin – Step by Step for Beginners

Last Updated on August 21, 2022 By Arsalan Rauf

After installing WordPress on your site, if you are a beginner, you need to learn how to install a WordPress plugin. Plugins have the ability to add new features to your WordPress website including slideshow and gallery etc. There are numerous paid and free plugins available for WordPress. In this post, I shall show you how to install a WordPress plugin.

Before You Start

If you are a user of WordPress.com, you cannot install plugins.

I have seen people complaining about plugins that they cannot see the plugins menu in their dashboard. It is because they are using WordPress.com and it has limitations. You need to upgrade to business plan of WordPress.com in order to install plugins.

On the other hand, you can install and activate any plugin you want to use on self hosted WordPress.org website.

How to Install a WordPress Plugin

You need to follow these instructions which can allow you to learn step by step how to install a WordPress plugin.

I have covered all three methods: uploading a WordPress plugin, installing a WordPress plugin using search and manually installing a WordPress plugin using FTP.

Install a Plugin using WordPress Plugin Search

To install the WordPress plugin in the easiest way, use the plugin search method. The downside of this option is that it should be available in the WordPress plugin directory which is limited to only free plugins.

First of all, go to your WordPress admin area and click on plugins>Add>New

search plugins

You will see a screen as above in the screenshot. You need to find the plugin by typing its name or functionality to find it like I did. After putting the name, you will find a number of listings like this:

plugin search results

Pick the plugin of your choice. in our search, we were finding floating social bar plugin which is the first plugin. I shall click the ‘install now’ button.

WordPress will start the download and install the plugin. After installation, you will see the button to activate the plugin.

activate plugin

You can install a WordPress plugin on your site but it will not work until you activate it. So click on the activate button to activate the plugin on your site.

That’s it. You have installed the first WordPress plugin on your site.

The next step is to configure the settings of plugin. These settings are different for each plugin that is why I cannot cover that in this post.

Install a Plugin using the WordPress Admin Plugin Upload

Paid WordPress plugins are not available in WordPress plugin directory. You cannot install these plugins by using the search method or first method.

Therefore, WordPress has given us the upload method to install such plugins. I shall also show you how to install WordPress plugin using the upload option or method in WordPress.

First of all, you have to download the plugin from the source that is available in zip format or file. Now, you have to go to WordPress admin area and click plugins>Add new page.

After that, click the upload plugin button at the top of the page.

upload plugin wp admin

It will lead you to the plugin upload page. Now click choose file button to select the file or plugin you want to upload from your computer.

plugin upload page

After selecting the file, now click on the install now button to begin the process.

WordPress will upload the plugin file from your computer and install it. You will see the success message after the completion of installation.

plugin installed manual

After installation, you have to click the activate plugin button to start using it.

You need to configure the settings according to your needs. The settings are different for every plugin I shall not be able to cover that in this post.

Manually Install a WordPress Plugin using FTP

At times, your WordPress hosting provider may restrict the files which can limit your ability to install the plugin from the admin area.

In such cases, you need to install the plugin manually using FTP.

FTP manager method is the least friendly for beginners.

First of all, download the plugin file which is in zip format. Now extract the zip file on your computer.

When you will extract it the plugin will create a new folder using the same name. That is the folder you need to upload manually to your website by FTP client.

You have to access your host using FTP manager. If you do not possess a FTP username and password, contact your WordPress hosting provider to get them.

Use the login credentials to connect to your website and open the FTP client on your PC or computer. After connecting, access the path /wp-content/plugins/

Now upload the extracted folder from the zip file to this directory /wp-content/plugins/ on your web server.

ftp plugin upload

After uploading the files, go to your WordPress admin area and visit plugins link in the menu. Now you will see that you have installed the plugin successfully on plugins page.

installed plugins

Now click on the activate button to activate the plugin. After activation, you may need to configure it. Every WordPress plugin comes with its own settings which are different from one another. So I shall not discuss it in this post.

I hope that you have learned how to install WordPress plugins.

If you are having any problems kindly post it in the comment section. I shall respond to you asap.

Do not forget to share this post.

Arsalan Rauf
Arsalan Rauf

Arsalan Rauf is an entrepreneur, freelancer, creative writer, and also a fountainhead of Green Hat Expert. Additionally, he is also an eminent researcher of Blogging, SEO, Internet Marketing, Social Media, premium accounts, codes, links, tips and tricks, etc.

www.greenhatexpert.com

Filed Under: Guide, How to, WordPress Tagged With: add new plugin wordpress missing, can you add plugins to free wordpress, how to add plugin in wordpress page, how to add plugins to wordpress free blog, how to install wordpress plugins manually, how to use plugin in wordpress, no option to add plugin wordpress, why can't i install plugins on wordpress

  • « Previous Page
  • 1
  • 2
  • 3
  • 4
  • Next Page »


Recent Posts

  • Free DeepSeek Accounts 2025
  • Free Zoho Mail Accounts 2025
  • Acudepot Discount Codes 2025
  • Free Blackshot Accounts 2025
  • Free GMX Email Accounts 2025
  • Songtrust Discount Codes 2025
  • Uzicases Discount Codes 2025
  • Cardillo Promo Codes 2025
  • Free DriverFix License Keys 2025
  • Avast Secureline VPN Activation Codes 2025

Recommended Posts

Create a Gmail Account Without Phone Number

Free Course Hero Account

Crunchyroll Accounts

Cracked Apps

Free Pokemon Go Accounts
Onlyfans Free Accounts
Free Chegg Accounts
Free Paypal Accounts
Free Gmail Accounts
Funny Steam Names

Categories

  • Apps
  • Apps for PC
  • Blogging
  • Discord
  • Facebook
  • Gaming
  • Grammar
  • Guide
  • How to
  • Instagram
  • Messaging
  • OnlyFans
  • Pinterest
  • Reddit
  • SEO
  • Snapchat
  • Social Media
  • Spotify
  • Steam
  • Telegram
  • TikTok
  • Twitch
  • Twitter
  • Whatsapp
  • WordPress
  • YouTube
  • Home
  • Social Media
  • Messaging
  • About
  • Submit Guest post