Green Hat Expert

  • Home
  • Social Media
    • Instagram
    • TikTok
    • Snapchat
    • Facebook
    • YouTube
    • Twitter
  • Messaging
    • Discord
    • Telegram
    • Whatsapp
  • About
  • Submit Guest post
You are here: Home / Archives for Guide

How to Install and Setup Facebook Comments in WordPress

Last Updated on August 21, 2022 By Arsalan Rauf

How to Install and Setup Facebook Comments in WordPress

Are you looking to add Facebook comments on your WordPress site?

Facebook is the largest social media network in the world. Therefore, top sites including TechCrunch are using Facebook comment system and avoiding default WordPress comments. In this post, I am going to show you how to install and set up Facebook comments in WordPress.

Before we get to know it, let’s take a look at why would anyone want to use Facebook comments instead of default WordPress comments.

Pros and Cons of Using Facebook Comments in WordPress

The first benefit of using Facebook comments in WordPress is that it boosts your site visibility on Facebook’s network. When someone leaves a comment on your site, they can check the box to share the comment with their Facebook friends. It can give you the potential for additional traffic.

The second benefit of using Facebook comments is that it will remove the anonymity factor, so the users will not leave spammy comments. It is because it will be published on their Facebook profile.

However, it also has a downside too. It is because users do not feel comfortable leaving a comment from their Facebook account or profile due to their sense of anonymity.

Unlike other comment systems such as Disqus, Facebook comments are neither synced to your WordPress comments nor stored. They replace WordPress comments completely. If your post has some posts with WordPress comments, those existing comments will appear after or before Facebook comments.

Now you are aware of pros and cons, now see how to install Facebook comments in WordPress.

Installing Facebook Comments in WordPress

First of all, you have to install and activate the Facebook Comments plugin to your site. After activation, you need to go to Settings> Facebook Comments to setup the plugin.
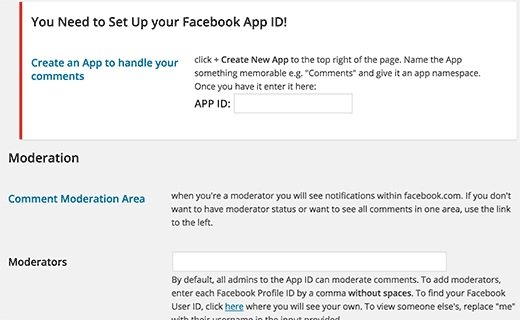
fb comments plugin settings

If you want to use Facebook comments on your site, you need to create a Facebook app. If you already have created an app for your site, you can use that app ID here. Otherwise, you will have to create a new one.

First of all, visit the Facebook Apps page, then click on the create new app button to create an app.

Now you have to give a name for your app and click on the create app ID button to complete it.
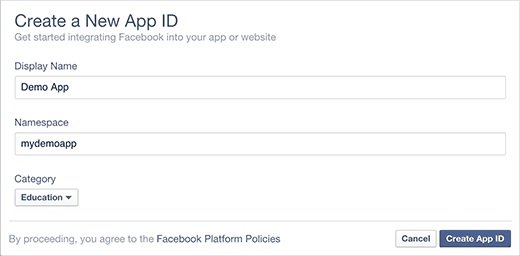
new fb ap

Facebook will create a new app for you to use and it will take you to app dashboard. You will see your app ID there.

Now you will copy and paste this app ID into your plugin settings. Before doing that, you have to configure the app to make it functional on your website. Now click on settings link, click on +Add platform button.
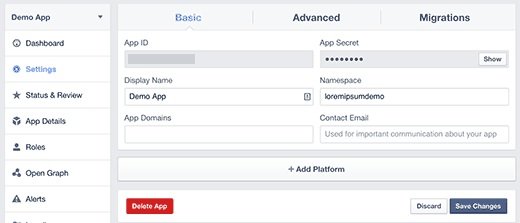
settings platform

You will see a new popup window on the screen. Now click on website to select it as your platform.
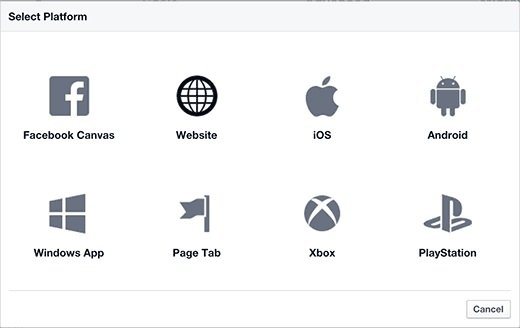
platforms

It will add a new website section in the settings of your app’s page where you can enter the address of your WordPress site.
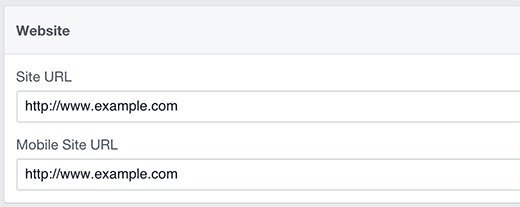
app domain

Now save your settings, you can copy the app ID and paste it into the plugin’s settings page available on your WordPress site.

This WordPress Facebook comments plugins offer a comprehensive set of options. The default settings of the plugin work for most of the sites. If it is not working on your site, you should see the settings to see what to change.

After completing it, click the ‘save changes’ button to save your settings.

Now, go to your website to see Facebook comments in comment section on your site.

fb comments preview

Moderating Your Facebook Comments

Now you are the admin of the Facebook app, that is why you will get notifications for new comments whenever you will login or use your Facebook account. You can find the link to your Facebook comment moderation tool in the plugin’s settings page.

fb comment moderation

Click on the settings link in the Facebook comment moderation tool to add new comment moderators.
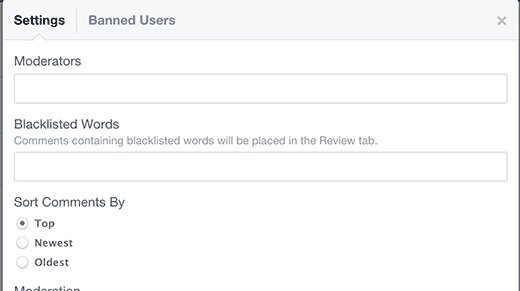
adding moderators

I hope that you will like this post and it will help you to install and setup Facebook comments in WordPress.

You may also want to check our guide on How to add social media icons to blogger.

Do not forget to share this post and like our Facebook Page.

Arsalan Rauf
Arsalan Rauf

Arsalan Rauf is an entrepreneur, freelancer, creative writer, and also a fountainhead of Green Hat Expert. Additionally, he is also an eminent researcher of Blogging, SEO, Internet Marketing, Social Media, premium accounts, codes, links, tips and tricks, etc.
www.greenhatexpert.com

Filed Under: Blogging, Facebook, Guide, Social Media, WordPress Tagged With: best facebook comments plugin for wordpress, facebook comments app, facebook comments on blog, facebook comments vs wordpress comments, facebook comments wordpress without plugin, how to use facebook comment in wordpress, import facebook comments to wordpress, wordpress facebook comments plugin responsive

How to Embed a Facebook Video in WordPress

Last Updated on August 21, 2022 By Arsalan Rauf

How to Embed a Facebook Video in WordPress

Do you want to embed a Facebook video in WordPress?

Due to the recent popularity of Facebook videos and Facebook live platform, people also want to embed Facebook videos in WordPress. In this post, I shall show you how to embed Facebook videos in WordPress with ease and Facebook live video in WordPress.

Why Add Facebook Videos in WordPress?

I suggest to my friends and followers that they should not upload videos to WordPress. I also suggest using a video sharing site like YouTube.

Currently, Youtube is the largest video hosting platform in the world, Facebook is the biggest social network and their videos are growing very fast. Recently Facebook has introduced Facebook live video and Facebook auto-play features. Marketers are paying attention to these features from all over the world. It is because they increase user engagement and overall reach.

By using Facebook videos, you can increase the likes on your Facebook page. For more social experience, you can install Facebook comments, add Facebook page plugin, and add Facebook like button on your WordPress website.

After this discussion, let’s take a look how to embed Facebook videos on a WordPress website.

Embedding Facebook Videos in WordPress

First of all, you need to select the video that you want to embed on your website.

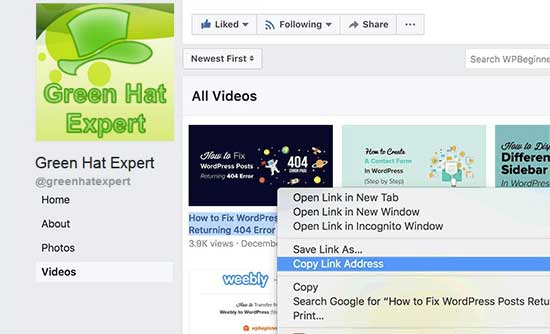
Now use the right click on the video date or name, and copy the link address.

copy video url

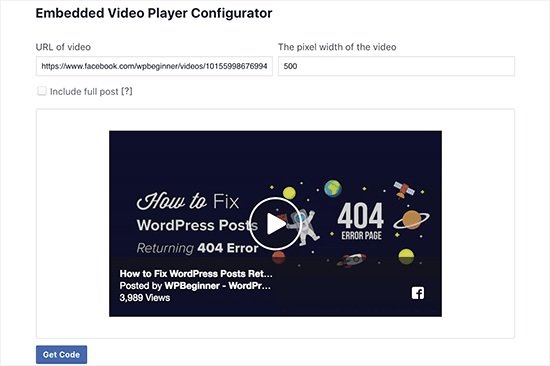
After doing so, you have to go to Facebook embedded video player website and scroll down to reach code generator section.

Now paste the URL that you copied earlier while clicking on the video name or date.

embed code generator

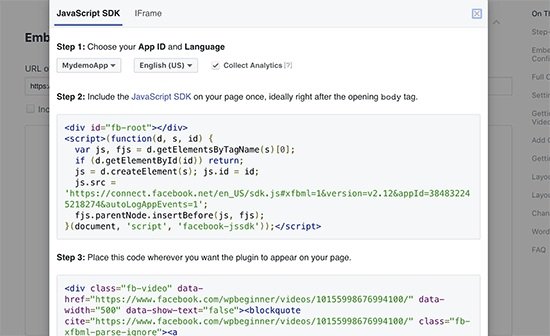
The next step is to click on the get code button and it will show you a popup of two boxes that contain code.

embed code

The first part of the code will go in the header section of your site.

There are several ways to add this code to your site.

If you are comfortable with editing files of theme, then you can add it to your theme and you need to edit header.php file and paste it after the <body> tag.

In addition, you can also install Insert Headers and Footers plugin to add it. For more details, see our post on how to install a WordPress plugin.

After activation, now go to the settings>Insert Headers and Footer page in admin of your WordPress and paste the code in the footer box. And press save changes to save it.

Note: You only have to add the first part of the code one time. For the next time, you need to add a Facebook video, to do that, you will copy and paste the second part of the code.

So go to the Facebook video embedder page to copy the second part of the code to paste it.

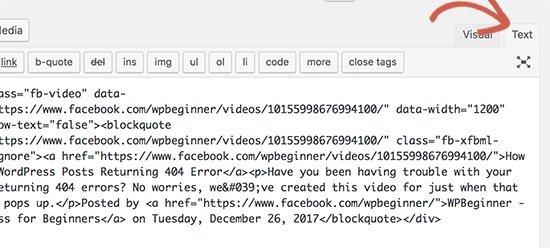
You can add the code in your pages, posts and even a sidebar widget of your WordPress site. While adding the code to your page and posts, you will have to go to the text editor, otherwise, WordPress visual editor will mishandle the code.

switch to text

Now go to your site to see the Facebook video embedded.

How to Embed Facebook Live Video in WordPress

You can embed the Facebook live video as well as a regular video let’s see how to do it. The difference is, you need to get the link of your Facebook live video.

The question is how to get the URL of Facebook live video?

Facebook does not enable you to get a URL of your live video before you launch the live video. If you want to broadcast your live video of Facebook on your site, you need to go live.

You need to do the same procedure after going live, right click on the date and select the copy link address to copy the URL of live video.

facebook video embed preview

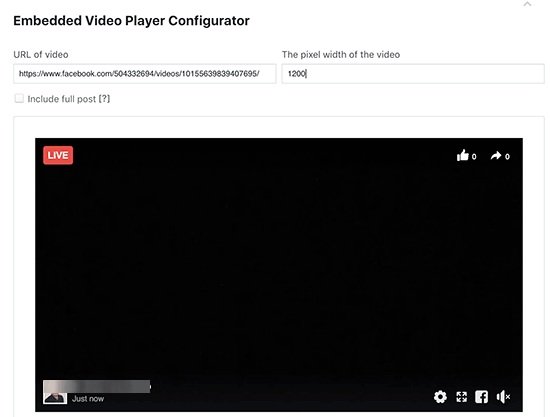
After getting the URL, you need to visit Facebook embedded video player website and paste the link in the ‘URL of video’ field.

fb live video url

Then the video embed code generator will fetch and show a preview of live Facebook video. You will have to click on the get code button and follow the rest of the instruction as described above to add these codes to your site.

After adding the Facebook live video code on your website, your visitors will be able to watch the Facebook live video from your site directly and also in their Facebook feeds.

live video embed code

I hope that you liked the post and you learn how to embed Facebook videos in WordPress. You may want to see our guide on Voice Search SEO.

Arsalan Rauf
Arsalan Rauf

Arsalan Rauf is an entrepreneur, freelancer, creative writer, and also a fountainhead of Green Hat Expert. Additionally, he is also an eminent researcher of Blogging, SEO, Internet Marketing, Social Media, premium accounts, codes, links, tips and tricks, etc.
www.greenhatexpert.com

Filed Under: Facebook, Guide, WordPress Tagged With: embed facebook live stream, embed facebook live video wordpress, embed facebook video wordpress plugin, facebook embedded video, facebook this video can t be embedded, facebook video embed autoplay, facebook video embed tool, wordpress facebook video gallery

14 Legit Ways to Avoid PayPal Fees

Last Updated on December 26, 2023 By Arsalan Rauf

How to Avoid PayPal Fees

At the end of every year, people usually review their past 12 months to observe their spending habits and net worth etc.

In my opinion, it is necessary to take your personal finance matters into consideration in general month-to-month tracking.

There are 2 reasons of doing that:

  • You can observe the financial well-being whether it is positive or negative.
  • To track the income you generate from your work to encourage yourself.

After going through the past transactions of 1 year, I have come to know about shockingly wastage of money: I wasted about 110$ in PayPal fees in 2020.

You may have experience this incident, that is why I am writing this guide. I do not want to make it worse every coming year.

If you send money from PayPal on daily or hourly basis it is a big deal. So, you need to know the methods of how to save PayPal fees to save some money.

This article is on:

  • How PayPal Fees Work
  • How to Avoid PayPal Fees
  • Alternative payment methods that you can consider or use

Let’s start.

PayPal Fees Explained:

PayPal Business Account Fees:

The fees of PayPal depends on different factors including the type of account of PayPal, the currency you are dealing in, and the purpose of transaction etc.

If you are using PayPal as a payment gateway in your online business, you need to open a PayPal Business account.

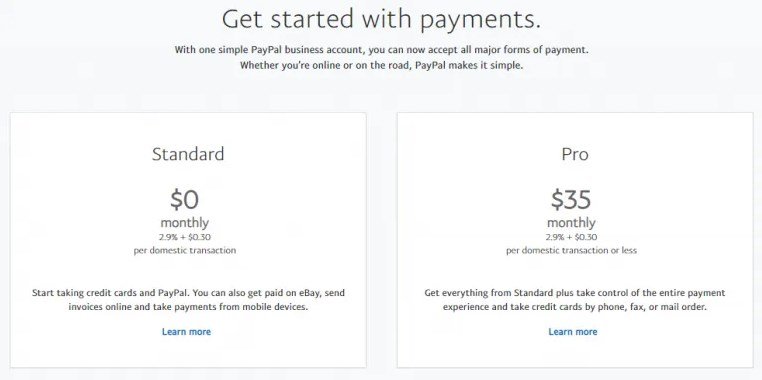
PayPal business accounts consist of monthly costs and merchant fees. This type of account can be divided into Standard and pro plans:

As a merchant, if the payment you get from a PayPal account in Canada, the fee for this transaction is 2.9% of the amount + 0.30$ CAD.

If the money you receive from a PayPal account in the United States, the fee for this transaction is 3.7% of the amount + 0.30$ USD.

Apart from USA and Canada, if your sender is from any other country, you have to pay fee of 3.9% of the amount along with a fixed fee based on the currency.

PayPal Personal Account Fees:

If you are a user of personal PayPal account in order to receive the payments from your job, you may have to pay PayPal fees to get the job done.

Personal PayPal accounts come with different fee structures keeping in view your country of residence, but I am going to discuss the US based PayPal fee information for personal accounts.

For United States personal PayPal accounts:

  • Buying is free of cost if it is within the US (same is the case in Canada).
  • Sending money is free if the transfer is made by your bank account linke to your PayPal account or PayPal balance (you will be charged 2.9% plus a fixed fee if payment is made using a credit/debit card or PayPal credit).
  • Money Transfer from your PayPal account to your linked bank account is free of cost, however, instant transfers charge 1% of the amount transferred up to a maximum of $10.

PayPal payment method also charges a currency conversion fee in such cases:

  • When you buy goods sold in a currency your personal account does not have in the account.
  • Secondly, when you send money in a currency that you do not have in the account.
  • When you try to receive payment in a currency your PayPal account is not configured to accept.
  • When you withdraw payment to your linked bank account that is in a different currency than your bank holds.

The conversion fee of PayPal currency is 3.0% for U.S as well as Canadian dollars and it charges 3.5% for all other currencies than US and Canadian. The base exchange rate depends on the rates from the wholesale currency markets on the payment day or prior to one business day based on the time of the payment made.

How to Avoid PayPal Fees

The strategies you can use to avoid PayPal fees will be different in terms of types of accounts, so I am going to discuss some actionable tips for personal as well as business accounts.

Method 1: Change Payment Structure/Frequency

If you are running an online business such as a dropshipping business to sell one-time items to the customers, this strategy will not work for you to avoid PayPal fees.

However, if you are running a business model that charges the consumers for repeated services such as coaching, consulting work and subscriptions, you can save plenty of money by changing the payment model.

For example, if your customers are paying using PayPal payment gateway on a weekly or bi-weekly basis for the services, shift them to a monthly payment schedule, in this way, you will be able to reduce the times you are charged a $0.30 transaction fee.

I agree it doesn’t seem to be enough, but if you have a high amount of transactions it can result in decent savings right?

Method 2: How to Avoid PayPal Fees When Sending Money

The answer is to use the PayPal friends and family option. PayPal friends and family payments is another option that handles the transactions differently as compared with normal transactions.

According to PayPal: “If the request is for goods and services, invoice fees are only 2.9% + $0.30 per paid request.* If you’re requesting money from friends & family on our app or using PayPal online, it’s free to receive money.”

If you are a business owner or a freelancer, you need to make sure that your clients are completely comfortable if you are using this option and that you have been making transactions for a while.

The buyers can lose the protection of their payments if they will send money using this option of friend and family, so using this trick to avoid PayPal fees can be a hard task if the client is new. However, you can split the 2.9% fee with the client to convince him to use PayPal friends and family feature.

Method 3: Claim PayPal Fees on your Tax Return:

If you are paying PayPal fees as a business holder, you can claim the fees in the tax return, it is because they are the inevitable cost of your business dealings.

All you have to do is to maintain the document of your amounts you pay in PayPal fees throughout the whole year, it can take a while if you process a plenty of transactions using this payment method.

Method 4: Plan your Cash Flow Needs in Advance

You can withdraw your payment or PayPal funds to your linked bank account without paying any fees. However, if you try to make an instant transfer, you need to pay 1% of the total transaction up to $10.

One of the easiest and simplest ways to avoid PayPal fees is to have patient, plan your cash flow needs in advance. Avoid using instant transfer option to withdraw money to your bank account (it means use the normal withdrawal method).

Method 5: Open a New Bank Account (Especially if you’re Canadian):

The main way I paid PayPal fees when I moved US dollars from PayPal account to the linked bank account (Canadian).

Making money online or freelancing can be an international matter, you are more likely to deal with a currency that is not your native currency. Eventually, you have to go through this if you work online.

If you are from outside of US, this tip will be a helpful way to avoid PayPal fees (since the great deal of online transactions use US dollars).

There are a number of zero-fee or low fee bank account options available for Canadians looking to open a new US bank account, so my friend tried to open a new account so he can connect PayPal account to the bank that can handle US dollars transactions because he was getting paid in USD.

If you get paid in a lot of US dollars for your job, I highly suggest to open a US bank account if you want to avoid paying PayPal fees on currency conversions.

Method 6: Plan Ahead with Pricing:

If you are getting paid through PayPal payments for most of the online work, you should consider determining your pricing, how you price the services you provide.

Just calculate the PayPal fees in the back of your mind when setting the pricing features.

This is especially helpful when you are going to begin flipping items on Ebay, it means you need to consider how to avoid PayPal fees on eBay and PayPal in your margin calculations.

Method 7: Ask To Be Paid In A Specific Currency

The first way to avoid paying PayPal fee on foreign currency conversions to simply state in the offer that you need to get paid in the native currency.

For example, if you hire a freelancer for search engine optimization or web development, they will request the money in USD. It is quite common.

Method 8: Apply For Micropayments

If you are receiving payments frequently for less than $10 on PayPal, it is a sane thing to sign up for a micropayment model of PayPal. It will not fully avoid PayPal fees but it will save some.

It is an ideal choice for merchants performing a serious amount of low cost transactions. As a merchant, you need to pay 5% fee on the transactions for United States customers and 6.5% for international consumers.

You need to apply for this option, and while applying for it, your PayPal account should be in good standing. However, paying a micropayment fee makes more sense as compared with 2.9% + $0.30 for each transaction on every deal.

Method 9: Use Harvest & PayPal Business Payments

If you are dealing with invoices on a frequent basis whether you are a freelancer or business owner, the use of Harvest enables you to organize your payments with fewer PayPal fees.

In addition, it also allows you to invoice clients with ease, track ongoing projects, manage the expenses and save money too. It is very easy task to integrated it to PayPal and manage your outgoing and incoming invoices, the process can also save you money.

Setting up the PayPal business payments using Harvest, you will be charged a fixed fee of $0.50 per transaction instead of the regular percentage base fee. It is a good deal not only for freelancers but also for businesses. It is because it keeps more money in your pocket not in PayPal.

Harvest offers 30 day free trial and the free version also supports up to 2 projects for free of cost. The paid version of Harvest gives access for unlimited users and projects, it costs $10.80 when billed annually (otherwise it costs $12 monthly).

If you are looking for trick to avoid PayPal fees, making business payments with the help of invoicing software Harvest is the easy way to proceed.

Method 10: Use PayPal Alternatives

There are a number of payment methods available besides PayPal, you can also use them if they fulfill your requirements.

Some useful alternatives to PayPal are:

Payoneer: It is a helpful alternative, it offers a Payoneer debit card, you need to pay annual fee and fees on withdrawal to another bank account.

Wire Transfer: It is an ideal choice to send international transfers in multiple currencies (using bank transfer).

Stripe: It is another site like PayPal to consider and you need to open an account to use it. People like it and it can be helpful to withdraw your money from Medium. It has the ability to deposit money automatically to your bank account and the fees are similar to PayPal method.

Dwolla: It charges a $0.25 transaction fee on any amount that is over $10, but making bank transfer is an easy and simple task with this option. It is functional in US only and both the receiver and the sender need to have Dwolla for transactions.

Skrill: It is like PayPal, except it can transfer money incredibly quickly to the debit card offered by Skrill.

4 Ways to Avoid PayPal Fees for Receiving Money

People also want to avoid PayPal fees when receiving money and PayPal also charges fees to receive payments.

Even housing retailers that accept credit cards have to pay a percentage to American express, mastercard, each time a consumer uses one of the cards. If you are a freelancer or entrepreneur, you cannot bear the fees on your income, it can be a major hit.

Luckily, there are several ways to avoid or cut down PayPal fees. Here are some of the methods to know why should you use them and why shouldn’t.

Tip 1: List PayPal Fees as a Billable Expense

The legit way to get rid of PayPal fees for receiving money is to pass them as a billable expense.

Whether you are a freelancer or a small business owner, billable expenses are costs contractually pass on to the client, the fee is included in the final invoice. It means the client will pay the transaction fee instead of you.

Tip 2: Receive Fewer Payments

This trick is also effective but only to an extent, by receiving fewer payments, you can avoid the fixed PayPal fees every time. If you want to save every cent, this tip will enable you to avoid some of the PayPal fees.

Tip 3: Request Clients to Pay as a Friend and Family

In this method, you will know how to avoid PayPal fees using friends and family. This method is allows you to pay zero fees with PayPal, it is useful for freelancers and small business owners.

Note: You can use this method for some transactions, if you try to use it for every transaction, PayPal may catch you and it is likely to terminate your account.

Tip 4: Use PayPal Fees as a Business Expense

As we have already given the tip that you can pass on the fees to the clients as a billable expense, but you can also use PayPal fees as a business expense on your tax sheet.

Conclusion

In the end, losing 100-200$ a year on PayPal fees may not seem the end of the world as long as your business is profitable and you are earning a good amount of money.

But why give away these dollars too?

I think after going through this post you have learned how to avoid PayPal fees when sending money or when receiving money. You can save thousands of dollars with our tricks to avoid PayPal fees and you can invest them into your business or invest it somewhere else or you can grow the savings.

None of these strategies are difficult to implement but we did our best to provide you the best ways to get rid of PayPal fees or cut off some.

Am I missing anything? Feel free to share it in the comment section.

That’s it for this post, share it with other PayPal users so they can also learn about it.

Related Posts:

Free PayPal Accounts

Arsalan Rauf
Arsalan Rauf

Arsalan Rauf is an entrepreneur, freelancer, creative writer, and also a fountainhead of Green Hat Expert. Additionally, he is also an eminent researcher of Blogging, SEO, Internet Marketing, Social Media, premium accounts, codes, links, tips and tricks, etc.
www.greenhatexpert.com

Filed Under: Guide

Entropay Review And Guide To Create Free Virtual Credit Card (VCC)

Last Updated on June 1, 2018 By Arsalan Rauf

Entropay Review And Guide To Create Free Virtual Credit Card (VCC)

What is a VCC?

VCC is an abbreviation of Virtual credit card that works as a tool to make online payment or transactions. Currently, VCC is used for verification such as Google play developer account purchase, PayPal, applications, VPS, web hosting, purchase games and online shopping alternative for those who cannot make a transaction from local bank account.

Apart from the pros of VCC, it can protect the major credit card while making transactions online. It is because the owner of the credit card does not give the actual credit card information. The purpose of doing that is to protect your credit card from misuse or undesirable use of credit cards.

Vcc can be used as an alternative if you do not have a credit card to buy or make transactions online.

There are a number of free internet virtual credit card providers and Neteller and Entropay are two of them. In this post, I shall discuss making VCC at Entropay.

Also Read:

  • Best Free Virtual Credit Card (VCC) Provider For Verifying Sites
  • How To Get 100% Free Working Virtual Credit Card

Entropay Guide To Create and Charge Virtual Credit Card (VCC):

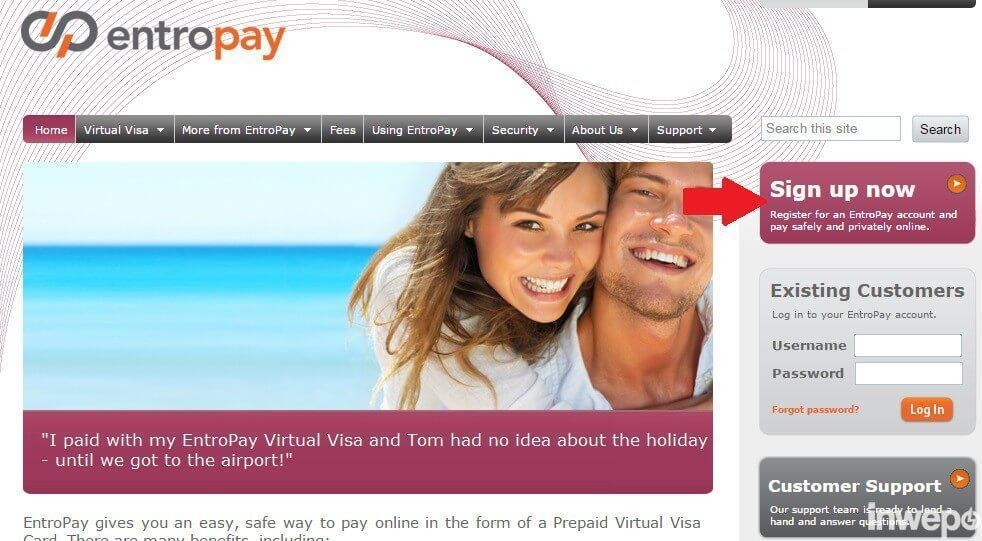
  1. Open the site Entropay.com

entropay website

  1. Click the  Sign up now button.
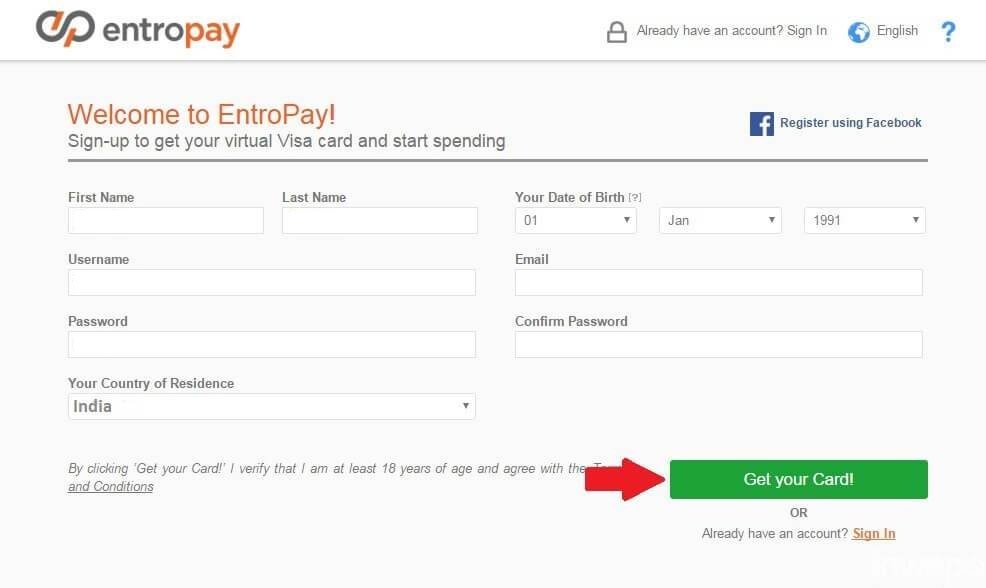
  2. Enter your name, date of birth, country name, email and create a username and password to login. After putting every information in the fields now click  Get your card.

sign up for entropay


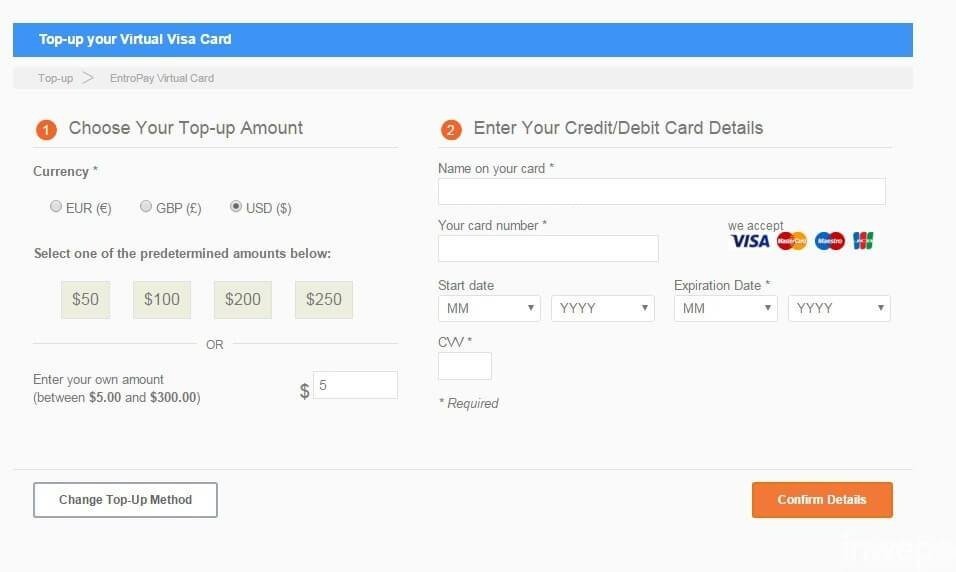
  1. Enter a standalone debit card information, or other with Visa / MasterCard and already has a token to be able to make transactions online.
  2. Change the “Choose Your Top-up Amount”became the currency of $ dollar. Then fill in the $ 5 as a minimum must be charged $ 5. The goal is to fill the balance of the initial virtual credit card for you.

choose your top up account

* Here use your debit card that already has a token. If you do not have the token please sign up first independent internet banking and SMS banking in the nearest bank and do not forget to register your phone number at the ATM.

  1. If everything is in the fields and click on the confirm detail to perform a top-up. Wait for the process will be directed to the independent web and make sure the phone and your number are active already registered for SMS banking.
  2. In mobile phoneyou will be getting a verification code to confirm the VCC charging.
  3. Enter the code sent to the phonethen press ok.

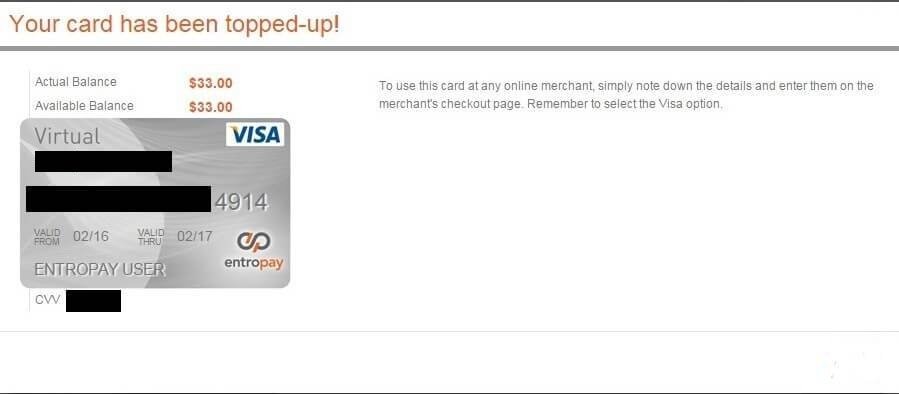
entropay topup card

  1. If the transaction is successful then you will get the information of virtual credit card or VCC that has been in the top-up. Congratulations!

Now you are good to go.

Do not forget to share this post.

Arsalan Rauf
Arsalan Rauf

Arsalan Rauf is an entrepreneur, freelancer, creative writer, and also a fountainhead of Green Hat Expert. Additionally, he is also an eminent researcher of Blogging, SEO, Internet Marketing, Social Media, premium accounts, codes, links, tips and tricks, etc.

www.greenhatexpert.com

Filed Under: Guide Tagged With: entropay alternative, entropay fees, entropay paypal, entropay review, entropay to paytm, how does entropay work, how to use entropay, is entropay safe

How to Fix ERR_CONNECTION_REFUSED Error In Google Chrome Browser

Last Updated on May 31, 2018 By Arsalan Rauf

How to Fix ERR_CONNECTION_REFUSED Error In Google Chrome Browser

Google Chrome is a one of the famous online browsers on the web which sometimes gets problems in internet connection. It will show you ERR_CONNECTION_REFUSED Error on your Computer, Mac, or Android. At times, this error comes when you open certain websites or maybe at times it shows on every website that you have been trying to visit.

Like I said the problem is about Google Chrome and if you will use this browser on any operating system including Android, Windows, PC, Mac or Linux. It will be an easy task that you suffer from these problems every time you connect to the internet using this web browser.

Also Read:

  • Best VPN Extension for Chrome
  • Best Site to Download free PC games
  • How to Disable UC browser notifications

In this post, I have written about all the operating system including Windows, PC, Mac, Android and so on. So choose your OS and follow the steps to fix ERR_CONNECTION_REFUSED Error in Google Chrome.

Fix ERR_CONNECTION_REFUSED Error In Google Chrome Browser

At times, this problem comes forward due to the cache of the browser and history and you can resolve it with ease.

  1. a) In your PC or laptop, open Google Chrome browser.
  2. b) On the right side, click Menu.
  3. c) After that select “Preferences” and on the options click “Show advanced settings”.
  4. d) In “Cookies”, click “All cookies together with website data”.

1. Flushing DNS Settings

Usually, the DNS system of the customer will store IP cache addresses or other types of DNS material automatically. In order to speed up the following requests for the same hostname and since some corrupt cache stored may enable this problem to occur on your computer.

To fix this issue, you should clear the cache in protected cache storage to allows your system to communicate with the hostname in a correct way.

It is possible ??

The DNS cache protected computer has been damaged and also need to be fixed. you should flush all DNS cache from the PC as well as the size specified below can allow you to take the second action.

How to Flush DNS on Windows

This process is ideal for all versions of Windows:

  1. a) First of all, open “Run Command” on your windows by pressing Windows Key + R key right at the same time.
  2. b) Type “cmd” in the search box that will open the Windows Command Prompt.
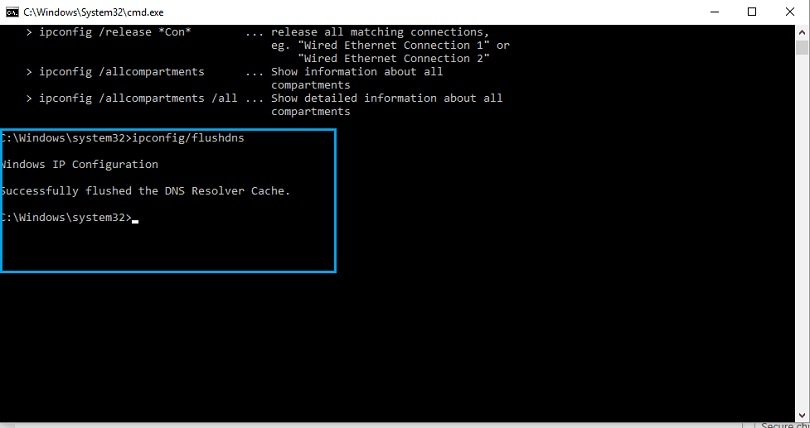
  3. c) Now type this command

“ipconfig/flushdns”

and then hit “Enter”, it will flush all DNS cache from your computer.

Flushed dns

  1. d) After doing so, restart your PC will analyze, if the problem persists try to retry you open cmd, try the 2nd Command below.
  2. e) Second command: “netsh winsock reset catalog” (only try when previously never worked).

2.  Use Chrome Cleanup-Tool

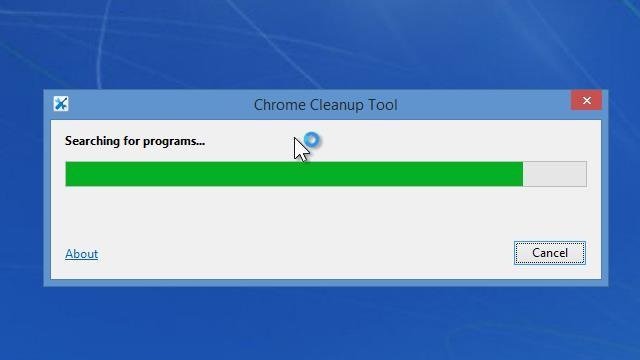
Chrome Cleanup Tool

In 2014, Google came up with a beta edition of Chrome cleanup tool that helps you to scan your computer and remove apps that are causing problems in Chrome.

Even it is in beta version, but it is functional on any computer or PC, and it will resolve your ERR_CONNECTION_REFUSED Error problem.

So you need to download this clean up tool as I am providing you the link below. It will enable you to fix this problem.

Chrome Cleanup-Tool

3.  Disable Firewall

In some cases, the firewall restricts links online and prohibits computers to get the worldwide web. If you will disable it then it may work.

This disable firewall process is only valid for windows, but not for Mac or Linux since only windows has this firewall problem.

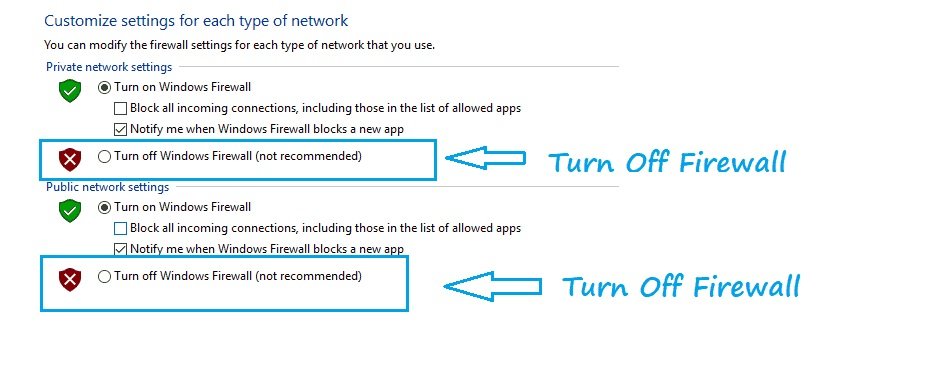
  1. a) To disable the firewall in Windows you need to visit your Windows control panel and select the “Windows Firewall” option in it; you can even search from the search box by typing ‘Firewall’ in it.
  2. b) In your windows firewall settings, Check “Turn off Windows Firewall or disable” option from the left side panel. Administrator approval is needed, If you are asked for administrator password or type password or supply verification.

turn off firewall

  1. c) Click “Turn off Windows Firewall” option under network location, and it will stop your protection, then click “OK” to save the settings.

4. Clear All Google Chrome Cache & Cookies

It is another simple step to fix ERR_CONNECTION_REFUSED Error code and you may already know that how to clear all the cookies and cache of chrome. You can follow the same method to clear the cache and history as you use for your own browser. So you need to follow these steps to clear all the cookies and cache of your Chrome browser. I hope that it will fix your issue.

  • First of all, Go to Settings (http://chrome://settings/)of your Google Chrome browser
  • Then using Search bar find “history” and click on “Clear browsing data” option to clear it.

Keyboard Shortcut: Ctrl+Shift+Del

5. Try out This Commands If You Face The Issues Still:

a, Open CMD or command prompt.

b,  Run below commands.

  • ipconfig/release
  • ipconfig/renew
  • netsh int ip set dns
  • ipconfig/flushdns
  • netsh winsock reset
  • ipconfig/all

So these are the methods to follow to fix Err_Connection_Refused Error in Chrome. If you have any more ideas to share then kindly share in the comment section.

Do not forget to share this post.

Arsalan Rauf
Arsalan Rauf

Arsalan Rauf is an entrepreneur, freelancer, creative writer, and also a fountainhead of Green Hat Expert. Additionally, he is also an eminent researcher of Blogging, SEO, Internet Marketing, Social Media, premium accounts, codes, links, tips and tricks, etc.

www.greenhatexpert.com

Filed Under: Guide Tagged With: err_connection_refused android, err_connection_refused mac, error connection refused android, error connection refused mac, localhost refused to connect chrome, refused to connect chrome, this site cannot be reached refused to connect, www.youtube.com refused to connect

What is an XML Sitemap? How to Create a Sitemap in WordPress?

Last Updated on May 8, 2018 By Arsalan Rauf

What is an XML Sitemap? How to Create a Sitemap in WordPress?

In 2000s, Government websites used to have sitemap page on the main page. It contained a list of all the pages available on the site. In this age, even some sites have HTML sitemaps of that kind. Now sitemaps have evolved from manually created HTML bulleted list. Today sitemaps are available in XML instead of HTML and their target audience is not people but search engines.

People also ask:

What is a WordPress sitemap?

Do I need to have a sitemap on my website?

How to create a sitemap in WordPress or how can I create a sitemap in my site?

If you are finding the answers to these questions, you are at the right place.

In this post, I shall explain what is sitemap? Why do you need a sitemap? How to create a sitemap in WordPress? How to tell search engines about your sitemaps?

What is a WordPress XML Sitemap?

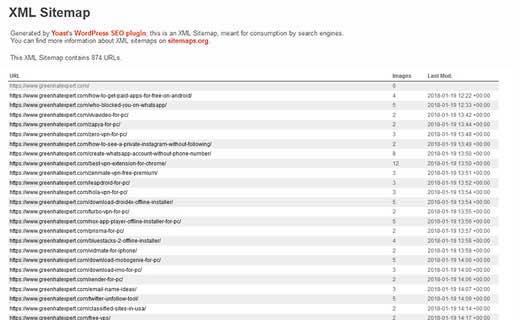
It is a list of pages on a site which can accessible by all users. An XML sitemap is a way of telling search engines about all the pages available on your website. WordPress XML sitemap also informs search engines that which links are important than others and how frequently you update your site as well. sitemaps enable search engines to crawl your site in a better way and it does not boost your search rankings.

greenhatexpert sitemap

Why You Need an XML Sitemap

From SEO or Search engine optimization point of view, XML sitemap is a part and parcel. First of all, you need to know it does not affect your search rankings. However, if your website has a page which is not indexed yet, sitemap will give a way to allow search engine to know about that page, then search engines will index it in a proper way.

Sitemaps are very helpful for new blogs and websites. It is because most of the new blogs generally do not get enough backlinks to their individual posts so it is difficult for search engines to know about their pages and posts. Sitemaps enable those sites to help search engines to crawl their websites in an efficient way.

For famous websites, sitemap enables your site to interact with search engines in more effective way. Search engines will guess how often you update your website, which parts of your site are updated on daily basis as compared to others. Then search engine will set a crawl rate for your website. It will improve the visibility of your website to search engines.

How to create a Sitemap in WordPress?

There are different ways to create an XML sitemap for your WordPress site. At Greenhatexpert, I use WordPress SEO plugin by Yoast to generate our sitemaps. In addition, it also allows you to optimize your blog posts and pages with different features including social integration, sitemaps and so on. I have noticed that it is efficient as compared to other standalone sitemap generators for WordPress site. In addition, it also offers custom sitemaps such as Video sitemap.

To add a sitemap to your site, first of all, you need to install and activate WordPress SEO by Yoast. WordPress does not allow XML sitemap functionality by default. So you need to turn it on by yourself.

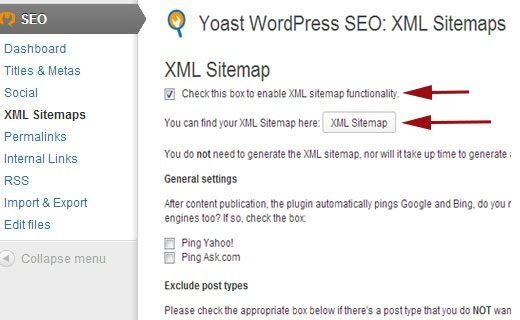
To perform this task go to SEO>XML Sitemaps and check the box to make the XML sitemap functional.

enable sitemaps wp seo

When you will check the box to enable the function of sitemap, WordPress seo will display a plenty of options that will help you to configure your sitemaps. If you are not aware of their functions then ignore them and click on save settings to save it.

Now you have generated XML sitemap and it is accessible publicly. WordPress SEO will show a XML sitemap button which you can use to see your sitemap_index.xml sitemap.

How to Tell Search Engines About Sitemaps?

Search engines are at home in finding a sitemap. Whenever you publish a post or page, a ping reaches Google and Bing to let them know about changes in your sitemap. However, I suggest that you submit your sitemap to Google by using Google webmaster tools. The advantage of doing it is that Google will display the errors, pages indexed and other relevant stats and it will be beneficial for you as a webmaster.

Visit Google webmaster tools. If you are not already log in to your Gmail account, then you need to sign in. After logging in, you will reach webmaster tools. There you can see ‘ Add a property’ button, click it and then add the URL of your site.

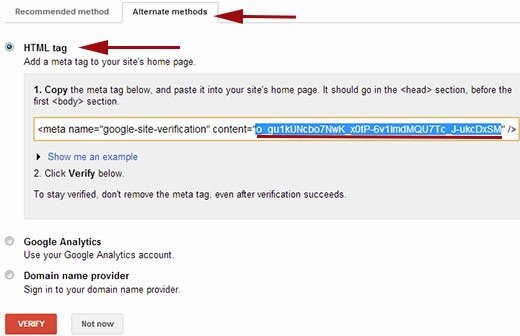
Then you need to verify your ownership of your site which you want to add. There are many ways to do it. But if you are already using WordPress SEO plugin, so you copy the HTML meta tag value and paste it in WordPress SEO plugin because it is the easiest way for you.

To do that, click on Alternate methods and then on HTML tag. You will see a line of HTML meta tag code there.

verify ownership2

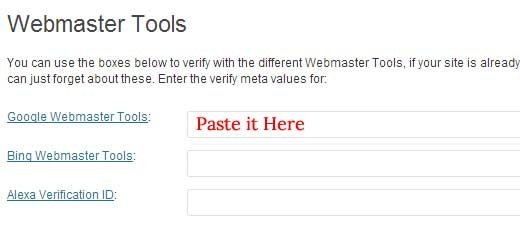
Copy and paste this line in a text editor like word or notepad. Now copy the value inside the content=””. Now leave the verification page of webmaster tools site open because you need to revisit it after adding the meta tag to verify the ownership of the site. Go to the admin area of your WordPress and then click on SEO tab. It will take you to the dashboard of WordPress SEO plugin. Scroll down to see webmaster tools heading. Paste the meta tag value you copied from Google webmaster tools and save the settings.

wp seo webmaster tools

Go back to Google webmaster tools and here you will have to press the verify button. You will see a notification like ‘ Congratulations you have successfully verified your ownership of ‘www.greenhatexpert.com’. click continue to see webmaster tools dashboard for your website.

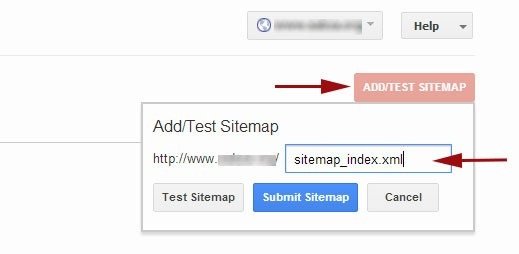
On the next screen, you will see sitemaps column and there will be no sitemap. When you will click on it, it will take you to sitemaps page where you will be able to add your sitemaps. Click the red button ‘Add/Test Sitemap’ and give the URL of your sitemap.

submit sitemap google

WordPress SEO plugin by Yoast publishes a number of sitemaps for your WordPress website. the main sitemap is sitemap_index.xml which has link to your other sitemaps. You can submit it (sitemap_index.xml) alone or submit all other sitemaps one by one. I suggest submitting sitemap_index.xml alone, Google will take care of the rest of the sitemaps and will crawl them automatically.

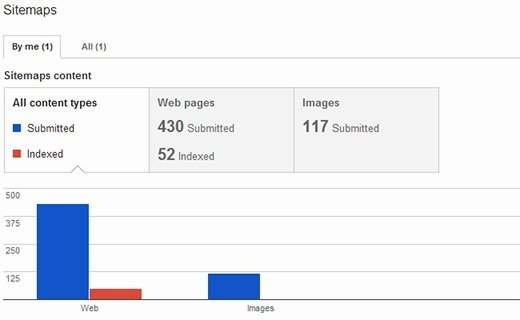
After the installation of your sitemap, it will be shown as pending. Google will take some time to crawl your site. After some time, you can see some stats about your sitemap. It will display a number of links that available in sitemap. It will also show a ratio of index and ratio of images and web pages like how many of them got indexed etc.

sitemap stats

So visit Google webmaster tools often, at least once in a month. When your website becomes old, you will see more and more stats of your site. In addition, how search engine sees it. It will allow you to learn how well your site is performing in search engine. And how can you improve it?

I hope that you liked this post. I hope that I have answered your questions about XML sitemap. What is XML sitemap and its benefits, how to create one etc. Still have questions?

Do not hesitate to ask them.

Do not forget to share this post.

Arsalan Rauf
Arsalan Rauf

Arsalan Rauf is an entrepreneur, freelancer, creative writer, and also a fountainhead of Green Hat Expert. Additionally, he is also an eminent researcher of Blogging, SEO, Internet Marketing, Social Media, premium accounts, codes, links, tips and tricks, etc.
www.greenhatexpert.com

Filed Under: Guide, SEO Tagged With: best sitemap generator, google xml sitemap, html sitemap generator, sitemap google, what is xml sitemap in seo, xml sitemap drupal, xml sitemap example, xml sitemap wordpress

How to Set Custom Avatars for Users in WordPress (Gravatar Alternative)

Last Updated on May 2, 2018 By Arsalan Rauf

Have you ever tried to set custom avatars for those users who leave comments without using Gravatar?

Do you want to set custom avatars for them?

Do you want to get rid of gravatar to speed your page load time?

In this post, I shall show you an alternative to gravatar. It will allow you to use the first letter in the name of the user as their avatar for WordPress comments.

first letter avatars

First of all, you need to install and activate the WP First Letter Avatarplugin.

After activation, you need to go to Settings>WP First Letter Avatar to configure the settings of the plugin.

first letter avatar settings

On the settings page of the plugin, you can select a set of icons. Currently, it only has a default set of icons which is already selected.

If you want to replace Gravatar on your website completely then you need to uncheck the box of ‘Use Gravatar’. After doing so, click the save changes button to store your settings.

Now go to your site to see this plugin in action.

If you chose to use Gravatar then it will display first letter avatars for those users who do not have gravatar image associated with their email address. If you selected to replace gravatar, then this plugin will display the first in the name of user as his avatar.

In the Gmail app, Google shows the first letter of the name of the sender if the contact does not have a photo. So it is an ideal way of following that trend.

I hope that you liked this post and it will allow you to set custom avatars for users in WordPress. It is also Gravatar alternative.

Do not forget to share this post.

Arsalan Rauf
Arsalan Rauf

Arsalan Rauf is an entrepreneur, freelancer, creative writer, and also a fountainhead of Green Hat Expert. Additionally, he is also an eminent researcher of Blogging, SEO, Internet Marketing, Social Media, premium accounts, codes, links, tips and tricks, etc.
www.greenhatexpert.com

Filed Under: Blogging, Guide, WordPress

How to Fix Add Media Button Not Working in WordPress

Last Updated on May 2, 2018 By Arsalan Rauf

Recently I have found this issue that ‘Add Media’ button on my WordPress site suddenly stopped working. This problem does not show any warning or error that leaves the user in dark about why their ‘Add Media’ button is not working. In this post, I shall show you how to easily fix the ‘Add Media’ button not working issue in WordPress site.

What causes the WordPress ‘Add Media’ Button to Stop Working?

Usually, this problem occurs due to conflicting scripts or stylesheets loaded by WordPress themes or plugins installed on your website. The default behavior of WordPress site is to load all needed stylesheets and scripts by combining the requests.

It is usually done in the admin area of WordPress to improve the speed and performance of website.

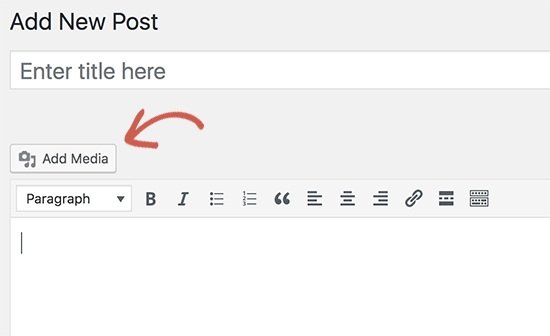
The post editor of WordPress uses JavaScript for all buttons available on the screen including Add Media button. A conflict can stop JavaScript from working and it will disable “Add Media” button.

add media button

After this discussion, let’s see how to troubleshoot and fix the Add Media button not working problem in WordPress.

Fixing Add Media Button Not Working Issue in WordPress

Add the following code to your wp-config.php file to fix it quickly. You need to edit wp-config.php file to add this code just before the line that says. That is it, stop editing and enjoy blogging.

1
define('CONCATENATE_SCRIPTS', false );

This code will allow WordPress to load each script separately that helps the JavaScript to avoid conflict with other scripts and the core WordPress features.

After doing it, go to the post edit screen to observe if the media button is working as expected or not.

Note: Adding this code is not a proper long-term solution because you still have a script that is causing the issue. Using the inspect tool is an easier way to find the source of the problem. It will display you console errors that can lead you to the source of the conflict or problem.

Do not forget to see our guide on Best Managed WordPress hosting.

I also suggest that you do this on your staging site instead of a live website.

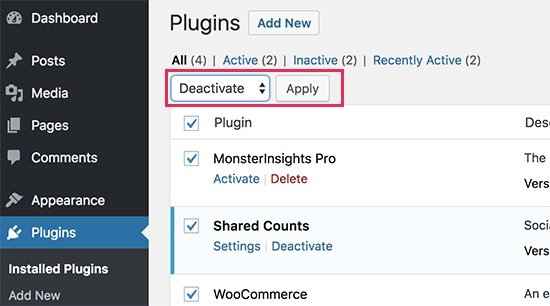
You need to begin with deactivating of all your WordPress plugins and then check whether the Add Media button is functional or not. If it does, then this shows that one of your plugins was creating the problem.

deactivate all plugins

Now activate the plugins one by one, after the activation of plugin, check the Add Media button. It will help you to find out which plugin is causing the problem. After finding the plugin that is causing issues, replace it with another plugin or ask the plugin author for help.

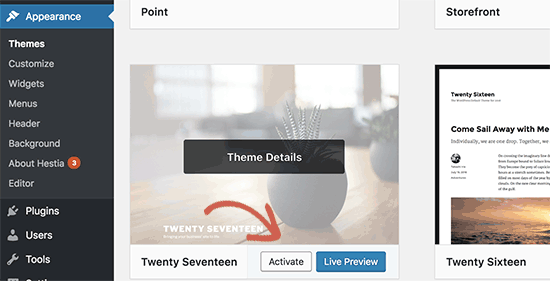
If the deactivation of plugins does not solve the issue, then the next step is to switch to the default WordPress theme like twenty seventeen.

switch default theme

After switching to the default theme solves the issue for you, it means that your theme was causing the conflict. You can ask theme author for support or switch to another WordPress theme.

After finding the source of the problem on your staging site, you can apply the fix on your live WordPress website too.

I hope that you liked the article and it helped you to learn how to fix Add Media button not working in WordPress.

Arsalan Rauf
Arsalan Rauf

Arsalan Rauf is an entrepreneur, freelancer, creative writer, and also a fountainhead of Green Hat Expert. Additionally, he is also an eminent researcher of Blogging, SEO, Internet Marketing, Social Media, premium accounts, codes, links, tips and tricks, etc.
www.greenhatexpert.com

Filed Under: Blogging, Guide Tagged With: add media not working wordpress, can t add media to wordpress, cannot add images to wordpress, no add media button on twitter, wordpress 4.8 add media not working, wordpress 4.9 add media not working, wordpress add media does not insert into post, wordpress buttons not working

How to Install and Setup WP Super Cache for Beginners

Last Updated on April 29, 2018 By Arsalan Rauf

Now Google and its search engine are considering the site speed as a ranking factor. So I have written this post for our users to improve their site speed to an optimum level. By doing that, you will find out that your site has improved the site speed and got a huge spikes in traffic. I use W3 Total Cache plugin to improve the performance of my website. There are several people who also ask for how to install and setup WP Super cache. That is why in this post, I shall show you how to install and setup WP Super Cache with ease.

Note: Both WP Super Cache and W3 Total Cache are great plugins. I highly suggest that you use one or the other depends on your needs.

First of all, you have to install and activate WP Super Cache plugin (tutorial: how to install a WordPress plugin).

After activation, WP Super Cache will inform you that caching is not enabled on your site right now.

Setting up WP Super Cache – The Easy Way

To enable cache, go to Settings > WP Super Cache.

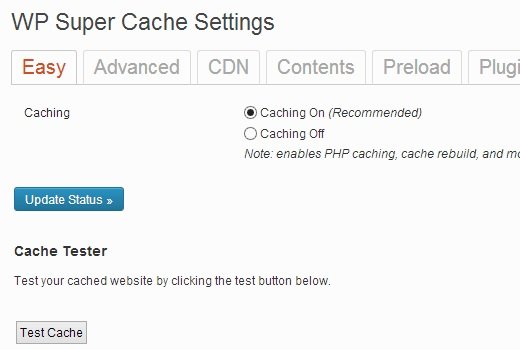
Under the easy tab, you need to turn cache on and press update status button.

wp super cache

After turning on the cache, you need to click the test cache button to check whether it is working or not. WP Super Cache plugin will fetch your WordPress website twice and will compare the time stamps of both pages. If the both times tamps are matching, it means that cache is working on your website now.

WP Super Cache Advanced Set up

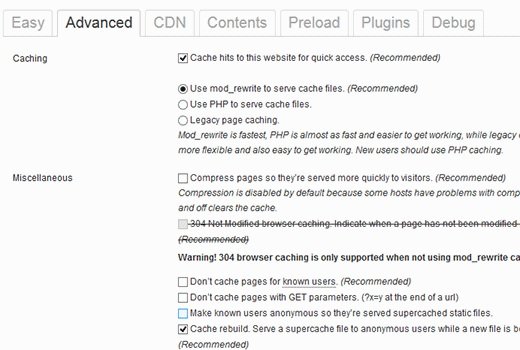
WP super cache is a powerful tool and plugin, it also has advance options. These options have the ability to improve the performance of your site. To set the advance options of WP super cache, visit Settings>WP Super Cache and click on advanced tab.

wp super cache advance

Enable Caching

first of all, check the box that says Cache hits to this website for quick access. Below you will see three more caching options. WP Super Cache uses PHP to serve cache files by default. However, it can be resources intensive on shared hosting if using PHP to serve cache files.

So I would like to suggest that you try using mod-rewrite to serve cache files. Now scroll down and press the update status button to save the settings.

WP Super Cache will show you a notification that mod_rewrite rules must be updated and another notification about scheduling garbage collection.

Scroll down the page to see mod_rewrite rules that need to be added. Click on update Mod_Rewrite rules button to update the rules.

After updating the Mod_Rewrite rules section, you will see that section has turned green.

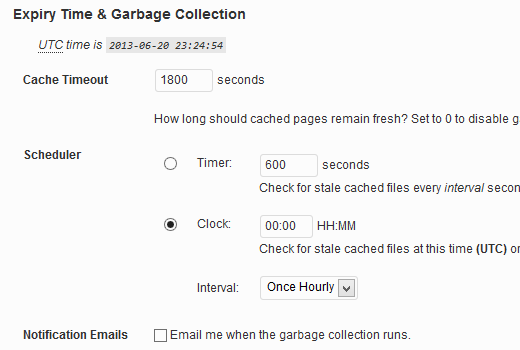
To get rid of the notification about garbage collection, scroll down on the advance settings page to the ExpiryTime & Garbage collection section and set up a frequency and time for garbage collection of cached files on your server.

wp super cache garbage

Enable Compression in WP Super Cache:

Compression enables WP Super Cache plugin to serve cached files as compressed files. The files are downloaded by the user browsers quickly because they have the smaller size.

Simply check the box that says Compress page so they’re served more quickly to visitor to enable the compression.

Setting up CDN with WP Super Cache

Most content sites serve a lot of static files with each page request. These files are images, stylesheets and JavaScripts etc. unlike your WordPress posts which are generated by PHP, these files can be served by a CDN or Content Delivery Network. If you do not have any idea what is a CDN and why you need a CDN, then you should read our post about What is CDN and why do you need one.

If you need a tutorial on how to install and setup MaxCDN for WordPress then we have one.

The tutorial uses W3 Total Cache but the basic concept is the same.

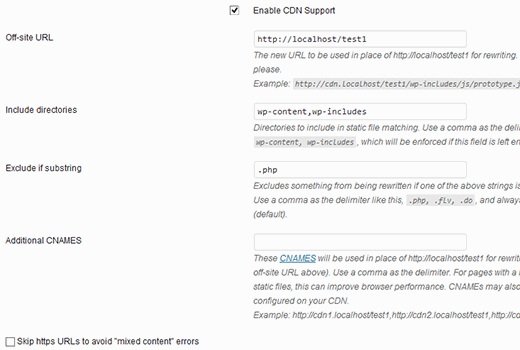
To setup CDN using WP Super Cache, you need to click on the CDN tab and check the box next to Enable CDN support option.

Enter the offsite URL that will be the URL of your pullzone, for example, https://cdn.greenhatexpert.com

wp super cache max cdn

In the additional CNAMEs field, enter other CNAMEs that you created for pullzone.

For example, https://cdn1.greenhatexpert.com, https://cdn2.greenhatexpert.com, https://cdn3.greenhatexpert.com.

Lastly, check the box that says Skip https URLs to avoid ‘mixed content’ errors and save the changes. Now your site is ready to serve static content using a CDN.

Serve a Static Site with WP Super Cache

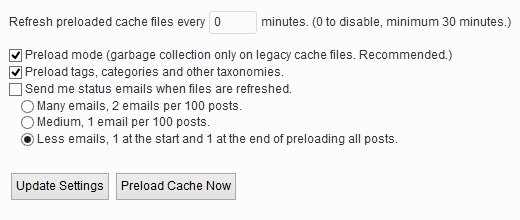
WP Super Cache has a preload mode to create super cache static files for all your pages and posts and serve a static site. You may ask why would anyone want to do that?

To conserve server resources.
To serve an old site that is not being updated anymore.
To improve the speed of site by serving static content only.

These are the few reasons but there can be several reasons and situations where you may want to entirely disable PHP processes.

Do not worry your WordPress will work in a normal way, you can still be able to manage your content on WordPress.

wp super cache preload

Refresh preload cache files options will be set to zero by default, minimum required time is at least thirty minutes. Pre-loading your full WordPress website takes some time and consumes a lot of resources on your server. You can leave it to zero (0) if you do not want your static files to expire ever until you manually refresh cache.

I hope that this post will help you to setup WP Super Cache on your WordPress blog.

For other feedback and questions, please leave it in the comment section.

Do not forget to share this post.

Arsalan Rauf
Arsalan Rauf

Arsalan Rauf is an entrepreneur, freelancer, creative writer, and also a fountainhead of Green Hat Expert. Additionally, he is also an eminent researcher of Blogging, SEO, Internet Marketing, Social Media, premium accounts, codes, links, tips and tricks, etc.
www.greenhatexpert.com

Filed Under: Blogging, Guide, WordPress

Best Shutterstock Images Downloader

Last Updated on April 29, 2023 By Arsalan Rauf

In this post of Green Hat Expert, we shall share with you the latest version of shutterstock images downloader.

Best Shutterstock Images Downloader

Shutterstock images downloader is an offline setup that is available for 32-bit and 64-bit Windows. It is a reliable source to download shutterstock images without watermark. shutterstock gives high quality and high-resolution images for everyone. Whether you are a blogger or any other website owner and you need a high-resolution image. You need to use the latest version of Shutterstock images downloader to get the stock images free of cost.

Though it is a premium image source and it has more than 30 billion images on the server. By using some tricks, you can download Shutterstock images downloader full version for PC.

Features of Shutterstock downloader for PC/Windows

  • It is a lightweight and simple application
  • Enable you to download images without watermark or remove shutterstock watermark
  • User interface is easy to understand
  • Instructions are also easy to understand
  • Just paste the URL and preview it before downloading
  • Download premium images of Shutterstock free
  • Auto download
  • No download issues
  • No bugs

Do not forget to share your ideas and thoughts in the comments section.

Also, read our related article about

  • How to Get Shutterstock images without Watermark

Do not forget to share and like our post.

Arsalan Rauf
Arsalan Rauf

Arsalan Rauf is an entrepreneur, freelancer, creative writer, and also a fountainhead of Green Hat Expert. Additionally, he is also an eminent researcher of Blogging, SEO, Internet Marketing, Social Media, premium accounts, codes, links, tips and tricks, etc.
www.greenhatexpert.com

Filed Under: Guide Tagged With: Best Shutterstock Images Downloader

  • « Previous Page
  • 1
  • …
  • 13
  • 14
  • 15
  • 16
  • Next Page »


Recent Posts

  • Free DeepSeek Accounts 2025
  • Free Zoho Mail Accounts 2025
  • Acudepot Discount Codes 2025
  • Free Blackshot Accounts 2025
  • Free GMX Email Accounts 2025
  • Songtrust Discount Codes 2025
  • Uzicases Discount Codes 2025
  • Cardillo Promo Codes 2025
  • Free DriverFix License Keys 2025
  • Avast Secureline VPN Activation Codes 2025

Recommended Posts

Create a Gmail Account Without Phone Number

Free Course Hero Account

Crunchyroll Accounts

Cracked Apps

Free Pokemon Go Accounts
Onlyfans Free Accounts
Free Chegg Accounts
Free Paypal Accounts
Free Gmail Accounts
Funny Steam Names

Categories

  • Apps
  • Apps for PC
  • Blogging
  • Discord
  • Facebook
  • Gaming
  • Grammar
  • Guide
  • How to
  • Instagram
  • Messaging
  • OnlyFans
  • Pinterest
  • Reddit
  • SEO
  • Snapchat
  • Social Media
  • Spotify
  • Steam
  • Telegram
  • TikTok
  • Twitch
  • Twitter
  • Whatsapp
  • WordPress
  • YouTube
  • Home
  • Social Media
  • Messaging
  • About
  • Submit Guest post