Green Hat Expert

  • Home
  • Social Media
    • Instagram
    • TikTok
    • Snapchat
    • Facebook
    • YouTube
    • Twitter
  • Messaging
    • Discord
    • Telegram
    • Whatsapp
  • About
  • Submit Guest post
You are here: Home / Archives for Blogging

How to Add Your WordPress Site to Google Webmaster Tools

Last Updated on August 21, 2022 By Arsalan Rauf

To add your WordPress site to Google Webmaster tools is an important step to optimize your site for search engines. Many people search for SEO Tips and how to increase organic search traffic on their sites. I will provide other tips with usage of Google webmaster tools. In this post, I shall show you how to add your WordPress site to Google Webmaster tools.

What is Google Webmaster Tools

Google Webmaster tools is a set of tools powered by Google in order to give an overview of your site. How people see your site and how search engines observe it. It gives data and reports which can help you to find out the pages which are appearing in the search engine or search results. It provides you the search queries and you will be able to get the keywords and search results. How people click it.

This data allows you to improve your older posts, create new content, and formulate a content strategy for your site. You can also submit XML sitemap of your site using Google websmaster tools. You can also help Google to display the most important content of your site. Google will also notify you if there is a problem with your site that stops Google from indexing and crawling your web pages.

How to Add your WordPress Site to Google Webmaster Tools

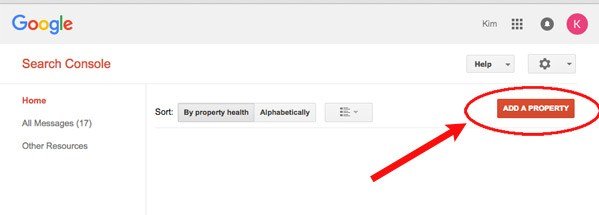
Go to Google Webmaster tools website and sign in with a Google account.

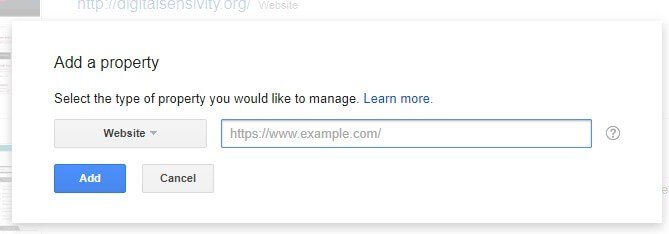
After signing in, you need to add the URL of your website and click the add a Property button.

add the URL of your website

Now enter your website url

Add a Property to google webmaster tools

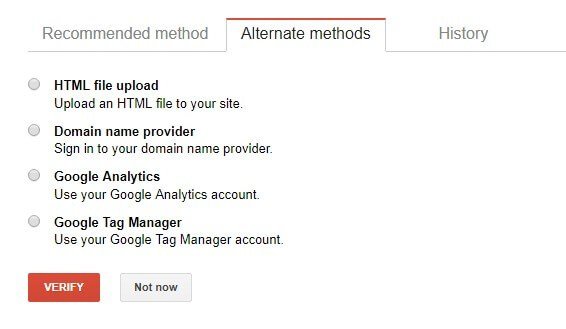
On the next screen, you will see the option to verify the ownership of the website that you are adding. You can upload an HTML file to the root directory of your site using FTP or click on alternate method to get a meta tag which you can paste to your WordPress website.

verify the ownership

In order to add meta tag with ease to your website, you need to install and activate Insert Headers and Footers plugin.

Copy the meta tag line given by webmaster tools which will look something like this:

<meta name=”google-site-verification” content=”VerificationKeyCode” />

Now go to Settings » Insert Headers and Footers and paste the meta tag line into the header field.

Now save the changes and go back to Google webmaster tools in order to Verify your site. Click on verify site button.

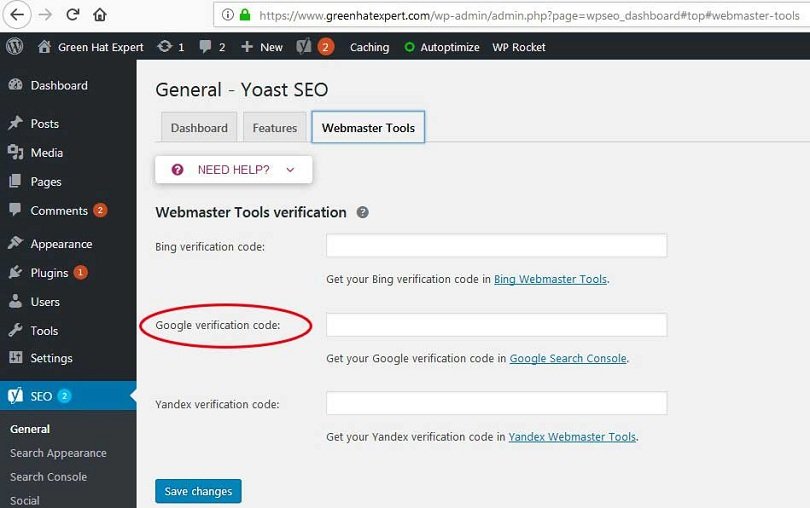
If you are using WordPress SEO plugin by Yoast, you can copy the verification key in content part of the meta tag and paste it in Yoast SEO plugin. Click on SEO option in your WordPress dashboard sidebar and scroll down to webmaster tools section to paste the unique key in the Google webmaster tools field.

Save the changes and go back to Google webmaster tools to verify your site.

Put verification key in yoast

After verifying your site, you will need to add your XML sitemap.

Don’t have a sitemap or don’t know what is sitemap?

Check our post about How to Create XML sitemaps in WordPress.

After adding the sitemap, it may take a while for Google to show your site data.

This is how you add your WordPress site to Google Webmaster tools.

Still have questions? Do not hesitate to ask them in the comment section.

Do not forget to share this post.

Arsalan Rauf
Arsalan Rauf

Arsalan Rauf is an entrepreneur, freelancer, creative writer, and also a fountainhead of Green Hat Expert. Additionally, he is also an eminent researcher of Blogging, SEO, Internet Marketing, Social Media, premium accounts, codes, links, tips and tricks, etc.

www.greenhatexpert.com

Filed Under: Blogging, How to, WordPress Tagged With: google disavow tool, google site verification, google site verification meta tag wordpress, google sitemap submit, how to upload google html verification file wordpress, how to upload html verification file to my website, submit url to google search engine, verify wordpress site with google, webmaster tools verification, website verification services wordpress

How to Add Google Maps in WordPress

Last Updated on August 21, 2022 By Arsalan Rauf

You can add all kind of content into your WordPress blog, site or website. At Green Hat Expert, I have shown you how to add audio files, videos, PDF and Spreadsheets in WordPress.

You can create highly useful and interactive content by adding content from external sources. In this post, I shall show you how to add Google Maps in WordPress.

Manually Adding a Google Map in WordPress

Go to Google Maps website, now search for a location that you want to add by typing its address. After finding the location, you need to click on the link button in the right hand panel. It will give you an embed code. Copy the iframe code or you can also click on ‘customize and preview the embedded map’ to customize the appearance of the map on your website.

google maps embed iframe

Now go to your WordPress site and paste the code in a page, post or a template. Now save the post/page in order to see the Google map live on your website.

Adding Google Maps in WordPress Using a Plugin

The first is method is good if you only want to show a single Google map to one location on your WordPress blog. If the map is a part and parcel of your site, and you need to add them frequently basis. Then you I will recommend use a plugin for this purpose.

First of all, you need to install and activate MapPress Easy Google Maps plugin. Edit a page/post where you want to add the map. Now scroll down to MapPress section on your page or post edit screen and press the New Map button.

mappress google maps plugin


It will open MapPress editor where you need to enter an address or click on MyLocation link to enable the plugin to detect your location automatically.

Choose the size of the map and give a title to your map. After doing all the work, click on the save button and click on insert into post button to add the map into your post. Publish or update your post and you can preview it.

By using MapPress, you can add many maps to a post or page. It will also add plugin settings menu in your WordPress admin sidebar and it also works out of the box. Change the plugin settings by clicking on it including map border, type, alignment and controls etc.

mappress settings

Adding Google Maps in a Widget and a Lightbox

Add Google maps to your WordPress with ease by installing Google Maps Widget plugin.

After activating the plugin, go to Appearance > Widgets and drag and drop Google Maps Widget to your sidebar.

google maps widget settings

Now enter the address that you want to display on the map in Widget settings. You can also select the size of the map, pin color and zoom level etc. configure the lightbox settings by clicking on the lightbox tab.

Lastly, click on the save button to save the widget settings.

Visit your website to see the widget in action.

google maps widget

I hope that you have learned how to add Google maps in your WordPress site.

Still have questions or problems?

Leave them in the comment section.

Do not forget to share this post.

Arsalan Rauf
Arsalan Rauf

Arsalan Rauf is an entrepreneur, freelancer, creative writer, and also a fountainhead of Green Hat Expert. Additionally, he is also an eminent researcher of Blogging, SEO, Internet Marketing, Social Media, premium accounts, codes, links, tips and tricks, etc.

www.greenhatexpert.com

Filed Under: Blogging, How to, WordPress Tagged With: Add Google Maps in WordPress, contact form with google map wordpress plugin, embed google map wordpress plugin, How to Add a Favicon to Your WordPress Blog, how to add google map api in wordpress, how to add google map in wordpress contact page, how to add google map in wordpress without plugin, how to use wp google maps, update google map wordpress, wordpress map plugin multiple locations

How to Add a Favicon to Your WordPress Blog

Last Updated on August 21, 2022 By Arsalan Rauf

Favicon is also known as site icon which is a tiny image which appears next to your site title in browser. It will help the users to identify your site. Most of the users will recognize your site with that tiny image. It will establish your brand among the users and you will be able to build trust among your users.

If you are not adding a favicon on your site, you are doing the most common WordPress mistake. In this post, I shall show you how to add a favicon to your WordPress site.

Why you should Add a Favicon to Your WordPress Site?

As I mentioned earlier that it builds your website’s identity.

In addition, it also improves the user experience and site’s usability. This image will help you to understand it in a better way:

favicons

Many users usually open multiple tabs in their browser. When the number of tabs increases, it hides the title of your website. If you will use a favicon, the user will easily identify your website and move quickly to the tab he wants.

Your site favicon or icon is also used when a visitor adds your website to his homescreen on a mobile device. You can also ask the users to add your site to their homescreen.

home screen site icon

How to Create a Favicon

You can use the logo of your brand as your favicon or site icon. The recommended size for your site icon image is at least 512 pixels in both height and width. The icon image of the site should be a square, you can also use a larger rectangular image and WordPress will enable you to crop the image when you will add it.

creating site icon wordpress

I suggest using an image editor or editing software like Gimp or Adobe Photoshop to create an icon of exact 512×512 pixels. That is the way to create maintain the proportions of your image. In addition, you can also fill the image with a background color or use transparent image of your choice. This image can be in JPEG, PNG or GIF format.

Adding Your Site Icon or Favicon in WordPress

After the launch of WordPress 4.3 version, you can add a favicon or site icon from WordPress dashboard.

You need to go to Appearance>Customize and click on the Site Identity tab.

site identity

In this site identity section, you can change the title, description and control whether you want to display it in the header or not.

It also enables you to upload the site icon of your site. Click on the select file button to upload the image that you want to use as favicon or icon.

adding site icon

If you are uploading an image that is exceeding recommended size, you can also crop it to use it. If your image is matching the suggested size, then save your changes.

After doing so, you can now preview your site to see your favicon.

Additionally, you can also visit your site on mobile phone and by using browser menu you can choose “add to homescreen”. You will see your site icon on the homescreen.

Adding Favicon to Older WordPress (4.2 or below)

If you are using older WordPress version 4.2 or below, you need to upload favicon to the root directory of your website using FTP. After that, you need to paste the code into the header of your theme in header.php file.

1
2
<link rel="icon" href="https://www.greenhatexpert.com/favicon.png" type="image/x-icon" />
<link rel="shortcut icon" href="https://www.greenhatexpert.com/favicon.png" type="image/x-icon" />

Replace Greenhatexpert.com with your site’s Url and you are done.

If your theme does not have a header.php file or you are unable to find it. Then do not worry, I have a plugin for you.

Install and activate Insert Headers and Footers plugin.

After activating the plugin go to Settings » Insert Headers and Footersand paste the code provided above in the header section and save your settings.

If you do not want to deal with FTP, then you have to use the plugin known as All in One Favicon.

I hope that you have learned that how to add favicon to your WordPress site.

Still having problems?

Leave your problems in the comment section.

Do not forget to share this post and like our Facebook page to get the latest updates.

Arsalan Rauf
Arsalan Rauf

Arsalan Rauf is an entrepreneur, freelancer, creative writer, and also a fountainhead of Green Hat Expert. Additionally, he is also an eminent researcher of Blogging, SEO, Internet Marketing, Social Media, premium accounts, codes, links, tips and tricks, etc.

www.greenhatexpert.com

Filed Under: Blogging, How to, WordPress Tagged With: create favicon, How to Add a Favicon to Your WordPress Blog, site icon wordpress, wordpress add favicon functions php, wordpress favicon change, wordpress favicon not showing, wordpress favicon plugin, wordpress favicon size, wordpress site icon not working

5 Best Related Posts Plugins for WordPress

Last Updated on August 21, 2022 By Arsalan Rauf

Are your readers or users leaving your website after reading one post?

This guide is for you. To reduce the bounce rate and increase the pageviews is a hard task for site owners.

If you show a user related content, it will be an effective way to get more pageviews. By using a plugin, you can show related posts on your WordPress site easily.

In this post, I am going to show you the best related posts plugins for WordPress.

5 Best Related Posts Plugins for WordPress

1. Yet Another Related Posts Plugin

yarpp

Yet Another Related Posts plugin is also known as YARPP is the most famous WordPress related posts plugin. It has more than 3.4 million downloads. It supports both text display of related posts and thumbnail.

Pros:

Yet Another Related Posts plugin has a built in algorithm to find related posts from the site. It consists of great template system, text display, allows for thumbnails, supports custom post types and RSS feed display.

Cons:

YARPP can be very resource intensive, if you are running a very large website. The pro or premium version of the plugin can solve the problem by doing heavy-lifting on YARPP’s own servers.

Yet Another Related Post Plugin is not compatible with WPML plugin. If you want to create a multi-lingual or multi language WordPress website, you should select Polylang.

Lastly, YARRP is blocked on Managed WordPress hosting providers such as WPEngine.

2. Contextual Related Posts

contextualrelatedposts

Contextual Related posts is another WordPress related post plugin that shows related posts. It drives contextually matching posts to the users. It shows related posts with text and thumbnails.

Pros:

It has a simpler settings page for text related posts and it works out of the box for this. This plugin uses images inside a post as thumbnail when there is not featured image and post thumbnail are present.

Cons:

This plugin does not consist of any template to show thumbnails. It shows thumbnail images in a bulleted list. The beginners cannot add a style to it, but expert users can add their own CSS to style it.

Like YARPP, Contextual related posts plugin cannot work well on larger sites. Managed WordPress Hosts like WPEngine has blocked this plugin for customers. It is because this plugin slow down the sites when they are larger.

3. Related Posts for WordPress

relatedpostsforwp

Related Posts for WordPress is another alternative plugin for related posts plugin which is lightweight. This plugin uses cache to show related posts and does all the resource intensive tasks in the admin area.

Pros:

Related Posts for WordPress pays attention to performance. It is fast and will not slow down your site. It also supports textual and thumbnail display of related posts list.

There are a shortcode and widget that you can use to show related posts anywhere on your site.

Cons:

If you had been using other related posts plugin, then you may miss a few extra features.

4. Yuzo Related Posts

yuzorp

Yuzo Related Posts is another related posts plugin which is free. It is full of comprehensive features which you are expecting from a related posts plugin. List views, thumbnail views, horizontal views with thumbnails, built-in-cache etc.

Pros:

It is very easy to setup and use. Users can choose the style by just clicking on it. Caching features makes the performance better from YARPP and Contextual related posts. The widget of this plugin is highly customizable with a number of options.

Cons:

You cannot compromise on speed and you need to know that it is not lightweight.

5. Inline Related Posts

inlinerelatedposts

Inline related posts is unique from other plugins in the list. This plugin does not show related posts below the content, it rather shows them inside the post. This type of inline display of related content is famous on blog and news websites.

Pros:

This plugin shows related posts when users are engaged in the content and more likely to click the related post. It is easy to setup and enables you to control the location where you want to show inline related post links in your content or post.

Cons:

If you want to show the related posts at the end of the post, then you need other plugins to do this. To install two related posts plugins on one website can be resource intensive.

Bonus Tips

You may have noticed that I have mentioned several times that related posts plugins can be resource intensive. It is also possible that any of these plugins may not functional on shared WordPress hosting.

In such situation, you need to use Manual Related Posts plugin. By using this plugin, you will be able to add related posts to a post manually. The link relationship will work both ways. If you add an old post as related post to a new post and vice versa.

There is another option to display related posts with thumbnails without using plugins manually.

I hope that this article will help you to find the best related posts plugin for your WordPress site.

Do not forget to share and like this post.

Arsalan Rauf
Arsalan Rauf

Arsalan Rauf is an entrepreneur, freelancer, creative writer, and also a fountainhead of Green Hat Expert. Additionally, he is also an eminent researcher of Blogging, SEO, Internet Marketing, Social Media, premium accounts, codes, links, tips and tricks, etc.

www.greenhatexpert.com

Filed Under: Blogging, WordPress Tagged With: best related posts plugin 2018, Best Related Posts Plugins, contextual related posts, manual related posts wordpress, related pages plugin wordpress, Related Posts Plugins for WordPress, wordpress related posts plugin custom post types, wordpress related posts without plugin, yet another related posts plugin (yarpp), yuzo related posts

8 Best WordPress Backup Plugins Compared (Pros and Cons)

Last Updated on August 21, 2022 By Arsalan Rauf

In this post of Green Hat Expert, I am going to share 8 best WordPress backup plugins.

Best WordPress Backup Plugins

Are you searching for best WordPress backup and restore plugins? This post is for you.

You may need to create a WordPress backup for your site on regular basis. If you create a backup of your site, it can save you in difficult situations like if you have locked yourself accidentally. There are many free and premium backup plugins for WordPress and most of them are easy to use. In this post, I shall share with you the 8 best WordPress plugins for WordPress.

Image

Note: There are a number of WordPress hosting providers that offer limited backup services. But it is your responsibility to create a backup on your own for your site. Do not rely on hosting providers only.

If you are already making backups of your site, then you should select one of these 8 WordPress backup plugins to make it with ease.

Image

1: All in One WP Migration

All-In-One WP Migration

All in One WP Migration is the best WordPress backup plugin and I strongly recommend it.

I am also using this plugin for my sites. This plugin exports your WordPress files including themes, plugins, media files and database etc. You do not need technical knowledge for this plugin because it is very easy to use.

You can upload your WordPress site to a different location with a drag and drop in WordPress. All in One WP Migration will also solve the replace operations in your database and it is the first plugin that gives true mobile experience.

The free version of this plugin allows you to upload the file of 512MB only. Do not worry I am here to solve your issue.

How to Remove 512MB upload Size Limit on All-in-One WP Migration Plugin

If you own an existing WordPress site which you want to move with plugins, themes, settings and media content. All-in-One WP Migration is the first plugin that comes to your mind.

If the size of your .wpress file exceeds 512MB, it will redirect you to purchase the premium version to get the unlimited access to All-in-One WP Migration plugin. If your site is productive and you want to create a backup and you are facing the small size limit. See the instructions to uplift the limit of 512MB.

wpmigration 512 upload limit

First of all, you need to know that unlimited extension of this plugin costs you 59$. It includes lifetime update with unlimited support.

Go ahead and open up

/wp-content/plugins/all-in-one-wp-migration/constants.php

Lines 199:201 define the file upload size limit, there’s a nice comment there indicating such. Use Ctrl+F  “size”, it should take you right to it.

// =================
// = Max File Size =
// =================
define( 'AI1WM_MAX_FILE_SIZE', 536870912 );

You’ll see the max file size is available in Bytes. In order to increase the upload size limit to 4GB, simply multiply the number seen here by 8.

// =================
// = Max File Size =
// =================
define( 'AI1WM_MAX_FILE_SIZE', 4294967296 );

We’ve been getting lazier and doing this, which works the same as above.

// =================
// = Max File Size =
// =================
define( 'AI1WM_MAX_FILE_SIZE', 536870912 * 8 );

Save the file and navigate back to the import section of All-in-One WP Migration plugin to import. The file limit will uplift to 4GB.


wpmigration limit removed
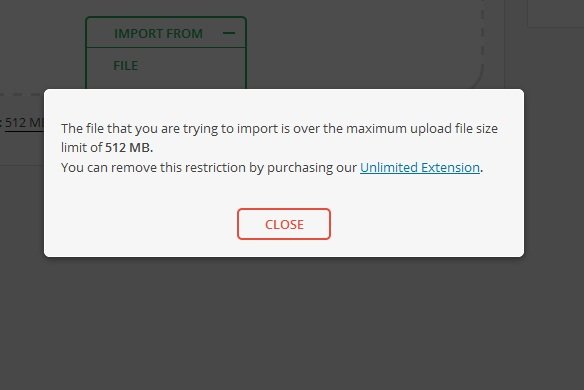
The plugin will no longer reject your large file uploads.
3 images

2. BackupBuddy

BackupBuddy

BackupBuddy is another famous premium WordPress backup plugin. It enables the users to create backups on daily, weekly or monthly basis. It can save your backups automatically in Amazon S3, Dropbox, Rackspace, Cloud, FTP, Stash and even mail it to yourself.

If you are using Stash service, then you can make real-time backups. The biggest advantage of using BackupBuddy WordPress plugin is that it is not based on subscription. So you do not have to pay the monthly fee. You can use this plugin on the number of sites available in your plan.

In addition, you also get access to premium support forums with regular updates, you can also store your backups in cloud storage of 1GB.

You can also use BackupBuddy WordPress plugin to migrate, duplicate and restore websites.

3. UpdraftPlus

UpdraftPlus

UpdraftPlus is another WordPress backup plugin that backup your WordPress site to your computer. You can create the complete backup of your site and can store it on the cloud as well.

It supports on-demand and scheduled backups as well. You can also select which type of files to backup. It will upload your backups automatically to Google Drive, S3, Dropbox, Rackspace, FTP, SFTP, email and other cloud storage services etc.

UpdraftPlus WordPress plugin also has a premium version with add-ons that help to clone site or migrate, database search and replace, and multisite support etc.

The premium version also allows you to get access to priority support.

4. BackWPUp

BackWPup – WordPress Backup Plugin

backWPup is another free plugin that creates the complete WordPress site backup for free. It stores the backup on the cloud (Amazon S3, Dropbox, Rackspace etc), FTP, email or on your PC or computer.

It is very easy to use and you can schedule automatic backups by keeping in view the update of your site.

Restoring a WordPress site from backup is also an easy task.

BackWPup also features a pro version that gives priority support, backups on Google drive, ability to store and so on.

5. BackUpWordPress

BackUpWordPress

BackupWordPress is a WordPress backup plugin that creates the complete backup with automatic scheduling support.

You can create different schedules for your files and database. There is a problem with free version, it does not allow you to store your WordPress backups to a cloud storage services.

If you want to save or store your backups on Google Drive, FTP or Dropbox, you need to buy a premium extension for it. The extensions are available for each service, you can buy the bundle of your own choice.

6. Duplicator

Duplicator

Duplicator is another famous WordPress plugin to migrate WordPress sites and the name also suggests that. It also offers backup features.

But it does not allow you to create autmomatic scheduled backups that is the quality which makes it less ideal as compared to other WordPress backup solutions. If you are maintaining a regular site, it is not a suitable choice for you.

7. WP-DB-Backup

wp-db-backup

This WordPress backup plugin has more than 400,000 active installs and WP-DB backup is another popular backup WordPress plugin. The problem is that it only creates backup of your WordPress database.

It means that you have to create backup of your media files manually.

You can choose this plugin if you do not update your site too often or do not upload images. Then you can use WP-DB backup as your primary WordPress backup plugin.

So WP-DB backup allows you to create database backups, restore your database, schedule automated backups with ease.

WP-DB Backup WordPress plugin is also beneficial for those users who do not have access to phpMyAdmin to backup WordPress database manually.

8. VaultPress (with Jetpack)

VaultPress (with Jetpack)

The founder of VaultPress is Matt Mullenwag (WordPress co-founder) and his team at automattic.

Recently, it has become part of Automattic’s another product that is, JetPack. You will require a JetPack subscription plan if you want to use VaultPress. There are different pricing plans available with different features.

VaultPress gives automated real-time cloud backup begins at 3.50$ per month. Setting up VaultPress and restoring from backups can be done in a few clicks. There are some packages which also offer security scans.

There are a few downsides of VaultPress as well.

First of all, it is a recurring expense which can multiply if you are using multiple WordPress sites.

Secondly, you will need to subscribe to JetPack, get a WordPress.com account, and install the JetPack plugin on your website.

Lastly, lower plans backups can be stored only for 30 days. If you want to get unlimited backup archive, it will cost you 29$ per month fee for each website. It is more expensive for beginners if we compare them to other plugins or solutions listed here.

Conclusion

To be continued

Every WordPress backup plugin has it’s pros and cons. I use All-in-One WP Migration due to two reasons. It is very easy to use and offers real-time backups. In my opinion, it is an ideal for large sites.

If you are a beginner and want to run a small or medium size website and do not want to pay monthly fee. We recommend BackupBuddy plugin for this purpose. They offer their own cloud storage, stash and it makes it an easy task for beginners to backup their site in few clicks.

Not matter which WordPress backup plugin you select, do not store your backups on the same server as your site.

If you do that, you are putting all of your eggs in one basket. If your server’s hardware fails, you will not have a backup which kills the purpose of setting up regular backups.

So, I highly suggest storing your backups on a third party storage service like Amazon S3, Dropbox and Google drive etc.

I hope that after reading this guide, you will be able to pick eht best WordPress backup plugin for your site.

Do not forget to share this post and also like our Facebook Page to get latest updates.


Arsalan Rauf
Arsalan Rauf

Arsalan Rauf is an entrepreneur, freelancer, creative writer, and also a fountainhead of Green Hat Expert. Additionally, he is also an eminent researcher of Blogging, SEO, Internet Marketing, Social Media, premium accounts, codes, links, tips and tricks, etc.

www.greenhatexpert.com

Filed Under: Blogging, Guide Tagged With: backupbuddy wordpress plugin, how to backup wordpress website using plugin, multisite backup plugin, updraft backup plugin wordpress, updraftplus wordpress backup plugin, wordpress backup and restore plugin, wordpress backup to dropbox, wordpress full backup plugin

How to Fix Eliminate render-blocking JavaScript and CSS in WordPress

Last Updated on August 21, 2022 By Arsalan Rauf

In this post of Green Hat Expert, we shall discuss How to Fix Eliminate render-blocking JavaScript and CSS in WordPress.

How to Fix Eliminate render-blocking JavaScript and CSS in WordPress

Do you want to eliminate render-blocking JavaScript and CSS in WordPress?

When you put your website on Google pagespeed insights, you may face the problem of eliminate render-blocking scripts and CSS.

In this post, I shall show you how to easily fix render blocking JavaScript and CSS in WordPress to increase Google pagespeed score.

What is Render-Blocking JavaScript and CSS?

Every WordPress site consists of theme and plugins which adds JavaScript and CSS files to the front side of your site.

So these scripts can slow your website and increase the load time and also block rendering of the page.

The browser of the user has to load the scripts and CSS before loading the HTML on the page.

It means that those users who have slow connection will wait for a few milliseconds to see the page.

The stylesheets and scripts are known as render-blocking JavaScript and CSS.

Bloggers or site owners will have to fix this issue in order to get 100/100 Google PageSpeed score.

What is Google PageSpeed Score?

Google PageSpeed Insights is an online tool by Google in order to help the users to optimize their sites on mobile as well as on desktop.

This tool will test your websites for Google’s guidelines to check the speed of your site and how to improve it.

Google calculates your score on the number of rules that your site passes.

Most of the sites get 50-70 score.

There are some users who want to achieve 100 that is the highest page score.

Do You Really Need the Perfect “100” Google PageSpeed Score?

Google pagespeed insights give you guidelines to improve the performance and speed of your website.

You do not have to follow these rules strictly.

The speed has become one of the main SEO metrics in Google and it tells Google how to rank your site.

The speed of the site improves the user experience on your website.

A better user experience does not depend on just speed. You have to provide useful information, better user interface with engaging content, text, videos and images.

Your task is to create a fast site which gives great user experience.

So you need to focus on speed as well as improving the user experience.

We suggest that you should use Google Pagespeed insights rules as recommendation. If you can implement on your site without ruining the user experience. Then it is a great thing. Otherwise, do as much as you can do.

Now let’s take a look at what we can do to fix render blocking JavaScript and CSS in WordPress.

I shall give you two methods to fix the render blocking JavaScript and CSS in WordPress. You can select the one that suits you and your site.

  1. Fix Render Blocking Scripts and CSS with Autoptimize

It is a simple method and recommended for most of the users.

First of all, you need to install and activate Autoptimize plugin.

After activation, you need to go to the Settings » Autoptimize page to configure the plugin settings.

autoptimize settings

Begin with checking the box next to CSS and JavaScript options and click the save changes button after doing so.

Use the pagespeed tool to test your website. If you are still having render blocking scripts, you need to go to the plugin’s settings page. Then click on show advanced settings button which is at the top.

autoptimize advanced js

Now you can allow the plugin to include inline JS and remove scripts which are excluded by default like seal.js or jquery.js.

Scroll down to CSS option and allow plugin to aggregate inline CSS.

Then click “save changes and empty cache” button in order to save the changes and empty cache.

After completing it, go ahead to check your site again using PageSpeed tool.

Now thoroughly check your website to see that if anything is broken by optimizing your CSS and JavaScripts.

How does it work?

Autoptimize combines all enqueued JavaScript and CSS. After doing that, it creates minified CSS and JavaScripts files and gives cached copies to your website as deferred or async.

It allows you to fix the render blocking scripts and styles issues or problems. But you need to keep in view that it can also affect the appearance and performance of your website.

2. Fix Render Blocking JavaScript using W3 Total Cache

This method needs a little more work and suggested for users who are already using W3 Total Cache plugin on their site.

First of all, you need to install and activate the W3 Total Cache plugin.

Then, visit Performance>General Settings page and scroll down to minify section.

w3tc enable minify

Firstly, check the option “enable” next to minify option and select manual for minify mode option.

Click on save all the settings button to save your settings.

Your next task is to add the scripts and CSS which you want to minify.

Get the URLs of all the stylesheets and scripts which are render blocking from Google pagespeed insights tool.

You may also like our guide about

How to Score 100/100 in Google Pagespeed insights

You will see under the suggestions where it displays the error ‘Eliminate render-blocking JavaScript and CSS in above the fold content’, click on ‘show how to fix’. It will show you the list of scripts and stylesheets.

script urls

Use your mouse to a script and it will show you the full URL. Select the URL and press CTRL+C from your keyboard to copy the URL.

Now go to your WordPress admin area and go to Performance>Minify page.

First of all, add JavaScript files which you want to minify or to be minified. Scroll down to JS section and under the ‘operations in areas’ set the embed type to ‘Non-blocking async’ for the head section.

add scripts

Now click on the ‘add script’ button and start adding the script URLs which you copied from Google PageSpeed tool.

After doing that, scroll down to CSS section and click the button “Add a stylesheet”. Now start adding stylesheet URLs which you copied from Google PageSpeed tool.

add style sheets

Now hit “save settings and purge cache” button to save your settings.

Go to Google PageSpeed tool to test your site again.

Also, check your website thoroughly to see that everything is functional and working fine on your website.

Troubleshooting

It depends on how your WordPress themes and plugins use JavaScript and CSS? It can be challenging to completely fix all render blocking JavaScript and CSS issues in WordPress.

The above tools can be helpful and your plugins may require certain scripts at a different level to work in a proper way.

In that case, the above mentioned solutions can behave unexpectedly or break your plugins.

Google may still show you certain issues like optimizing CSS delivery for above the fold content. Autoptimize can enable you to fix this by adding manually inline CSS needed to display the above fold area of your theme.

However, it can be a difficult task to find what CSS code you will require to display above the fold content.

I hope that this article will help you to learn how to fix Eliminate render blocking JavaScript and CSS in WordPress.

Do not forget to share this post and also like our Facebook page.


Arsalan Rauf
Arsalan Rauf

Arsalan Rauf is an entrepreneur, freelancer, creative writer, and also a fountainhead of Green Hat Expert. Additionally, he is also an eminent researcher of Blogging, SEO, Internet Marketing, Social Media, premium accounts, codes, links, tips and tricks, etc.

www.greenhatexpert.com

Filed Under: Blogging, How to, SEO, WordPress Tagged With: eliminate render-blocking css, Eliminate render-blocking JavaScript and CSS, eliminate render-blocking javascript and css in above-the-fold content magento, eliminate render-blocking javascript and css in above-the-fold content php, eliminate render-blocking javascript and css in above-the-fold content shopify, eliminate render-blocking javascript and css in above-the-fold content w3 total cache, eliminate render-blocking javascript and css using htaccess, eliminate render-blocking javascript and css wordpress, remove render-blocking javascript wordpress without plugin

How to Install and Setup Facebook Comments in WordPress

Last Updated on August 21, 2022 By Arsalan Rauf

How to Install and Setup Facebook Comments in WordPress

Are you looking to add Facebook comments on your WordPress site?

Facebook is the largest social media network in the world. Therefore, top sites including TechCrunch are using Facebook comment system and avoiding default WordPress comments. In this post, I am going to show you how to install and set up Facebook comments in WordPress.

Before we get to know it, let’s take a look at why would anyone want to use Facebook comments instead of default WordPress comments.

Pros and Cons of Using Facebook Comments in WordPress

The first benefit of using Facebook comments in WordPress is that it boosts your site visibility on Facebook’s network. When someone leaves a comment on your site, they can check the box to share the comment with their Facebook friends. It can give you the potential for additional traffic.

The second benefit of using Facebook comments is that it will remove the anonymity factor, so the users will not leave spammy comments. It is because it will be published on their Facebook profile.

However, it also has a downside too. It is because users do not feel comfortable leaving a comment from their Facebook account or profile due to their sense of anonymity.

Unlike other comment systems such as Disqus, Facebook comments are neither synced to your WordPress comments nor stored. They replace WordPress comments completely. If your post has some posts with WordPress comments, those existing comments will appear after or before Facebook comments.

Now you are aware of pros and cons, now see how to install Facebook comments in WordPress.

Installing Facebook Comments in WordPress

First of all, you have to install and activate the Facebook Comments plugin to your site. After activation, you need to go to Settings> Facebook Comments to setup the plugin.

fb comments plugin settings

If you want to use Facebook comments on your site, you need to create a Facebook app. If you already have created an app for your site, you can use that app ID here. Otherwise, you will have to create a new one.

First of all, visit the Facebook Apps page, then click on the create new app button to create an app.

Now you have to give a name for your app and click on the create app ID button to complete it.

new fb ap

Facebook will create a new app for you to use and it will take you to app dashboard. You will see your app ID there.

Now you will copy and paste this app ID into your plugin settings. Before doing that, you have to configure the app to make it functional on your website. Now click on settings link, click on +Add platform button.

settings platform

You will see a new popup window on the screen. Now click on website to select it as your platform.

platforms

It will add a new website section in the settings of your app’s page where you can enter the address of your WordPress site.

app domain

Now save your settings, you can copy the app ID and paste it into the plugin’s settings page available on your WordPress site.

This WordPress Facebook comments plugins offer a comprehensive set of options. The default settings of the plugin work for most of the sites. If it is not working on your site, you should see the settings to see what to change.

After completing it, click the ‘save changes’ button to save your settings.

Now, go to your website to see Facebook comments in comment section on your site.

fb comments preview

Moderating Your Facebook Comments

Now you are the admin of the Facebook app, that is why you will get notifications for new comments whenever you will login or use your Facebook account. You can find the link to your Facebook comment moderation tool in the plugin’s settings page.

fb comment moderation

Click on the settings link in the Facebook comment moderation tool to add new comment moderators.

adding moderators

I hope that you will like this post and it will help you to install and setup Facebook comments in WordPress.

You may also want to check our guide on How to add social media icons to blogger.

Do not forget to share this post and like our Facebook Page.

Arsalan Rauf
Arsalan Rauf

Arsalan Rauf is an entrepreneur, freelancer, creative writer, and also a fountainhead of Green Hat Expert. Additionally, he is also an eminent researcher of Blogging, SEO, Internet Marketing, Social Media, premium accounts, codes, links, tips and tricks, etc.

www.greenhatexpert.com

Filed Under: Blogging, Facebook, Guide, Social Media, WordPress Tagged With: best facebook comments plugin for wordpress, facebook comments app, facebook comments on blog, facebook comments vs wordpress comments, facebook comments wordpress without plugin, how to use facebook comment in wordpress, import facebook comments to wordpress, wordpress facebook comments plugin responsive

How to Set Custom Avatars for Users in WordPress (Gravatar Alternative)

Last Updated on May 2, 2018 By Arsalan Rauf

Have you ever tried to set custom avatars for those users who leave comments without using Gravatar?

Do you want to set custom avatars for them?

Do you want to get rid of gravatar to speed your page load time?

In this post, I shall show you an alternative to gravatar. It will allow you to use the first letter in the name of the user as their avatar for WordPress comments.

first letter avatars

First of all, you need to install and activate the WP First Letter Avatarplugin.

After activation, you need to go to Settings>WP First Letter Avatar to configure the settings of the plugin.

first letter avatar settings

On the settings page of the plugin, you can select a set of icons. Currently, it only has a default set of icons which is already selected.

If you want to replace Gravatar on your website completely then you need to uncheck the box of ‘Use Gravatar’. After doing so, click the save changes button to store your settings.

Now go to your site to see this plugin in action.

If you chose to use Gravatar then it will display first letter avatars for those users who do not have gravatar image associated with their email address. If you selected to replace gravatar, then this plugin will display the first in the name of user as his avatar.

In the Gmail app, Google shows the first letter of the name of the sender if the contact does not have a photo. So it is an ideal way of following that trend.

I hope that you liked this post and it will allow you to set custom avatars for users in WordPress. It is also Gravatar alternative.

Do not forget to share this post.

Arsalan Rauf
Arsalan Rauf

Arsalan Rauf is an entrepreneur, freelancer, creative writer, and also a fountainhead of Green Hat Expert. Additionally, he is also an eminent researcher of Blogging, SEO, Internet Marketing, Social Media, premium accounts, codes, links, tips and tricks, etc.

www.greenhatexpert.com

Filed Under: Blogging, Guide, WordPress

How to Fix Add Media Button Not Working in WordPress

Last Updated on May 2, 2018 By Arsalan Rauf

Recently I have found this issue that ‘Add Media’ button on my WordPress site suddenly stopped working. This problem does not show any warning or error that leaves the user in dark about why their ‘Add Media’ button is not working. In this post, I shall show you how to easily fix the ‘Add Media’ button not working issue in WordPress site.

What causes the WordPress ‘Add Media’ Button to Stop Working?

Usually, this problem occurs due to conflicting scripts or stylesheets loaded by WordPress themes or plugins installed on your website. The default behavior of WordPress site is to load all needed stylesheets and scripts by combining the requests.

It is usually done in the admin area of WordPress to improve the speed and performance of website.

The post editor of WordPress uses JavaScript for all buttons available on the screen including Add Media button. A conflict can stop JavaScript from working and it will disable “Add Media” button.

add media button

After this discussion, let’s see how to troubleshoot and fix the Add Media button not working problem in WordPress.

Fixing Add Media Button Not Working Issue in WordPress

Add the following code to your wp-config.php file to fix it quickly. You need to edit wp-config.php file to add this code just before the line that says. That is it, stop editing and enjoy blogging.

1
define('CONCATENATE_SCRIPTS', false );

This code will allow WordPress to load each script separately that helps the JavaScript to avoid conflict with other scripts and the core WordPress features.

After doing it, go to the post edit screen to observe if the media button is working as expected or not.

Note: Adding this code is not a proper long-term solution because you still have a script that is causing the issue. Using the inspect tool is an easier way to find the source of the problem. It will display you console errors that can lead you to the source of the conflict or problem.

Do not forget to see our guide on Best Managed WordPress hosting.

I also suggest that you do this on your staging site instead of a live website.

You need to begin with deactivating of all your WordPress plugins and then check whether the Add Media button is functional or not. If it does, then this shows that one of your plugins was creating the problem.

deactivate all plugins

Now activate the plugins one by one, after the activation of plugin, check the Add Media button. It will help you to find out which plugin is causing the problem. After finding the plugin that is causing issues, replace it with another plugin or ask the plugin author for help.

If the deactivation of plugins does not solve the issue, then the next step is to switch to the default WordPress theme like twenty seventeen.

switch default theme

After switching to the default theme solves the issue for you, it means that your theme was causing the conflict. You can ask theme author for support or switch to another WordPress theme.

After finding the source of the problem on your staging site, you can apply the fix on your live WordPress website too.

I hope that you liked the article and it helped you to learn how to fix Add Media button not working in WordPress.

Arsalan Rauf
Arsalan Rauf

Arsalan Rauf is an entrepreneur, freelancer, creative writer, and also a fountainhead of Green Hat Expert. Additionally, he is also an eminent researcher of Blogging, SEO, Internet Marketing, Social Media, premium accounts, codes, links, tips and tricks, etc.

www.greenhatexpert.com

Filed Under: Blogging, Guide Tagged With: add media not working wordpress, can t add media to wordpress, cannot add images to wordpress, no add media button on twitter, wordpress 4.8 add media not working, wordpress 4.9 add media not working, wordpress add media does not insert into post, wordpress buttons not working

Google AdSense Auto Ads: Everything You Need To Know

Last Updated on April 30, 2018 By Arsalan Rauf

Google Adsense is one of the best ad programs available on the internet. There are several alternatives to Adsense available but none has consistently outperformed Adsense in terms of user friendliness, innovation and overall experience it is a jack of all trades.

On February 21, 2018, Adsense team has introduced and launched Google auto ads feature for everyone. Recently, Adsense team has made the biggest innovation. In fact, Auto ads are going to change the way of using Adsense in real time.

Ad placement, ad optimization, and maintain a better user experience are one of the biggest concerns of most Adsense publishers.

Google auto ads are using artificial intelligence to manage the ad optimization and ad placement automatically for publishers. However, as a publisher, you can manage:

  • Global settings:What kind of ads should be shown
  • Domain-based setting:Configure what ads should be shown on specific domain or sub-domain
  • Directory settings:Configure the kind of ads to be shown on the particular directory. For example, on pagination pages or archive pages, you may not want to show matched content ads, and you can configure the same from the AdSense settings panel. This feature is known as Advanced URL settings. You can read more about it here.

So far I have read mixed reviews of users about Auto ads. However, I am optimistic about the future of Adsense auto ads because it will take care of the process of ad optimization and a blogger can pay attention to build quality content. Adsense will take care of the rest. Google Adsense is a plug and play ad program that is entirely automatic. Say thanks to artificial intelligence.

Important things to know about AdSense Auto ads

Auto ads will not be an issue for anyone who has used Google Adsense. However, before you start setting up auto ads, some instructions you need to know. Before you start the integration, it will also answer your questions.

  • If you already have AdSense ads placed on your website, you can decide not to remove it. AdSense auto ads will automatically detect those ads and place more ads accordingly.
  • Already using Anchor or Vignette ads?Auto ads consist of Anchor and Vignette ads and many more additional formats such as Text and display, In-feed and Matched content ads. Note that all users that use Page-level ads will automatically be migrated to Auto ads without any need to add a code to their page. However, logging in to your AdSense account and setting up Global settings for auto-ads for the first time is the best idea.

How to Enable Google AdSense Auto ads (Complete Guide)

Here is a quick walkthrough of the steps:

  • Login to your Google AdSense account
  • Go to my Ads > Auto Ads
  • Click on ‘Setup Auto Ads’
  • Configure your Global settings

Auto Ads AdSense global settings

  • ‘Enabling’ automatically get new formats at the bottom.
  • Click on Save.
  • Now place the ad codes on every page of your blog/website. I use Google tag manager for the same. You can use any technique that is suitable for you. If you are already using Page level ads, you do not need to do anything.
  • You can always check the performance of Google Auto ads by going to My Ads > Auto ads and clicking on Statistics.

Overall, it will be exciting to see how Google auto ads work in the future. So far I have read mixed reviews.

As I discussed earlier, it will be something that everyone will adapt with the passage of time. It uses artificial intelligence or machine learning and it will become better with time.

Let me know your experience with Adsense auto ads.

Have you implemented on your blog?

If not, what is your plan to implement it?

Also see: Official AdSense help page on Auto-ads

If you liked this post, do not forget to share this latest post.

Arsalan Rauf
Arsalan Rauf

Arsalan Rauf is an entrepreneur, freelancer, creative writer, and also a fountainhead of Green Hat Expert. Additionally, he is also an eminent researcher of Blogging, SEO, Internet Marketing, Social Media, premium accounts, codes, links, tips and tricks, etc.

www.greenhatexpert.com

Filed Under: Blogging, WordPress Tagged With: add google ads to website, adsense auto ads wordpress, adsense google ads, amp auto ads, google adsense auto ads clicker, google adsense login, google adsense money, google debuts adsense auto ads for publishers

  • « Previous Page
  • 1
  • 2
  • 3
  • 4
  • Next Page »


Recent Posts

  • Free DeepSeek Accounts 2025
  • Free Zoho Mail Accounts 2025
  • Acudepot Discount Codes 2025
  • Free Blackshot Accounts 2025
  • Free GMX Email Accounts 2025
  • Songtrust Discount Codes 2025
  • Uzicases Discount Codes 2025
  • Cardillo Promo Codes 2025
  • Free DriverFix License Keys 2025
  • Avast Secureline VPN Activation Codes 2025

Recommended Posts

Create a Gmail Account Without Phone Number

Free Course Hero Account

Crunchyroll Accounts

Cracked Apps

Free Pokemon Go Accounts
Onlyfans Free Accounts
Free Chegg Accounts
Free Paypal Accounts
Free Gmail Accounts
Funny Steam Names

Categories

  • Apps
  • Apps for PC
  • Blogging
  • Discord
  • Facebook
  • Gaming
  • Grammar
  • Guide
  • How to
  • Instagram
  • Messaging
  • OnlyFans
  • Pinterest
  • Reddit
  • SEO
  • Snapchat
  • Social Media
  • Spotify
  • Steam
  • Telegram
  • TikTok
  • Twitch
  • Twitter
  • Whatsapp
  • WordPress
  • YouTube
  • Home
  • Social Media
  • Messaging
  • About
  • Submit Guest post