Green Hat Expert

  • Home
  • Social Media
    • Instagram
    • TikTok
    • Snapchat
    • Facebook
    • YouTube
    • Twitter
  • Messaging
    • Discord
    • Telegram
    • Whatsapp
  • About
  • Submit Guest post
You are here: Home / Archives for Blogging

How to Install and Setup WP Super Cache for Beginners

Last Updated on April 29, 2018 By Arsalan Rauf

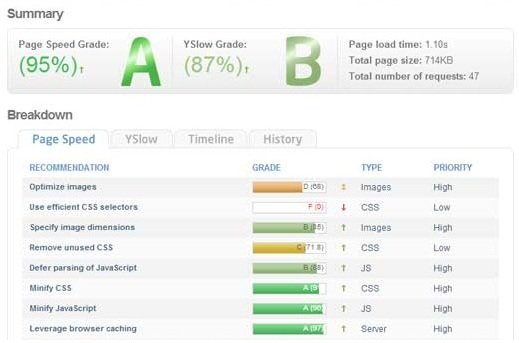
Now Google and its search engine are considering the site speed as a ranking factor. So I have written this post for our users to improve their site speed to an optimum level. By doing that, you will find out that your site has improved the site speed and got a huge spikes in traffic. I use W3 Total Cache plugin to improve the performance of my website. There are several people who also ask for how to install and setup WP Super cache. That is why in this post, I shall show you how to install and setup WP Super Cache with ease.

Note: Both WP Super Cache and W3 Total Cache are great plugins. I highly suggest that you use one or the other depends on your needs.

First of all, you have to install and activate WP Super Cache plugin (tutorial: how to install a WordPress plugin).

After activation, WP Super Cache will inform you that caching is not enabled on your site right now.

Setting up WP Super Cache – The Easy Way

To enable cache, go to Settings > WP Super Cache.

Under the easy tab, you need to turn cache on and press update status button.

wp super cache

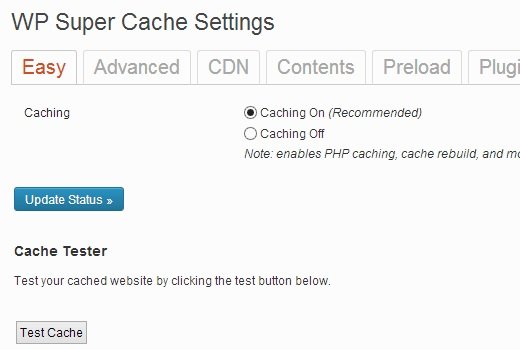
After turning on the cache, you need to click the test cache button to check whether it is working or not. WP Super Cache plugin will fetch your WordPress website twice and will compare the time stamps of both pages. If the both times tamps are matching, it means that cache is working on your website now.

WP Super Cache Advanced Set up

WP super cache is a powerful tool and plugin, it also has advance options. These options have the ability to improve the performance of your site. To set the advance options of WP super cache, visit Settings>WP Super Cache and click on advanced tab.
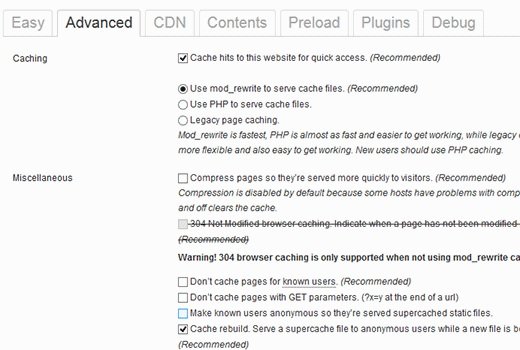
wp super cache advance

Enable Caching

first of all, check the box that says Cache hits to this website for quick access. Below you will see three more caching options. WP Super Cache uses PHP to serve cache files by default. However, it can be resources intensive on shared hosting if using PHP to serve cache files.

So I would like to suggest that you try using mod-rewrite to serve cache files. Now scroll down and press the update status button to save the settings.

WP Super Cache will show you a notification that mod_rewrite rules must be updated and another notification about scheduling garbage collection.

Scroll down the page to see mod_rewrite rules that need to be added. Click on update Mod_Rewrite rules button to update the rules.

After updating the Mod_Rewrite rules section, you will see that section has turned green.

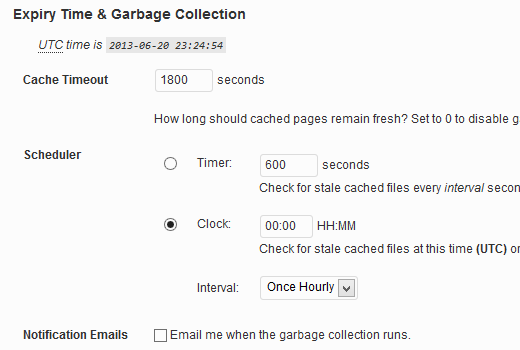
To get rid of the notification about garbage collection, scroll down on the advance settings page to the ExpiryTime & Garbage collection section and set up a frequency and time for garbage collection of cached files on your server.

wp super cache garbage

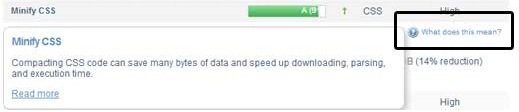
Enable Compression in WP Super Cache:

Compression enables WP Super Cache plugin to serve cached files as compressed files. The files are downloaded by the user browsers quickly because they have the smaller size.

Simply check the box that says Compress page so they’re served more quickly to visitor to enable the compression.

Setting up CDN with WP Super Cache

Most content sites serve a lot of static files with each page request. These files are images, stylesheets and JavaScripts etc. unlike your WordPress posts which are generated by PHP, these files can be served by a CDN or Content Delivery Network. If you do not have any idea what is a CDN and why you need a CDN, then you should read our post about What is CDN and why do you need one.

If you need a tutorial on how to install and setup MaxCDN for WordPress then we have one.

The tutorial uses W3 Total Cache but the basic concept is the same.

To setup CDN using WP Super Cache, you need to click on the CDN tab and check the box next to Enable CDN support option.

Enter the offsite URL that will be the URL of your pullzone, for example, https://cdn.greenhatexpert.com

wp super cache max cdn

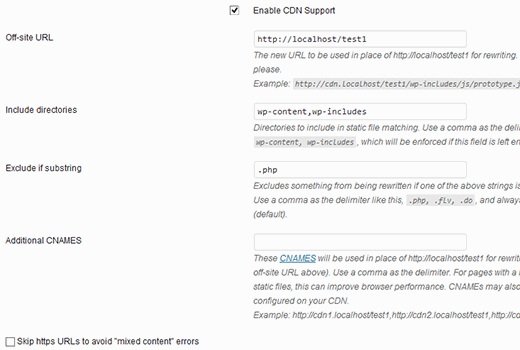
In the additional CNAMEs field, enter other CNAMEs that you created for pullzone.

For example, https://cdn1.greenhatexpert.com, https://cdn2.greenhatexpert.com, https://cdn3.greenhatexpert.com.

Lastly, check the box that says Skip https URLs to avoid ‘mixed content’ errors and save the changes. Now your site is ready to serve static content using a CDN.

Serve a Static Site with WP Super Cache

WP Super Cache has a preload mode to create super cache static files for all your pages and posts and serve a static site. You may ask why would anyone want to do that?

To conserve server resources.
To serve an old site that is not being updated anymore.
To improve the speed of site by serving static content only.

These are the few reasons but there can be several reasons and situations where you may want to entirely disable PHP processes.

Do not worry your WordPress will work in a normal way, you can still be able to manage your content on WordPress.

wp super cache preload

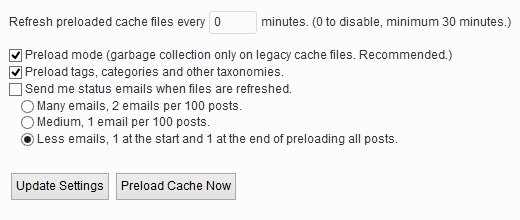
Refresh preload cache files options will be set to zero by default, minimum required time is at least thirty minutes. Pre-loading your full WordPress website takes some time and consumes a lot of resources on your server. You can leave it to zero (0) if you do not want your static files to expire ever until you manually refresh cache.

I hope that this post will help you to setup WP Super Cache on your WordPress blog.

For other feedback and questions, please leave it in the comment section.

Do not forget to share this post.

Arsalan Rauf
Arsalan Rauf

Arsalan Rauf is an entrepreneur, freelancer, creative writer, and also a fountainhead of Green Hat Expert. Additionally, he is also an eminent researcher of Blogging, SEO, Internet Marketing, Social Media, premium accounts, codes, links, tips and tricks, etc.

www.greenhatexpert.com

Filed Under: Blogging, Guide, WordPress

How to Use GTMetrix Plugin to Improve WordPress Site Performance

Last Updated on April 22, 2018 By Arsalan Rauf

GTMetrix is one of the tools that a number of people use to get more detailed reports about the site’s performance. It is a free tool which analyzes the page speed performance of your page using Google Page Speed and Yslow.

GTMetrix not only gives scores of your pages or website but also gives actionable suggestions on how to fix them. In this post, I shall show you how to use GTMetrix plugin to improve your WordPress site performance.

The benefit of using the GTMetrix WordPress plugin is that it allows the users to run analyses using their WordPress dashboard. It also enables you to schedule reports on daily, weekly or monthly basis. GTMetrix plugin also allows you to receive alerts about the status of your site using WordPress admin.

You need to register for a free GTMetrix account. The free account API is limited to a certain number of requests per day.

If you do not want to use the plugin, then you can always use their website by simply going to GTMetrix website.

In addition, you can also add the GTMetrix Bookmarklet in your Google Chrome, Firefox, and internet explorer.

Now I have covered all.

How GTMetrix helps you improve your WordPress site performance?

GTMetrix gives a detailed report that tells you what do you need to fix. Check the example of report:

gtmetrix report

If you notice that the same websites have two separate grade 95% A from Google Page Speed and 87% B from Yslow. If your Yslow score is low, it means that your site is not smart enough for Yslow system. They cannot always detect your CDN. You need to go to your user settings to define the CDNs vs Google automatically detects it.

As you can observe in the report, it will show all the things that you need to work on priority level. In my case, it was optimizing images. The best part of using GTMetrix is that when you click the tab, it tells you exactly which image needs to be optimized and how much size you can reduce.

In addition, it also enables you to preview the optimized version of the image. You need to right click on the optimized image and save it. GTMetrix is doing the work for you.

It is one of the examples. Every tab has a little “what does this mean” icon. If you click on it, it will elaborate the full details that what does each item mean.

gtmetrix what does this mean

GTMetrix is a gem for those bloggers or website owners who want to optimize their sites. Instead of downloading the Yslow extension or visiting Google Webmaster tools to get Google Page Speed score. You can get all these tools using GTMetrix.

If you even have GTMetrix WordPress plugin you can get these features.

What do you know about GTMetrix?

What are your ideas about GTMetrix?

Have you ever used it?

Let us know and share your experience.

Do not forget to share this post.

Arsalan Rauf
Arsalan Rauf

Arsalan Rauf is an entrepreneur, freelancer, creative writer, and also a fountainhead of Green Hat Expert. Additionally, he is also an eminent researcher of Blogging, SEO, Internet Marketing, Social Media, premium accounts, codes, links, tips and tricks, etc.

www.greenhatexpert.com

Filed Under: Blogging, WordPress Tagged With: gtm metrics, gtmetrix, gtmetrix api, website optimization tools, website speed optimization, website speed test, wordpress performance test, yslow speed test

5 Best Drag and Drop WordPress Page Builders Compared

Last Updated on March 18, 2018 By Arsalan Rauf

In this post of Green Hat Expert, we shall discuss the Best Drag and Drop WordPress Page Builders in 2018.

5 Best Drag and Drop WordPress Page Builders Compared (2018)

Are you looking for an easy way to customize or build your WordPress website?

So you need drag and drop WordPress page builder plugins for this purpose.

Best WordPress page builders will allow you to edit, create and customize the layout of your site without any coding. In this article, we shall review and compare 5 of the best drag and drop WordPress page builders.

Why Use a Drag and Drop Page Builder for WordPress?

When a blogger starts his WordPress website then he considers it a difficult task to customize or change his page layouts.

There are a number of premium WordPress themes available which has different page layouts. They are extremely hard to customize if one does not aware of CSS/HTML coding.

So this is the reason that user asks the question “how to make WordPress drag and drop?” or “is there an easy drag and drop WordPress page builder?”

When the users shift from Wix to WordPress or from Weebly to WordPress, they wish that WordPress should have a drag and drop site builder.

There are many drag and drop page builder plugins available for WP.

These plugins enable you to customize every element or component on your website without coding.

It includes adding multiple columns, full width images, content slider and parallax backgrounds etc.

Users can use these elements to create their own layouts within the WordPress themes.

There are several types of drag and drop page builders and there are some which are available in theme frameworks.

On the other hand, there are some plugins, so we shall compare them. It will help you to choose the best page builder for WordPress.

Our criteria for comparing these WordPress page builders include flexibility, ease of use and design output etc.

Let’s check the best page builder for WordPress.

Beaver Builder

Beaver Builder

Beaver Builder is a premium WordPress drag and drop builder plugin for users. It is the best WordPress page builder plugin available on the market.

It has built in tour that enables the users to become familiar with its interface and it is extremely fast.

It has a live drag and drop interface. You have to drag elements from the right sidebar and drop them on your page to add them. Additionally, you can click on any component in a page to edit it.

It consists of many basic and advanced modules and it will fulfill your requirements.

In addition, you can add modules such as carousel, sliders, backgrounds and content blocks, buttons and much more.

If you are a beginner, Beaver Builder is an easy one to use.

Pricing: Starting from 99$ for unlimited sites.

Our Grade: A+

Review: Beaver Builder is one of the easiest page builders for WordPress in the market. It has pre-made templates to give you a start. It has the ability to customize everything and details and it makes it an easy one for WordPress.

Elementor

Elementor

Elementor is another powerful drag and drop WordPress page builder. It is fast and you will automatically get to know how fast and responsive it is.

It is a live page builder because when you make changes to your page, you will see your page live as you edit in Elementor.

You can select the number of columns for every section and create sections too.

You can drag and drop widgets from the left panel. It has a number of widgets such as commonly used website elements.

From basic image and text widgets to advanced sliders, icons, social media tabs, testimonials etc. Each widget has its own settings.

Elemenator also enables you to add widgets made by other WordPress plugins.

If you do not want to build your own layout, Elemenator has ready to use templates which you can use for your pages.

You need to point and click in order to edit any item on the page and you can replace it with your content.

Pricing: Starting from 49$ and the license is for a single site.

Our Grade: A

Review:Elemenator is also one of the best page builder plugins on the market and it is super fast. Additionally, it is easy to use and has a number of modules and templates.

Divi

Divi Page Builder

Divi is another drag and drop WordPress page builder and theme. It is also super fast WordPress and easy to use.

It consists of 20+ different templates or layouts and you can use it for different kind of websites.

You can also compose and save your Divi layouts.

Export a layout from one Divi installation into another easily.

It has several elements which you can drag and drop anywhere in your layout.

Pricing: Starting from $69 per year

Our Grade: B

Review: Divi is a good page builder and its functionality is majestic. It enables you to work with other WordPress themes. It consists of tons of shortcodes which can make it difficult for you to change themes or page builder in the future.

Themify Builder

Themify Builder

If you are a WordPress user and using the theme that is, Themify. It means that you already have Themify builder in your theme.

If you are not a Themify theme user, you can also get Themify builder plugin.

It is also a simple page builder which has many ready to use modules which you can use for your posts and pages. Usually, you require separate WordPress plugins to install in order to get these modules.

You can either edit your page from your live site or from the admin area using Themify builder.

If you are using live editing, you will be able to see the change live on your site.

Themify builder has ready to use layouts which you can apply to your posts in a moment.

Pricing: $39

Our Grade: C+

Review: Page builder consists of promising features but you have to learn it. Learning can become a frustration for you. It is free.

Page Builder by Site Origin

Page Builder by Site Origin

This page builder has more than 1 million installs. Site Origin’s page builder is another eminent WordPress page builder on the market. The price is one of the basic reason because it is free of cost. It is a fully functional plugin that is free.

Site Origin page builder is easy to use and it is compatible with any standard WordPress theme. Use WordPress widgets for components and it has its own widgets. You can download and install its widgets. It also has a history tool which can allow you to redo or undo your changes or actions. So it is a time saver and you can work with it by peace of mind. It is because you know that you can undo your actions.

Pricing: Free

Our Grade: C

Review: Site Origin page builder is free of cost plugin which has a drag and drop interface and you can also create and customize layouts.

Conclusion

After doing the comparison between drag and drop WordPress page builders, we have come to the conclusion that Elementor and Beaver Builder are the best choice.

If you can spend a little money to get the best builder in the market with guaranteed support from developers. You need to select these two plugins and it is the perfect choice to make.

I hope that you will like this article about the best WordPress drag and drop page builder plugins in 2018.

If you have liked our post, do not forget to share this post to share your love.

Arsalan Rauf
Arsalan Rauf

Arsalan Rauf is an entrepreneur, freelancer, creative writer, and also a fountainhead of Green Hat Expert. Additionally, he is also an eminent researcher of Blogging, SEO, Internet Marketing, Social Media, premium accounts, codes, links, tips and tricks, etc.

www.greenhatexpert.com

Filed Under: Blogging, Guide, WordPress Tagged With: beaver page builder, best free page builder wordpress, drag and drop wordpress theme builder free, elementor page builder, page builder by siteorigin, wordpress page builder bootstrap, wordpress theme builder software, wordpress website builder software

How to Add Social Media Icons to Blogger

Last Updated on January 19, 2018 By Arsalan Rauf

In this post of Green Hat Expert, we shall tell you that How to Add Social Media Icons to Blogger or how to add Custom social media icons to your blog sidebar.

How to Add Social Media Icons to Blogger

Before you get to know that how to add social media icons to Blogger, you need to know that it will be linked to your social media profiles. It includes Facebook, Twitter, Pinterest accounts. If any visitor will click on your social media profile link, he will be sent to your social media profile page. Then it will be their choice whether they follow you on Twitter or Facebook or not to get the updates. Social media custom icons to your blogger will attract the attention of your readers. Additionally, you can also add social media network icons to your blog by using an HTML code. It will automatically customize the icons for your site.


Image social media icon


How To Add social Media Icons To Your Blog Sidebar

1- First of all, you will need to download Social Media Icons.
2- Secondly, upload those Icons to your blog.
3- Thirdly, copy the code in Microsoft Word.

1- First of all, download Social Media Icons according to your own choice and save them in your PC. You can get a plenty of icons by searching in Google “Free Social media icon”.

2-  Secondly, upload Icons to your blogger, select the icons from your PC which you have finalized and upload them.

How to Upload to blog?

a. Login to your blog & Create a new Post.

Blogger Dashboard


b. Click on insert image icon


Screenshot_1c. Click on Choose files


Screenshot_2


d. Select Social media icon from your PC


Select Social media icon from your PC


e. After uploading. Right click on icons to choose “Copy Image Location” option from menu


After uploading. Right click on icons & choose “Copy Image Location” option from menu


f. Now open Microsoft Word document & paste icon address in the document page & Save the file


Now open Microsoft Word document & paste icon address in the document page & Save the file


g. You can also Copy image location Later “from This blog” option in insert image box

You can also Copy image location Later “from This blog” option in insert image box


3- Copy code in MS Word-  Copy this whole HTML Code

<a href=”Enter here your social profiles address”><img src=”Enter here your image address” width=”50″ height=”50″ /></a>

1- Enter here your social profiles address
This is the template to add URL address for your social media profiles like your Facebook, twitter, Google Plus, RSS feeds and Pinterest. For example, here I am using my Facebook account and the URL of my Facebook account address is-

https://web.facebook.com/devil22cool

2- Enter here your image address

This is the Direct link of image address from each image on blog upload. For example –
https://lh5.googleusercontent.com/-K-N6xsfEyko/VCl7II1Pc4I/AAAAAAAAAJk/YgJOQVMhlCg/w140h68p/10469391_715884315169281_1134657531565478036_ rssfeeds.jpg

3- You can change Width or height of icon with width=”50″ height=”50″ . In this code 50 mean the size of Icon. Just change the size of icon for adjusting & fitting on your blog sidebar.

Open a new word document & paste the whole code into your word document & make a series for each your social profiles

Screenshot_7

Now enter your URL address of your Facebook or social profile with red characters. Additionally, you need to enter your image location address with blue characters. So make sure that you remove my words which are mentioned in the red and blue characters. Do not delete the quotation marks.

For example-

 <a href=” https://web.facebook.com/devil22cool“><img src=”https://lh5.googleusercontent.com/-K-N6xsfEyko/VCl7II1Pc4I/AAAAAAAAAJk/YgJOQVMhlCg/w140h68p/10469391_715884315169281_1134657531565478036_ rssfeeds.jpg” width=”50″ height=”50″ /></a>

When you are good to go,  remove the spaces and copy the whole code

Screenshot_8

How to Open social links into the new tab:

Here is another example, if you want to open social link into the new tab instead of the same tab.Then the blogger has to add target=”_blank” just after the social link as follows:

<a href=” https://web.facebook.com/devil22cool” target=”_blank”><img src=”https://lh5.googleusercontent.com/-K-N6xsfEyko/VCl7II1Pc4I/AAAAAAAAAJk/YgJOQVMhlCg/w140h68p/10469391_715884315169281_1134657531565478036_ rssfeeds.jpg” width=”50″ height=”50″ /></a>

Now login to your blog Dashboard

a- Click on Layout  & Click on Add a Gadget

Click on Layout & Click on Add a Gadget


b- Now Choose HTML/Java Script Gadget

Now Choose HTML/Java Script Gadget-

c- PASTE your complete code which you copied from the Word Document into the HTML box and then Click SAVE.

PASTE your complete code which you copied from the Word Document into the HTML box and then Click SAVE

d- Now drag HTML/Java Script Gadget and drop them where you want to show social media icons on your side bar and click save arrangement button.

Now drag HTML/Java Script Gadget and drop them where you want to show social media icons on your side bar and click save arrangement button.


Everything is completed. Now you have completed the task by going through our post, how to add social media icons to Blogger.

Arsalan Rauf
Arsalan Rauf

Arsalan Rauf is an entrepreneur, freelancer, creative writer, and also a fountainhead of Green Hat Expert. Additionally, he is also an eminent researcher of Blogging, SEO, Internet Marketing, Social Media, premium accounts, codes, links, tips and tricks, etc.

www.greenhatexpert.com

Filed Under: Blogging Tagged With: add social media buttons to blogger html, blogger social media buttons widget, free social media widget for blogger, how to add social media icons to blogger header, how to add social media icons to blogger post, social media plugins for blogger, social media share buttons for blogger, social media widget for blogger

How to Create a Free Blog on Blogspot

Last Updated on January 19, 2018 By Arsalan Rauf

In this post of Green Hat Expert, we shall discuss that how to create a free blog on Blogspot.

How to Create a Free Blog on Blogspot

If you have a blog, it is a good thing because you can share your ideas of your choice on it. Additionally, if you are an intelligent person, you can easily earn a decent amount of income for yourself from your blog.

Here at Green Hat Expert, we have composed several blogging platforms which you can use to make a blog for yourself. We recommend creating a blog buying your own hosting and domain. Additionally, create a blog using WordPress.

We shall talk about self-hosted WordPress blogs in upcoming posts. If we compare this blogging stage to free blogging platforms like Blogspot and WordPress, we assume that self-hosted WordPress blogs are better.

How to Create a Free Blog on Blogspot

However, we can see that people who are new in blogging field do not want to make an initial investment. They do not use initial funds to create their own blog which is a reasonable task. There are several platforms of blogging available on the internet that offers you to create free blogs. If you do not want to make an investment and want to start free blogging, our recommendation is Blogspot.com WordPress.com.

After getting some blogging experience, you can take a step to become more professional by getting a self-hosted WordPress blog. Blogspot will allow you to create a free blog but it will also put limitations on you. However, if you are a beginner, it is a good thing to learn how to create a blog and start the process.

Create free Blog BlogSpot


We are dedicating this post to the “beginners” who are newbies in blogging and want to start blogging after going through the basics.

Before starting this complete tutorial, there is some information you should know.

  • First of all, BlogSpot is a free platform for blogging created by Google. It gives you a chance to start a free blog. Additionally, your images will be hosted on Picasa which is also a piece of Google. Therefore, Blogspot is a product of Google.
  • Second of all, if you want to create your blog for the sake of earning money and want to give professional look to your blog. We suggest that you should create your blog on WordPress platform. You can do it easily by going through our exclusive free WordPress guide, you can create your blog in the next 60 minutes.

Step by Step Guide to Create a Free Blog on Blogspot

To create your free blog or website, you need to go to Blogspot.com and log in with your existing Google account or create a new one. As you are a first time user, you can see the option to utilize your identity from Google Plus profile, or you can also use your Blogspot profile as well. We suggest that you use your Google Plus profile. After logging in, you need to click on “new blog” button or this link will lead you to that website: Create a free blog.

Select a Name for Your Blog

First of all, you need to add a name and select a domain to create a blog. We recommend that you should go through “How To Select a Domain Name” for additional information.

Do not use your personal name for the domain name, instead of using your name use a generic domain name. Later, you can also use it as your brand with a custom domain. You will see a number of blog templates which you can use and change at any time. Then click on “create blog”. Now your blog has been created successfully but you are not done yet.

Name of your blog

You need to do a few settings which will make you able to use your Blogspot blog easily. While being on Blogspot dashboard you can also see the blog’s backend. You need to go to the “settings” to make changes which will improve your blog’s performance and visibility.

Here is a screenshot of what you would see:

BlogSpot dashboard


Before you start writing your first post, we suggest that you go to “pages” section and create one “About” page. This page will describe you and your blog, we can say that it will introduce you to others.

  • You can read our post on why do you need an “About” page for your blog.

You should change your blog’s template which is an important thing. It is because the default template is generic and boring according to our point of view.

Here you can check our list of free Blogspot templates which you can download as well as install on your blog. Or you can also use the available templates by going to “Settings” > Template.

On this page of your blog, you can create and add a logo to the header of Blogspot. Additionally, you can also add and remove other available features.

Once you will create a few blog posts, you can go to the “Settings” tab then “Earnings” to enable Adsense for your free blog. It will enable you to earn money from your free Blogspot website.

  • Read our guide on How to Sign up for an Adsense Account
  • Your blog is ready to use now you can create your own posts. a Free BlogSpot Blog:

BlogSpot AdSense

Note: This post is made for every reader who does not already have a blog and wants to create one it is an easy way to create a free blog.

I have also started my voyage with Blogspot and later shifted to WordPress. If you want to take the professional route, you need to go through our WordPress starter guide.

  • Also read: BlogSpot SEO tips

If you like this post, don’t forget to share it on Facebook, Pinterest and Twitter and other social media platforms.

Arsalan Rauf
Arsalan Rauf

Arsalan Rauf is an entrepreneur, freelancer, creative writer, and also a fountainhead of Green Hat Expert. Additionally, he is also an eminent researcher of Blogging, SEO, Internet Marketing, Social Media, premium accounts, codes, links, tips and tricks, etc.

www.greenhatexpert.com

Filed Under: Blogging Tagged With: blogger app, blogger login google account, blogger websites, blogspot blogs, blogspot search, blogspot sign in old account, create a blog google, how to create a blog for free and make money

The Ultimate WordPress Guide for Beginners

Last Updated on March 28, 2018 By Arsalan Rauf

In this post of Green Hat Expert, we shall discuss the WordPress guide for beginners or WordPress beginner guide.

The Ultimate WordPress Guide for Beginners

Welcome to this post of Green Hat Expert, where we are going to show you that how to create a WordPress website or blog. This guide is dedicated to new bloggers who want to create or set up their new blog on the platform of WordPress.

For existing WordPress bloggers, we are going to share pro tips as well. The existing bloggers should implement those tips to make their WordPress website or blog more professional.

This WordPress guide or tutorial will show you the following information:

  • How and where to buy a web-hosting and a domain name for your WordPress website.
  • Necessary things to setup your website after installing WordPress.
  • Tasks you need to perform instantly after the configuration of WordPress (Step by Step Tutorial along with pictures.
  • Essential WordPress plugins which you need to install and how to set them.
  • Professional tips to make your website or blog grow rapidly.
  • Basic SEO of your WordPress blog.

You can set up your WordPress blog or website within the next 10 minutes and you are good to go.

The Ultimate WordPress Guide for Beginners

You need to keep in mind that this WordPress beginner guide is made with extreme care and we update it on regular basis. Bloggers can also bookmark this page for future information. You can also go through our blog to see more articles which you may find interesting and helpful for you.

Creating your WordPress blog (First step)

First of all, a blogger needs a web-hosting and a domain name to install or create a WordPress blog.

  • Web-hosting will help you to sort out your files.
  • The domain will be the name or URL of your blog.

You can buy web hosting from Bluehost or from any other hosting provider. It comes with a free domain and it will cost you 5.95$ per month for unlimited bandwidth and hosting space which is not expensive.

This process will need your 5 minutes and click the below link to get the hosting packages now.

  • Sign up for Bluehost(Exclusive discount + free domain name)

Secondly, you need to install the WordPress platform in your domain name. This process will take additional 5-10 minutes. Below you will be able to get WordPress website tutorial.

  • How to install WordPress on Bluehost within 5 minutes

After the installation of your WordPress platform, you will have to make a few amendments. It includes setting up permalinks, set up your discussion settings, update the ping list etc. You do not need to worry about it because you can do it easily and quickly with the help of our guide.

  • Essential tips for settings after installing WordPress blog(This process should take another 10 minutes)

You have done a good job and your blog is good to go.

There are a few things to learn before moving on to the next level:

If you want to go to the next level you need to learn more things. It will help you to move smoothly and you can do it quickly will not be stuck anywhere.

WordPress For Beginners:

Use these guides as your reference:

  • How to Install a WordPress Plugin
  • How to Install WordPress Themes

After completing all the above steps, you have become a beginner from a newbie.

Now it is the time to install WordPress plugins which are essential.

  • Begin from here: Useful list of WordPress plugins for a new blog

Now it’s time to embellish your blog with some important and useful things. Here they are:

  • Firstly, you need to Burn your blog feed using Feedburner(This feature will allow your readers to subscribe to your blog via RSS feed or email updates etc.)
  • Adding Google Analytics to your WordPress blog(This is very important as it will give you an overview that how much traffic you are getting on your blog on daily basis. Additionally, it will also tell you the source of traffic.
  • Set up Google tag manager(We can call it a little bit of a pro-tip, but you should go through it and implement it right now. This will help you to manage all the tags, including the Google analytics tag.)
  • Update WordPress ping list(Go to this post and copy/paste the list as we are guiding. It will help you to increase your traffic and you can drive more traffic to your blog.)

Beginner Tips To Blogging Like A WordPress Pro:

There are several mistakes which are major in nature, every newbie does when he creates a WordPress blog. He does not set up some things which are useful and create a huge difference. Every step needs 5 minutes and every aspect is helpful for a new website.

Now it is time to set up a few WordPress plugins which are essential and important.

  • Firstly, activate the Akismet plugin and you can easily get your free API key and we are going to share a tutorial which will help you to get free API key. Additionally, it will also help you to add it to your website.
  • Secondly, you need to install WordPress SEO by Yoast which is an amazing plugin. It is also free and can make your blog SEO friendly. This guide will guide you how to set up Yoast SEO plugin by WordPress on your website. It is an easy task if you are unable to complete this step kindly leave your comment below.
  • WP Super Cache plugin(This plugin is very helpful because it will make your blog to load faster. But you have to ensure that you do not use any other cache plugin along with this plugin.)
  • No self-ping WordPress plugin (Do not ping yourself!)
  • WordPress related post plugins (You can use any of these plugins to add related posts along with thumbnails after every single post. It will be beneficial for your readers as well as for you. The readers will be able to discover the content easily on your website.)
  • SocialWarfare WordPress plugin(This plugin will help you to get more social shares on social media websites.)
  • PushEngage(We highly recommend this Free WordPress plugin to make your blog web-push ready.)

WordPress SEO: From Beginner to Intermediate Level

Congratulations! Welcome to the next level

Now, these steps will enable you to create the biggest difference when you compare your blog to other blogs. This section will make sure that you start getting traffic to your blog and people see your written post more and more.

This will need one hour to get everything done. If you have been doing as we have described in our WordPress guide for beginners. You should take a break now and come back with an active and fresh mind. You need to learn these tips with a fresh mind which will make you apart from other bloggers.

  • Exclusive WordPress SEO training video from WordCamp(This video will answer most of your SEO queries in the next 30 minutes.)
  • A DIY guide for WordPress Blog SEO
  • How to SEO optimize individual posts in WordPress
  • Why & How to submit your blog sitemap to Google Search console
  • How to submit your blog sitemap to Bing Search engine

WordPress Pro Tips:

As we have promised that we shall share some pro tips with existing bloggers. This tip is for those bloggers who have been using WordPress for a while and want to learn new tips.

Note: Those who are beginners and reading this WordPress guide for beginners, they will need these tips after 2-3 months. The time of 2-3 months will be counted after starting your blog.

  • How to reduce database size of your WordPress blog
  • Broken Link checker plugin:

This plugin has the ability to find all broken links (internally and externally) and will fix them instantly.

WordPress Security

In this WordPress guide for beginners, you should have some know-how of security.

  • Use WordFence pluginto boost your security.
  • 7 Essential WordPress security tips
  • 9 steps to secure your WordPress Blog

Kindly let us know if you want to share your experience or additional feature to this WordPress guide.

Don’t forget to subscribe to like our page and share it with other bloggers who are new in this business.

Arsalan Rauf
Arsalan Rauf

Arsalan Rauf is an entrepreneur, freelancer, creative writer, and also a fountainhead of Green Hat Expert. Additionally, he is also an eminent researcher of Blogging, SEO, Internet Marketing, Social Media, premium accounts, codes, links, tips and tricks, etc.

www.greenhatexpert.com

Filed Under: Blogging Tagged With: how to use wordpress blog, how to use wordpress to create a website, wordpress beginner tutorial free, wordpress blog for beginners, wordpress for beginners 2017, wordpress for beginners 2017 pdf, wordpress for beginners pdf, wordpress tutorial for developers

  • « Previous Page
  • 1
  • 2
  • 3
  • 4


Recent Posts

  • Free DeepSeek Accounts 2025
  • Free Zoho Mail Accounts 2025
  • Acudepot Discount Codes 2025
  • Free Blackshot Accounts 2025
  • Free GMX Email Accounts 2025
  • Songtrust Discount Codes 2025
  • Uzicases Discount Codes 2025
  • Cardillo Promo Codes 2025
  • Free DriverFix License Keys 2025
  • Avast Secureline VPN Activation Codes 2025

Recommended Posts

Create a Gmail Account Without Phone Number

Free Course Hero Account

Crunchyroll Accounts

Cracked Apps

Free Pokemon Go Accounts
Onlyfans Free Accounts
Free Chegg Accounts
Free Paypal Accounts
Free Gmail Accounts
Funny Steam Names

Categories

  • Apps
  • Apps for PC
  • Blogging
  • Discord
  • Facebook
  • Gaming
  • Grammar
  • Guide
  • How to
  • Instagram
  • Messaging
  • OnlyFans
  • Pinterest
  • Reddit
  • SEO
  • Snapchat
  • Social Media
  • Spotify
  • Steam
  • Telegram
  • TikTok
  • Twitch
  • Twitter
  • Whatsapp
  • WordPress
  • YouTube
  • Home
  • Social Media
  • Messaging
  • About
  • Submit Guest post