Green Hat Expert

  • Home
  • Social Media
    • Instagram
    • TikTok
    • Snapchat
    • Facebook
    • YouTube
    • Twitter
  • Messaging
    • Discord
    • Telegram
    • Whatsapp
  • About
  • Submit Guest post
You are here: Home / Archives for How to Add a Favicon to Your WordPress Blog

How to Add Google Maps in WordPress

Last Updated on August 21, 2022 By Arsalan Rauf

You can add all kind of content into your WordPress blog, site or website. At Green Hat Expert, I have shown you how to add audio files, videos, PDF and Spreadsheets in WordPress.

You can create highly useful and interactive content by adding content from external sources. In this post, I shall show you how to add Google Maps in WordPress.

Manually Adding a Google Map in WordPress

Go to Google Maps website, now search for a location that you want to add by typing its address. After finding the location, you need to click on the link button in the right hand panel. It will give you an embed code. Copy the iframe code or you can also click on ‘customize and preview the embedded map’ to customize the appearance of the map on your website.
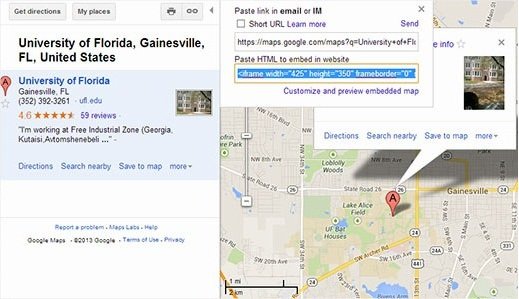
google maps embed iframe

Now go to your WordPress site and paste the code in a page, post or a template. Now save the post/page in order to see the Google map live on your website.

Adding Google Maps in WordPress Using a Plugin

The first is method is good if you only want to show a single Google map to one location on your WordPress blog. If the map is a part and parcel of your site, and you need to add them frequently basis. Then you I will recommend use a plugin for this purpose.

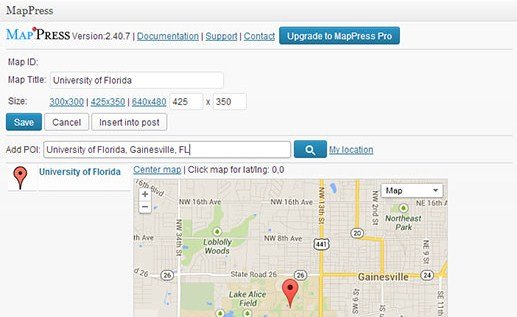
First of all, you need to install and activate MapPress Easy Google Maps plugin. Edit a page/post where you want to add the map. Now scroll down to MapPress section on your page or post edit screen and press the New Map button.
mappress google maps plugin


It will open MapPress editor where you need to enter an address or click on MyLocation link to enable the plugin to detect your location automatically.

Choose the size of the map and give a title to your map. After doing all the work, click on the save button and click on insert into post button to add the map into your post. Publish or update your post and you can preview it.

By using MapPress, you can add many maps to a post or page. It will also add plugin settings menu in your WordPress admin sidebar and it also works out of the box. Change the plugin settings by clicking on it including map border, type, alignment and controls etc.
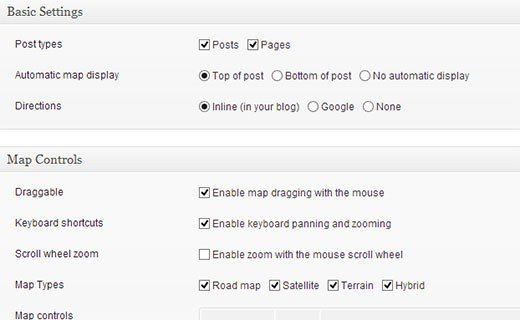
mappress settings

Adding Google Maps in a Widget and a Lightbox

Add Google maps to your WordPress with ease by installing Google Maps Widget plugin.

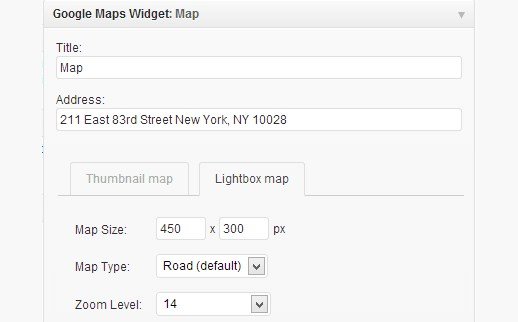
After activating the plugin, go to Appearance > Widgets and drag and drop Google Maps Widget to your sidebar.
google maps widget settings

Now enter the address that you want to display on the map in Widget settings. You can also select the size of the map, pin color and zoom level etc. configure the lightbox settings by clicking on the lightbox tab.

Lastly, click on the save button to save the widget settings.

Visit your website to see the widget in action.
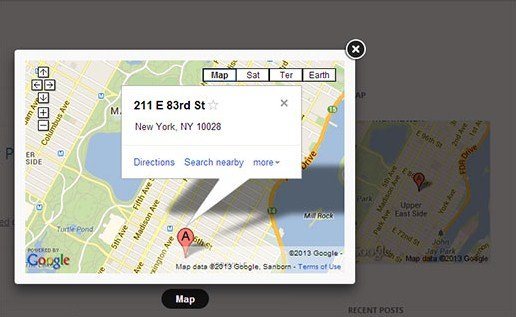
google maps widget

I hope that you have learned how to add Google maps in your WordPress site.

Still have questions or problems?

Leave them in the comment section.

Do not forget to share this post.

Arsalan Rauf
Arsalan Rauf

Arsalan Rauf is an entrepreneur, freelancer, creative writer, and also a fountainhead of Green Hat Expert. Additionally, he is also an eminent researcher of Blogging, SEO, Internet Marketing, Social Media, premium accounts, codes, links, tips and tricks, etc.
www.greenhatexpert.com

Filed Under: Blogging, How to, WordPress Tagged With: Add Google Maps in WordPress, contact form with google map wordpress plugin, embed google map wordpress plugin, How to Add a Favicon to Your WordPress Blog, how to add google map api in wordpress, how to add google map in wordpress contact page, how to add google map in wordpress without plugin, how to use wp google maps, update google map wordpress, wordpress map plugin multiple locations

How to Add a Favicon to Your WordPress Blog

Last Updated on August 21, 2022 By Arsalan Rauf

Favicon is also known as site icon which is a tiny image which appears next to your site title in browser. It will help the users to identify your site. Most of the users will recognize your site with that tiny image. It will establish your brand among the users and you will be able to build trust among your users.

If you are not adding a favicon on your site, you are doing the most common WordPress mistake. In this post, I shall show you how to add a favicon to your WordPress site.

Why you should Add a Favicon to Your WordPress Site?

As I mentioned earlier that it builds your website’s identity.

In addition, it also improves the user experience and site’s usability. This image will help you to understand it in a better way:

favicons

Many users usually open multiple tabs in their browser. When the number of tabs increases, it hides the title of your website. If you will use a favicon, the user will easily identify your website and move quickly to the tab he wants.

Your site favicon or icon is also used when a visitor adds your website to his homescreen on a mobile device. You can also ask the users to add your site to their homescreen.

home screen site icon

How to Create a Favicon

You can use the logo of your brand as your favicon or site icon. The recommended size for your site icon image is at least 512 pixels in both height and width. The icon image of the site should be a square, you can also use a larger rectangular image and WordPress will enable you to crop the image when you will add it.

creating site icon wordpress

I suggest using an image editor or editing software like Gimp or Adobe Photoshop to create an icon of exact 512×512 pixels. That is the way to create maintain the proportions of your image. In addition, you can also fill the image with a background color or use transparent image of your choice. This image can be in JPEG, PNG or GIF format.

Adding Your Site Icon or Favicon in WordPress

After the launch of WordPress 4.3 version, you can add a favicon or site icon from WordPress dashboard.

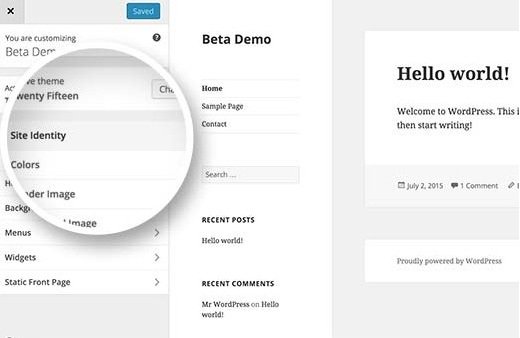
You need to go to Appearance>Customize and click on the Site Identity tab.

site identity

In this site identity section, you can change the title, description and control whether you want to display it in the header or not.

It also enables you to upload the site icon of your site. Click on the select file button to upload the image that you want to use as favicon or icon.

adding site icon

If you are uploading an image that is exceeding recommended size, you can also crop it to use it. If your image is matching the suggested size, then save your changes.

After doing so, you can now preview your site to see your favicon.

Additionally, you can also visit your site on mobile phone and by using browser menu you can choose “add to homescreen”. You will see your site icon on the homescreen.

Adding Favicon to Older WordPress (4.2 or below)

If you are using older WordPress version 4.2 or below, you need to upload favicon to the root directory of your website using FTP. After that, you need to paste the code into the header of your theme in header.php file.

1
2
<link rel="icon" href="https://www.greenhatexpert.com/favicon.png" type="image/x-icon" />
<link rel="shortcut icon" href="https://www.greenhatexpert.com/favicon.png" type="image/x-icon" />

Replace Greenhatexpert.com with your site’s Url and you are done.

If your theme does not have a header.php file or you are unable to find it. Then do not worry, I have a plugin for you.

Install and activate Insert Headers and Footers plugin.

After activating the plugin go to Settings » Insert Headers and Footersand paste the code provided above in the header section and save your settings.

If you do not want to deal with FTP, then you have to use the plugin known as All in One Favicon.

I hope that you have learned that how to add favicon to your WordPress site.

Still having problems?

Leave your problems in the comment section.

Do not forget to share this post and like our Facebook page to get the latest updates.

Arsalan Rauf
Arsalan Rauf

Arsalan Rauf is an entrepreneur, freelancer, creative writer, and also a fountainhead of Green Hat Expert. Additionally, he is also an eminent researcher of Blogging, SEO, Internet Marketing, Social Media, premium accounts, codes, links, tips and tricks, etc.

www.greenhatexpert.com

Filed Under: Blogging, How to, WordPress Tagged With: create favicon, How to Add a Favicon to Your WordPress Blog, site icon wordpress, wordpress add favicon functions php, wordpress favicon change, wordpress favicon not showing, wordpress favicon plugin, wordpress favicon size, wordpress site icon not working


Recent Posts

  • Free DeepSeek Accounts 2025
  • Free Zoho Mail Accounts 2025
  • Acudepot Discount Codes 2025
  • Free Blackshot Accounts 2025
  • Free GMX Email Accounts 2025
  • Songtrust Discount Codes 2025
  • Uzicases Discount Codes 2025
  • Cardillo Promo Codes 2025
  • Free DriverFix License Keys 2025
  • Avast Secureline VPN Activation Codes 2025

Recommended Posts

Create a Gmail Account Without Phone Number

Free Course Hero Account

Crunchyroll Accounts

Cracked Apps

Free Pokemon Go Accounts
Onlyfans Free Accounts
Free Chegg Accounts
Free Paypal Accounts
Free Gmail Accounts
Funny Steam Names

Categories

  • Apps
  • Apps for PC
  • Blogging
  • Discord
  • Facebook
  • Gaming
  • Grammar
  • Guide
  • How to
  • Instagram
  • Messaging
  • OnlyFans
  • Pinterest
  • Reddit
  • SEO
  • Snapchat
  • Social Media
  • Spotify
  • Steam
  • Telegram
  • TikTok
  • Twitch
  • Twitter
  • Whatsapp
  • WordPress
  • YouTube
  • Home
  • Social Media
  • Messaging
  • About
  • Submit Guest post